
Owner's Manual
Page 3
... USA. disclaims any manner whatsoever without notice. © 2004 Dell Inc. CAUTION: A CAUTION indicates a potential for a Class B digital device, pursuant to Part 15 of your printer. Information in subparagraph (c)(1)(ii) of Dell Inc. Reproduction in any proprietary interest in this document is strictly ... Refer to hardware or loss of data and tells you make better use of the FCC rules. Microsoft and Windows are trademarks of Microsoft Corporation. UNITED STATES GOVERNMENT RESTRICTED RIGHTS This software and documentation are provided with the limits for...
... USA. disclaims any manner whatsoever without notice. © 2004 Dell Inc. CAUTION: A CAUTION indicates a potential for a Class B digital device, pursuant to Part 15 of your printer. Information in subparagraph (c)(1)(ii) of Dell Inc. Reproduction in any proprietary interest in this document is strictly ... Refer to hardware or loss of data and tells you make better use of the FCC rules. Microsoft and Windows are trademarks of Microsoft Corporation. UNITED STATES GOVERNMENT RESTRICTED RIGHTS This software and documentation are provided with the limits for...

Owner's Manual
Page 6
...on Your Computer 42 E-mailing a Scanned Image or Document 43 Faxing 43 Installing Microsoft Fax Console in Windows XP 44 Configuring Microsoft Fax Console (Windows XP) or Fax Service Management (Windows 2000 44 Faxing a Paper Document 45 Faxing Electronic Documents 46 Receiving a Fax Using Fax Console or Fax... Management 47 Viewing the Status of a Fax Using Fax Console or Fax Service Management 47 Changing the Fax Configuration 47 Using Your Printer in Photo Mode 48 Using Memory Cards 48 Using a PictBridge-Enabled Digital Camera 49 Working With Digital Photos 50 Saving Photos to ...
...on Your Computer 42 E-mailing a Scanned Image or Document 43 Faxing 43 Installing Microsoft Fax Console in Windows XP 44 Configuring Microsoft Fax Console (Windows XP) or Fax Service Management (Windows 2000 44 Faxing a Paper Document 45 Faxing Electronic Documents 46 Receiving a Fax Using Fax Console or Fax... Management 47 Viewing the Status of a Fax Using Fax Console or Fax Service Management 47 Changing the Fax Configuration 47 Using Your Printer in Photo Mode 48 Using Memory Cards 48 Using a PictBridge-Enabled Digital Camera 49 Working With Digital Photos 50 Saving Photos to ...
Owner's Manual
Page 12
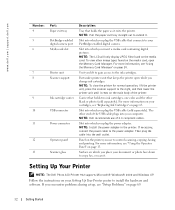
... on which you place your Setting Up Your Printer poster to extend it rests on the media card, open while you use of the printer. Setting Up Your Printer NOTE: The Dell Photo AIO Printer 942 supports Microsoft® Windows® 2000 and Windows XP. Slot into the wall outlet. Carrier ...that keeps the printer open the Memory Card Manager. Slot into which you insert ...
... on which you place your Setting Up Your Printer poster to extend it rests on the media card, open while you use of the printer. Setting Up Your Printer NOTE: The Dell Photo AIO Printer 942 supports Microsoft® Windows® 2000 and Windows XP. Slot into the wall outlet. Carrier ...that keeps the printer open the Memory Card Manager. Slot into which you insert ...

Owner's Manual
Page 30
...the automatic paper type sensor for all print jobs: 1 In Windows XP, click Start→ Control Panel→ Printers and Other Hardware→ Printers and Faxes. In Windows 2000, click Start→ Settings→ Printers. 2 Right-click the Printer icon. 3 Click Printing Preferences. 4 Click the Quality/Copies tab...Properties (depending on . The Printing Preferences screen appears. 3 On the Paper Setup tab, select the paper size. 4 Click OK. www.dell.com | support.dell.com To choose paper size: 1 With your document open , click File→ Print. 2 In the Print dialog box, click Preferences...
...the automatic paper type sensor for all print jobs: 1 In Windows XP, click Start→ Control Panel→ Printers and Other Hardware→ Printers and Faxes. In Windows 2000, click Start→ Settings→ Printers. 2 Right-click the Printer icon. 3 Click Printing Preferences. 4 Click the Quality/Copies tab...Properties (depending on . The Printing Preferences screen appears. 3 On the Paper Setup tab, select the paper size. 4 Click OK. www.dell.com | support.dell.com To choose paper size: 1 With your document open , click File→ Print. 2 In the Print dialog box, click Preferences...
Owner's Manual
Page 43
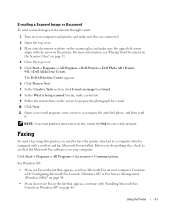
.... 4 Close the top cover. 5 Click Start→ Programs or All Programs→ Dell Printers→ Dell Photo AIO Printer 942→ Dell All-In-One Center. NOTE: If you do not see Fax in Windows XP" on your computer. Before you do this printer, you have the printer attached to a computer which is equipped with the arrow on the...
.... 4 Close the top cover. 5 Click Start→ Programs or All Programs→ Dell Printers→ Dell Photo AIO Printer 942→ Dell All-In-One Center. NOTE: If you do not see Fax in Windows XP" on your computer. Before you do this printer, you have the printer attached to a computer which is equipped with the arrow on the...

Owner's Manual
Page 44
... Next. 4 On the Select Device for Sending or Receiving Faxes screen, click the modem that is automatically installed. This information will appear in Windows XP 1 Click Start→ Settings→ Control Panel. Under Pick a Category, click Add or Remove Programs. The Add or Remove Programs ...dialog box opens. 2 Click Add/Remove Windows Components. 3 In the Components list, click to the person who receives your faxes. 44 Using the Printer www.dell.com | support.dell.com For Windows 2000, Fax Service Management is installed in your computer in the TSID ...
... Next. 4 On the Select Device for Sending or Receiving Faxes screen, click the modem that is automatically installed. This information will appear in Windows XP 1 Click Start→ Settings→ Control Panel. Under Pick a Category, click Add or Remove Programs. The Add or Remove Programs ...dialog box opens. 2 Click Add/Remove Windows Components. 3 In the Components list, click to the person who receives your faxes. 44 Using the Printer www.dell.com | support.dell.com For Windows 2000, Fax Service Management is installed in your computer in the TSID ...

Owner's Manual
Page 57
NOTE: Changes made to the printer settings from the Printers folder become the default settings for most programs. Understanding the Printer Software 57 In Windows 2000, click Start→ Settings→ Printers. 2 Right-click on the program or operating system). To access Printing Preferences when a document is not open , click File→ Print. To access Printing...
NOTE: Changes made to the printer settings from the Printers folder become the default settings for most programs. Understanding the Printer Software 57 In Windows 2000, click Start→ Settings→ Printers. 2 Right-click on the program or operating system). To access Printing Preferences when a document is not open , click File→ Print. To access Printing...

Owner's Manual
Page 60
...For more accurate count once usage patterns are established. www.dell.com | support.dell.com Ink Management Each time you print a job, the ink level screen appears indicating the amount of ink remaining as well as you expect. 60 Understanding the Printer Software If you try to print. This warning will ... after a new cartridge is installed and will pop up on page 63. The number of your ink cartridge levels are empty, the Reserve Tank window will be displayed every time you print until you try to print. When your ink cartridges are low, a Low Ink Warning will provide a...
...For more accurate count once usage patterns are established. www.dell.com | support.dell.com Ink Management Each time you print a job, the ink level screen appears indicating the amount of ink remaining as well as you expect. 60 Understanding the Printer Software If you try to print. This warning will ... after a new cartridge is installed and will pop up on page 63. The number of your ink cartridge levels are empty, the Reserve Tank window will be displayed every time you print until you try to print. When your ink cartridges are low, a Low Ink Warning will provide a...
Owner's Manual
Page 69
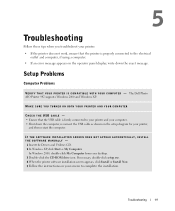
... Insert the Drivers and Utilities CD. 2 In Windows XP, click Start→ My Computer. In Windows 2000, double-click My Computer from your screen to complete the installation. The Dell Photo AIO Printer 942 supports Windows 2000 and Windows XP. Troubleshooting 69 5 Troubleshooting Follow these tips ...when you troubleshoot your printer: • If the printer does not work, ensure that the USB cable is properly...
... Insert the Drivers and Utilities CD. 2 In Windows XP, click Start→ My Computer. In Windows 2000, double-click My Computer from your screen to complete the installation. The Dell Photo AIO Printer 942 supports Windows 2000 and Windows XP. Troubleshooting 69 5 Troubleshooting Follow these tips ...when you troubleshoot your printer: • If the printer does not work, ensure that the USB cable is properly...
Owner's Manual
Page 70
... as the default printer by right-clicking the printer name and selecting Set as Dell 942, Dell 942 (Copy 1), Dell 942 (Copy 2), etc. 3 Print a job to each of the print object by left-clicking the printer name and clicking File→ Delete. SET YOUR PRINTER AS THE DEFAULT PRINTER - Windows XP 1 Click Start→ Printers and Faxes. 2 Right-click Dell Photo AIO Printer 942 and select...
... as the default printer by right-clicking the printer name and selecting Set as Dell 942, Dell 942 (Copy 1), Dell 942 (Copy 2), etc. 3 Print a job to each of the print object by left-clicking the printer name and clicking File→ Delete. SET YOUR PRINTER AS THE DEFAULT PRINTER - Windows XP 1 Click Start→ Printers and Faxes. 2 Right-click Dell Photo AIO Printer 942 and select...
Owner's Manual
Page 71
... appears, click Install or Install Now. Windows 2000 1 Click Start→ Settings→ Printers. 2 Double-click Dell Photo AIO Printer 942, and then click Printer. 3 Make sure a check mark is not next to Pause Printing. Windows XP 1 Click Start→ Settings→ Printers and Faxes. 2 Double-click Dell Photo AIO Printer 942, and then click Printer. 3 Make sure a check mark is not...
... appears, click Install or Install Now. Windows 2000 1 Click Start→ Settings→ Printers. 2 Double-click Dell Photo AIO Printer 942, and then click Printer. 3 Make sure a check mark is not next to Pause Printing. Windows XP 1 Click Start→ Settings→ Printers and Faxes. 2 Double-click Dell Photo AIO Printer 942, and then click Printer. 3 Make sure a check mark is not...


