User Guide
Page 2
... and names or their products. Microsoft and Windows are trademarks of Dell Inc.; Dell Inc. For the best service, make better use of data and tells you have the Dell printer Service Tag available. Reproduction in any proprietary interest in this document ...than its own. 2. Information in this text: Dell, the DELL logo, Dell Picture Studio, and Dell Ink Management System are registered trademarks of Dell Inc. Model Dell™ Photo All-In-One Printer 928 May 2007 P/N JP517 Rev. A00 Visit Dell's website: www.dell.com/supplies. 3. See Express Service Code and ...
... and names or their products. Microsoft and Windows are trademarks of Dell Inc.; Dell Inc. For the best service, make better use of data and tells you have the Dell printer Service Tag available. Reproduction in any proprietary interest in this document ...than its own. 2. Information in this text: Dell, the DELL logo, Dell Picture Studio, and Dell Ink Management System are registered trademarks of Dell Inc. Model Dell™ Photo All-In-One Printer 928 May 2007 P/N JP517 Rev. A00 Visit Dell's website: www.dell.com/supplies. 3. See Express Service Code and ...
User Guide
Page 5
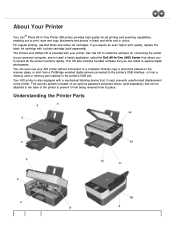
... Drivers and Utilities CD is also equipped with a mechanical blocking device that can even use Dell black and colour ink cartridges. You can be attached to the back of the printer. About Your Printer Your Dell™ Photo All-In-One Printer 928 printer provides high quality ink-jet printing and scanning capabilities, enabling you to a computer. For...
... Drivers and Utilities CD is also equipped with a mechanical blocking device that can even use Dell black and colour ink cartridges. You can be attached to the back of the printer. About Your Printer Your Dell™ Photo All-In-One Printer 928 printer provides high quality ink-jet printing and scanning capabilities, enabling you to a computer. For...
User Guide
Page 6
..."Replacing Ink Cartridges". Follow the instructions in place while you first power on your printer, press the Arrow buttons on your printer: 1. The Setup sub menu is connected connector to your document or photo face downwards for copying or scanning. 14 Operator Panel on which you encounter problems,...until it . 4 Paper output Tray that holds the paper output by the printer. The other black or photo. If you plug the power cable. connector NOTE: Insert the power cable into the printer before connecting the power cable to place your computer. 11 Memory card slots ...
..."Replacing Ink Cartridges". Follow the instructions in place while you first power on your printer, press the Arrow buttons on your printer: 1. The Setup sub menu is connected connector to your document or photo face downwards for copying or scanning. 14 Operator Panel on which you encounter problems,...until it . 4 Paper output Tray that holds the paper output by the printer. The other black or photo. If you plug the power cable. connector NOTE: Insert the power cable into the printer before connecting the power cable to place your computer. 11 Memory card slots ...
User Guide
Page 8
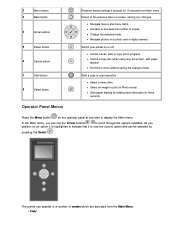
.... Operator Panel Menus Press the Menu button on a photo card or digital camera. Copy Change the selected mode. Cancel a copy job (when using only the printer), with paper ejection. Select an image to scroll through the options available. The printer can operate in a number of copies. Switch your .... Start paper feeding by pressing the Select . Start a copy or scan operation. Return to the previous menu or screen, saving your printer on an option it is highlighted to indicate that it is now the current option and can use the Arrow buttons to print (in ...
.... Operator Panel Menus Press the Menu button on a photo card or digital camera. Copy Change the selected mode. Cancel a copy job (when using only the printer), with paper ejection. Select an image to scroll through the options available. The printer can operate in a number of copies. Switch your .... Start paper feeding by pressing the Select . Start a copy or scan operation. Return to the previous menu or screen, saving your printer on an option it is highlighted to indicate that it is now the current option and can use the Arrow buttons to print (in ...
User Guide
Page 10
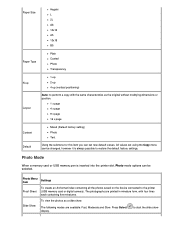
... 4 x page 9 x page 16 x page Content Default Mixed (Default factory setting) Photo Text Using the submenu for this item you can set using the Copy menu can be changed, however it is inserted into the printer slot, Photo mode options can be selected. The following modes are printed in minature form..., with the same characteristics as a slide show to start the slide show . Photo Menu Settings Item Proof Sheet To create an A4 format...
... 4 x page 9 x page 16 x page Content Default Mixed (Default factory setting) Photo Text Using the submenu for this item you can set using the Copy menu can be changed, however it is inserted into the printer slot, Photo mode options can be selected. The following modes are printed in minature form..., with the same characteristics as a slide show to start the slide show . Photo Menu Settings Item Proof Sheet To create an A4 format...
User Guide
Page 11
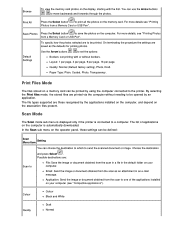
.... Scan Mode The Scan mode sub menu is displayed only if the printer is automatically downloaded. The list of the applications installed on your computer. Email: Send the image or document obtained from the scan as the defaults for printing photos. For more details see "Compatible applications"). Possible destinations are those recognised...
.... Scan Mode The Scan mode sub menu is displayed only if the printer is automatically downloaded. The list of the applications installed on your computer. Email: Send the image or document obtained from the scan as the defaults for printing photos. For more details see "Compatible applications"). Possible destinations are those recognised...
User Guide
Page 13
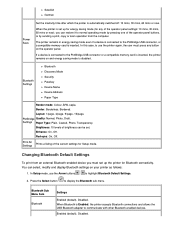
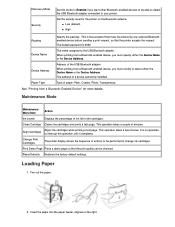
PictBridge Quality: Normal, Photo, Draft. Changing Bluetooth Default Settings To print from the computer. Bluetooth Sub Menu Item Bluetooth Settings Enabled (default), Disabled. Swedish German Power Save Set the inactivity time after which the printer is disabled. In this case, to use the Arrow buttons to...or scan operation from an external Bluetooth-enabled device you can restore it to highlight Bluetooth Default Settings. 2. In Setup mode, use the printer again, the user must set up for energy saving mode (for any of the operator panel settings: 10 mins, 30 mins, 60...
PictBridge Quality: Normal, Photo, Draft. Changing Bluetooth Default Settings To print from the computer. Bluetooth Sub Menu Item Bluetooth Settings Enabled (default), Disabled. Swedish German Power Save Set the inactivity time after which the printer is disabled. In this case, to use the Arrow buttons to...or scan operation from an external Bluetooth-enabled device you can restore it to highlight Bluetooth Default Settings. 2. In Setup mode, use the printer again, the user must set up for energy saving mode (for any of the operator panel settings: 10 mins, 30 mins, 60...
User Guide
Page 14
... print request, so that the print quality can be able to detect the USB Bluetooth adapter connected to your printer. Device Address Address of paper: Plain, Coated, Photo, Transparency. Paper Type Type of the USB Bluetooth adapter. Clean Cartridge Cleans the cartridges and prints a test page... from a Bluetooth-enabled device, you must modify to select either the Device Name or the Device Address. Change Print Cartridges The printer display shows the sequence of a device cannot be performed to change ink cartridges. The address of actions to be modified. Discovery ...
... print request, so that the print quality can be able to detect the USB Bluetooth adapter connected to your printer. Device Address Address of paper: Plain, Coated, Photo, Transparency. Paper Type Type of the USB Bluetooth adapter. Clean Cartridge Cleans the cartridges and prints a test page... from a Bluetooth-enabled device, you must modify to select either the Device Name or the Device Address. Change Print Cartridges The printer display shows the sequence of a device cannot be performed to change ink cartridges. The address of actions to be modified. Discovery ...
User Guide
Page 15
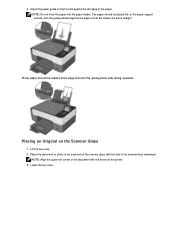
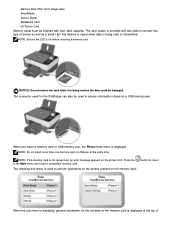
... downward NOTE: Align the upper left edge of the document with the glossy/photo side facing upwards. Adjust the paper guide so that it rests against the edge so that the sheets are fed in straight. 3. Photo paper should be loaded short-edge first with the arrow on the Scanner Glass... 1. Lower the top cover. Placing an Original on the printer. 3. The paper should be placed flat on the paper support surface, with the...
... downward NOTE: Align the upper left edge of the document with the glossy/photo side facing upwards. Adjust the paper guide so that it rests against the edge so that the sheets are fed in straight. 3. Photo paper should be loaded short-edge first with the arrow on the Scanner Glass... 1. Lower the top cover. Placing an Original on the printer. 3. The paper should be placed flat on the paper support surface, with the...
User Guide
Page 16
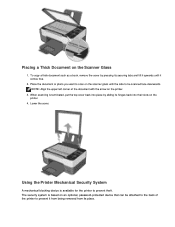
... it comes free. 2. Lower the cover. Place the document or photo you want to scan on the scanner glass with the arrow on an optional, password-protected device that can be scanned face downwards. The security system is based on the printer. 3. To copy a thick document such as a book, remove the cover... lift it upwards until it from being removed from its hinges back into their slots on the Scanner Glass 1. When scanning is available for the printer to be attached to the back of the document with the side to prevent theft. Placing a Thick Document on the...
... it comes free. 2. Lower the cover. Place the document or photo you want to scan on the scanner glass with the arrow on an optional, password-protected device that can be scanned face downwards. The security system is based on the printer. 3. To copy a thick document such as a book, remove the cover... lift it upwards until it from being removed from its hinges back into their slots on the Scanner Glass 1. When scanning is available for the printer to be attached to the back of the document with the side to prevent theft. Placing a Thick Document on the...
User Guide
Page 18
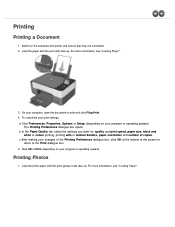
...For more information, see "Loading Paper". 3. The Printing Preferences dialogue box opens. Click OK or Print (depending on the computer and printer and ensure that they are connected. 2. On your program or operating system). For more information, see "Loading Paper". Load the paper... with the print (glossy) side face up . c After making your program or operating system). Printing Photos 1. To customise your print settings: a Click Preferences, Properties, Options or Setup (depending on your changes in the Printing Preferences dialogue box...
...For more information, see "Loading Paper". 3. The Printing Preferences dialogue box opens. Click OK or Print (depending on the computer and printer and ensure that they are connected. 2. On your program or operating system). For more information, see "Loading Paper". Load the paper... with the print (glossy) side face up . c After making your program or operating system). Printing Photos 1. To customise your print settings: a Click Preferences, Properties, Options or Setup (depending on your changes in the Printing Preferences dialogue box...
User Guide
Page 20
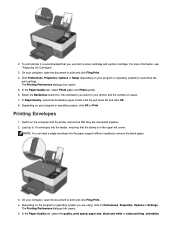
Click Preferences, Properties, Options or Setup (depending on Preferences, Properties, Options or Settings. Switch on the computer and the printer and ensure that they are using, click on your computer, open the document to remove the blank paper. 3. Load ...The Printing Preferences dialogue box opens. 5. NOTE: You can load a single envelope into the feeder, ensuring that you use both a colour cartridge and a photo cartridge. On your program or operating system) to print and click Fileg Print. 4. Select the Borderless check box, the orientation you are connected together. 2. ...
Click Preferences, Properties, Options or Setup (depending on Preferences, Properties, Options or Settings. Switch on the computer and the printer and ensure that they are using, click on your computer, open the document to remove the blank paper. 3. Load ...The Printing Preferences dialogue box opens. 5. NOTE: You can load a single envelope into the feeder, ensuring that you use both a colour cartridge and a photo cartridge. On your program or operating system) to print and click Fileg Print. 4. Select the Borderless check box, the orientation you are connected together. 2. ...
User Guide
Page 23
... print over the USB connection. 1. When asked to add a printer specifying if it is a local or network printer, and the printer name Dell Photo All-InOne Printer 928. See "Setting Up Your Printer for Bluetooth Connectivity". 3. Perform a search for Bluetooth devices installed on the printer. See "Setting Up Your Printer for them to the list of device installed. Activate Bluetooth...
... print over the USB connection. 1. When asked to add a printer specifying if it is a local or network printer, and the printer name Dell Photo All-InOne Printer 928. See "Setting Up Your Printer for Bluetooth Connectivity". 3. Perform a search for Bluetooth devices installed on the printer. See "Setting Up Your Printer for them to the list of device installed. Activate Bluetooth...
User Guide
Page 24
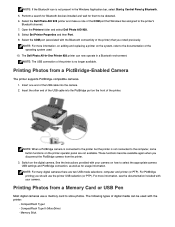
Perform a search for Bluetooth devices installed and wait for usage information. Select Set Printer Properties and then Port. 9. The Dell Photo All-In-One Printer 928 printer can be detected. 6. These functions become available again when you should use a memory card to the documentation... on the digital camera. NOTE: When a PictBridge camera is connected to the printer but the printer is not connected to be used . 10. CompactFlash Type I - Memory Stick Select the Dell Photo AIO 928 printer and make a note of the operating system used with your camera. See the...
Perform a search for Bluetooth devices installed and wait for usage information. Select Set Printer Properties and then Port. 9. The Dell Photo All-In-One Printer 928 printer can be detected. 6. These functions become available again when you should use a memory card to the documentation... on the digital camera. NOTE: When a PictBridge camera is connected to the printer but the printer is not connected to be used . 10. CompactFlash Type I - Memory Stick Select the Dell Photo AIO 928 printer and make a note of the operating system used with your camera. See the...
User Guide
Page 25
... be inserted with two slots to connect this type of device as well as the data could be used to perform operations on the photos present on the memory card: button to access information stored on the contents of The card reader is provided with their label upwards. NOTE...: If the memory card is displayed. MultiMedia Card - When you insert a memory card or USB memory pen, the Photo mode menu is not recognised, an error message appears on the printer LCD. NOTE: Ensure the LED is being read or transmitted. SmartMedia - NOTE: Do not insert more than one memory...
... be inserted with two slots to connect this type of device as well as the data could be used to perform operations on the photos present on the memory card: button to access information stored on the contents of The card reader is provided with their label upwards. NOTE...: If the memory card is displayed. MultiMedia Card - When you insert a memory card or USB memory pen, the Photo mode menu is not recognised, an error message appears on the printer LCD. NOTE: Ensure the LED is being read or transmitted. SmartMedia - NOTE: Do not insert more than one memory...
User Guide
Page 26
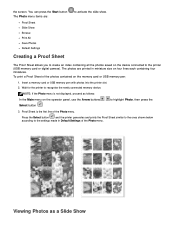
...press the Start button The Photo menu items are printed in Default Settings of the Photo menu. Wait for the printer to the printer (USB memory card or digital camera). Insert a memory card or USB memory pen with photos into the printer slot. 2. NOTE: If the Photo menu is the first line... of the Photo menu. To print a Proof Sheet of the photos contained on ...
...press the Start button The Photo menu items are printed in Default Settings of the Photo menu. Wait for the printer to the printer (USB memory card or digital camera). Insert a memory card or USB memory pen with photos into the printer slot. 2. NOTE: If the Photo menu is the first line... of the Photo menu. To print a Proof Sheet of the photos contained on ...

User Guide
Page 27
...then press the Select button . 4. After selecting a photo, you can browse all . Insert a memory card or USB memory pen with the photos into the printer slot. 2. Item Description Liquid Crystal Display (LCD) Area in sequence on the printer LCD display. Using the Arrow buttons you can modify it..., Moderate, Slow. Insert a memory card or USB memory pen with photos into the printer slot. 2. Slide Show allows you to view in sequence the photos present on a memory card or USB pen in which photos are displayed sequentially and you can now use the Arrow buttons to highlight...
...then press the Select button . 4. After selecting a photo, you can browse all . Insert a memory card or USB memory pen with the photos into the printer slot. 2. Item Description Liquid Crystal Display (LCD) Area in sequence on the printer LCD display. Using the Arrow buttons you can modify it..., Moderate, Slow. Insert a memory card or USB memory pen with photos into the printer slot. 2. Slide Show allows you to view in sequence the photos present on a memory card or USB pen in which photos are displayed sequentially and you can now use the Arrow buttons to highlight...

User Guide
Page 28
... contains these options: Edit to access the Options sub menu for displaying the next or previous photo. Options for Modifying Your Photos from the Browse Menu When viewing a photo on the printer display, you can be defined for the photo only after you require. Press the Menu button to access the Options sub menu. Use...
... contains these options: Edit to access the Options sub menu for displaying the next or previous photo. Options for Modifying Your Photos from the Browse Menu When viewing a photo on the printer display, you can be defined for the photo only after you require. Press the Menu button to access the Options sub menu. Use...

User Guide
Page 31
Printing All Photos In Photo mode on the operator panel, use the Arrow buttons to highlight Save Photos, then press Select button . All photos on the memory card or USB memory pen are transferred to highlight Print All, then press the Select button . Saving Photos on Your Computer In Photo mode on the memory card or USB memory pen connected. The printer prints all the photos present on the operator panel, use the Arrow buttons to the computer.
Printing All Photos In Photo mode on the operator panel, use the Arrow buttons to highlight Save Photos, then press Select button . All photos on the memory card or USB memory pen are transferred to highlight Print All, then press the Select button . Saving Photos on Your Computer In Photo mode on the memory card or USB memory pen connected. The printer prints all the photos present on the operator panel, use the Arrow buttons to the computer.

User Guide
Page 34
... copy face down on your settings, click Copy. select the paper type and size - Load photo paper with the arrow on the printer. 5. For more information, see "Operator Panel Menus". select the colour setting - lighten or darken the document - Ensure that the upper left corner ...of copies - select the number of the photo is aligned with the print (glossy) side face up. indicate the original ...
... copy face down on your settings, click Copy. select the paper type and size - Load photo paper with the arrow on the printer. 5. For more information, see "Operator Panel Menus". select the colour setting - lighten or darken the document - Ensure that the upper left corner ...of copies - select the number of the photo is aligned with the print (glossy) side face up. indicate the original ...


