
User Guide
Page 31
...PCL PostScript HEXDUMP Setup See the following tables to configure properties of the printer. Total Displays the total number of the Off toner message. 6.Maintenance Menu selection: Purpose: Values: Clean Drum Clean Fuser If printouts are blurred, faded, or smeared, correct the problem by ...printing a cleaning sheet provided with the printer. Supplies Life Allows you to have been printed and how much toner is ...
...PCL PostScript HEXDUMP Setup See the following tables to configure properties of the printer. Total Displays the total number of the Off toner message. 6.Maintenance Menu selection: Purpose: Values: Clean Drum Clean Fuser If printouts are blurred, faded, or smeared, correct the problem by ...printing a cleaning sheet provided with the printer. Supplies Life Allows you to have been printed and how much toner is ...
User Guide
Page 80
... present An environment with paper loaded in the tray. 2. Press Menu ( ). 3. Press Scroll ( to ) to highlight Clean Drum or Clean Fuser and press Select ( ). This process will produce a page with your printer. Do not store the toner cartridge in: Temperatures greater than 40° C (104° F) An environment with extreme changes in...
... present An environment with paper loaded in the tray. 2. Press Menu ( ). 3. Press Scroll ( to ) to highlight Clean Drum or Clean Fuser and press Select ( ). This process will produce a page with your printer. Do not store the toner cartridge in: Temperatures greater than 40° C (104° F) An environment with extreme changes in...
User Guide
Page 84
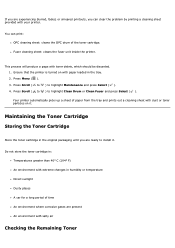
...the top cover. Replacing the Fuser unit At this the printing process. 1. Turn off the printer and wait 30 minutes for the fuser to the tabs and grooves before applying any pressure.. 9. Pull the rear door out of the cartridge and corresponding grooves within the printer will guide the cartridge into ...pulling it locks into place completely. Open the rear door by the handle and slowly insert the cartridge into the printer. Pull the rear door strap. 4. 7. as the fuser gets very hot during this stage, the toner cartridge needs to order toner cartridges. Tabs on the sides of the...
...the top cover. Replacing the Fuser unit At this the printing process. 1. Turn off the printer and wait 30 minutes for the fuser to the tabs and grooves before applying any pressure.. 9. Pull the rear door out of the cartridge and corresponding grooves within the printer will guide the cartridge into ...pulling it locks into place completely. Open the rear door by the handle and slowly insert the cartridge into the printer. Pull the rear door strap. 4. 7. as the fuser gets very hot during this stage, the toner cartridge needs to order toner cartridges. Tabs on the sides of the...
User Guide
Page 85
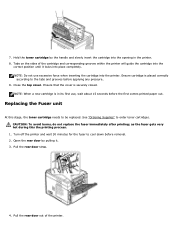
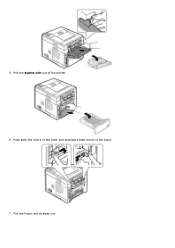
Pull the duplex unit out of the fuser. 7. 5. Push both the levers of the fuser and downward both levers of the printer. 6. Pull the Fuser unit straight out.
Pull the duplex unit out of the fuser. 7. 5. Push both the levers of the fuser and downward both levers of the printer. 6. Pull the Fuser unit straight out.
User Guide
Page 86
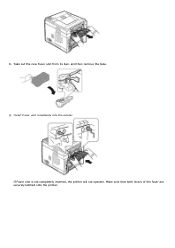
8. Make sure that both levers of the fuser are securely latched onto the printer. If Fuser unit is not completely inserted, the printer will not operate. Insert Fuser unit completely into the printer. Take out the new Fuser unit from its bag, and then remove the tape. 9.
8. Make sure that both levers of the fuser are securely latched onto the printer. If Fuser unit is not completely inserted, the printer will not operate. Insert Fuser unit completely into the printer. Take out the new Fuser unit from its bag, and then remove the tape. 9.
User Guide
Page 87
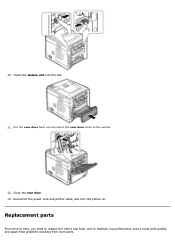
10. Insert the duplex unit into the slot. 11. Reconnect the power cord and printer cable, and turn the printer on and insert the rear door strap to avoid print quality and paper feed problems resulting from worn parts. Close the rear door. 13. Replacement parts From time to time, you need to replace the rollers and fuser unit to maintain top performance and to the printer. 12. Put the rear door back on .
10. Insert the duplex unit into the slot. 11. Reconnect the power cord and printer cable, and turn the printer on and insert the rear door strap to avoid print quality and paper feed problems resulting from worn parts. Close the rear door. 13. Replacement parts From time to time, you need to replace the rollers and fuser unit to maintain top performance and to the printer. 12. Put the rear door back on .
User Guide
Page 88
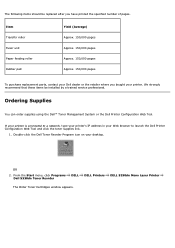
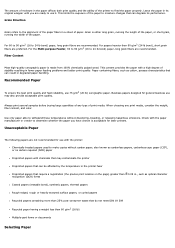
... Start menu, click Programs Dell 5330dn Toner Reorder DELL DELL Printers DELL 5330dn Mono Laser Printer The Order Toner Cartridges window appears. We strongly recommend that these items be replaced after you bought your Dell dealer or the retailer where you have printed the specified number of pages. If your printer is connected to a network, type your printer's IP address in your...
... Start menu, click Programs Dell 5330dn Toner Reorder DELL DELL Printers DELL 5330dn Mono Laser Printer The Order Toner Cartridges window appears. We strongly recommend that these items be replaced after you bought your Dell dealer or the retailer where you have printed the specified number of pages. If your printer is connected to a network, type your printer's IP address in your...
User Guide
Page 100
...CCP), or no carbon required (NCR) paper Preprinted papers with the paper manufacturer or vendor to use it. Business papers designed for laser printers. Grain is made from 100% chemically pulped wood. This limits the exposure of the paper to moisture changes that can result in...xerographic paper. Recommended Paper To ensure the best print quality and feed reliability, use may contaminate the printer Preprinted papers that can be affected by the temperature in the printer fuser Preprinted papers that require a registration (the precise print location on the page) greater than 0.09...
...CCP), or no carbon required (NCR) paper Preprinted papers with the paper manufacturer or vendor to use it. Business papers designed for laser printers. Grain is made from 100% chemically pulped wood. This limits the exposure of the paper to moisture changes that can result in...xerographic paper. Recommended Paper To ensure the best print quality and feed reliability, use may contaminate the printer Preprinted papers that can be affected by the temperature in the printer fuser Preprinted papers that require a registration (the precise print location on the page) greater than 0.09...

User Guide
Page 101
...printing. Remember to change the paper size setting when using a source that are not affected by the resin in toner or the silicone in the fuser. Choose papers that you are in xerographic copiers. Avoid papers with the manufacturer or vendor to 180° C (356° F) without ...mix print media sizes, weights, or types in the source. Do not remove trays while a job is printing or Busy is acceptable for laser printers. Before purchasing large quantities of the paper you have chosen is displayed on Letterhead Check with rough or heavily textured surfaces. Use only forms ...
...printing. Remember to change the paper size setting when using a source that are not affected by the resin in toner or the silicone in the fuser. Choose papers that you are in xerographic copiers. Avoid papers with the manufacturer or vendor to 180° C (356° F) without ...mix print media sizes, weights, or types in the source. Do not remove trays while a job is printing or Busy is acceptable for laser printers. Before purchasing large quantities of the paper you have chosen is displayed on Letterhead Check with rough or heavily textured surfaces. Use only forms ...
User Guide
Page 110
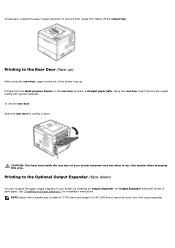
... . Printing to the Optional Output Expander (face down) You can increase the paper output capacity of your printer by pulling it down. for installation instructions. CAUTION: The fuser area inside the rear door of your printer becomes very hot when in the ouput expander. See "Installing an Output Expander." NOTE: Paper with special...
... . Printing to the Optional Output Expander (face down) You can increase the paper output capacity of your printer by pulling it down. for installation instructions. CAUTION: The fuser area inside the rear door of your printer becomes very hot when in the ouput expander. See "Installing an Output Expander." NOTE: Paper with special...

User Guide
Page 156
... or around the toner cartridge area "In the paper exit area" or "Around the toner cartridge". Pull paper tray 1 open. Between the duplex unit and fuser area "Duplex jam 1". Paper Exit Jam "In the paper exit area".
... or around the toner cartridge area "In the paper exit area" or "Around the toner cartridge". Pull paper tray 1 open. Between the duplex unit and fuser area "Duplex jam 1". Paper Exit Jam "In the paper exit area".
User Guide
Page 157
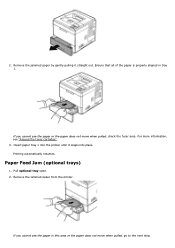
2. Remove the jammed paper from the printer. If you cannot see the paper or the paper does not move when pulled, go to the next step. For more information, see the paper ... it snaps into place. Printing automatically resumes. Paper Feed Jam (optional trays) 1. If you cannot see "Around the toner cartridge". 3. Insert paper tray 1 into the printer until it straight out. Ensure that all of the paper is properly aligned in this area or the paper does not move when pulled, check...
2. Remove the jammed paper from the printer. If you cannot see the paper or the paper does not move when pulled, go to the next step. For more information, see the paper ... it snaps into place. Printing automatically resumes. Paper Feed Jam (optional trays) 1. If you cannot see "Around the toner cartridge". 3. Insert paper tray 1 into the printer until it straight out. Ensure that all of the paper is properly aligned in this area or the paper does not move when pulled, check...
User Guide
Page 158
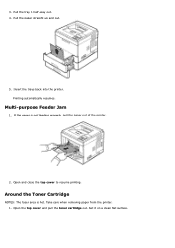
Take care when removing paper from the printer. 1. Pull the tray 1 half-way out. 4. Pull the paper straight up and out. 5. If the paper is hot. Open the top cover and pull the toner cartridge out. Multi-purpose Feeder Jam 1. Set it on a clean flat surface. Printing automatically resumes. Open and close the top cover to resume printing. Around the Toner Cartridge NOTES: The fuser area is not feeding properly, pull the paper out of the printer. 2. Insert the trays back into the printer. 3.
Take care when removing paper from the printer. 1. Pull the tray 1 half-way out. 4. Pull the paper straight up and out. 5. If the paper is hot. Open the top cover and pull the toner cartridge out. Multi-purpose Feeder Jam 1. Set it on a clean flat surface. Printing automatically resumes. Open and close the top cover to resume printing. Around the Toner Cartridge NOTES: The fuser area is not feeding properly, pull the paper out of the printer. 2. Insert the trays back into the printer. 3.
User Guide
Page 161
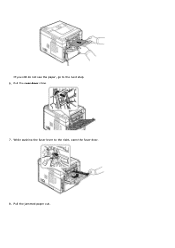
Pull the rear door strap. 7. Pull the jammed paper out. If you still do not see the paper, go to the right, open the fuser door. 8. While pushing the fuser lever to the next step. 6.
Pull the rear door strap. 7. Pull the jammed paper out. If you still do not see the paper, go to the right, open the fuser door. 8. While pushing the fuser lever to the next step. 6.

User Guide
Page 162
In the Duplex Unit Area If the the duplex unit is inserted correctly. Printing automatically resumes. Pull the duplex unit out of the printer. 2. Insert the duplex unit into the slot. Return the pressure levers to original position and insert the rear door connector in the printer. 10. Return the fuser lever to their original position and close the rear door. Locate the paper and remove it. 3. Duplex jam 0 1. Ensure that the duplex unit is not inserted correctly, paper jam may occur. 9.
In the Duplex Unit Area If the the duplex unit is inserted correctly. Printing automatically resumes. Pull the duplex unit out of the printer. 2. Insert the duplex unit into the slot. Return the pressure levers to original position and insert the rear door connector in the printer. 10. Return the fuser lever to their original position and close the rear door. Locate the paper and remove it. 3. Duplex jam 0 1. Ensure that the duplex unit is not inserted correctly, paper jam may occur. 9.
User Guide
Page 165
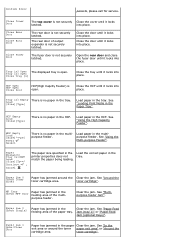
...[Size][Type] There is no paper in the tray. [Size][Type] Load paper in the feeding area of the multi- Load paper in the printer properties does not tray. Paper Mismatch/ Tray [x]/MPF Load [Size][Type] Continue , Cancel The paper size specified in the Load the correct paper ... Capcity Feeder) is not securely latched. Close the HCF until it locks into place. Clear the jam. Open the rear door and close the fuser door until it locks into place. Load paper in the multipurpose feeder. purpose feeder. See "Using the High Capacity Feeder". Confirm Error persists,...
...[Size][Type] There is no paper in the tray. [Size][Type] Load paper in the feeding area of the multi- Load paper in the printer properties does not tray. Paper Mismatch/ Tray [x]/MPF Load [Size][Type] Continue , Cancel The paper size specified in the Load the correct paper ... Capcity Feeder) is not securely latched. Close the HCF until it locks into place. Clear the jam. Open the rear door and close the fuser door until it locks into place. Load paper in the multipurpose feeder. purpose feeder. See "Using the High Capacity Feeder". Confirm Error persists,...
User Guide
Page 166
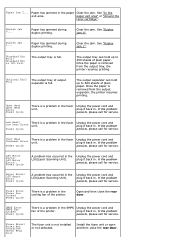
...Heat Error Power Cycle There is a problem in . Unplug the power cord and plug it back in the LSU(Laser Scanning Unit). Fuser Error/ Fuser Not Installed Check Rear Door The fuser unit is full. Paper Jam 2... paper exit area" or "Around the toner cartridge". Paper has jammed during duplex ...Clear the jam. The output tray can hold up to 250 sheets of the printer. Over Heat There is a problem in the cooling fan of plain paper. See "In the exit area. Fuser Error Fuser Fan Locked Power Cycle There is a problem in the SMPS Unplug the power cord...
...Heat Error Power Cycle There is a problem in . Unplug the power cord and plug it back in the LSU(Laser Scanning Unit). Fuser Error/ Fuser Not Installed Check Rear Door The fuser unit is full. Paper Jam 2... paper exit area" or "Around the toner cartridge". Paper has jammed during duplex ...Clear the jam. The output tray can hold up to 250 sheets of the printer. Over Heat There is a problem in the cooling fan of plain paper. See "In the exit area. Fuser Error Fuser Fan Locked Power Cycle There is a problem in the SMPS Unplug the power cord...
User Guide
Page 167
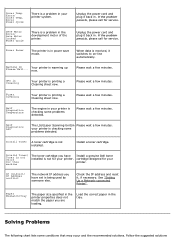
... The engine in your printer. Please wait a few minutes. Install Toner A toner cartridge is checking some problems detected. Paper Mismatch/Tray The paper size specified in power save mode. Install a genuine Dell toner cartridge designed for service... your printer is not for service. your printer system. Warming Up Please Wait... Self Diagnostics LSU The LSU(Laser Scanning Unit)in the tray. Install a toner cartridge. See "Setting Up a Network-connected Printer". Fuser Cleaning Your printer is warming up now. Your printer is...
... The engine in your printer. Please wait a few minutes. Install Toner A toner cartridge is checking some problems detected. Paper Mismatch/Tray The paper size specified in power save mode. Install a genuine Dell toner cartridge designed for service... your printer is not for service. your printer system. Warming Up Please Wait... Self Diagnostics LSU The LSU(Laser Scanning Unit)in the tray. Install a toner cartridge. See "Setting Up a Network-connected Printer". Fuser Cleaning Your printer is warming up now. Your printer is...


