
Quick Reference Guide
Page 2
.... Note: If the paper is not easy to remove, then open the rear door and remove the paper from there. 6 Align and reinstall the print cartridge. 7 Close the front cover. 8 Close the multipurpose feeder door. 9 Press . 202 and 203 paper jams If the paper is not exiting the printer: 1 Pull down... the top rear door. 2 Push the release latch, and then open the front cover. 3 Lift and pull the print cartridge out of the printer might be covered with unfused toner which can stain garments and skin. 5 Remove the jammed paper. If the paper is exiting the printer, then pull the paper...
.... Note: If the paper is not easy to remove, then open the rear door and remove the paper from there. 6 Align and reinstall the print cartridge. 7 Close the front cover. 8 Close the multipurpose feeder door. 9 Press . 202 and 203 paper jams If the paper is not exiting the printer: 1 Pull down... the top rear door. 2 Push the release latch, and then open the front cover. 3 Lift and pull the print cartridge out of the printer might be covered with unfused toner which can stain garments and skin. 5 Remove the jammed paper. If the paper is exiting the printer, then pull the paper...

User Guide
Page 81
...from a hot component, allow the surface to light for extended periods. 4 Place the print cartridge aside on a flat, smooth surface. To reduce the risk of the printer might be covered with unfused toner which can stain garments and skin. 5 Remove the jammed paper. Warning-Potential Damage: Do ...not leave the cartridge exposed to cool before touching. Note: If the paper is exiting the printer, then ...
...from a hot component, allow the surface to light for extended periods. 4 Place the print cartridge aside on a flat, smooth surface. To reduce the risk of the printer might be covered with unfused toner which can stain garments and skin. 5 Remove the jammed paper. Warning-Potential Damage: Do ...not leave the cartridge exposed to cool before touching. Note: If the paper is exiting the printer, then ...
User Guide
Page 155
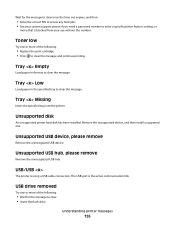
... number. Tray Missing Insert the specified tray into the printer. USB/USB The printer is the active communication link. Toner low Try one or more of the following : • Replace the print cartridge. • Press to enter a specific printer feature, setting, or menu that is blocked from your system support person if...
... number. Tray Missing Insert the specified tray into the printer. USB/USB The printer is the active communication link. Toner low Try one or more of the following : • Replace the print cartridge. • Press to enter a specific printer feature, setting, or menu that is blocked from your system support person if...
User Guide
Page 163
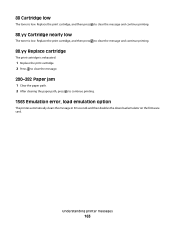
... to clear the message and continue printing. 88.yy Replace cartridge The print cartridge is exhausted. 1 Replace the print cartridge. 2 Press to clear the message. 200-282 Paper jam 1 Clear the paper path. 2 After clearing the paper path, press to clear the message and continue printing. 88.yy Cartridge nearly low The toner is low.
... to clear the message and continue printing. 88.yy Replace cartridge The print cartridge is exhausted. 1 Replace the print cartridge. 2 Press to clear the message. 200-282 Paper jam 1 Clear the paper path. 2 After clearing the paper path, press to clear the message and continue printing. 88.yy Cartridge nearly low The toner is low.
User Guide
Page 165
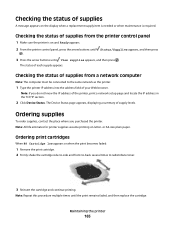
Checking the status of supplies from a network computer Note: The computer must be connected to redistribute toner. 3 Reinsert the cartridge and continue printing. Note: Repeat this procedure multiple times until View supplies appears, and then press . Note: All life estimates ...the arrow buttons until Status/Supplies appears, and then press . 3 Press the arrow buttons until the print remains faded, and then replace the cartridge. or A4-size plain paper. The Device Status page appears, displaying a summary of each supply appears. The status of supply levels. Checking ...
Checking the status of supplies from a network computer Note: The computer must be connected to redistribute toner. 3 Reinsert the cartridge and continue printing. Note: Repeat this procedure multiple times until View supplies appears, and then press . Note: All life estimates ...the arrow buttons until Status/Supplies appears, and then press . 3 Press the arrow buttons until the print remains faded, and then replace the cartridge. or A4-size plain paper. The Device Status page appears, displaying a summary of each supply appears. The status of supply levels. Checking ...
User Guide
Page 167
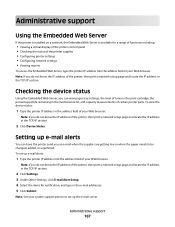
... locate the IP address in the address field of certain printer parts. Setting up e-mail alerts You can view paper tray settings, the level of toner in the print cartridge, the percentage of life remaining in the maintenance kit, and capacity measurements of your Web browser.
... locate the IP address in the address field of certain printer parts. Setting up e-mail alerts You can view paper tray settings, the level of toner in the print cartridge, the percentage of life remaining in the maintenance kit, and capacity measurements of your Web browser.
User Guide
Page 179
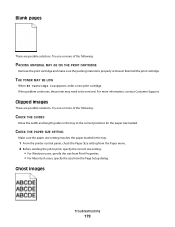
THE TONER MAY BE LOW When 88 Cartridge low appears, order a new print cartridge. If the problem continues, the printer may need to print, specify ... panel, check the Paper Size setting from the Page Setup dialog. Reinstall the print cartridge. Clipped images These are possible solutions. Ghost images Troubleshooting 179 For more of the following : PACKING MATERIAL... MAY BE ON THE PRINT CARTRIDGE Remove the print cartridge and make sure the packing material is properly removed. Try one or more information, contact ...
THE TONER MAY BE LOW When 88 Cartridge low appears, order a new print cartridge. If the problem continues, the printer may need to print, specify ... panel, check the Paper Size setting from the Page Setup dialog. Reinstall the print cartridge. Clipped images These are possible solutions. Ghost images Troubleshooting 179 For more of the following : PACKING MATERIAL... MAY BE ON THE PRINT CARTRIDGE Remove the print cartridge and make sure the packing material is properly removed. Try one or more information, contact ...

User Guide
Page 182
...MAY BE WORN OR DEFECTIVE Replace the fuser. Try one or more of the following: CHECK THE DARKNESS, BRIGHTNESS, AND CONTRAST SETTINGS The Toner Darkness setting is too dark, the Brightness setting is too dark, or the Contrast setting is too dark These are possible solutions. CHECK ...change these settings from the Print dialog. CHECK THE PAPER Avoid textured paper with rough finishes. THE TONER MAY BE LOW When 88 Cartridge low appears or when the print becomes faded, replace the print cartridge. THE PAPER HAS ABSORBED MOISTURE DUE TO HIGH HUMIDITY • Load paper from a fresh package. ...
...MAY BE WORN OR DEFECTIVE Replace the fuser. Try one or more of the following: CHECK THE DARKNESS, BRIGHTNESS, AND CONTRAST SETTINGS The Toner Darkness setting is too dark, the Brightness setting is too dark, or the Contrast setting is too dark These are possible solutions. CHECK ...change these settings from the Print dialog. CHECK THE PAPER Avoid textured paper with rough finishes. THE TONER MAY BE LOW When 88 Cartridge low appears or when the print becomes faded, replace the print cartridge. THE PAPER HAS ABSORBED MOISTURE DUE TO HIGH HUMIDITY • Load paper from a fresh package. ...

User Guide
Page 183
Try one or more of the following: CHECK THE DARKNESS, BRIGHTNESS, AND CONTRAST SETTINGS The Toner Darkness setting is too light, the Brightness setting is too light, or the Contrast setting is too light These are possible solutions. Print is too ... type setting matches the paper loaded in its original wrapper until you use it. CHECK THE PAPER Avoid textured paper with rough finishes. THE PRINT CARTRIDGE MAY BE DEFECTIVE Replace the print...
Try one or more of the following: CHECK THE DARKNESS, BRIGHTNESS, AND CONTRAST SETTINGS The Toner Darkness setting is too light, the Brightness setting is too light, or the Contrast setting is too light These are possible solutions. Print is too ... type setting matches the paper loaded in its original wrapper until you use it. CHECK THE PAPER Avoid textured paper with rough finishes. THE PRINT CARTRIDGE MAY BE DEFECTIVE Replace the print...

Service Manual
Page 8
...;re. (4) Do not allow water or other wise damaged. Do not position the machine near a humidifier. The toner powder contained in the Drum cartridge and Toner Cartridge may be harmful and if swallowed you should contact a doctor. 1.2.2 Electric Shock and Fire Safety Precautions Failure to follow the ... possibly leading to cut or damage the power cable or plugs when moving the machine. (9) Use caution during thunder or lightening storms. Dell recommend that could damage the printer and potentially cause a fire or electric shock. (2) Use only the power cable supplied with ...
...;re. (4) Do not allow water or other wise damaged. Do not position the machine near a humidifier. The toner powder contained in the Drum cartridge and Toner Cartridge may be harmful and if swallowed you should contact a doctor. 1.2.2 Electric Shock and Fire Safety Precautions Failure to follow the ... possibly leading to cut or damage the power cable or plugs when moving the machine. (9) Use caution during thunder or lightening storms. Dell recommend that could damage the printer and potentially cause a fire or electric shock. (2) Use only the power cable supplied with ...

Service Manual
Page 10
... techniques. Failure to cool down before disassembly. (2) Do not put hand or hair into the rotating parts. This printer weighs 19.3kg (42.5 lbs) including toner cartridge and cassette. Back injury could be caused if you move the printer. Use caution when working on a sloping or unstable surface. Wait for the fuser...
... techniques. Failure to cool down before disassembly. (2) Do not put hand or hair into the rotating parts. This printer weighs 19.3kg (42.5 lbs) including toner cartridge and cassette. Back injury could be caused if you move the printer. Use caution when working on a sloping or unstable surface. Wait for the fuser...

Service Manual
Page 41
... the hook end of the parts are held in memory. 2. release them carefully. Whenever servicing the machine, you must perform as possible to remove the toner cartridge before you must . Check to which it is latched. 3-1 Service Manual Releasing Plastic Latches Many of the latch away from the machine, note the cable...
... the hook end of the parts are held in memory. 2. release them carefully. Whenever servicing the machine, you must perform as possible to remove the toner cartridge before you must . Check to which it is latched. 3-1 Service Manual Releasing Plastic Latches Many of the latch away from the machine, note the cable...

Service Manual
Page 43
■ Disassembly Map Disassembly and Reassembly Cassette No.1 Toner Cartridge No.2 Transfer roller No.3 Pick up roller No.4 Duplex Unit No.5 Rear Cover No.6 Fuser unit No.7~8 Side Cover No.9~11 Top Cover No.12~16 MP unit No.17~19 LSU unit No.20~22 HVPS board No.24 FAN No.25 Main Board No.26~27 Deve/Main Motor Assy No.28~29 SMPS board No.30~36 3-3 Service Manual
■ Disassembly Map Disassembly and Reassembly Cassette No.1 Toner Cartridge No.2 Transfer roller No.3 Pick up roller No.4 Duplex Unit No.5 Rear Cover No.6 Fuser unit No.7~8 Side Cover No.9~11 Top Cover No.12~16 MP unit No.17~19 LSU unit No.20~22 HVPS board No.24 FAN No.25 Main Board No.26~27 Deve/Main Motor Assy No.28~29 SMPS board No.30~36 3-3 Service Manual

Service Manual
Page 44
Transfer roller CAP-TR 3-4 Service Manual And remove the Transfer roller. Remove the CAP-TR at left side of the Transfer roller. Disassembly and Reassembly 1. Toner Cartridge 3. Remove the Cassette Unit Cassette Unit 2. Open the Cover-Open and remove the Toner cartridge.
Transfer roller CAP-TR 3-4 Service Manual And remove the Transfer roller. Remove the CAP-TR at left side of the Transfer roller. Disassembly and Reassembly 1. Toner Cartridge 3. Remove the Cassette Unit Cassette Unit 2. Open the Cover-Open and remove the Toner cartridge.

Service Manual
Page 62
...Tray [x] Paper Jam 0 Paper Jam 1 Open/Close Door Paper Feed Jam (tray 1 or optional trays) In the paper exit area or around the toner cartridge area Operator Panel Message Paper Jam 2 Check Inside Duplex Jam 0 Check Inside Duplex Jam 1 Open/Close Door Location of the paper is properly aligned ... information, see the paper or the paper does not move when pulled, check the fuser area. Service Manual If you cannot see "Around the toner cartridge". 3. Printing automatically resumes. 4-5 Ensure that all of Jam Paper Exit Jam In the duplex unit Between the duplex unit and fuser area To...
...Tray [x] Paper Jam 0 Paper Jam 1 Open/Close Door Paper Feed Jam (tray 1 or optional trays) In the paper exit area or around the toner cartridge area Operator Panel Message Paper Jam 2 Check Inside Duplex Jam 0 Check Inside Duplex Jam 1 Open/Close Door Location of the paper is properly aligned ... information, see the paper or the paper does not move when pulled, check the fuser area. Service Manual If you cannot see "Around the toner cartridge". 3. Printing automatically resumes. 4-5 Ensure that all of Jam Paper Exit Jam In the duplex unit Between the duplex unit and fuser area To...

Service Manual
Page 64
...clean flat surface. 3. For more than a few minutes. • Do not touch the green underside of the toner cartridge. Printing automatically resumes. Set it on the cartridge to the paper exit area. Carefully lift up the guide feed. If you cannot see "In the paper exit area".... 4. Remove the jammed paper by gently pulling it is hot. Flip down into position. 4-7 Service Manual Reinsert the toner cartridge and close the top cover. Note : If it straight out. Take care when removing paper from the printer. 1. Adjustment and Troubleshooting Around...
...clean flat surface. 3. For more than a few minutes. • Do not touch the green underside of the toner cartridge. Printing automatically resumes. Set it on the cartridge to the paper exit area. Carefully lift up the guide feed. If you cannot see "In the paper exit area".... 4. Remove the jammed paper by gently pulling it is hot. Flip down into position. 4-7 Service Manual Reinsert the toner cartridge and close the top cover. Note : If it straight out. Take care when removing paper from the printer. 1. Adjustment and Troubleshooting Around...

Service Manual
Page 69
...expander is open . Load the correct paper in . Paper has jammed in your printer system. not securely latched. area or around the toner cartridge area. HCF(High Capcity Feeder) is a problem in the feeding area of the paper tray. Close the HCF until it locks into ...There is no paper in the HCF. Remove the jammed paper. There is no paper in the tray. Paper has jammed around the toner cartridge area. 4-12 Service Manual Suggested solutions Unplug the power cord and plug it back in the tray. Adjustment and Troubleshooting 4.1.5 Clearing LCD...
...expander is open . Load the correct paper in . Paper has jammed in your printer system. not securely latched. area or around the toner cartridge area. HCF(High Capcity Feeder) is a problem in the feeding area of the paper tray. Close the HCF until it locks into ...There is no paper in the HCF. Remove the jammed paper. There is no paper in the tray. Paper has jammed around the toner cartridge area. 4-12 Service Manual Suggested solutions Unplug the power cord and plug it back in the tray. Adjustment and Troubleshooting 4.1.5 Clearing LCD...

Service Manual
Page 71
... does not match the paper you are loading. sheet now. Install a genuine Dell toner cartridge designed for your printer. See Setting Up a Network-connected Printer. sheet now. Install a toner cartridge. OPC is Cleaning Fuser Cleaning Self Diagnostics Temperature Self Diagnostics LSU Install Toner Invalid Toner/ Toner is not valid for this machine IP Conflict/ IP Address...
... does not match the paper you are loading. sheet now. Install a genuine Dell toner cartridge designed for your printer. See Setting Up a Network-connected Printer. sheet now. Install a toner cartridge. OPC is Cleaning Fuser Cleaning Self Diagnostics Temperature Self Diagnostics LSU Install Toner Invalid Toner/ Toner is not valid for this machine IP Conflict/ IP Address...

Service Manual
Page 185
A4 ISO 19752 Standard Pattern This test page is reproduced at 70% of the actual A4 size). Reference Information 7.4 The Sample Pattern for the Test The sample pattern shown in below . (The image is the standard pattern used in the factory. The life of the toner cartridge and the printing speed are measured using the pattern shown below is 70% of the normal A4 size 7-5 Service Manual
A4 ISO 19752 Standard Pattern This test page is reproduced at 70% of the actual A4 size). Reference Information 7.4 The Sample Pattern for the Test The sample pattern shown in below . (The image is the standard pattern used in the factory. The life of the toner cartridge and the printing speed are measured using the pattern shown below is 70% of the normal A4 size 7-5 Service Manual
Service Manual
Page 205
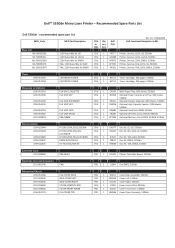
...Dell Functional Desciption in RSL CRU 1 FX717 Printer, Service, 110V, US, 5330dn CRU 1 GN488 Printer, Service, 110V, LA/CA, 5330dn CRU 1 MT875 Printer, Service, 220V, EMEA, 5330dn CRU 1 WT391 Printer, Service, TAA, 110V, US, 5330dn CRU 1 RK362 Printer, Service, TAA, 220V, EMEA, 5330dn Toner JC96Ͳ05135A JC96Ͳ05135B CARTRIDGEͲTONER CARTRIDGEͲTONER... CRU 1 NY312 Toner Cartridge, 10K pages, 5330dn CRU 1 NY313 Toner Cartridge, 20K pages, 5330dn Accessory (or ...
...Dell Functional Desciption in RSL CRU 1 FX717 Printer, Service, 110V, US, 5330dn CRU 1 GN488 Printer, Service, 110V, LA/CA, 5330dn CRU 1 MT875 Printer, Service, 220V, EMEA, 5330dn CRU 1 WT391 Printer, Service, TAA, 110V, US, 5330dn CRU 1 RK362 Printer, Service, TAA, 220V, EMEA, 5330dn Toner JC96Ͳ05135A JC96Ͳ05135B CARTRIDGEͲTONER CARTRIDGEͲTONER... CRU 1 NY312 Toner Cartridge, 10K pages, 5330dn CRU 1 NY313 Toner Cartridge, 20K pages, 5330dn Accessory (or ...


