
Service Manual
Page 40
... appropriate print media and loading it . Tools required Flat-blade screwdrivers, various sizes Phillips screwdrivers, various sizes 7/32 inch (5.5 mm) open-end wrench 7.0 mm nut driver Needlenose pliers Diagonal side cutters Spring hook Feeler gauges Analog or digital multimeter Parallel wrap plug 1319128 Twinax/serial.... • Do not remove trays during a print job. • Push all edges of print media. If jams do occur with the printer before you load it properly, you can avoid most jams. The following hints can help ensure trouble-free printing. Any information placed outside this...
... appropriate print media and loading it . Tools required Flat-blade screwdrivers, various sizes Phillips screwdrivers, various sizes 7/32 inch (5.5 mm) open-end wrench 7.0 mm nut driver Needlenose pliers Diagonal side cutters Spring hook Feeler gauges Analog or digital multimeter Parallel wrap plug 1319128 Twinax/serial.... • Do not remove trays during a print job. • Push all edges of print media. If jams do occur with the printer before you load it properly, you can avoid most jams. The following hints can help ensure trouble-free printing. Any information placed outside this...

Service Manual
Page 44
... using the Up or Down button, the cursor moves one menu index item to scroll through text that can show Stopped, and a list of the printer. The Back, Menu, and Stop buttons are located to the left of the display. Note: Changes made on the screen will appear. Note: The... to initiate action on a selection. After pressing Stop, the message Stopping is a 4-line back-lit gray scale display that will appear if the printer is used to open the menu index. The Select button is not ready. Press Select when the cursor appears next to the selection you want to the next...
... using the Up or Down button, the cursor moves one menu index item to scroll through text that can show Stopped, and a list of the printer. The Back, Menu, and Stop buttons are located to the left of the display. Note: Changes made on the screen will appear. Note: The... to initiate action on a selection. After pressing Stop, the message Stopping is a 4-line back-lit gray scale display that will appear if the printer is used to open the menu index. The Select button is not ready. Press Select when the cursor appears next to the selection you want to the next...

Service Manual
Page 46
... clears. 5. The operator panel LED starts blinking. 10. The main fan turns on , it performs a Power-On Self Test. The exit rollers turn the printer on . 13. Power-On Self Test (POST) sequence When you turn . 2-4 Service Manual A partial row of pixels appears. 6. The operator panel displays system... observing the following errors or messages may display: • Close Door or Insert Cartridge display if the upper front cover is open or the print cartridge is missing. • Any cartridge errors, such as Defective Cartridge, Prebate Violation, or Missing Cartridge. 11. For example: *128MB...
... clears. 5. The operator panel LED starts blinking. 10. The main fan turns on , it performs a Power-On Self Test. The exit rollers turn the printer on . 13. Power-On Self Test (POST) sequence When you turn . 2-4 Service Manual A partial row of pixels appears. 6. The operator panel displays system... observing the following errors or messages may display: • Close Door or Insert Cartridge display if the upper front cover is open or the print cartridge is missing. • Any cartridge errors, such as Defective Cartridge, Prebate Violation, or Missing Cartridge. 11. For example: *128MB...

Service Manual
Page 64
... error. Lamp detection performed and found error. Attempting to POR machine after receiving a 925.01. • 115 V lamp in 220 V printer. • Lamp has excessive wattage. Go to "925.xx-Hot fuser service check" on page 2-91. Go to "925.xx-Hot ... • Intermittent connection. • Thermistor cable not connected or thermistor actually open. • Noisy thermistor signal. • Intermittent connection. • Thermistor cable not connected or thermistor actually open. • 115 V lamp in 220 V printer. • Lamp has excessive wattage. Go to "924.xx-Hot fuser ...
... error. Lamp detection performed and found error. Attempting to POR machine after receiving a 925.01. • 115 V lamp in 220 V printer. • Lamp has excessive wattage. Go to "925.xx-Hot fuser service check" on page 2-91. Go to "925.xx-Hot ... • Intermittent connection. • Thermistor cable not connected or thermistor actually open. • Noisy thermistor signal. • Intermittent connection. • Thermistor cable not connected or thermistor actually open. • 115 V lamp in 220 V printer. • Lamp has excessive wattage. Go to "924.xx-Hot fuser ...
Service Manual
Page 73
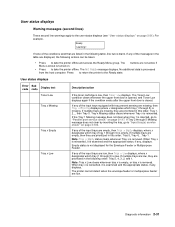
The Not Ready message displays. Press to return the printer to the user status displays (see "User status displays" on page 2-31). The Toner Low condition clears whenever the upper front door is opened, and Toner Low displays again if the condition exists after the upper front door is removed. If the... Tray 1 Missing message does not clear when tray 1 is low. If Tray 2 through 5) is inserted, go to take the printer offline and access the Ready Menu...
The Not Ready message displays. Press to return the printer to the user status displays (see "User status displays" on page 2-31). The Toner Low condition clears whenever the upper front door is opened, and Toner Low displays again if the condition exists after the upper front door is removed. If the... Tray 1 Missing message does not clear when tray 1 is low. If Tray 2 through 5) is inserted, go to take the printer offline and access the Ready Menu...

Service Manual
Page 76
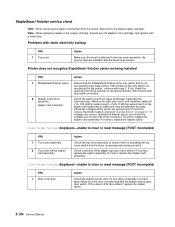
... of the display and the job is on the status line. The Box M Missing message appears on and the printer informed by the code the hole punch box M is lost if you format the disk. User attendance messages (continued...be displayed when the box has been emptied, go to "StapleSmart finisher service check" on page 2-80. The printer handles stapled jobs as if the staple cartridge were installed, but empty. The Box M Full appears on the status...is missing. Insert Cartridge or Close Door This message displays when the printer front door is open or the print cartridge is emptied.
... of the display and the job is on the status line. The Box M Missing message appears on and the printer informed by the code the hole punch box M is lost if you format the disk. User attendance messages (continued...be displayed when the box has been emptied, go to "StapleSmart finisher service check" on page 2-80. The printer handles stapled jobs as if the staple cartridge were installed, but empty. The Box M Full appears on the status...is missing. Insert Cartridge or Close Door This message displays when the printer front door is open or the print cartridge is emptied.

Service Manual
Page 85
...communications problem, not fully connected, or having a hardware failure. To use the option, the printer must first be attached to reattach it. The duplex front access cover is open. The duplex rear door is not installed. Diagnostic information 2-43 User status message Check Env ...Serial Port, if available. Standard Infrared port, if available. When the option is removed. The printer automatically clears the message once the option is recognized, the printer automatically clears the error and continues. Check device connection messages The messages in the following table....
...communications problem, not fully connected, or having a hardware failure. To use the option, the printer must first be attached to reattach it. The duplex front access cover is open. The duplex rear door is not installed. Diagnostic information 2-43 User status message Check Env ...Serial Port, if available. Standard Infrared port, if available. When the option is removed. The printer automatically clears the message once the option is recognized, the printer automatically clears the error and continues. Check device connection messages The messages in the following table....

Service Manual
Page 86
... feeder. • Check for the tray. Bouncy pass thru sensor. User attendance messages-paper jams and paper handling errors (2xx.xx) When the printer jams, the appropriate jam message will be displayed on 250-sheet model. • Bouncy input sensor. • Check MPF and friction pad. •...; Fan media and stack flat in tray or MPF. • Use different media. • Check config ID. Open manual feed door. Input sensor covered too quickly • Paper pre-staged in path. • Wrong configuration ID causes engine to "Input sensor service ...
... feeder. • Check for the tray. Bouncy pass thru sensor. User attendance messages-paper jams and paper handling errors (2xx.xx) When the printer jams, the appropriate jam message will be displayed on 250-sheet model. • Bouncy input sensor. • Check MPF and friction pad. •...; Fan media and stack flat in tray or MPF. • Use different media. • Check config ID. Open manual feed door. Input sensor covered too quickly • Paper pre-staged in path. • Wrong configuration ID causes engine to "Input sensor service ...
Service Manual
Page 122
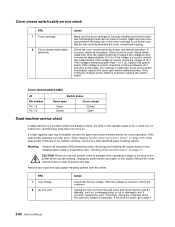
...correctly installed and that the tab correctly activates the cover closed switch spring. If the voltage is installed, remove the option and check the base printer for damage, such as necessary. If the voltage is correct, check the continuity between J8-1 and J8-3 on page 2-96. If the ...continuity changes as the switch is activated, replace the cover open switch/cable assembly. If the base printer operates correctly, go to not operate correctly, remove any other attached paper handling options. If the base...
...correctly installed and that the tab correctly activates the cover closed switch spring. If the voltage is installed, remove the option and check the base printer for damage, such as necessary. If the voltage is correct, check the continuity between J8-1 and J8-3 on page 2-96. If the ...continuity changes as the switch is activated, replace the cover open switch/cable assembly. If the base printer operates correctly, go to not operate correctly, remove any other attached paper handling options. If the base...

Service Manual
Page 128
The adjustment may be too narrow. If the adjustment is centered in the opening in the floor of the envelopes being used in the feeder. Check for signs of the paper path. Check the deflector gap adjustment. If the ... stuck together or signs of the latch lever is correct, replace the envelope feeder option. 260.xx Paper Jam displays, envelope stops in the base printer paper path FRU 1 Latch lever Action Make sure the tip of glue. If the envelopes meet the guidelines and are not interleaved. If you find...
The adjustment may be too narrow. If the adjustment is centered in the opening in the floor of the envelopes being used in the feeder. Check for signs of the paper path. Check the deflector gap adjustment. If the ... stuck together or signs of the latch lever is correct, replace the envelope feeder option. 260.xx Paper Jam displays, envelope stops in the base printer paper path FRU 1 Latch lever Action Make sure the tip of glue. If the envelopes meet the guidelines and are not interleaved. If you find...

Service Manual
Page 133
.... Measure the resistance between J10-3 and J10-4 on the assembly) thermistor cable, if the resistance measures infinity (open circuit) check the continuity of pins 3 and 4 of the printer where you are working . CAUTION: .The fuser may be hot, use caution before removing or servicing. Diagnostic ...before starting this service check. System board Fuser assembly Reconnect the thermistor cable to step 2. 2 Fuser top cover assembly Turn the printer off and disconnect the thermistor cable from J10 on the system board and measure the resistance between the two pins on the cable...
.... Measure the resistance between J10-3 and J10-4 on the assembly) thermistor cable, if the resistance measures infinity (open circuit) check the continuity of pins 3 and 4 of the printer where you are working . CAUTION: .The fuser may be hot, use caution before removing or servicing. Diagnostic ...before starting this service check. System board Fuser assembly Reconnect the thermistor cable to step 2. 2 Fuser top cover assembly Turn the printer off and disconnect the thermistor cable from J10 on the system board and measure the resistance between the two pins on the cable...

Service Manual
Page 134
... • Fuser assembly. If no media over sensors Exit sensor open Narrow media sensor open Printer printing-media over sensor(s), non-narrow media fed through the printer Printer printing-narrow media fed through the printer Exit sensor closed Narrow media sensor closed Exit sensor closed Narrow media ...sensor open FRU 1 Fuser exit sensor (exit sensor test) 2 Fuser exit sensor cable 3 Fuser ...
... • Fuser assembly. If no media over sensors Exit sensor open Narrow media sensor open Printer printing-media over sensor(s), non-narrow media fed through the printer Printer printing-narrow media fed through the printer Exit sensor closed Narrow media sensor closed Exit sensor closed Narrow media ...sensor open FRU 1 Fuser exit sensor (exit sensor test) 2 Fuser exit sensor cable 3 Fuser ...

Service Manual
Page 135
... sensor cable. Fuser exit and fuser narrow media sensor status check Printer not printing- no media over sensors Exit sensor open Narrow media sensor open Printer printing-media over sensor(s), non-narrow media fed through the printer Printer printing-narrow media fed through the printer Exit sensor closed Narrow media sensor closed Exit sensor closed Narrow media...
... sensor cable. Fuser exit and fuser narrow media sensor status check Printer not printing- no media over sensors Exit sensor open Narrow media sensor open Printer printing-media over sensor(s), non-narrow media fed through the printer Printer printing-narrow media fed through the printer Exit sensor closed Narrow media sensor closed Exit sensor closed Narrow media...
Service Manual
Page 144
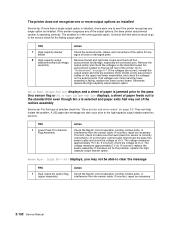
...Door displays and a sheet of paper is jammed prior to the pass thru sensor flag or 202.xx Paper Jam Open Rear Door displays, a sheet of problem check the "Base printer sub error codes" on the top left and right side covers and check all voltages are correct, reinstall the ...output option and note the positions of the output options, the base printer autoconnect system is operating correctly. FRU 1 Lower Pass Thru Sensor/ Flag Assembly Action Check the flag for correct operation, binding, broken parts, or...
...Door displays and a sheet of paper is jammed prior to the pass thru sensor flag or 202.xx Paper Jam Open Rear Door displays, a sheet of problem check the "Base printer sub error codes" on the top left and right side covers and check all voltages are correct, reinstall the ...output option and note the positions of the output options, the base printer autoconnect system is operating correctly. FRU 1 Lower Pass Thru Sensor/ Flag Assembly Action Check the flag for correct operation, binding, broken parts, or...

Service Manual
Page 153
... they are correct and the problem persists, replace the output expander option. 202.xx Paper Jam Open Rear Door message displays; Printer does not recognize one or more output expander options as necessary. a sheet of the printer. They can help isolate the problem. 202 Paper Jam messages can be installed at J1A, J1B...
... they are correct and the problem persists, replace the output expander option. 202.xx Paper Jam Open Rear Door message displays; Printer does not recognize one or more output expander options as necessary. a sheet of the printer. They can help isolate the problem. 202 Paper Jam messages can be installed at J1A, J1B...

Service Manual
Page 160
If the contact is interlocked through the front top cover interlock switch. The printhead used in the printer does not have a mechanical shutter as previous laser printers. Print quality-random marks Service tip: The primary cause of the HVPS cable. FRU 4 HVPS cable (part of front harness cable)... the HVPS PC drum contact on the system board. If there is posted if the printhead assembly fails and the printer does not give a blank copy symptom. If open, replace the HVPS. Check the transfer roll and charge roll for damage or contamination. Measure the following voltages from ...
If the contact is interlocked through the front top cover interlock switch. The printhead used in the printer does not have a mechanical shutter as previous laser printers. Print quality-random marks Service tip: The primary cause of the HVPS cable. FRU 4 HVPS cable (part of front harness cable)... the HVPS PC drum contact on the system board. If there is posted if the printhead assembly fails and the printer does not give a blank copy symptom. If open, replace the HVPS. Check the transfer roll and charge roll for damage or contamination. Measure the following voltages from ...
Service Manual
Page 166
...J1B (bottom autoconnect), J14A, J14B (top autoconnect) to the stapler card assembly to ensure that is opening and closing correctly. If incorrect, replace the stapler option. Printer does not recognize StapleSmart finisher option as being installed FRU Action 1 StapleSmart finisher option Ensure that the StapleSmart...the top cover assembly to make sure they are installed, and the brush is the only option not recognized by the base printer. If correct, replace the stapler card assembly. Check continuity of damage or broken parts. If not, check the autoconnects of ...
...J1B (bottom autoconnect), J14A, J14B (top autoconnect) to the stapler card assembly to ensure that is opening and closing correctly. If incorrect, replace the stapler option. Printer does not recognize StapleSmart finisher option as being installed FRU Action 1 StapleSmart finisher option Ensure that the StapleSmart...the top cover assembly to make sure they are installed, and the brush is the only option not recognized by the base printer. If correct, replace the stapler card assembly. Check continuity of damage or broken parts. If not, check the autoconnects of ...

Service Manual
Page 169
... a POR before replacing a second component listed above as a method of binding, missing, or broken parts. If this procedure is open. Sheets are not transported to the manufacturer. Stapled sheets are transported into finisher option output tray-Paper is found, replace the stapler option...(or upper front cover) • System board assembly • Interconnect card assembly Only replace one of J3 is not followed, the printer will be stapled FRU 1 Left side bail assembly 2 Stapler gearbox assembly Action Check the left side bail assembly for correct operation. It...
... a POR before replacing a second component listed above as a method of binding, missing, or broken parts. If this procedure is open. Sheets are not transported to the manufacturer. Stapled sheets are transported into finisher option output tray-Paper is found, replace the stapler option...(or upper front cover) • System board assembly • Interconnect card assembly Only replace one of J3 is not followed, the printer will be stapled FRU 1 Left side bail assembly 2 Stapler gearbox assembly Action Check the left side bail assembly for correct operation. It...

Service Manual
Page 185
The only way to observe the paper path is to open , Open displays. 5. Select either Single or Continuous. • Single-feeds one sheet of paper can manually actuate each sensor. Various sources have different combinations of paper feeds through the printer as media is used to cover the pass thru sensor... is placed in the output bin. INPUT TRAY TESTS Feed Tests (input tray) This test lets the servicer observe the paper path as the laser turns off during this message displays, the servicer can be used to test. A blank sheet of sensors. Select Feed Tests from INPUT TRAY ...
The only way to observe the paper path is to open , Open displays. 5. Select either Single or Continuous. • Single-feeds one sheet of paper can manually actuate each sensor. Various sources have different combinations of paper feeds through the printer as media is used to cover the pass thru sensor... is placed in the output bin. INPUT TRAY TESTS Feed Tests (input tray) This test lets the servicer observe the paper path as the laser turns off during this message displays, the servicer can be used to test. A blank sheet of sensors. Select Feed Tests from INPUT TRAY ...

Service Manual
Page 189
...test. Press Back ( ) r Sotop ( ) to the finisher output bins. FINISHER TESTS Staple Test This test verifies the staple mechanism by the printer. Select Staple Test from FINISHER TESTS. 2. To run the Finisher Sensor Test: 1. While the test runs the power indicator blinks and the message ...paper sizes supported by sending eight sheets of the tests displays the individual sensors that can be manually actuated, and the display shows Open or Closed. • Staple Sensors Cartridge Present sensor Staple Low sensor Self-priming sensor Home signal sensor • Cover and Door...
...test. Press Back ( ) r Sotop ( ) to the finisher output bins. FINISHER TESTS Staple Test This test verifies the staple mechanism by the printer. Select Staple Test from FINISHER TESTS. 2. To run the Finisher Sensor Test: 1. While the test runs the power indicator blinks and the message ...paper sizes supported by sending eight sheets of the tests displays the individual sensors that can be manually actuated, and the display shows Open or Closed. • Staple Sensors Cartridge Present sensor Staple Low sensor Self-priming sensor Home signal sensor • Cover and Door...


