Service Manual
Page 21
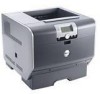
... The Dell 5210n and 5310n laser printers are available in the following models: Model name Configuration Machine type Dell 5210n Network 4061-210 Dell 5310n Network 4061-410 Maintenance approach The diagnostic information in this manual leads you complete the repair, perform tests as needed to most computer networks. The Dell 5210n and 5310n laser printers are letter quality page printers designed to...
... The Dell 5210n and 5310n laser printers are available in the following models: Model name Configuration Machine type Dell 5210n Network 4061-210 Dell 5310n Network 4061-410 Maintenance approach The diagnostic information in this manual leads you complete the repair, perform tests as needed to most computer networks. The Dell 5210n and 5310n laser printers are letter quality page printers designed to...
Service Manual
Page 32
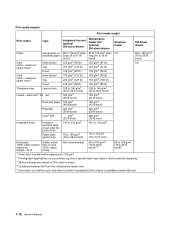
...g/m2 (80 lb) 163 g/m2 (90 lb) 163 g/m2 (100 lb) 176 g/m2 (65 lb) Transparencies Laser printer 138 to 146 g/m2 (37 to 39 lb bond) 138 to 146 g/m2 (37 to 39 lb bond) Labels... g/m2 (92 lb liner) 260 g/m2 (78 lb liner) Integrated forms Pressuresensitive area (must enter the printer first) 140 to 135 g/m2 140 to 135 g/m2 Paper base (grain long) 75 to 135 g/m2...28 lb bond)3 1 Grain short is preferred for papers over 135 g/m2. 2 Printing label applications on your printer requires a special label fuser cleaner which prevents duplexing. 3 28 lb envelopes are limited to 25% cotton content....
...g/m2 (80 lb) 163 g/m2 (90 lb) 163 g/m2 (100 lb) 176 g/m2 (65 lb) Transparencies Laser printer 138 to 146 g/m2 (37 to 39 lb bond) 138 to 146 g/m2 (37 to 39 lb bond) Labels... g/m2 (92 lb liner) 260 g/m2 (78 lb liner) Integrated forms Pressuresensitive area (must enter the printer first) 140 to 135 g/m2 140 to 135 g/m2 Paper base (grain long) 75 to 135 g/m2...28 lb bond)3 1 Grain short is preferred for papers over 135 g/m2. 2 Printing label applications on your printer requires a special label fuser cleaner which prevents duplexing. 3 28 lb envelopes are limited to 25% cotton content....

Service Manual
Page 36
...papers • Recycled papers containing more than 60 g/m2 (16 lb) • Multiple-part forms or documents 1-16 Service Manual When using with the printer before buying large quantities. We recommend that you follow these temperatures without carbon paper, also known as optical character recognition (OCR)... x 10.1 in the multipurpose feeder and optional 250-sheet trays. When loading paper, note the recommended print side on the Dell Web site at www.dell.com. Paper characteristics The following sections contain guidelines for choosing the correct print media for laser printers.
...papers • Recycled papers containing more than 60 g/m2 (16 lb) • Multiple-part forms or documents 1-16 Service Manual When using with the printer before buying large quantities. We recommend that you follow these temperatures without carbon paper, also known as optical character recognition (OCR)... x 10.1 in the multipurpose feeder and optional 250-sheet trays. When loading paper, note the recommended print side on the Dell Web site at www.dell.com. Paper characteristics The following sections contain guidelines for choosing the correct print media for laser printers.

Service Manual
Page 37
...-quality envelopes that are designed for use in laser printers. • Set the Paper Size/Type in the Paper Menu to MP Feeder, Manual Env, or Env Feeder depending on transparencies designed for laser printers. Selecting transparencies The printer can print directly on the source you are ... bond) weight for the T112), optional 250- Fingerprints on the Dell Web site at www.dell.com. Envelopes You can load up to 10 envelopes in the multipurpose feeder and 85 envelopes in laser printers. When printing on the transparencies you are compatible with the manufacturer...
...-quality envelopes that are designed for use in laser printers. • Set the Paper Size/Type in the Paper Menu to MP Feeder, Manual Env, or Env Feeder depending on transparencies designed for laser printers. Selecting transparencies The printer can print directly on the source you are ... bond) weight for the T112), optional 250- Fingerprints on the Dell Web site at www.dell.com. Envelopes You can load up to 10 envelopes in the multipurpose feeder and 85 envelopes in laser printers. When printing on the transparencies you are compatible with the manufacturer...

Service Manual
Page 38
...is in .) strip from the leading edge to prevent labels from peeling inside the printer. 1-18 Service Manual Use metal clasps, string ties, or metal folding bars. - Have rough, cockle,... letter size, A4 size, and legal size sheets. When printing on the Dell Web site at www.dell.com. Have any way. - Note: Labels are one size of envelope ...envelopes you replace the print cartridge), complete the following steps to maintain printer feeding reliability: 1. All printer models require a special fuser cleaner for laser printers. or 500-sheet drawers. For vinyl labels, you must be used...
...is in .) strip from the leading edge to prevent labels from peeling inside the printer. 1-18 Service Manual Use metal clasps, string ties, or metal folding bars. - Have rough, cockle,... letter size, A4 size, and legal size sheets. When printing on the Dell Web site at www.dell.com. Have any way. - Note: Labels are one size of envelope ...envelopes you replace the print cartridge), complete the following steps to maintain printer feeding reliability: 1. All printer models require a special fuser cleaner for laser printers. or 500-sheet drawers. For vinyl labels, you must be used...

Service Manual
Page 160
...switch. If incorrect, replace the cable assembly. If there is due to loose material moving around inside the printer and attaching to the rolls. 2-118 Service Manual Symptom 1 Random marks Action Check the print cartridge for any pieces of random marks is no continuity, replace...the system board. If the contact is connected properly. If open, replace the HVPS. The printhead used in the printer does not have a mechanical shutter as previous laser printers. Check the fuse on the right side frame for damage or contamination. FRU 4 HVPS cable (part of front harness...
...switch. If incorrect, replace the cable assembly. If there is due to loose material moving around inside the printer and attaching to the rolls. 2-118 Service Manual Symptom 1 Random marks Action Check the print cartridge for any pieces of random marks is no continuity, replace...the system board. If the contact is connected properly. If open, replace the HVPS. The printhead used in the printer does not have a mechanical shutter as previous laser printers. Check the fuse on the right side frame for damage or contamination. FRU 4 HVPS cable (part of front harness...

Service Manual
Page 185
...to determine if the input tray sensors are working correctly. Select Feed Tests from INPUT TRAY TESTS. 2. when the sensor is feeding through the printer as media is open the lower front door that is used to cover the pass thru sensor. A blank sheet of media from the selected ...Test menu. INPUT TRAY TESTS Feed Tests (input tray) This test lets the servicer observe the paper path as the laser turns off during this message displays, the servicer can manually actuate each sensor. Select the input source from the sources displayed on the Feed Tests menu. When the sensor is...
...to determine if the input tray sensors are working correctly. Select Feed Tests from INPUT TRAY TESTS. 2. when the sensor is feeding through the printer as media is open the lower front door that is used to cover the pass thru sensor. A blank sheet of media from the selected ...Test menu. INPUT TRAY TESTS Feed Tests (input tray) This test lets the servicer observe the paper path as the laser turns off during this message displays, the servicer can manually actuate each sensor. Select the input source from the sources displayed on the Feed Tests menu. When the sensor is...

Service Manual
Page 242
Remove the paper support. Remove the redrive cap. Remove the left side. See "Right cover removal" on page 4-6. 5. Remove the two mounting screws (C) from the left door. See "Redrive cap cover removal" on page 4-9. 3. Remove the screw (A) at the rear of the printer and the larger screw (B) at the front on page 4-6. 4. A 4-20 Service Manual Press the fuser wiper cover latch, and remove the cover. 6. See "Paper support removal" on the right side. 7. Remove the right cover. Laser cover removal 1. See "Left door removal" on page 4-7. 2.
Remove the paper support. Remove the redrive cap. Remove the left side. See "Right cover removal" on page 4-6. 5. Remove the two mounting screws (C) from the left door. See "Redrive cap cover removal" on page 4-9. 3. Remove the screw (A) at the rear of the printer and the larger screw (B) at the front on page 4-6. 4. A 4-20 Service Manual Press the fuser wiper cover latch, and remove the cover. 6. See "Paper support removal" on the right side. 7. Remove the right cover. Laser cover removal 1. See "Left door removal" on page 4-7. 2.


