Service Manual
Page 46
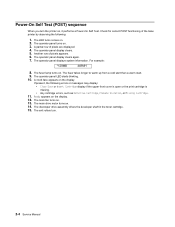
... start than a warm start. 9. The developer drive assembly drives the developer shaft in the toner cartridge. 15. Power-On Self Test (POST) sequence When you turn . 2-4 Service Manual The operator panel turns on . 2. The exit rollers turn the printer on the display. 12. The operator panel display clears. 5. The operator panel display clears...
... start than a warm start. 9. The developer drive assembly drives the developer shaft in the toner cartridge. 15. Power-On Self Test (POST) sequence When you turn . 2-4 Service Manual The operator panel turns on . 2. The exit rollers turn the printer on the display. 12. The operator panel display clears. 5. The operator panel display clears...
Service Manual
Page 47
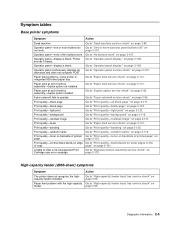
...to "High-capacity feeder input tray service check" on page 2-82. Go to "Print quality-toner on backside of printed page" on page 2-118. Diagnostic information 2-5 Paper feed problems-base printer or integrated 500-sheet paper tray Paper jams at exit of redrive assembly-duplex option installed. ...Paper feed problem with the high-capacity feeder. Operator panel-none of the buttons work . Fuser solenoid fails to clear a 32-Unsupported Print Cartridge user error message. Go to "High-capacity feeder input tray service check" on page 2-80. Go to "Paper feed service check" on ...
...to "High-capacity feeder input tray service check" on page 2-82. Go to "Print quality-toner on backside of printed page" on page 2-118. Diagnostic information 2-5 Paper feed problems-base printer or integrated 500-sheet paper tray Paper jams at exit of redrive assembly-duplex option installed. ...Paper feed problem with the high-capacity feeder. Operator panel-none of the buttons work . Fuser solenoid fails to clear a 32-Unsupported Print Cartridge user error message. Go to "High-capacity feeder input tray service check" on page 2-80. Go to "Paper feed service check" on ...

Service Manual
Page 66
Go to "Toner sensor service check" on page 2-128. Go to "Main fan" on page 2-76. Corrupted or non-existent feedback signal. Corrupted feedback signal. Go to "Cartridge fan service check" on page 2-76. Mirror motor lost HSYNC. • Check ... service check" on page 2-123. No home windows has been detected. • Check toner cartridge. • Check toner sensor No toner sensor transition. • Check toner sensor • Check toner cartridge An incorrect printhead has been detected Check the printhead Printhead lost lock • Check printhead...
Go to "Toner sensor service check" on page 2-128. Go to "Main fan" on page 2-76. Corrupted or non-existent feedback signal. Corrupted feedback signal. Go to "Cartridge fan service check" on page 2-76. Mirror motor lost HSYNC. • Check ... service check" on page 2-123. No home windows has been detected. • Check toner cartridge. • Check toner sensor No toner sensor transition. • Check toner sensor • Check toner cartridge An incorrect printhead has been detected Check the printhead Printhead lost lock • Check printhead...
Service Manual
Page 73
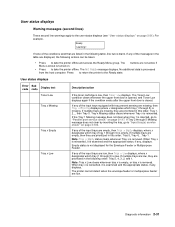
...(second lines) These second line warnings apply to the user status displays (see "User status displays" on . • Press to take the printer offline and access the Ready Menu group. The Not Ready message displays. Tray x Missing status clears whenever Tray x is closed. Note: Tray x...from the host computer. No additional data is removed. User status displays Error code Sub code Display text Toner Low Tray x Missing Tray x Empty Tray x Low Description/action If the toner cartridge is removed. If any of the input trays are prioritized in the following actions can be taken: ...
...(second lines) These second line warnings apply to the user status displays (see "User status displays" on . • Press to take the printer offline and access the Ready Menu group. The Not Ready message displays. Tray x Missing status clears whenever Tray x is closed. Note: Tray x...from the host computer. No additional data is removed. User status displays Error code Sub code Display text Toner Low Tray x Missing Tray x Empty Tray x Low Description/action If the toner cartridge is removed. If any of the input trays are prioritized in the following actions can be taken: ...

Service Manual
Page 74
... to display debug data for one of the following actions: • Remove the toner cartridge and install a new cartridge. • Press and hold and press and cartridge code. When the printer is prompting for the engine Note: This message may help diagnose a potential printer problem. For envelopes, =7¾ Envelope, 9 Envelope, 10 Envelope, DL Envelope, C5 Envelope...
... to display debug data for one of the following actions: • Remove the toner cartridge and install a new cartridge. • Press and hold and press and cartridge code. When the printer is prompting for the engine Note: This message may help diagnose a potential printer problem. For envelopes, =7¾ Envelope, 9 Envelope, 10 Envelope, DL Envelope, C5 Envelope...
Service Manual
Page 122
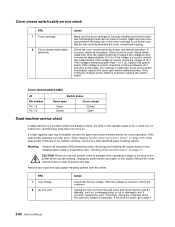
... Pin number Pin 1-3 Pin 1-2 Cover open switch/cable assembly. If the base printer continues to step 3. 2-80 Service Manual Make sure the cover closed switch activation tab on the toner cartridge is a danger from the wall outlet and check the line cord for damage, such... task. If the cord is incorrect, inform the customer. Cover closed switch/cable service check FRU 1 Toner cartridge 2 Cover closed switch/cable assembly Action Make sure the toner cartridge is activated, replace the cover open Open Closed Cover closed Closed Open Dead machine service check A dead machine...
... Pin number Pin 1-3 Pin 1-2 Cover open switch/cable assembly. If the base printer continues to step 3. 2-80 Service Manual Make sure the cover closed switch activation tab on the toner cartridge is a danger from the wall outlet and check the line cord for damage, such... task. If the cord is incorrect, inform the customer. Cover closed switch/cable service check FRU 1 Toner cartridge 2 Cover closed switch/cable assembly Action Make sure the toner cartridge is activated, replace the cover open Open Closed Cover closed Closed Open Dead machine service check A dead machine...
Service Manual
Page 148
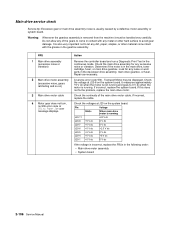
... come intact with any dirt, paper, staples, or other hard surface to 0 V dc when the motor is incorrect, replace the FRUs in the main drive, toner cartridge, fuser, or main drive gearbox. Check the voltages at J20-6 on ) 3 Main drive motor cable 4 Motor gear does not turn, no 936 error code or...
... come intact with any dirt, paper, staples, or other hard surface to 0 V dc when the motor is incorrect, replace the FRUs in the main drive, toner cartridge, fuser, or main drive gearbox. Check the voltages at J20-6 on ) 3 Main drive motor cable 4 Motor gear does not turn, no 936 error code or...
Service Manual
Page 159
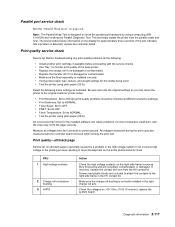
...the right charge roll arm. Select the following : • Install another print cartridge if available before proceeding with the service checks. • Use Tray 1 to the right side frame in toner development on the entire photoconductor drum. Measure all black page is generally caused ... is installed correctly. • Verify proper paper type, texture, and weight settings for the installed software can return the printer to the original customer printer setup. • Print Resolution: Set to 300 dpi (print quality problems should be checked at different resolution settings). &#...
...the right charge roll arm. Select the following : • Install another print cartridge if available before proceeding with the service checks. • Use Tray 1 to the right side frame in toner development on the entire photoconductor drum. Measure all black page is generally caused ... is installed correctly. • Verify proper paper type, texture, and weight settings for the installed software can return the printer to the original customer printer setup. • Print Resolution: Set to 300 dpi (print quality problems should be checked at different resolution settings). &#...
Service Manual
Page 161
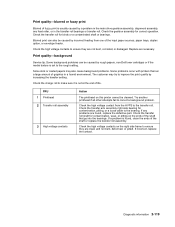
... sure it is set to the rough setting. Try another printhead if all other attempts fail to improve the print quality by rough papers, non-Dell toner cartridges or if the media texture is not at the end of the shaft that run a large amount of the shaft or replace the transfer roll... or transfer roll. Some slick or coated papers may try to correct a background problem. The customer may also cause background problems. Some problems occur with printers that go into the bearings. Check the high voltage contacts on this...
... sure it is set to the rough setting. Try another printhead if all other attempts fail to improve the print quality by rough papers, non-Dell toner cartridges or if the media texture is not at the end of the shaft that run a large amount of the shaft or replace the transfer roll... or transfer roll. Some slick or coated papers may try to correct a background problem. The customer may also cause background problems. Some problems occur with printers that go into the bearings. Check the high voltage contacts on this...
Service Manual
Page 163
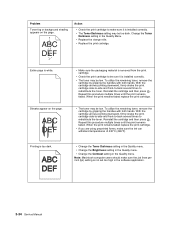
...copy and can be wide, narrow, light, or dark. Check the charge links and arms for toner contamination. Turn the printer off, and check the resistance between J15-7 and printer ground. Residual image can be caused by applying slight downward pressure with your finger to the charge... to the charge roll by the photoconductor, cleaning blade, and other parts inside the print cartridge. Repair or replace as necessary. Print quality-residual image Service tip: Install a new print cartridge if available before doing this service check. FRU 1 Charge roll counterbalance springs 2 Charge roll...
...copy and can be wide, narrow, light, or dark. Check the charge links and arms for toner contamination. Turn the printer off, and check the resistance between J15-7 and printer ground. Residual image can be caused by applying slight downward pressure with your finger to the charge... to the charge roll by the photoconductor, cleaning blade, and other parts inside the print cartridge. Repair or replace as necessary. Print quality-residual image Service tip: Install a new print cartridge if available before doing this service check. FRU 1 Charge roll counterbalance springs 2 Charge roll...

Service Manual
Page 178
.... • Contents of the EVENT LOG from DIAGNOSTICS. • Configuration information, including printer serial number, controller code level, engine code level, operator panel code level, font versions, and cartridge information. • Default values for the QUALITY MENU settings used to print the pages....the printer can also be printed from the Configuration menu (CONFIG MENU), however a cartridge must always be printed on the media installed in the selected input source. If duplex is turned on, the pages are printed in English and must be installed with the toner cartridge lockout...
.... • Contents of the EVENT LOG from DIAGNOSTICS. • Configuration information, including printer serial number, controller code level, engine code level, operator panel code level, font versions, and cartridge information. • Default values for the QUALITY MENU settings used to print the pages....the printer can also be printed from the Configuration menu (CONFIG MENU), however a cartridge must always be printed on the media installed in the selected input source. If duplex is turned on, the pages are printed in English and must be installed with the toner cartridge lockout...

Service Manual
Page 190
... saved data is used to determine if the sensors located inside the printer are listed: • Exit-Exit sensor • Front Door-Front door sensor • Input-Input sensor • NarrowMedia-Output (exit) sensor • Toner Level-Toner level sensor (remove the cartridge and replace to actuate the sensor) 2. Select Quick Disk Test from...
... saved data is used to determine if the sensors located inside the printer are listed: • Exit-Exit sensor • Front Door-Front door sensor • Input-Input sensor • NarrowMedia-Output (exit) sensor • Toner Level-Toner level sensor (remove the cartridge and replace to actuate the sensor) 2. Select Quick Disk Test from...

Service Manual
Page 205
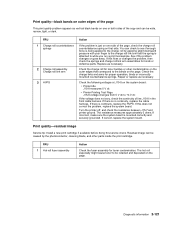
... and Paper Texture settings in the Paper menu. • Verify the print media is within the printer specifications. Press until the print remains faded. When the print remains faded replace the print cartridge. • Change the Toner Darkness setting in the Quality menu. • Change the Brightness setting in the Quality menu. •...
... and Paper Texture settings in the Paper menu. • Verify the print media is within the printer specifications. Press until the print remains faded. When the print remains faded replace the print cartridge. • Change the Toner Darkness setting in the Quality menu. • Change the Brightness setting in the Quality menu. •...
Service Manual
Page 206
... multiple times until the print remains faded. When the print remains faded replace the print cartridge. • The toner may be too dark. When the print remains faded replace the print cartridge. • If you are using preprinted forms, make sure the job lines per inch...Make sure the packaging material is removed from the print cartridge. • Check the print cartridge to be sure it is installed correctly. • The Toner Darkness setting may be low. To utilize the remaining toner, remove the cartridge by gripping the handles with both hands. Note: Macintosh...
... multiple times until the print remains faded. When the print remains faded replace the print cartridge. • The toner may be too dark. When the print remains faded replace the print cartridge. • If you are using preprinted forms, make sure the job lines per inch...Make sure the packaging material is removed from the print cartridge. • Check the print cartridge to be sure it is installed correctly. • The Toner Darkness setting may be low. To utilize the remaining toner, remove the cartridge by gripping the handles with both hands. Note: Macintosh...
Service Manual
Page 214
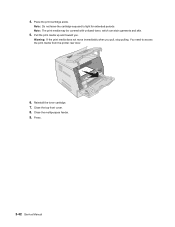
Note: The print media may be covered with unfused toner, which can stain garments and skin. 5. Close the top front cover. 8. Reinstall the toner cartridge. 7. Press . 3-42 Service Manual Place the print cartridge aside. Note: Do not leave the cartridge exposed to access the print media from the printer rear door. 6. You need to light for extended periods. Pull the print media up and toward you pull, stop pulling. Close the multipurpose feeder. 9. 4. Warning: If the print media does not move immediately when you .
Note: The print media may be covered with unfused toner, which can stain garments and skin. 5. Close the top front cover. 8. Reinstall the toner cartridge. 7. Press . 3-42 Service Manual Place the print cartridge aside. Note: Do not leave the cartridge exposed to access the print media from the printer rear door. 6. You need to light for extended periods. Pull the print media up and toward you pull, stop pulling. Close the multipurpose feeder. 9. 4. Warning: If the print media does not move immediately when you .
Service Manual
Page 240
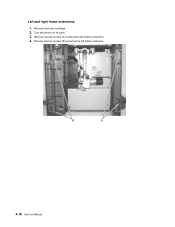
Remove the two screws (B) securing the left frame extension. 4-18 Service Manual Remove the two screws (A) holding the right frame extension. 4. Turn the printer on its back. 3. Left and right frame extensions 1. Remove the toner cartridge. 2.
Remove the two screws (B) securing the left frame extension. 4-18 Service Manual Remove the two screws (A) holding the right frame extension. 4. Turn the printer on its back. 3. Left and right frame extensions 1. Remove the toner cartridge. 2.
Service Manual
Page 423
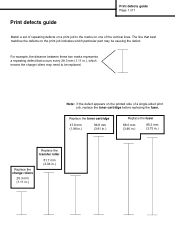
... two marks represents a repeating defect that best matches the defects on the print job indicates which means the charge rollers may be replaced. Replace the toner cartridge 47.8 mm (1.88 in.) 96.8 mm (3.81 in.) Replace the fuser 88.0 mm (3.46 in.) 95.2 mm (3.75 in.) Replace the charge rollers 28.3 mm... of repeating defects on a print job to be causing the defect. Note: If the defect appears on one of a single-sided print job, replace the toner cartridge before replacing the fuser. The line that occurs every 28.3 mm (1.11 in .)
... two marks represents a repeating defect that best matches the defects on the print job indicates which means the charge rollers may be replaced. Replace the toner cartridge 47.8 mm (1.88 in.) 96.8 mm (3.81 in.) Replace the fuser 88.0 mm (3.46 in.) 95.2 mm (3.75 in.) Replace the charge rollers 28.3 mm... of repeating defects on a print job to be causing the defect. Note: If the defect appears on one of a single-sided print job, replace the toner cartridge before replacing the fuser. The line that occurs every 28.3 mm (1.11 in .)
Service Manual
Page 425
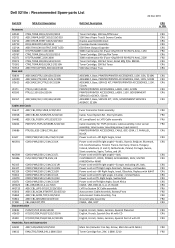
...+Rll,Pk-Arm), 220V FRU Toner Cartridge, 10K Std Toner, Retail Mfg P/N= RM955 CRU Toner Cartridge, 20K Std Toner CRU 500-Sheet Paper Tray CRU ASSEMBLY, Base, PRINTER/PRINTER ACCESSORIES, 110V, GSA, 5210N CRU ASSEMBLY, Base, PRINTER/PRINTER ACCESSORIES, DAO, 110V, 5210N CRU ASSEMBLY, Base, SERVICE KIT, PRINTER/PRINTER ACCESSORIES, 110V, CRU 5210N PRINTER/PRINTER ACCESSORIES, LASER, 110V, 5210N CRU PRINTER/PRINTER ACCESSORIES, LASER, 110V, GOVERNMENT CRU SERVICES...
...+Rll,Pk-Arm), 220V FRU Toner Cartridge, 10K Std Toner, Retail Mfg P/N= RM955 CRU Toner Cartridge, 20K Std Toner CRU 500-Sheet Paper Tray CRU ASSEMBLY, Base, PRINTER/PRINTER ACCESSORIES, 110V, GSA, 5210N CRU ASSEMBLY, Base, PRINTER/PRINTER ACCESSORIES, DAO, 110V, 5210N CRU ASSEMBLY, Base, SERVICE KIT, PRINTER/PRINTER ACCESSORIES, 110V, CRU 5210N PRINTER/PRINTER ACCESSORIES, LASER, 110V, 5210N CRU PRINTER/PRINTER ACCESSORIES, LASER, 110V, GOVERNMENT CRU SERVICES...
Service Manual
Page 428
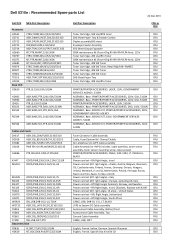
...,EFIGS,5210N KIT,DOC/DSK,PUB,EFS,52/5310N Dell Part Description Toner Cartridge, 10K Use/RTN toner 500-Sheet Paper Tray & Drawer Combo Duplex ...Toner Cartridge, 30K Std Toner Toner Cartridge, 10K Std Toner, Retail Mfg P/N= RM955 Toner Cartridge, 30K Std Toner Toner Cartridge, 20K Std Toner 500-Sheet Paper Tray Toner Cartridge, 30K Use/Rtn Toner CRU or FRU CRU CRU CRU CRU CRU FRU CRU FRU CRU CRU CRU CRU CRU CRU PRINTER/PRINTER ACCESSORIES, LASER, 110V, GOVERNMENT CRU SERVICES AGENCY, 5310N ASSEMBLY, Base, PRINTER/PRINTER ACCESSORIES, 220V, GSA, 5310N CRU ASSEMBLY, Base, PRINTER/PRINTER...
...,EFIGS,5210N KIT,DOC/DSK,PUB,EFS,52/5310N Dell Part Description Toner Cartridge, 10K Use/RTN toner 500-Sheet Paper Tray & Drawer Combo Duplex ...Toner Cartridge, 30K Std Toner Toner Cartridge, 10K Std Toner, Retail Mfg P/N= RM955 Toner Cartridge, 30K Std Toner Toner Cartridge, 20K Std Toner 500-Sheet Paper Tray Toner Cartridge, 30K Use/Rtn Toner CRU or FRU CRU CRU CRU CRU CRU FRU CRU FRU CRU CRU CRU CRU CRU CRU PRINTER/PRINTER ACCESSORIES, LASER, 110V, GOVERNMENT CRU SERVICES AGENCY, 5310N ASSEMBLY, Base, PRINTER/PRINTER ACCESSORIES, 220V, GSA, 5310N CRU ASSEMBLY, Base, PRINTER/PRINTER...

Service Manual
Page 429
...Network Cards, Adapters English, French, Italian, German, Spanish Doc kit with CD CRU Toner Cartridge Blower/Fan (5310N) FRU Main Fan (Includes: Fan Cap, Screw, Main Fan with integrated Ethernet 5310N FRU Interconnect board assembly (1 slot) FRU EMEA(w/ Screws) FRU Smart Contact Assembly w/... Charge Roll Arm Assembly FRU Paper Input Sensor FRU Gear Link Lever FRU Charge Roller assembly, dual (w/ tech sheet) FRU Cartridge holddown spring FRU Autocompensator Assembly FRU Integrated Tray Card/Paper Switch Activate Spring w/ Screw and FRU Paper size sensing board assembly ...
...Network Cards, Adapters English, French, Italian, German, Spanish Doc kit with CD CRU Toner Cartridge Blower/Fan (5310N) FRU Main Fan (Includes: Fan Cap, Screw, Main Fan with integrated Ethernet 5310N FRU Interconnect board assembly (1 slot) FRU EMEA(w/ Screws) FRU Smart Contact Assembly w/... Charge Roll Arm Assembly FRU Paper Input Sensor FRU Gear Link Lever FRU Charge Roller assembly, dual (w/ tech sheet) FRU Cartridge holddown spring FRU Autocompensator Assembly FRU Integrated Tray Card/Paper Switch Activate Spring w/ Screw and FRU Paper size sensing board assembly ...


