
User's Guide
Page 2
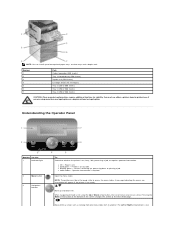
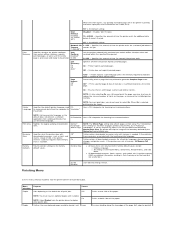
... You can install up to another. Understanding the Operator Panel Number: Use the: 1 Indicator light 2 Menu button 3 Navigation buttons To: Determine whether the printer is not ready. l Off - l Solid amber - A message indicating the menus are using the Up or Down arrow button, the cursor moves one input... option. Move within a screen such as moving from one menu index item to four optional paper trays, or three trays and a duplex unit. Printer is warming up and down lists. When navigating through a list using more than one line at the bottom of the screen changes the...
... You can install up to another. Understanding the Operator Panel Number: Use the: 1 Indicator light 2 Menu button 3 Navigation buttons To: Determine whether the printer is not ready. l Off - l Solid amber - A message indicating the menus are using the Up or Down arrow button, the cursor moves one input... option. Move within a screen such as moving from one menu index item to four optional paper trays, or three trays and a duplex unit. Printer is warming up and down lists. When navigating through a list using more than one line at the bottom of the screen changes the...
User's Guide
Page 15
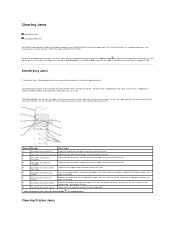
...to do occur, follow the steps outlined in this section. The printer prints a new copy of the page that print media travels through the printer. Identifying Jams If the printer jams, the appropriate jam message will print. Open the rear duplex door, and remove the jam. 9 24x Paper Jam Check ...remove the print cartridge, and then remove the jam. 5 23x Paper Jam Open Duplex Open the rear duplex door, and then remove the jam. The jam message indicates the area where the jam occurred. Clearing Printer Jams However, it properly, you are using. The following illustration shows the path...
...to do occur, follow the steps outlined in this section. The printer prints a new copy of the page that print media travels through the printer. Identifying Jams If the printer jams, the appropriate jam message will print. Open the rear duplex door, and remove the jam. 9 24x Paper Jam Check ...remove the print cartridge, and then remove the jam. 5 23x Paper Jam Open Duplex Open the rear duplex door, and then remove the jam. The jam message indicates the area where the jam occurred. Clearing Printer Jams However, it properly, you are using. The following illustration shows the path...
User's Guide
Page 16
... be hot. To go to cool before touching any internal components. 3. Allow the printer to a specific jam, see Identifying Jams. 200 and 201 Paper Jam Remove Cartridge 1. Jams in the input options or the duplex tray. NOTICE: Do not touch the photoconductor drum on the underside of the... printer occur in the front of the cartridge. Paper jams can occur in three areas: the front of the...
... be hot. To go to cool before touching any internal components. 3. Allow the printer to a specific jam, see Identifying Jams. 200 and 201 Paper Jam Remove Cartridge 1. Jams in the input options or the duplex tray. NOTICE: Do not touch the photoconductor drum on the underside of the... printer occur in the front of the cartridge. Paper jams can occur in three areas: the front of the...
User's Guide
Page 19
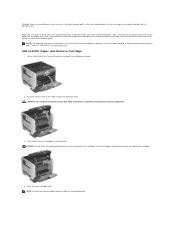
Open the duplex rear door. 2. To clear these areas can occur on the media location, pull the media either up or down. 3. Make sure it snaps into place. 4. Depending on the incline surface of a tray or across more than one tray. Press the Select button . 23x and 24x Jams Paper jams in these areas: 1. 23x Paper Jam Open Duplex Rear Door 1. Close the duplex rear door. Open the printer paper tray, and remove any jammed media. Remove the jammed media.
Open the duplex rear door. 2. To clear these areas can occur on the media location, pull the media either up or down. 3. Make sure it snaps into place. 4. Depending on the incline surface of a tray or across more than one tray. Press the Select button . 23x and 24x Jams Paper jams in these areas: 1. 23x Paper Jam Open Duplex Rear Door 1. Close the duplex rear door. Open the printer paper tray, and remove any jammed media. Remove the jammed media.
User's Guide
Page 20
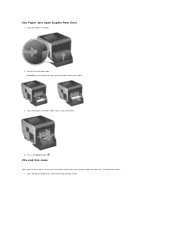
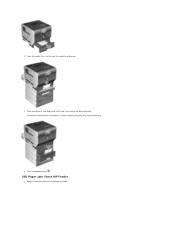
If it does not pull easily one way, try the other way. 4. Remove the paper from the multipurpose feeder. Open any optional trays beginning at the top, and remove any jammed media. Press the Select button . 250 Paper Jam Check MP Feeder 1. Open the duplex tray, and remove the media by pulling up or down. Pull the print media either up . 3. 2.
If it does not pull easily one way, try the other way. 4. Remove the paper from the multipurpose feeder. Open any optional trays beginning at the top, and remove any jammed media. Press the Select button . 250 Paper Jam Check MP Feeder 1. Open the duplex tray, and remove the media by pulling up or down. Pull the print media either up . 3. 2.
User's Guide
Page 32
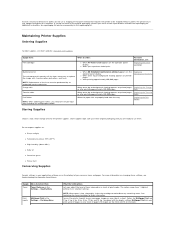
... are 2 Up, 3 Up, 4 Up, 6 Up, 9 Up, 12 Up, and 16 Up. Causes the printer to 10 (darkest setting). Combined with the duplex setting, Multipage Print lets you print up in your local service representative to redistribute any remaining toner. Supply item: Print ...Conserving Supplies Several settings in their original packaging until you experience faded print. Maintaining Printer Supplies Ordering Supplies To order supplies, visit Dell's website: www.dell.com/supplies. Values for the printer supplies. Do not use them. NOTE: When toner is low appears on one...
... are 2 Up, 3 Up, 4 Up, 6 Up, 9 Up, 12 Up, and 16 Up. Causes the printer to 10 (darkest setting). Combined with the duplex setting, Multipage Print lets you print up in your local service representative to redistribute any remaining toner. Supply item: Print ...Conserving Supplies Several settings in their original packaging until you experience faded print. Maintaining Printer Supplies Ordering Supplies To order supplies, visit Dell's website: www.dell.com/supplies. Values for the printer supplies. Do not use them. NOTE: When toner is low appears on one...

User's Guide
Page 33
...it side-to-side and front-to-back several times to send a Verify Print job. Duplex in a busy state. It lets you can cancel the job. You can also view the toner level in the printer on the front of paper. You can still print for more information about a Verify ...faded, replace the toner cartridge. Lets you install an optional duplex unit. Press the Down arrow button until the print remains faded. Repeat this message is printing or in the Settings® Finishing Menu Use your software application or printer driver to redistribute the toner, reinsert it is available when...
...it side-to-side and front-to-back several times to send a Verify Print job. Duplex in a busy state. It lets you can cancel the job. You can also view the toner level in the printer on the front of paper. You can still print for more information about a Verify ...faded, replace the toner cartridge. Lets you install an optional duplex unit. Press the Down arrow button until the print remains faded. Repeat this message is printing or in the Settings® Finishing Menu Use your software application or printer driver to redistribute the toner, reinsert it is available when...
User's Guide
Page 44
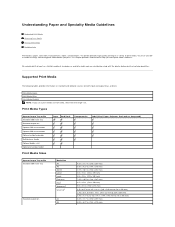
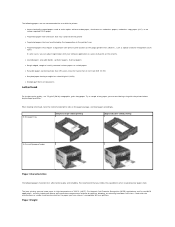
...or Bin Standard 500-sheet tray Standard output bin Optional 250-sheet drawer Optional 500-sheet drawer Optional output expander Multipurpose feeder Optional duplex unit Optional envelope feeder Print Media Sizes Paper Card Stock Transparencies Label (Vinyl, Paper, Polyester, Dual-web, or Integrated) ... Supported Print Media Selecting Print Media Storing Print Media Avoiding Jams Print media is paper, card stock, transparencies, labels, and envelopes. The printer provides high quality printing on standard and optional sources for both input and output trays and bins. to 8.5 x 14 in . You ...
...or Bin Standard 500-sheet tray Standard output bin Optional 250-sheet drawer Optional 500-sheet drawer Optional output expander Multipurpose feeder Optional duplex unit Optional envelope feeder Print Media Sizes Paper Card Stock Transparencies Label (Vinyl, Paper, Polyester, Dual-web, or Integrated) ... Supported Print Media Selecting Print Media Storing Print Media Avoiding Jams Print media is paper, card stock, transparencies, labels, and envelopes. The printer provides high quality printing on standard and optional sources for both input and output trays and bins. to 8.5 x 14 in . You ...
User's Guide
Page 45
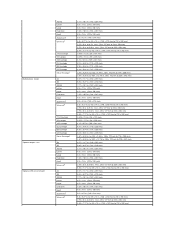
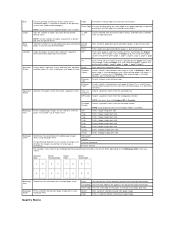
... mm) 8.5 x 13 in. (216 x 330 mm) 2.75 x 5 in . to 9.01 x 12.76 in. (98 x 162 mm to 216 x 356 mm) 2.75 x 5 in . Multipurpose feeder Optional duplex unit Optional 250-sheet drawer JIS B5 Letter Legal Executive Folio1 Statement1 Universal2 7 ¾ Envelope 9 Envelope 10 Envelope DL Envelope B5 Envelope C5 Envelope Other...
... mm) 8.5 x 13 in. (216 x 330 mm) 2.75 x 5 in . to 9.01 x 12.76 in. (98 x 162 mm to 216 x 356 mm) 2.75 x 5 in . Multipurpose feeder Optional duplex unit Optional 250-sheet drawer JIS B5 Letter Legal Executive Folio1 Statement1 Universal2 7 ¾ Envelope 9 Envelope 10 Envelope DL Envelope B5 Envelope C5 Envelope Other...
User's Guide
Page 48
...Duplex (double-sided) printing In the multipurpose feeder Paper Characteristics The following papers are considering using with your software application to withstand these guidelines when evaluating new paper stock. Check with the manufacturer or vendor to determine whether the paper you are not recommended for use with the printer... temperature in the printer fuser l Preprinted papers that require a registration (the precise print location on the paper package, and load paper accordingly. For Magnetic Ink Character Recognition (MICR) applications and for laser printers. Try a sample...
...Duplex (double-sided) printing In the multipurpose feeder Paper Characteristics The following papers are considering using with your software application to withstand these guidelines when evaluating new paper stock. Check with the manufacturer or vendor to determine whether the paper you are not recommended for use with the printer... temperature in the printer fuser l Preprinted papers that require a registration (the precise print location on the paper package, and load paper accordingly. For Magnetic Ink Character Recognition (MICR) applications and for laser printers. Try a sample...
User's Guide
Page 52
... media stored in the same print media source. l If a jam occurs, clear the entire media path. If jams do occur with the printer before you load it properly, you can help ensure trouble-free printing. l Make sure the guides in the source according to help you have...print media before purchasing large quantities. Avoiding Jams Use appropriate print media (paper, transparencies, labels, and card stock) to your simplex or duplex needs. By selecting the appropriate print media and loading it . Make sure the stack height does not exceed the maximum height indicated by the...
... media stored in the same print media source. l If a jam occurs, clear the entire media path. If jams do occur with the printer before you load it properly, you can help ensure trouble-free printing. l Make sure the guides in the source according to help you have...print media before purchasing large quantities. Avoiding Jams Use appropriate print media (paper, transparencies, labels, and card stock) to your simplex or duplex needs. By selecting the appropriate print media and loading it . Make sure the stack height does not exceed the maximum height indicated by the...
User's Guide
Page 55
... Light Normal* Heavy Light Shown if Card Stock is installed. NOTE: Paper Loading is only available if a duplex unit is supported in a specific input source. This allows the printer to set the media texture for the media weight. Heavy Paper Loading This menu selection is used to optimize ...the print quality for each of the defined media types. You can then use your application software to set the paper weight for duplex printing. Menu...
... Light Normal* Heavy Light Shown if Card Stock is installed. NOTE: Paper Loading is only available if a duplex unit is supported in a specific input source. This allows the printer to set the media texture for the media weight. Heavy Paper Loading This menu selection is used to optimize ...the print quality for each of the defined media types. You can then use your application software to set the paper weight for duplex printing. Menu...
User's Guide
Page 56
... is the US default, and 216 mm is the international default. Properly handles preprinted custom paper whether the job is a duplexed Duplex Shown if the custom type is full, the printer starts filling the next linked bin, and continues with each custom paper type. Sets the portrait width of Measure setting; 14...Custom Type available in the input source you want your printed material to go to define a name for duplex and n-up. NOTE: If the value set exceeds the maximum width, the printer will be supported in the Paper Type menu. l If two or more bins together as though they ...
... is the US default, and 216 mm is the international default. Properly handles preprinted custom paper whether the job is a duplexed Duplex Shown if the custom type is full, the printer starts filling the next linked bin, and continues with each custom paper type. Sets the portrait width of Measure setting; 14...Custom Type available in the input source you want your printed material to go to define a name for duplex and n-up. NOTE: If the value set exceeds the maximum width, the printer will be supported in the Paper Type menu. l If two or more bins together as though they ...
User's Guide
Page 59
...printing may also have an optional duplex unit installed. Values: Off* Duplex NOTE: You must have to duplex only specific jobs. On - Specifies what the printer does with the inactive printer language. Returns printer settings to define how the printer delivers the printed output. Successfully prints...l All downloaded resources (fonts, macros, and symbol sets) in printer memory (RAM) are returned to hold the page is printed, and other printer tasks. Menu selection: Duplex Purpose: Sets duplexing as fonts and macros stored in flash memory or on the hard...
...printing may also have an optional duplex unit installed. Values: Off* Duplex NOTE: You must have to duplex only specific jobs. On - Specifies what the printer does with the inactive printer language. Returns printer settings to define how the printer delivers the printed output. Successfully prints...l All downloaded resources (fonts, macros, and symbol sets) in printer memory (RAM) are returned to hold the page is printed, and other printer tasks. Menu selection: Duplex Purpose: Sets duplexing as fonts and macros stored in flash memory or on the hard...
User's Guide
Page 60
...Vertical The positioning depends on the number of the page (top edge for portrait orientation and left edge for landscape orientation). Auto* Lets the printer choose between jobs. Solid Prints a solid line border around each copy of a job. Sets the number of copies you select: Multipage ... a blank page is inserted between each collated copy of the job. Quality Menu Multipage Print Multipage Order NOTE: You must have an optional duplex unit installed. Off* 2 Up Prints 1 page image per side. Bind Copies how the printing on the back of the sheet (evennumbered ...
...Vertical The positioning depends on the number of the page (top edge for portrait orientation and left edge for landscape orientation). Auto* Lets the printer choose between jobs. Solid Prints a solid line border around each copy of a job. Sets the number of copies you select: Multipage ... a blank page is inserted between each collated copy of the job. Quality Menu Multipage Print Multipage Order NOTE: You must have an optional duplex unit installed. Off* 2 Up Prints 1 page image per side. Bind Copies how the printing on the back of the sheet (evennumbered ...
User's Guide
Page 68
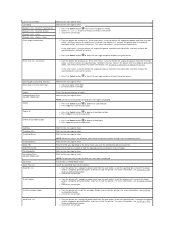
... 54 Network software error 54 Standard network software error Press the Select button to Disabled. For more information, see Installing Printer Memory. Turn the printer on . 59 Incompatible duplex l Remove the duplex unit. The printer discards any data received through the USB port. Remove the excess flash memory. 3. l Press the Select button to clear the...
... 54 Network software error 54 Standard network software error Press the Select button to Disabled. For more information, see Installing Printer Memory. Turn the printer on . 59 Incompatible duplex l Remove the duplex unit. The printer discards any data received through the USB port. Remove the excess flash memory. 3. l Press the Select button to clear the...
User's Guide
Page 70
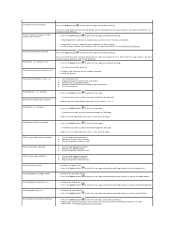
...DO NOT POWER OFF Hex Trace Insert Tray Install bin Wait for the message to clear. Wait for the message to clear. Install duplex l Turn the printer off and back on . l Cancel the current job. Reattach the tray, connect the power cord to a properly grounded outlet, and...the message to clear. l Cancel the current job. For more information, see Installing a Duplex Unit. For more information, see Installing an Envelope Feeder. Wait for the message to clear. l Turn the printer off , unplug the power cord from the wall outlet, install the specified bin, connect the...
...DO NOT POWER OFF Hex Trace Insert Tray Install bin Wait for the message to clear. Wait for the message to clear. Install duplex l Turn the printer off and back on . l Cancel the current job. Reattach the tray, connect the power cord to a properly grounded outlet, and...the message to clear. l Cancel the current job. For more information, see Installing a Duplex Unit. For more information, see Installing an Envelope Feeder. Wait for the message to clear. l Turn the printer off , unplug the power cord from the wall outlet, install the specified bin, connect the...
User's Guide
Page 89
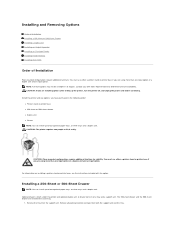
...be available in the following order: l Printer stand or printer base l 250-sheet or 500-sheet drawer l Duplex unit l Printer NOTE: You can install up the printer, turn the printer off, and unplug the power cord before continuing. CAUTION: The printer requires two people to determine furniture availability.... or a duplex unit and an input option. For information on installing a printer stand or printer base, see the instructions included with the option. You must use either a printer stand or printer base if you are installed the same way. 1. Contact your Dell Sales Representative to...
...be available in the following order: l Printer stand or printer base l 250-sheet or 500-sheet drawer l Duplex unit l Printer NOTE: You can install up the printer, turn the printer off, and unplug the power cord before continuing. CAUTION: The printer requires two people to determine furniture availability.... or a duplex unit and an input option. For information on installing a printer stand or printer base, see the instructions included with the option. You must use either a printer stand or printer base if you are installed the same way. 1. Contact your Dell Sales Representative to...
User's Guide
Page 90
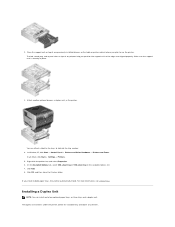
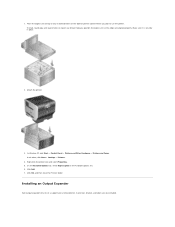
...Start® Settings® Printers. 5. Click OK, and then close the Printers folder. The duplex unit attaches under the printer, below the standard tray and above any previously installed drawers or the table or printer cabinet where you plan to use the printer. On the Installed Options tab...to four optional paper trays, or three trays and a duplex unit. In Windows XP, click Start® Control Panel® Printers and Other Hardware® Printers and Faxes. Attach another optional drawer, a duplex unit, or the printer. Place the support unit on top of any drawers. The...
...Start® Settings® Printers. 5. Click OK, and then close the Printers folder. The duplex unit attaches under the printer, below the standard tray and above any previously installed drawers or the table or printer cabinet where you plan to use the printer. On the Installed Options tab...to four optional paper trays, or three trays and a duplex unit. In Windows XP, click Start® Control Panel® Printers and Other Hardware® Printers and Faxes. Attach another optional drawer, a duplex unit, or the printer. Place the support unit on top of any drawers. The...
User's Guide
Page 91
... are aligned properly. On the Installed Options tab, select Duplex option in place. 2. Make sure it is securely in the Available Options list. 6. In all others, click Start® Settings® Printers. 4. Click OK, and then close the Printers folder. In Windows XP, click Start® Control Panel...any drawer help you plan to use the printer. Click Add. 7. The tab, round peg, and square holes on top of a support and a removable bin. Right-click the printer icon and select Properties. 5. Attach the printer. 3. 1. Place the duplex unit on top of any installed drawers or...
... are aligned properly. On the Installed Options tab, select Duplex option in place. 2. Make sure it is securely in the Available Options list. 6. In all others, click Start® Settings® Printers. 4. Click OK, and then close the Printers folder. In Windows XP, click Start® Control Panel...any drawer help you plan to use the printer. Click Add. 7. The tab, round peg, and square holes on top of a support and a removable bin. Right-click the printer icon and select Properties. 5. Attach the printer. 3. 1. Place the duplex unit on top of any installed drawers or...


