
OwnersManual.book
Page 6
www.dell.com/supplies | support.dell.com 5 Using Your Printer 33 Changing Printer Settings 34 Initializing NVRAM ...35 Setting of Panel Lock 35 Adjusting the Language 36 Printing a Job ...36 Canceling a Job From the Printer Operator Panel 36 Canceling the Job From a Computer 36 Canceling a Job From... the Used Toner Cartridge 43 Installing the New Toner Cartridge 44 Replacing the Transfer Roller 47 Removing the Used Transfer Roller 47 Installing the New Transfer Roller 48 Replacing the Fuser and Separator Roller 50 Removing the Used Fuser 50 Installing the New Fuser 52 Removing the...
www.dell.com/supplies | support.dell.com 5 Using Your Printer 33 Changing Printer Settings 34 Initializing NVRAM ...35 Setting of Panel Lock 35 Adjusting the Language 36 Printing a Job ...36 Canceling a Job From the Printer Operator Panel 36 Canceling the Job From a Computer 36 Canceling a Job From... the Used Toner Cartridge 43 Installing the New Toner Cartridge 44 Replacing the Transfer Roller 47 Removing the Used Transfer Roller 47 Installing the New Transfer Roller 48 Replacing the Fuser and Separator Roller 50 Removing the Used Fuser 50 Installing the New Fuser 52 Removing the...

OwnersManual.book
Page 39
Section 6 Maintenance Replacing the Imaging Drum Replacing the Toner Cartridge Replacing the Transfer Roller Replacing the Fuser and Separator Roller Cleaning the Automatic Density Control (ADC) Sensor 6 Maintenance
Section 6 Maintenance Replacing the Imaging Drum Replacing the Toner Cartridge Replacing the Transfer Roller Replacing the Fuser and Separator Roller Cleaning the Automatic Density Control (ADC) Sensor 6 Maintenance

OwnersManual.book
Page 41
... CAUTION: Do not touch inside the printer with the slots in this area. Remove the protective cover from your hands. Please cover the removed imaging drum by a newspaper or so not to remove parts in front of the light-sensitive drum surface (green-colored roller) or the transfer roller (black-colored roller). Holding the imaging drum by...
... CAUTION: Do not touch inside the printer with the slots in this area. Remove the protective cover from your hands. Please cover the removed imaging drum by a newspaper or so not to remove parts in front of the light-sensitive drum surface (green-colored roller) or the transfer roller (black-colored roller). Holding the imaging drum by...

OwnersManual.book
Page 42
... come into the printer without correctly aligning the rollers with the slots can damage the imaging drum. NOTICE: Do not allow the surface covered with a protective sheet to remove it. NOTICE: Do not touch the transfer roller (black-colored roller). Pull the protective cover on the roller deteriorates print quality. 4. www.dell.com/supplies | support.dell.com NOTICE: Lowering...
... come into the printer without correctly aligning the rollers with the slots can damage the imaging drum. NOTICE: Do not allow the surface covered with a protective sheet to remove it. NOTICE: Do not touch the transfer roller (black-colored roller). Pull the protective cover on the roller deteriorates print quality. 4. www.dell.com/supplies | support.dell.com NOTICE: Lowering...

OwnersManual.book
Page 47
... INSTRUCTIONS" on page 2. Maintenance 47 You can order more online at both ends of the transfer roller and gently lift it out of the transfer roller because it is sharp. Dell does not provide warranty coverage for your printer. Replacing the Transfer Roller CAUTION: Before performing any print jobs from the center output tray, and close the multipurpose...
... INSTRUCTIONS" on page 2. Maintenance 47 You can order more online at both ends of the transfer roller and gently lift it out of the transfer roller because it is sharp. Dell does not provide warranty coverage for your printer. Replacing the Transfer Roller CAUTION: Before performing any print jobs from the center output tray, and close the multipurpose...

OwnersManual.book
Page 48
www.dell.com/supplies | support.dell.com Installing the New Transfer Roller 1. Align the arrow marks on the transfer roller to the marks on the printer, and gently push the roller into the printer. 48 Maintenance Unpack a new transfer roller and grip the tabs as shown. 2.
www.dell.com/supplies | support.dell.com Installing the New Transfer Roller 1. Align the arrow marks on the transfer roller to the marks on the printer, and gently push the roller into the printer. 48 Maintenance Unpack a new transfer roller and grip the tabs as shown. 2.

OwnersManual.book
Page 49
Close the front cover. Maintenance 49 To lock the transfer roller into the printer, push down the tabs until you hear a click. 4. 3.
Close the front cover. Maintenance 49 To lock the transfer roller into the printer, push down the tabs until you hear a click. 4. 3.

OwnersManual.book
Page 56
Grip the tabs at both ends of the printer. 56 Maintenance Push the front latch up and fully open the front cover. 3. Turn off the printer. 2. www.dell.com/supplies | support.dell.com Cleaning the Automatic Density Control (ADC) Sensor CAUTION: Before performing any of the following procedures, read and follow the procedure below to clean it out of the transfer roller and gently lift it . 1. When the printer's automatic density control (ADC) sensor is dirty, follow the "CAUTION: SAFETY INSTRUCTIONS" on page 9.
Grip the tabs at both ends of the printer. 56 Maintenance Push the front latch up and fully open the front cover. 3. Turn off the printer. 2. www.dell.com/supplies | support.dell.com Cleaning the Automatic Density Control (ADC) Sensor CAUTION: Before performing any of the following procedures, read and follow the procedure below to clean it out of the transfer roller and gently lift it . 1. When the printer's automatic density control (ADC) sensor is dirty, follow the "CAUTION: SAFETY INSTRUCTIONS" on page 9.

OwnersManual.book
Page 57
Replace the transfer roller. Do not use excessive force to come in contact with a clean dry cloth or cotton swab. 4. Grip the tabs as shown. Gently wipe the automatic density control (ADC) sensor window with the automatic density control (ADC) sensor window. Maintenance 57 NOTE: Do not allow anything hard to clean the window. 5.
Replace the transfer roller. Do not use excessive force to come in contact with a clean dry cloth or cotton swab. 4. Grip the tabs as shown. Gently wipe the automatic density control (ADC) sensor window with the automatic density control (ADC) sensor window. Maintenance 57 NOTE: Do not allow anything hard to clean the window. 5.

OwnersManual.book
Page 58
www.dell.com/supplies | support.dell.com 6. Close the front cover. 58 Maintenance Align the arrow marks on the transfer roller to the marks on the printer, and gently push the roller into the printer, push down the tabs until you hear a click. 8. To lock the transfer roller into the printer. 7.
www.dell.com/supplies | support.dell.com 6. Close the front cover. 58 Maintenance Align the arrow marks on the transfer roller to the marks on the printer, and gently push the roller into the printer, push down the tabs until you hear a click. 8. To lock the transfer roller into the printer. 7.
ugtoc.html
Page 11
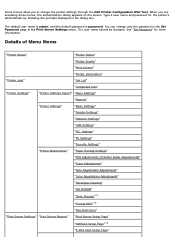
... Settings" "Parallel Settings" "Network Settings" "USB Settings" "PCL Settings" "PS Settings" "Security Settings" "Printer Maintenance" "Paper Density Settings" "BTR Adjustments (Transfer Roller Adjustments)" "Fuser Adjustments" "Auto Registration Adjustments" "Color Registration Adjustments" "Developer Cleaning" "Init NVRAM" "Clear Storage"*1 "Format HDD"*2 "Non-Dell Toner" "Print Server Settings" "Print Server Reports" "Print Server Setup Page" "NetWare Setup Page...
... Settings" "Parallel Settings" "Network Settings" "USB Settings" "PCL Settings" "PS Settings" "Security Settings" "Printer Maintenance" "Paper Density Settings" "BTR Adjustments (Transfer Roller Adjustments)" "Fuser Adjustments" "Auto Registration Adjustments" "Color Registration Adjustments" "Developer Cleaning" "Init NVRAM" "Clear Storage"*1 "Format HDD"*2 "Non-Dell Toner" "Print Server Settings" "Print Server Reports" "Print Server Setup Page" "NetWare Setup Page...

ugtoc.html
Page 16
...printer outputs error contents for the label. Displays the paper density for a PostScript error. Envelope Displays the voltage settings of the transfer roller for cover 1. Transparency Displays the temperature settings of the transfer roller for labels. Symbol Set Displays a symbol set the line termination. Color Mode Displays the color...the fuser for transparencies. Fuser Adjustments Plain 1 Plain 2 Displays the temperature settings of the transfer roller for the printer default value. Font Size Displays the font size for the plain paper. Paper Select Mode Displays...
...printer outputs error contents for the label. Displays the paper density for a PostScript error. Envelope Displays the voltage settings of the transfer roller for cover 1. Transparency Displays the temperature settings of the transfer roller for labels. Symbol Set Displays a symbol set the line termination. Color Mode Displays the color...the fuser for transparencies. Fuser Adjustments Plain 1 Plain 2 Displays the temperature settings of the transfer roller for the printer default value. Font Size Displays the font size for the plain paper. Paper Select Mode Displays...

ugtoc.html
Page 20
... Settings Purpose: To specify the paper density. Specifies the way to confirm. Printer Maintenance Printer Maintenance tab includes Paper Density Settings, Transfer Roller Adjustments, Fuser Adjustments, Auto Registration Adjustments, Color Registration Adjustments, Developer Cleaning, Init NVRAM, Clear Storage, Format HDD and Non-Dell Toner pages. Re-enter Password Type the new password again to select the...
... Settings Purpose: To specify the paper density. Specifies the way to confirm. Printer Maintenance Printer Maintenance tab includes Paper Density Settings, Transfer Roller Adjustments, Fuser Adjustments, Auto Registration Adjustments, Color Registration Adjustments, Developer Cleaning, Init NVRAM, Clear Storage, Format HDD and Non-Dell Toner pages. Re-enter Password Type the new password again to select the...

ugtoc.html
Page 21
... specify the reference voltage settings for transparencies. Transparency Sets the reference voltage settings for the transfer roller for the transfer roller. Auto Registration Adjustments Purpose: Specifies whether to adjust the color registration automatically. Plain 2 Sets the reference voltage settings for the transfer roller for the fuser. Fuser Adjustments Purpose: To specify the temperature settings value for plain...
... specify the reference voltage settings for transparencies. Transparency Sets the reference voltage settings for the transfer roller for the transfer roller. Auto Registration Adjustments Purpose: Specifies whether to adjust the color registration automatically. Plain 2 Sets the reference voltage settings for the transfer roller for the fuser. Fuser Adjustments Purpose: To specify the temperature settings value for plain...

ugtoc.html
Page 39
Scratches, dirt, or oil from the imaging drum. Remove the protective cover from your hands on the imaging drum or transfer roller may reduce the print quality. 1. Installing the Imaging Drum CAUTION: Make sure nothing touches or scratches the surface of the light-sensitive drum surface (green-colored roller) or the transfer roller (black-colored roller). Push the button as shown in the following illustration and open the front cover. 2. Push the front latch up and fully open the imaging drum cover. 3.
Scratches, dirt, or oil from the imaging drum. Remove the protective cover from your hands on the imaging drum or transfer roller may reduce the print quality. 1. Installing the Imaging Drum CAUTION: Make sure nothing touches or scratches the surface of the light-sensitive drum surface (green-colored roller) or the transfer roller (black-colored roller). Push the button as shown in the following illustration and open the front cover. 2. Push the front latch up and fully open the imaging drum cover. 3.

ugtoc.html
Page 40
...the cartridge into the printer. Make sure that nothing touches or scratches the roller surface. NOTICE: Do not allow the surface covered with the slots can damage the cartridge. NOTICE: Do not touch the transfer roller (black-colored roller). Scratches or oil from your hands on the printer. Holding the imaging ...drum by the handle with the flat part facing the back of the printer, align the plastic guides on both sides of the ...
...the cartridge into the printer. Make sure that nothing touches or scratches the roller surface. NOTICE: Do not allow the surface covered with the slots can damage the cartridge. NOTICE: Do not touch the transfer roller (black-colored roller). Scratches or oil from your hands on the printer. Holding the imaging ...drum by the handle with the flat part facing the back of the printer, align the plastic guides on both sides of the ...

ugtoc.html
Page 102
Values: Plain 1 -20 - +30 0* Plain 2 -20 - +30 0* Transparency -20 - +30 0* Covers 1 -20 - +30 0* Covers 2 -20 - +30 0* Label -20 - +30 0* Coated 1 -20 - +30 0* Coated 2 -20 - +30 0* Envelope -20 - +30 Plain 1 Light Normal* Label Label 1 Label 2* BTR Adj Purpose: To specify the reference voltage settings for the transfer roller.
Values: Plain 1 -20 - +30 0* Plain 2 -20 - +30 0* Transparency -20 - +30 0* Covers 1 -20 - +30 0* Covers 2 -20 - +30 0* Label -20 - +30 0* Coated 1 -20 - +30 0* Coated 2 -20 - +30 0* Envelope -20 - +30 Plain 1 Light Normal* Label Label 1 Label 2* BTR Adj Purpose: To specify the reference voltage settings for the transfer roller.

ugtoc.html
Page 140
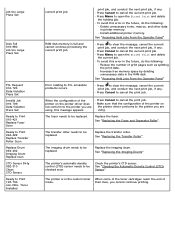
... up to open the outer front cover and remove any paper. Error NNN-NNN relates to be replaced. See "Replacing the Fuser and Separator Roller" The transfer roller needs to printer problems. Clear the paper path. Push the side button to open the outer front cover, and then remove any paper. Paper Jam 077...
... up to open the outer front cover and remove any paper. Error NNN-NNN relates to be replaced. See "Replacing the Fuser and Separator Roller" The transfer roller needs to printer problems. Clear the paper path. Push the side button to open the outer front cover, and then remove any paper. Paper Jam 077...
ugtoc.html
Page 142
... the Stored Print and delete the holding job. · To avoid this error in printer memory. · Install additional printer memory. The imaging drum needs to cancel the print job. Replace the transfer roller. The transfer roller needs to Print 193-700 non-DELL Toner Installed current print job. their lives, you are using , this error in...
... the Stored Print and delete the holding job. · To avoid this error in printer memory. · Install additional printer memory. The imaging drum needs to cancel the print job. Replace the transfer roller. The transfer roller needs to Print 193-700 non-DELL Toner Installed current print job. their lives, you are using , this error in...
ugtoc.html
Page 157
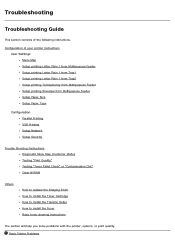
Troubleshooting Troubleshooting Guide This section consists of your printer instructions User Settings Menu Map Setup printing Letter Plain 1 from Multipurpose Feeder Setup printing Letter Plain 1 from Tray1 Setup printing Letter Plain 1 from Tray2 ...or "Contamination Chk" Clear NVRAM Others How to replace the Imaging Drum How to install the Toner Cartridge How to install the Transfer Roller How to install the Fuser Basic toner cleaning instructions The section will help you solve problems with the printer, options, or print quality. Configuration of the following instructions. Basic...
Troubleshooting Troubleshooting Guide This section consists of your printer instructions User Settings Menu Map Setup printing Letter Plain 1 from Multipurpose Feeder Setup printing Letter Plain 1 from Tray1 Setup printing Letter Plain 1 from Tray2 ...or "Contamination Chk" Clear NVRAM Others How to replace the Imaging Drum How to install the Toner Cartridge How to install the Transfer Roller How to install the Fuser Basic toner cleaning instructions The section will help you solve problems with the printer, options, or print quality. Configuration of the following instructions. Basic...


