User's Guide (PDF)
Page 2
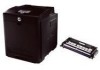
...Belt Unit Front Cover 2 NOTE: You can open the front cover by pressing the side button. 3 Duplexer (optional) 4 Side Button Rear View 550 Sheet Feeder (optional) 5 NOTE: Your printer allows for information on other documentation included with your printer. Back to Contents Page Dell™ 3130cn Color Laser Printer... User's Guide Click the links to the left for a maximum of your printer, see "Finding Information". For ...
...Belt Unit Front Cover 2 NOTE: You can open the front cover by pressing the side button. 3 Duplexer (optional) 4 Side Button Rear View 550 Sheet Feeder (optional) 5 NOTE: Your printer allows for information on other documentation included with your printer. Back to Contents Page Dell™ 3130cn Color Laser Printer... User's Guide Click the links to the left for a maximum of your printer, see "Finding Information". For ...
User's Guide (PDF)
Page 6
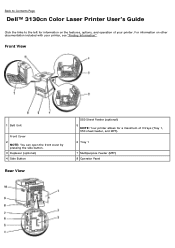
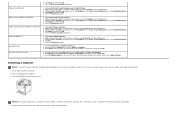
... the side button. 3 Duplexer (optional) 4 Side Button 550 Sheet Feeder (optional) 5 NOTE: Your printer allows for proper ventilation. It is also important to allow space around the printer for a maximum of 3 trays (Tray 1, 550 sheet feeder, and MPF). 6 Tray 1 7 Multipurpose...use the printer with the MPF opened, do not locate the printer in direct sunlight. Back to Contents Page About Your Printer Operator Panel Protecting Your Printer The following illustrations show the standard Dell™ 3130cn Color Laser Printer. 1 Belt Unit Front Cover 2 NOTE: You can open the printer tray, ...
... the side button. 3 Duplexer (optional) 4 Side Button 550 Sheet Feeder (optional) 5 NOTE: Your printer allows for proper ventilation. It is also important to allow space around the printer for a maximum of 3 trays (Tray 1, 550 sheet feeder, and MPF). 6 Tray 1 7 Multipurpose...use the printer with the MPF opened, do not locate the printer in direct sunlight. Back to Contents Page About Your Printer Operator Panel Protecting Your Printer The following illustrations show the standard Dell™ 3130cn Color Laser Printer. 1 Belt Unit Front Cover 2 NOTE: You can open the printer tray, ...
User's Guide (PDF)
Page 8
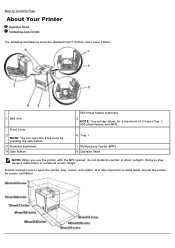
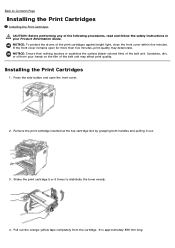
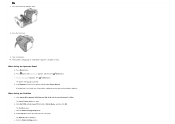
... may deteriorate. It is approximately 856 mm long. NOTICE: To protect the drums of the belt unit. Installing the Print Cartridges 1. NOTICE: Ensure that nothing touches or scratches the surface (black-colored film) of the print cartridges against bright light, close the front cover within five minutes. Scratches, dirt, or oil from...
... may deteriorate. It is approximately 856 mm long. NOTICE: To protect the drums of the belt unit. Installing the Print Cartridges 1. NOTICE: Ensure that nothing touches or scratches the surface (black-colored film) of the print cartridges against bright light, close the front cover within five minutes. Scratches, dirt, or oil from...
User's Guide (PDF)
Page 48
... list. 3. Close the Printers dialog box. 1. Select the Print & Fax in Printers list, and click Options & Supplies. 3. Select the printer from duplexer. 3. Click Printers on the printers, and then click OK. 1. Pull up on the belt release levers and rotate the belt unit up as shown in...side button and open for the Paper Tray Configuration item under Installable Options. 4. Close the Printers dialog box. 1. Ensure that nothing touches or scratches the surface (black-colored film) of the print cartridges against bright light, close the front cover within five minutes....
... list. 3. Close the Printers dialog box. 1. Select the Print & Fax in Printers list, and click Options & Supplies. 3. Select the printer from duplexer. 3. Click Printers on the printers, and then click OK. 1. Pull up on the belt release levers and rotate the belt unit up as shown in...side button and open for the Paper Tray Configuration item under Installable Options. 4. Close the Printers dialog box. 1. Ensure that nothing touches or scratches the surface (black-colored film) of the print cartridges against bright light, close the front cover within five minutes....
User's Guide (PDF)
Page 50
... Dell 3130cn Color Laser PCL 6 listed in the printer settings under Printer Options. Click the Printer Settings Report tab. e. Close the front cover. 9. Print a printer settings page to verify that the duplexer is not listed, turn off the printer, unplug the power cable, and reinstall the duplexer. The printer settings page is displayed. b. The Tool Box opens. Close the belt unit...
... Dell 3130cn Color Laser PCL 6 listed in the printer settings under Printer Options. Click the Printer Settings Report tab. e. Close the front cover. 9. Print a printer settings page to verify that the duplexer is not listed, turn off the printer, unplug the power cable, and reinstall the duplexer. The printer settings page is displayed. b. The Tool Box opens. Close the belt unit...
User's Guide (PDF)
Page 173
... jam in the wireless printer adapter. Turn the printer off the printer to printer problems. Confirm that you open . See "Contacting Dell". Ensure the following : Black Reinsert the specified print cartridge. Paper Jam 077-901 Open Front Cover Remove Paper Paper Jam The printer detects a paper jam. 077-907 Open Front Cover & Belt Unit Remove Paper XXX...
... jam in the wireless printer adapter. Turn the printer off the printer to printer problems. Confirm that you open . See "Contacting Dell". Ensure the following : Black Reinsert the specified print cartridge. Paper Jam 077-901 Open Front Cover Remove Paper Paper Jam The printer detects a paper jam. 077-907 Open Front Cover & Belt Unit Remove Paper XXX...
User's Guide (PDF)
Page 174
... print cartridge, print quality problems may occur. YYY indicates a paper size. C (cyan) See "Replacing Print Cartridges" M (magenta) See "Contacting Dell". K (black) Remove the belt unit and install a new one . The belt unit needs to printer problems. Remove the specified print cartridge and install a new one of the tray or multipurpose feeder. XXX is one...
... print cartridge, print quality problems may occur. YYY indicates a paper size. C (cyan) See "Replacing Print Cartridges" M (magenta) See "Contacting Dell". K (black) Remove the belt unit and install a new one . The belt unit needs to printer problems. Remove the specified print cartridge and install a new one of the tray or multipurpose feeder. XXX is one...
User's Guide (PDF)
Page 182
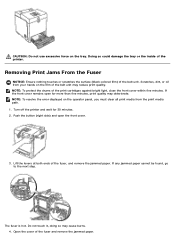
...next step. Do not touch it, doing so may cause burns. 4. Open the cover of the printer. Doing so could damage the tray or the inside of the fuser and remove the jammed paper.... If the front cover remains open the front cover. 3. NOTE: To protect the drums of the belt unit. Push the button (right side) and open for 30 minutes. 2. Removing Print Jams From the... Fuser NOTICE: Ensure nothing touches or scratches the surface (black-colored film) of the print cartridges against bright light, close the front cover within five minutes. NOTE: To...
...next step. Do not touch it, doing so may cause burns. 4. Open the cover of the printer. Doing so could damage the tray or the inside of the fuser and remove the jammed paper.... If the front cover remains open the front cover. 3. NOTE: To protect the drums of the belt unit. Push the button (right side) and open for 30 minutes. 2. Removing Print Jams From the... Fuser NOTICE: Ensure nothing touches or scratches the surface (black-colored film) of the print cartridges against bright light, close the front cover within five minutes. NOTE: To...

User's Guide (PDF)
Page 183
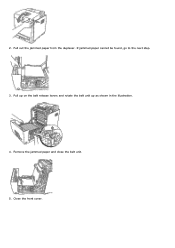
NOTICE: To protect the drums of paper remaining inside the printer, and then close the front cover within five minutes. Confirm that...error displayed on the operator panel, you must clear all print media from your hands on the film of the belt unit may deteriorate. Scratches, dirt, or oil from the print media path. 1. Push the button (right side... fuser and press down the levers at both ends of the belt unit. Removing Print Jams From the Optional Duplexer NOTICE: Ensure nothing touches or scratches the surface (black-colored film) of the fuser. 6. If the front cover remains ...
NOTICE: To protect the drums of paper remaining inside the printer, and then close the front cover within five minutes. Confirm that...error displayed on the operator panel, you must clear all print media from your hands on the film of the belt unit may deteriorate. Scratches, dirt, or oil from the print media path. 1. Push the button (right side... fuser and press down the levers at both ends of the belt unit. Removing Print Jams From the Optional Duplexer NOTICE: Ensure nothing touches or scratches the surface (black-colored film) of the fuser. 6. If the front cover remains ...
User's Guide (PDF)
Page 184
Remove the jammed paper and close the belt unit. 5. Close the front cover. Pull out the jammed paper from the duplexer. Pull up on the belt release levers and rotate the belt unit up as shown in the illustration. 4. If jammed paper cannot be found, go to the next step. 3. 2.
Remove the jammed paper and close the belt unit. 5. Close the front cover. Pull out the jammed paper from the duplexer. Pull up on the belt release levers and rotate the belt unit up as shown in the illustration. 4. If jammed paper cannot be found, go to the next step. 3. 2.

User's Guide (PDF)
Page 214
... in your Web browser, launch the Dell Printer Configuration Web Tool, and click the Order Supplies at a time.) Amount of Supplies Conserving Supplies Ordering Supplies Storing Print Media Storing Consumables Replacing Print Cartridges Replacing the Fuser Replacing Separator Roller Replacing the Belt Unit Adjusting Color Registration Periodically, your printer. To use the E-Mail Alert Setup...
... in your Web browser, launch the Dell Printer Configuration Web Tool, and click the Order Supplies at a time.) Amount of Supplies Conserving Supplies Ordering Supplies Storing Print Media Storing Consumables Replacing Print Cartridges Replacing the Fuser Replacing Separator Roller Replacing the Belt Unit Adjusting Color Registration Periodically, your printer. To use the E-Mail Alert Setup...
User's Guide (PDF)
Page 225
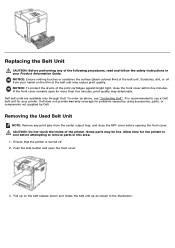
... components not supplied by phone, see "Contacting Dell". Replacing the Belt Unit CAUTION: Before performing any print jobs from your printer. NOTICE: To protect the drums of the printer. If the front cover remains open the front cover. 3. To order by Dell. CAUTION: Do not touch the inside of... remove parts in this area. 1. Ensure that the printer is recommended to use a Dell belt unit for more than five minutes, print quality may deteriorate. NOTICE: Ensure nothing touches or scratches the surface (black-colored film) of the belt unit may be hot. Pull up on the film ...
... components not supplied by phone, see "Contacting Dell". Replacing the Belt Unit CAUTION: Before performing any print jobs from your printer. NOTICE: To protect the drums of the printer. If the front cover remains open the front cover. 3. To order by Dell. CAUTION: Do not touch the inside of... remove parts in this area. 1. Ensure that the printer is recommended to use a Dell belt unit for more than five minutes, print quality may deteriorate. NOTICE: Ensure nothing touches or scratches the surface (black-colored film) of the belt unit may be hot. Pull up on the film ...
User's Guide (PDF)
Page 226
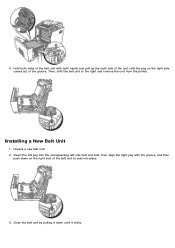
Close the belt unit by pulling it clicks. Insert the left peg into the corresponding left side belt unit hole, then align the right peg with both sides of the belt unit with the groove, and then push down until the peg on the right side of the groove. Hold both hands and pull up the right side of the unit until it down on the right side comes out of the belt unit to the right and remove the unit from the printer. Then, shift the belt unit to seat into place. 3. Unpack a new belt unit. 2. Installing a New Belt Unit 1. 4.
Close the belt unit by pulling it clicks. Insert the left peg into the corresponding left side belt unit hole, then align the right peg with both sides of the belt unit with the groove, and then push down until the peg on the right side of the groove. Hold both hands and pull up the right side of the unit until it down on the right side comes out of the belt unit to the right and remove the unit from the printer. Then, shift the belt unit to seat into place. 3. Unpack a new belt unit. 2. Installing a New Belt Unit 1. 4.
User's Guide (PDF)
Page 227
...the film cover from the installed belt unit and discard. 5. Press button until Admin Menu appears, and then press (Set) button. 3. Close the front cover. Printing the Color Registration Chart When Using the Operator Panel 1. Press button until Color Reg Adj appears, and then ... until Maintenance appears, and then press (Set) button. 4. Press button until Color Regi Chart appears, and then press (Set) button. Adjusting Color Registration To adjust the color registration when you first install the printer or after moving it to a new location, follow the procedure below. Press Menu...
...the film cover from the installed belt unit and discard. 5. Press button until Admin Menu appears, and then press (Set) button. 3. Close the front cover. Printing the Color Registration Chart When Using the Operator Panel 1. Press button until Color Reg Adj appears, and then ... until Maintenance appears, and then press (Set) button. 4. Press button until Color Regi Chart appears, and then press (Set) button. Adjusting Color Registration To adjust the color registration when you first install the printer or after moving it to a new location, follow the procedure below. Press Menu...
User's Guide (PDF)
Page 232
Hold the latch of the duplexer as shown in the following illustration and pull out the duplexer from your hands on the film of the belt unit. Close the front cover. Scratches, dirt, or oil from the printer. 5. Pull up on the belt release levers and rotate the belt unit up as shown in the illustration. 4. NOTICE: Ensure that nothing touches or scratches the surface (black-colored film) of the belt unit may reduce print quality. 3. Close the belt unit by pulling it down. 6.
Hold the latch of the duplexer as shown in the following illustration and pull out the duplexer from your hands on the film of the belt unit. Close the front cover. Scratches, dirt, or oil from the printer. 5. Pull up on the belt release levers and rotate the belt unit up as shown in the illustration. 4. NOTICE: Ensure that nothing touches or scratches the surface (black-colored film) of the belt unit may reduce print quality. 3. Close the belt unit by pulling it down. 6.


