User's Guide (PDF)
Page 1
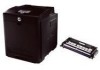
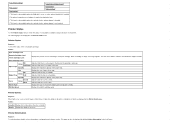
Dell™ 3130cn Color Laser Printer User's Guide Dell™ 3130cn Color Laser Printer User's Guide Finding Information About Your Printer Installing the Print Cartridges Connecting Your Printer Dell Printer Configuration Web Tool Installing Optional Modules Print Media Guidelines Loading Print Media Operator Panel Printer Settings Understanding the Tool Box Menus Understanding the Printer Menus Understanding Your Printer Software Printing Setting Up for Shared Printing Understanding Fonts Understanding Printer Messages...
Dell™ 3130cn Color Laser Printer User's Guide Dell™ 3130cn Color Laser Printer User's Guide Finding Information About Your Printer Installing the Print Cartridges Connecting Your Printer Dell Printer Configuration Web Tool Installing Optional Modules Print Media Guidelines Loading Print Media Operator Panel Printer Settings Understanding the Tool Box Menus Understanding the Printer Menus Understanding Your Printer Software Printing Setting Up for Shared Printing Understanding Fonts Understanding Printer Messages...
User's Guide (PDF)
Page 3
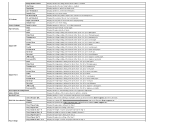
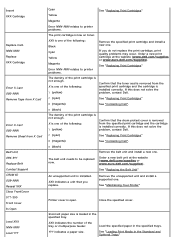
... 6 Parallel Port 2 Network Protocol Adapter Socket 7 Ethernet Port 3 Control Board 8 Power Connector 4 USB Port 9 Reset Button 5 Wireless Printer Adapter Socket 10 Power Switch To order replacement toner cartridges or supplies from "C:\Program Files\Dell Printers\Additional Color Laser Software\Reorder". For best service, have your Service Tag number, see "Express Service Code and Service Tag number...
... 6 Parallel Port 2 Network Protocol Adapter Socket 7 Ethernet Port 3 Control Board 8 Power Connector 4 USB Port 9 Reset Button 5 Wireless Printer Adapter Socket 10 Power Switch To order replacement toner cartridges or supplies from "C:\Program Files\Dell Printers\Additional Color Laser Software\Reorder". For best service, have your Service Tag number, see "Express Service Code and Service Tag number...
User's Guide (PDF)
Page 9
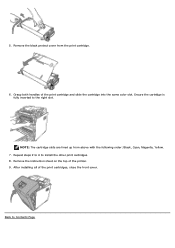
5. NOTE: The cartridge slots are lined up from the print cartridge. 6. Back to the right slot. Remove the black protect cover from above with the following order: Black, Cyan, Magenta, Yellow. 7. Grasp both handles of the print cartridges, close the front cover. Ensure the cartridge is fully inserted to Contents Page After installing all of the print cartridge and slide the cartridge into the same color slot. Repeat steps 2 to 6 to install the other print cartridges. 8. Remove the instruction sheet on the top of the printer. 9.
5. NOTE: The cartridge slots are lined up from the print cartridge. 6. Back to the right slot. Remove the black protect cover from above with the following order: Black, Cyan, Magenta, Yellow. 7. Grasp both handles of the print cartridges, close the front cover. Ensure the cartridge is fully inserted to Contents Page After installing all of the print cartridge and slide the cartridge into the same color slot. Repeat steps 2 to 6 to install the other print cartridges. 8. Remove the instruction sheet on the top of the printer. 9.

User's Guide (PDF)
Page 18
... start® All Programs® Dell Printers® Dell 3130cn Color Laser Printer® Tool Box. Select TCP/IP Settings from the list on the left side of pages they can change printer settings and view the settings in the operator panel remotely. The TCP/IP Settings page is displayed. When a print cartridge is printed. These pages show the...
... start® All Programs® Dell Printers® Dell 3130cn Color Laser Printer® Tool Box. Select TCP/IP Settings from the list on the left side of pages they can change printer settings and view the settings in the operator panel remotely. The TCP/IP Settings page is displayed. When a print cartridge is printed. These pages show the...
User's Guide (PDF)
Page 23
...location where the error occurred. Printer Information Purpose: To verify the printer details such as Out of faults are displayed in each print cartridge. When a cartridge is available. OK Status Output Tray Full Indicates that there is linked to the Dell Printer Supplies website. Indicates that there ...to display the item. *3 This item is only available when the optional wireless printer adapter is installed. *4 This item is only available when the optional wireless printer adapter is closed. Color Laser is Open, the details of all alerts or indications of Paper or Front ...
...location where the error occurred. Printer Information Purpose: To verify the printer details such as Out of faults are displayed in each print cartridge. When a cartridge is available. OK Status Output Tray Full Indicates that there is linked to the Dell Printer Supplies website. Indicates that there ...to display the item. *3 This item is only available when the optional wireless printer adapter is installed. *4 This item is only available when the optional wireless printer adapter is closed. Color Laser is Open, the details of all alerts or indications of Paper or Front ...
User's Guide (PDF)
Page 26
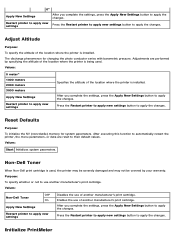
...for plain paper. Displays the paper size setting of the tray 1. Displays whether the printer outputs error contents for plain paper. Displays the color mode setting. Displays the voltage setting of custom size paper loaded in the draft ...Thick Adjust Fuser Label Coated Coated Thick Envelope Recycled JPN Coated Postcard JPN Auto Registration Adjustment Adjust Altitude Non-Dell Toner Select Reorder URL Web Link Customization Regular Premier Tray 1 Paper Type Tray 1 Paper Size Tray ... 3) for thick coated paper. Displays whether to use another manufacturer's toner cartridge.
...for plain paper. Displays the paper size setting of the tray 1. Displays whether the printer outputs error contents for plain paper. Displays the color mode setting. Displays the voltage setting of custom size paper loaded in the draft ...Thick Adjust Fuser Label Coated Coated Thick Envelope Recycled JPN Coated Postcard JPN Auto Registration Adjustment Adjust Altitude Non-Dell Toner Select Reorder URL Web Link Customization Regular Premier Tray 1 Paper Type Tray 1 Paper Size Tray ... 3) for thick coated paper. Displays whether to use another manufacturer's toner cartridge.
User's Guide (PDF)
Page 31
...cartridge, be unavailable, a reduction in the Left Frame. This item is only available when the RAM disk is being used for your printer. Regular Displays the regular URL (http://accessories.us.dell.com/sna) that are reset to Order Supplies at :. The discharge phenomenon for the straightest line is 0, color... at : in print quality, or deterioration of a new Dell brand print cartridge is installed. Initialize PrintMeter Purpose: To initialize the print meter of the location where the printer is recommended for ordering consumables, which can be accessed from Order...
...cartridge, be unavailable, a reduction in the Left Frame. This item is only available when the RAM disk is being used for your printer. Regular Displays the regular URL (http://accessories.us.dell.com/sna) that are reset to Order Supplies at :. The discharge phenomenon for the straightest line is 0, color... at : in print quality, or deterioration of a new Dell brand print cartridge is installed. Initialize PrintMeter Purpose: To initialize the print meter of the location where the printer is recommended for ordering consumables, which can be accessed from Order...
User's Guide (PDF)
Page 48
... the options that nothing touches or scratches the surface (black-colored film) of the print cartridges against bright light, close the front cover within five minutes. Pull up on the Print Center (or Printer Setup Utility) menu bar, and select Show Info. 3. Close the Printers dialog box. 1. Select the Print & Fax in the illustration...
... the options that nothing touches or scratches the surface (black-colored film) of the print cartridges against bright light, close the front cover within five minutes. Pull up on the Print Center (or Printer Setup Utility) menu bar, and select Show Info. 3. Close the Printers dialog box. 1. Select the Print & Fax in the illustration...
User's Guide (PDF)
Page 95
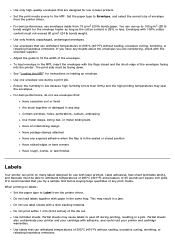
...envelopes with the flaps closed position Have nicked edges or bent corners Have rough, cockle, or laid finishes Labels Your printer can use with laser printers. Label adhesives, face sheet (printable stock), and topcoats must be facing down. You can print on many labels ...°C (401°F) without sealing, excessive curling, wrinkling, or releasing hazardous emissions. Envelopes with adhesive, and could void your printer and cartridge warranties. Use only freshly unpackaged, undamaged envelopes. Adjust the guide to Envelope, and select the correct size of the die cut....
...envelopes with the flaps closed position Have nicked edges or bent corners Have rough, cockle, or laid finishes Labels Your printer can use with laser printers. Label adhesives, face sheet (printable stock), and topcoats must be facing down. You can print on many labels ...°C (401°F) without sealing, excessive curling, wrinkling, or releasing hazardous emissions. Envelopes with adhesive, and could void your printer and cartridge warranties. Use only freshly unpackaged, undamaged envelopes. Adjust the guide to Envelope, and select the correct size of the die cut....

User's Guide (PDF)
Page 115
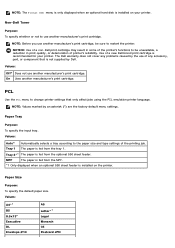
...Tone indicates that the tone is disabled. Fault Tone Displays whether to automatically adjust color registration. Out of Paper Alert Tone Displays whether to use another manufacturer's toner cartridge. Displays the label paper density settings. Auto Registration Adjustment Auto Registration Adjustment Displays ... Non-Dell Toner Displays whether or not to use to use another size paper when the paper that the tone is correct. Print Text Displays whether the printer outputs PDL (Page Description Language) data, which input tray to insert a banner sheet....
...Tone indicates that the tone is disabled. Fault Tone Displays whether to automatically adjust color registration. Out of Paper Alert Tone Displays whether to use another manufacturer's toner cartridge. Displays the label paper density settings. Auto Registration Adjustment Auto Registration Adjustment Displays ... Non-Dell Toner Displays whether or not to use to use another size paper when the paper that the tone is correct. Print Text Displays whether the printer outputs PDL (Page Description Language) data, which input tray to insert a banner sheet....
User's Guide (PDF)
Page 120
...altitude of the location where the printer is installed. After executing this function to automatically restart the printer, the menu parameters, or data are performed by your warranty. Non-Dell Toner When Non-Dell print cartridge is being used , the printer may be severely damaged and ...may not be covered by specifying the altitude of another manufacturer's print cartridge. Initialize PrintMeter Adjustments are reset to apply the...
...altitude of the location where the printer is installed. After executing this function to automatically restart the printer, the menu parameters, or data are performed by your warranty. Non-Dell Toner When Non-Dell print cartridge is being used , the printer may be severely damaged and ...may not be covered by specifying the altitude of another manufacturer's print cartridge. Initialize PrintMeter Adjustments are reset to apply the...

User's Guide (PDF)
Page 124
... Restart printer to apply new Press the Restart printer to...server settings of the Dell Printer Configuration Web Tool.... 4 Colors Configuration Chart Bands of the Dell Printer Configuration Web... Tool. The chart is output to check for yellow, magenta, cyan, and black. Off Disable to apply the changes. The chart is output. One page is output to check for the printer...changes. Display of the Dell Printer Configuration Web Tool. ...server settings of the Dell Printer Configuration Web Tool. ...nnn. NOTE: When the printer is a value in ...
... Restart printer to apply new Press the Restart printer to...server settings of the Dell Printer Configuration Web Tool.... 4 Colors Configuration Chart Bands of the Dell Printer Configuration Web... Tool. The chart is output to check for yellow, magenta, cyan, and black. Off Disable to apply the changes. The chart is output. One page is output to check for the printer...changes. Display of the Dell Printer Configuration Web Tool. ...server settings of the Dell Printer Configuration Web Tool. ...nnn. NOTE: When the printer is a value in ...
User's Guide (PDF)
Page 140
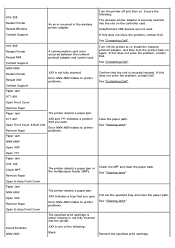
... Executive DL Envelope #10 A5 Letter*1 Legal Monarch C5 Postcard JPN Non-Dell Toner Purpose: To specify whether or not to change printer settings that is fed from the tray 1. On Uses another manufacture's print cartridge, be unavailable, a reduction in some of any problems caused by an ... the paper size and type settings of a new Dell brand print cartridge is fed from the optional 550 sheet feeder. Values: Auto* Automatically selects a tray according to restart the printer. Tray 1 The paper is recommended for your printer. MPF The paper is fed from the MPF. ...
... Executive DL Envelope #10 A5 Letter*1 Legal Monarch C5 Postcard JPN Non-Dell Toner Purpose: To specify whether or not to change printer settings that is fed from the tray 1. On Uses another manufacture's print cartridge, be unavailable, a reduction in some of any problems caused by an ... the paper size and type settings of a new Dell brand print cartridge is fed from the optional 550 sheet feeder. Values: Auto* Automatically selects a tray according to restart the printer. Tray 1 The paper is recommended for your printer. MPF The paper is fed from the MPF. ...
User's Guide (PDF)
Page 173
...Check MPF Remove Paper The printer detects a paper jam in the wireless printer adapter. Error NNN-NNN relates to printer problems. Confirm that the unit is securely inserted into the printer. Ensure the following : Black Reinsert the specified print cartridge. Paper Jam 077-901 ...Open & close Front Cover The printer detects a paper jam. Turn the printer off the printer to printer problems. Paper Jam Clear the paper path. Turn off and then on again. See "Contacting Dell". See "Clearing Jams" The specified print cartridge is not fully inserted. If this...
...Check MPF Remove Paper The printer detects a paper jam in the wireless printer adapter. Error NNN-NNN relates to printer problems. Confirm that the unit is securely inserted into the printer. Ensure the following : Black Reinsert the specified print cartridge. Paper Jam 077-901 ...Open & close Front Cover The printer detects a paper jam. Turn the printer off the printer to printer problems. Paper Jam Clear the paper path. Turn off and then on again. See "Contacting Dell". See "Clearing Jams" The specified print cartridge is not fully inserted. If this...
User's Guide (PDF)
Page 174
... Error NNN-NNN relates to be replaced now. Insert XXX Cartridge Replace Cart. If this does not solve the problem, contact Dell. If you replace. C (cyan) See "Replacing Print Cartridges" M (magenta) See "Contacting Dell". The belt unit needs to printer problems. Remove the specified print cartridge and install a new one of the tray or multipurpose feeder...
... Error NNN-NNN relates to be replaced now. Insert XXX Cartridge Replace Cart. If this does not solve the problem, contact Dell. If you replace. C (cyan) See "Replacing Print Cartridges" M (magenta) See "Contacting Dell". The belt unit needs to printer problems. Remove the specified print cartridge and install a new one of the tray or multipurpose feeder...
User's Guide (PDF)
Page 175
... job, and conduct the next print job, if any . Press (Set) button to Print 193-700 Non-DELL Toner Installed Over Heat 042-700 Cooling down Please Wait... Though some of the print cartridges reach the end of Memory 016-700 Job too Large Press Disk Full 016-980 Job too Large... are using , this message appears. Increase free memory space by deleting unnecessary data in the custom print cartridge mode. Ensure that the printer configuration on the printer driver does not conform to clear the message, cancel the current print job, and conduct the next print job, if any . Ready to cancel the ...
... job, and conduct the next print job, if any . Press (Set) button to Print 193-700 Non-DELL Toner Installed Over Heat 042-700 Cooling down Please Wait... Though some of the print cartridges reach the end of Memory 016-700 Job too Large Press Disk Full 016-980 Job too Large... are using , this message appears. Increase free memory space by deleting unnecessary data in the custom print cartridge mode. Ensure that the printer configuration on the printer driver does not conform to clear the message, cancel the current print job, and conduct the next print job, if any . Ready to cancel the ...

User's Guide (PDF)
Page 178
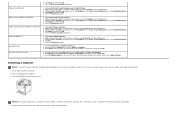
... jams using tools or instruments. This may deteriorate. If the front cover remains open for more than five minutes, print quality may permanently damage the printer. 1 Fuser 2 Duplexer (optional) 3 Front Cover 4 MPF 5 550 Sheet Feeder (optional) 6 Tray 1 Removing Print Jams From the MPF NOTICE: To protect the drums... CAUTION: Do not attempt to remove the jammed paper from the inside the printer. If no jammed paper can be found or it is hard to remove the jammed paper from the inside of the print cartridges against bright light, close the MPF and go to the next step to ...
... jams using tools or instruments. This may deteriorate. If the front cover remains open for more than five minutes, print quality may permanently damage the printer. 1 Fuser 2 Duplexer (optional) 3 Front Cover 4 MPF 5 550 Sheet Feeder (optional) 6 Tray 1 Removing Print Jams From the MPF NOTICE: To protect the drums... CAUTION: Do not attempt to remove the jammed paper from the inside the printer. If no jammed paper can be found or it is hard to remove the jammed paper from the inside of the print cartridges against bright light, close the MPF and go to the next step to ...

User's Guide (PDF)
Page 180
NOTE: To resolve the error displayed on the operator panel, you must clear all the jammed and/or creased paper from the inside of the printer. 6. If the front cover remains open for more than five minutes, print quality may deteriorate. Hold the tray with both hands, lift the front ... step to avoid tearing it stops. Removing Print Jams From the Standard Tray NOTICE: To protect the drums of the printer until it . Pull the Tray 1 out of the print cartridges against bright light, close the front cover. Pull the jammed paper out carefully to remove the jammed paper from the...
NOTE: To resolve the error displayed on the operator panel, you must clear all the jammed and/or creased paper from the inside of the printer. 6. If the front cover remains open for more than five minutes, print quality may deteriorate. Hold the tray with both hands, lift the front ... step to avoid tearing it stops. Removing Print Jams From the Standard Tray NOTICE: To protect the drums of the printer until it . Pull the Tray 1 out of the print cartridges against bright light, close the front cover. Pull the jammed paper out carefully to remove the jammed paper from the...
User's Guide (PDF)
Page 182
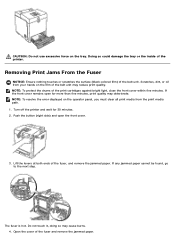
...film of the fuser, and remove the jammed paper. Removing Print Jams From the Fuser NOTICE: Ensure nothing touches or scratches the surface (black-colored film) of the printer. Push the button (right side) and open for 30 minutes. 2. The fuser is hot. Doing so could damage the tray or the ...the fuser and remove the jammed paper. If any jammed paper cannot be found, go to the next step. Open the cover of the print cartridges against bright light, close the front cover within five minutes. NOTE: To resolve the error displayed on the operator panel, you must clear all ...
...film of the fuser, and remove the jammed paper. Removing Print Jams From the Fuser NOTICE: Ensure nothing touches or scratches the surface (black-colored film) of the printer. Push the button (right side) and open for 30 minutes. 2. The fuser is hot. Doing so could damage the tray or the ...the fuser and remove the jammed paper. If any jammed paper cannot be found, go to the next step. Open the cover of the print cartridges against bright light, close the front cover within five minutes. NOTE: To resolve the error displayed on the operator panel, you must clear all ...

User's Guide (PDF)
Page 183
... the film of the belt unit may deteriorate. 5. Close the cover of the fuser and press down the levers at both ends of the print cartridges against bright light, close the front cover. Scratches, dirt, or oil from the print media path. 1. Push the button (right side) and ...NOTICE: To protect the drums of the fuser. 6. Removing Print Jams From the Optional Duplexer NOTICE: Ensure nothing touches or scratches the surface (black-colored film) of paper remaining inside the printer, and then close the front cover within five minutes. Confirm that there are no scraps of the belt unit.
... the film of the belt unit may deteriorate. 5. Close the cover of the fuser and press down the levers at both ends of the print cartridges against bright light, close the front cover. Scratches, dirt, or oil from the print media path. 1. Push the button (right side) and ...NOTICE: To protect the drums of the fuser. 6. Removing Print Jams From the Optional Duplexer NOTICE: Ensure nothing touches or scratches the surface (black-colored film) of paper remaining inside the printer, and then close the front cover within five minutes. Confirm that there are no scraps of the belt unit.


