User's Guide (PDF)
Page 172
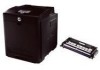
... the problem, contact Dell. If this message means NNN-NNN Restart Printer Contact Support Error NNN-NNN relates to printer problems. 016-316 Restart Printer Reseat Memory The printer detected an unsupported additional memory module in the network protocol adapter. Turn the printer off the printer, and then on both sides of the fuser unit are securely locked. This...
... the problem, contact Dell. If this message means NNN-NNN Restart Printer Contact Support Error NNN-NNN relates to printer problems. 016-316 Restart Printer Reseat Memory The printer detected an unsupported additional memory module in the network protocol adapter. Turn the printer off the printer, and then on both sides of the fuser unit are securely locked. This...
User's Guide (PDF)
Page 182
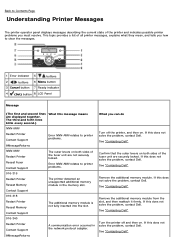
Lift the levers at both ends of the belt unit. Removing Print Jams From the Fuser NOTICE: Ensure nothing touches or scratches the surface (black-colored film) of the fuser, and remove the jammed paper. Turn off the printer and wait for more than five minutes, print quality may deteriorate. CAUTION: Do not use excessive force...
Lift the levers at both ends of the belt unit. Removing Print Jams From the Fuser NOTICE: Ensure nothing touches or scratches the surface (black-colored film) of the fuser, and remove the jammed paper. Turn off the printer and wait for more than five minutes, print quality may deteriorate. CAUTION: Do not use excessive force...

User's Guide (PDF)
Page 183
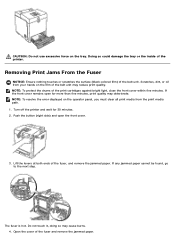
...against bright light, close the front cover. NOTICE: To protect the drums of the fuser. 6. 5. Removing Print Jams From the Optional Duplexer NOTICE: Ensure nothing touches or scratches the surface (black-colored film) of paper remaining inside the printer, and then close the front cover within five minutes. NOTE: To resolve the error... media from the print media path. 1. If the front cover remains open the front cover. Confirm that there are no scraps of the belt unit. Push the button (right side) and open for more than five minutes, print quality may reduce print quality.
...against bright light, close the front cover. NOTICE: To protect the drums of the fuser. 6. 5. Removing Print Jams From the Optional Duplexer NOTICE: Ensure nothing touches or scratches the surface (black-colored film) of paper remaining inside the printer, and then close the front cover within five minutes. NOTE: To resolve the error... media from the print media path. 1. If the front cover remains open the front cover. Confirm that there are no scraps of the belt unit. Push the button (right side) and open for more than five minutes, print quality may reduce print quality.

User's Guide (PDF)
Page 194
... Pitch Configuration Chart, and locate the cause of the color spots on your output with that on the Diagnosis tab. 2. Click the Pitch Configuration Chart button. Is the cause of the printer contact Dell. Replace the fuser if you replace the print cartridge, click Chart Print ... Contact Dell. No Go to the location of the problem using the Pitch Configuration Chart. 1. Click the Pitch Configuration Chart button. See "Replacing Print Cartridges". 2. Launch the Tool Box, and click Chart Print on the 3 Diagnosis tab. 3. Print cartridge- 2 Fuser - 3 Main unit of the problem located...
... Pitch Configuration Chart, and locate the cause of the color spots on your output with that on the Diagnosis tab. 2. Click the Pitch Configuration Chart button. Is the cause of the printer contact Dell. Replace the fuser if you replace the print cartridge, click Chart Print ... Contact Dell. No Go to the location of the problem using the Pitch Configuration Chart. 1. Click the Pitch Configuration Chart button. See "Replacing Print Cartridges". 2. Launch the Tool Box, and click Chart Print on the 3 Diagnosis tab. 3. Print cartridge- 2 Fuser - 3 Main unit of the problem located...

User's Guide (PDF)
Page 196
... print cartridge. Jagged characters Contact Dell. Is the problem recovered? The task is complete. Action Locate the cause of the problem: Print cartridge - 2 Fuser - See "Installing the Print Cartridges". 2 Is the problem recovered? On the Advanced tab, set Bitmap Text Smoothing under Items to High Quality in the printer driver. 2 1. Banding Yes No...
... print cartridge. Jagged characters Contact Dell. Is the problem recovered? The task is complete. Action Locate the cause of the problem: Print cartridge - 2 Fuser - See "Installing the Print Cartridges". 2 Is the problem recovered? On the Advanced tab, set Bitmap Text Smoothing under Items to High Quality in the printer driver. 2 1. Banding Yes No...

User's Guide (PDF)
Page 214
...Print Mode in your printer. Back to Contents Page Maintaining Your Printer Determining the Status of Supplies Conserving Supplies Ordering Supplies Storing Print Media Storing Consumables Replacing Print Cartridges Replacing the Fuser Replacing Separator Roller Replacing the Belt Unit Adjusting Color Registration Periodically, your... To use the E-Mail Alert Setup feature that uses less toner. Type the IP address of your printer in your Web browser, launch the Dell Printer Configuration Web Tool, and click the Order Supplies at a time.) Amount of the key operator in...
...Print Mode in your printer. Back to Contents Page Maintaining Your Printer Determining the Status of Supplies Conserving Supplies Ordering Supplies Storing Print Media Storing Consumables Replacing Print Cartridges Replacing the Fuser Replacing Separator Roller Replacing the Belt Unit Adjusting Color Registration Periodically, your... To use the E-Mail Alert Setup feature that uses less toner. Type the IP address of your printer in your Web browser, launch the Dell Printer Configuration Web Tool, and click the Order Supplies at a time.) Amount of the key operator in...
User Guide
Page 66
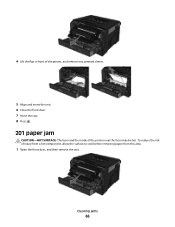
To reduce the risk of the printer near the fuser may be hot. 4 Lift the flap in front of the printer, and remove any jammed sheets. 5 Align and insert the unit. 6 Close the front door. 7 Insert the tray. 8 Press . 201 paper jam CAUTION-HOT SURFACE: The fuser and the inside of injury from a hot component, allow the surface to cool before removing paper from this area. 1 Open the front door, and then remove the unit. Clearing jams 66
To reduce the risk of the printer near the fuser may be hot. 4 Lift the flap in front of the printer, and remove any jammed sheets. 5 Align and insert the unit. 6 Close the front door. 7 Insert the tray. 8 Press . 201 paper jam CAUTION-HOT SURFACE: The fuser and the inside of injury from a hot component, allow the surface to cool before removing paper from this area. 1 Open the front door, and then remove the unit. Clearing jams 66
User Guide
Page 67
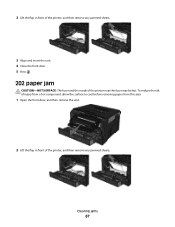
2 Lift the flap in front of the printer near the fuser may be hot. To reduce the risk of injury from a hot component, allow the surface to cool before removing paper from this area. 1 Open the front door, and then remove the unit. 2 Lift the flap in front of the printer, and then remove any jammed sheets. 3 Align and insert the unit. 4 Close the front door. 5 Press . 202 paper jam CAUTION-HOT SURFACE: The fuser and the inside of the printer, and then remove any jammed sheets. Clearing jams 67
2 Lift the flap in front of the printer near the fuser may be hot. To reduce the risk of injury from a hot component, allow the surface to cool before removing paper from this area. 1 Open the front door, and then remove the unit. 2 Lift the flap in front of the printer, and then remove any jammed sheets. 3 Align and insert the unit. 4 Close the front door. 5 Press . 202 paper jam CAUTION-HOT SURFACE: The fuser and the inside of the printer, and then remove any jammed sheets. Clearing jams 67


