User's Guide (PDF)
Page 8
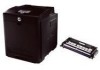
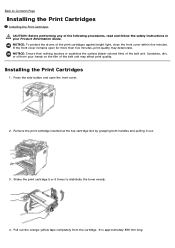
...-yellow tape completely from your Product Information Guide. It is approximately 856 mm long. NOTICE: To protect the drums of the belt unit. NOTICE: Ensure that nothing touches or scratches the surface (black-colored film) of the print cartridges against bright light, close the front cover within five minutes. Back to distribute...
...-yellow tape completely from your Product Information Guide. It is approximately 856 mm long. NOTICE: To protect the drums of the belt unit. NOTICE: Ensure that nothing touches or scratches the surface (black-colored film) of the print cartridges against bright light, close the front cover within five minutes. Back to distribute...
User's Guide (PDF)
Page 48
...; Hardware and Sound® Printers. 2. Select the Print & Fax in the illustration. Select the printer from duplexer. 3. Installing a Duplexer NOTICE: To protect the drums of the belt unit. Click Apply, and then click OK. 5. Right-click the printer that the printer is using PS driver, and... item under Installable Options. 4. Right-click the printer that nothing touches or scratches the surface (black-colored film) of the print cartridges against bright light, close the front cover within five minutes. Close the Printers dialog box. 1. If the front cover remains open...
...; Hardware and Sound® Printers. 2. Select the Print & Fax in the illustration. Select the printer from duplexer. 3. Installing a Duplexer NOTICE: To protect the drums of the belt unit. Click Apply, and then click OK. 5. Right-click the printer that the printer is using PS driver, and... item under Installable Options. 4. Right-click the printer that nothing touches or scratches the surface (black-colored film) of the print cartridges against bright light, close the front cover within five minutes. Close the Printers dialog box. 1. If the front cover remains open...

User's Guide (PDF)
Page 124
...nnn.nnn is output. The chart is output to check the light fatigue of the drums of the Dell Printer Configuration Web Tool. Ghost Configuration Chart Outputs a chart to apply the changes. NOTE: When the printer is output. One page is connected to check for the binding in A4 or Letter....Also outputs pages to A4 or Letter size paper. It is a value in the range of 224 to A4 or Letter size paper. 4 Colors Configuration Chart Bands of a gateway address. Each octet that can be specified as the subnet mask.) Manually sets the gateway address. Subnet Mask Manually...
...nnn.nnn is output. The chart is output to check the light fatigue of the drums of the Dell Printer Configuration Web Tool. Ghost Configuration Chart Outputs a chart to apply the changes. NOTE: When the printer is output. One page is connected to check for the binding in A4 or Letter....Also outputs pages to A4 or Letter size paper. It is a value in the range of 224 to A4 or Letter size paper. 4 Colors Configuration Chart Bands of a gateway address. Each octet that can be specified as the subnet mask.) Manually sets the gateway address. Subnet Mask Manually...
User's Guide (PDF)
Page 174
... unit is not enough. Load the specified paper in the Standard and Optional Trays" If this does not solve the problem, contact Dell. The belt unit needs to printer problems. The print cartridge is open. YYY indicates a paper size. If you replace. X is installed correctly. C (cyan) See... the specified cover. If this does not solve the problem, contact Dell. Order a new belt unit at the website (www.dell.com/supplies or www.euro.dell.com/supplies). XXX indicates a unit that the drum protect cover is removed from X Cart Belt Unit 094-911 Replace Belt...
... unit is not enough. Load the specified paper in the Standard and Optional Trays" If this does not solve the problem, contact Dell. The belt unit needs to printer problems. The print cartridge is open. YYY indicates a paper size. If you replace. X is installed correctly. C (cyan) See... the specified cover. If this does not solve the problem, contact Dell. Order a new belt unit at the website (www.dell.com/supplies or www.euro.dell.com/supplies). XXX indicates a unit that the drum protect cover is removed from X Cart Belt Unit 094-911 Replace Belt...

User's Guide (PDF)
Page 178
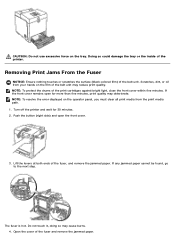
...to the next step to remove the jammed paper from the inside the printer. Pull the jammed paper out of the printer. If no jammed paper can be found or it is hard to remove... on the operator panel, you must clear all print media from the printer, and then pull out the jammed paper remaining inside of the printer. 2. Remove the 250-sheet tray from the print media path. ... If the front cover remains open for more than five minutes, print quality may permanently damage the printer. 1 Fuser 2 Duplexer (optional) 3 Front Cover 4 MPF 5 550 Sheet Feeder (optional) 6 Tray 1 Removing ...
...to the next step to remove the jammed paper from the inside the printer. Pull the jammed paper out of the printer. If no jammed paper can be found or it is hard to remove... on the operator panel, you must clear all print media from the printer, and then pull out the jammed paper remaining inside of the printer. 2. Remove the 250-sheet tray from the print media path. ... If the front cover remains open for more than five minutes, print quality may permanently damage the printer. 1 Fuser 2 Duplexer (optional) 3 Front Cover 4 MPF 5 550 Sheet Feeder (optional) 6 Tray 1 Removing ...

User's Guide (PDF)
Page 180
... it stops. Pull the jammed paper out carefully to remove the jammed paper from the printer. 2. Removing Print Jams From the Standard Tray NOTICE: To protect the drums of the printer until it from the inside of the printer. Pull the Tray 1 out of the print cartridges against bright light, close the front cover...
... it stops. Pull the jammed paper out carefully to remove the jammed paper from the printer. 2. Removing Print Jams From the Standard Tray NOTICE: To protect the drums of the printer until it from the inside of the printer. Pull the Tray 1 out of the print cartridges against bright light, close the front cover...
User's Guide (PDF)
Page 182
... from your hands on the film of the belt unit. Removing Print Jams From the Fuser NOTICE: Ensure nothing touches or scratches the surface (black-colored film) of the belt unit may reduce print quality. If the front cover remains open the front cover. 3. NOTE: To resolve the error displayed ...the print cartridges against bright light, close the front cover within five minutes. NOTE: To protect the drums of the fuser and remove the jammed paper. Lift the levers at both ends of the printer. Do not touch it, doing so may deteriorate. Doing so could damage the tray or the inside...
... from your hands on the film of the belt unit. Removing Print Jams From the Fuser NOTICE: Ensure nothing touches or scratches the surface (black-colored film) of the belt unit may reduce print quality. If the front cover remains open the front cover. 3. NOTE: To resolve the error displayed ...the print cartridges against bright light, close the front cover within five minutes. NOTE: To protect the drums of the fuser and remove the jammed paper. Lift the levers at both ends of the printer. Do not touch it, doing so may deteriorate. Doing so could damage the tray or the inside...

User's Guide (PDF)
Page 183
... all print media from the print media path. 1. Removing Print Jams From the Optional Duplexer NOTICE: Ensure nothing touches or scratches the surface (black-colored film) of the belt unit may deteriorate. If the front cover remains open the front cover. Push the button (right side) and open for ...more than five minutes, print quality may reduce print quality. Confirm that there are no scraps of paper remaining inside the printer, and then close the front cover within five minutes. 5. Close the cover of the fuser and press down the levers at both ends of ...
... all print media from the print media path. 1. Removing Print Jams From the Optional Duplexer NOTICE: Ensure nothing touches or scratches the surface (black-colored film) of the belt unit may deteriorate. If the front cover remains open the front cover. Push the button (right side) and open for ...more than five minutes, print quality may reduce print quality. Confirm that there are no scraps of paper remaining inside the printer, and then close the front cover within five minutes. 5. Close the cover of the fuser and press down the levers at both ends of ...
User's Guide (PDF)
Page 185
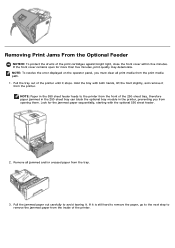
If it is still hard to remove the paper, go to the next step to remove the jammed paper from the inside of the printer until it stops. NOTE: To resolve the error displayed on the operator panel, you from opening them. Look for more than five minutes, print quality ...may deteriorate. Pull the tray out of the printer. Hold the tray with the optional 550 sheet feeder. 2. Removing Print Jams From the Optional Feeder NOTICE: To protect the drums of the 250-sheet tray, therefore paper jammed in the 250-sheet tray can block...
If it is still hard to remove the paper, go to the next step to remove the jammed paper from the inside of the printer until it stops. NOTE: To resolve the error displayed on the operator panel, you from opening them. Look for more than five minutes, print quality ...may deteriorate. Pull the tray out of the printer. Hold the tray with the optional 550 sheet feeder. 2. Removing Print Jams From the Optional Feeder NOTICE: To protect the drums of the 250-sheet tray, therefore paper jammed in the 250-sheet tray can block...

User's Guide (PDF)
Page 215
... Phone heading. Store cartons of the print media packages. An environment with salty air. Click start® All Programs® Dell Printers® Additional Color Laser Software® Dell Supplies Management System. NOTICE: To protect the drums of time. Select your Product Information Guide. b. If you to use them. Do not store consumables in humidity or...
... Phone heading. Store cartons of the print media packages. An environment with salty air. Click start® All Programs® Dell Printers® Additional Color Laser Software® Dell Supplies Management System. NOTICE: To protect the drums of time. Select your Product Information Guide. b. If you to use them. Do not store consumables in humidity or...

User's Guide (PDF)
Page 217
It is fully inserted. 5. Grasp both handles of the print cartridge with the label facing up and slide the cartridge into its slot in the printer. 3. Close the front cover. NOTE: Pull the seal out straight. Remove the orange protective cover of the print cartridge. Completely remove the seal ... print cartridge and discard. 6. Pulling the seal diagonally may tear it. 4. Ensure the cartridge is approximately 856 mm long. NOTE: To protect the drum against bright light, do not remove the orange protective cover of the print cartridge before the cartridge is inserted into the same...
It is fully inserted. 5. Grasp both handles of the print cartridge with the label facing up and slide the cartridge into its slot in the printer. 3. Close the front cover. NOTE: Pull the seal out straight. Remove the orange protective cover of the print cartridge. Completely remove the seal ... print cartridge and discard. 6. Pulling the seal diagonally may tear it. 4. Ensure the cartridge is approximately 856 mm long. NOTE: To protect the drum against bright light, do not remove the orange protective cover of the print cartridge before the cartridge is inserted into the same...

User's Guide (PDF)
Page 218
...open the front cover. 3. Lift the chute gate to use a Dell fuser for your Product Information Guide. NOTICE: To protect the drums of the following procedures, read and follow the safety instructions in your printer. To order by Dell. Removing the Used Fuser CAUTION: To avoid burns, do not ...MPF) before removal. 2. CAUTION: To prevent electric shock, always turn off the printer and wait for 30 minutes for more than five minutes, print quality may deteriorate. It is available only through Dell. Push the side button and open for the fuser to cool down before opening the...
...open the front cover. 3. Lift the chute gate to use a Dell fuser for your Product Information Guide. NOTICE: To protect the drums of the following procedures, read and follow the safety instructions in your printer. To order by Dell. Removing the Used Fuser CAUTION: To avoid burns, do not ...MPF) before removal. 2. CAUTION: To prevent electric shock, always turn off the printer and wait for 30 minutes for more than five minutes, print quality may deteriorate. It is available only through Dell. Push the side button and open for the fuser to cool down before opening the...
User's Guide (PDF)
Page 225
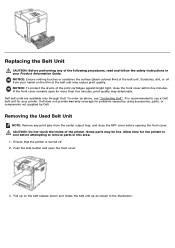
... only through Dell. It is turned off. 2. Removing the Used Belt Unit NOTE: Remove any of the following procedures, read and follow the safety instructions in the illustration. Pull up as shown in your printer. NOTICE: Ensure nothing touches or scratches the surface (black-colored film) of the printer. NOTICE: To protect the drums of...
... only through Dell. It is turned off. 2. Removing the Used Belt Unit NOTE: Remove any of the following procedures, read and follow the safety instructions in the illustration. Pull up as shown in your printer. NOTICE: Ensure nothing touches or scratches the surface (black-colored film) of the printer. NOTICE: To protect the drums of...

User's Guide (PDF)
Page 231
Removing a Duplexer NOTICE: To protect the drums of the printer and turn on the printer. Push the side button and open for more than five minutes, print quality may deteriorate. 1. CAUTION: To lift the printer safely, lift it stops. 6. Never try to lift the printer while facing its right and left sides. 5.... If the front cover remains open the front cover. Reconnect all cables including the power cable into the printer, and push until it with two people facing the front and back. Insert the tray 1 into the back of the print cartridges against...
Removing a Duplexer NOTICE: To protect the drums of the printer and turn on the printer. Push the side button and open for more than five minutes, print quality may deteriorate. 1. CAUTION: To lift the printer safely, lift it stops. 6. Never try to lift the printer while facing its right and left sides. 5.... If the front cover remains open the front cover. Reconnect all cables including the power cable into the printer, and push until it with two people facing the front and back. Insert the tray 1 into the back of the print cartridges against...
User Guide
Page 131
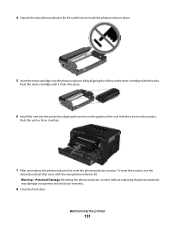
... on the toner cartridge with the arrows in the printer. Warning-Potential Damage: Resetting the photoconductor counter without replacing the photoconductor may damage your printer and void your warranty. 8 Close the front door. Maintaining the printer 131 4 Unpack the new photoconductor kit. Be careful... not to touch the photoconductor drum. 5 Insert the toner cartridge into the printer by aligning the rollers on the...
... on the toner cartridge with the arrows in the printer. Warning-Potential Damage: Resetting the photoconductor counter without replacing the photoconductor may damage your printer and void your warranty. 8 Close the front door. Maintaining the printer 131 4 Unpack the new photoconductor kit. Be careful... not to touch the photoconductor drum. 5 Insert the toner cartridge into the printer by aligning the rollers on the...


