User's Guide
Page 4
... Product Information Guide prior to the machine setup and advanced settings. 5 Start button: Initiate operation. 6. DADF 2. Optional tray 2 11. Paper output extension 13. Document width guides 3. Document width guides 3. Output tray (face down ) 7. USB port 2. Network port 4. Optional ... tray 2 11. Toner cartridge 15. Express šervice code 11. LCD: Display. 2. None: You can use my printer Quick Reference Guide Dell 2355dn MFP Quick Reference Guide Quick Reference Guide Quick Reference Guide Front 2 1 Front 3 Front 4 5 11 12 Front 13 ...
... Product Information Guide prior to the machine setup and advanced settings. 5 Start button: Initiate operation. 6. DADF 2. Optional tray 2 11. Paper output extension 13. Document width guides 3. Document width guides 3. Output tray (face down ) 7. USB port 2. Network port 4. Optional ... tray 2 11. Toner cartridge 15. Express šervice code 11. LCD: Display. 2. None: You can use my printer Quick Reference Guide Dell 2355dn MFP Quick Reference Guide Quick Reference Guide Quick Reference Guide Front 2 1 Front 3 Front 4 5 11 12 Front 13 ...
User's Guide
Page 6
Contents DellTM 2355dn Laser MFP User's Guide 1 Contacting Dell 1 Finding Information 3 Unpacking Your Printer 17 About Your Printer 20 Front View 20 Rear View 21 Operator Panel Button Functions 22 Common Keys 22 Function Keys 22 Fax Keys 22 Understanding...27 Setting up the hardware 27 Installing the Toner Cartridge 29 Loading Paper 31 Making Connections 34 Connecting the Telephone Line 34 Connecting the Printer Cable 37 Powering On the Printer 39 Setting fax setup sequence 39 Dell 2355dn Laser MFP Menu Functions 40 Printing the Printer setting and Op-panel Menu setting 41 5
Contents DellTM 2355dn Laser MFP User's Guide 1 Contacting Dell 1 Finding Information 3 Unpacking Your Printer 17 About Your Printer 20 Front View 20 Rear View 21 Operator Panel Button Functions 22 Common Keys 22 Function Keys 22 Fax Keys 22 Understanding...27 Setting up the hardware 27 Installing the Toner Cartridge 29 Loading Paper 31 Making Connections 34 Connecting the Telephone Line 34 Connecting the Printer Cable 37 Powering On the Printer 39 Setting fax setup sequence 39 Dell 2355dn Laser MFP Menu Functions 40 Printing the Printer setting and Op-panel Menu setting 41 5

User's Guide
Page 8
Uninstalling Software 65 Using the Dell Toner Management System 66 Printer Status Monitor 66 Printer Settings Utility 67 The Directory Section 68 The Fax Setting Section 69 The Setting Section 69 The Layout Section 69 The Paper Option Section 69 The Graphic Section 69 The Emulation Section 69 The Network(IPv4) Section 70 Firmware Update...
Uninstalling Software 65 Using the Dell Toner Management System 66 Printer Status Monitor 66 Printer Settings Utility 67 The Directory Section 68 The Fax Setting Section 69 The Setting Section 69 The Layout Section 69 The Paper Option Section 69 The Graphic Section 69 The Emulation Section 69 The Network(IPv4) Section 70 Firmware Update...

User's Guide
Page 9
... 96 MPF 97 Bypass Mode 97 Tray Mode 97 Printing Printing a Document 100 Canceling a Print Job 102 Printer Settings 103 Basic Tab 104 Paper Tab 105 Graphic Tab 107 Advanced Tab 110 Dell Tab 111 Using a Presets Setting 112 Using Help 112 Printing Multiple Pages on One Sheet of the... Paper 113 Change Percentage of Your Document 114 Fitting Your Document to a Selected Paper Size 115 Printing Posters 116 Printing Booklets 117 Printing on Both Sides of Paper 118 Using ...
... 96 MPF 97 Bypass Mode 97 Tray Mode 97 Printing Printing a Document 100 Canceling a Print Job 102 Printer Settings 103 Basic Tab 104 Paper Tab 105 Graphic Tab 107 Advanced Tab 110 Dell Tab 111 Using a Presets Setting 112 Using Help 112 Printing Multiple Pages on One Sheet of the... Paper 113 Change Percentage of Your Document 114 Fitting Your Document to a Selected Paper Size 115 Printing Posters 116 Printing Booklets 117 Printing on Both Sides of Paper 118 Using ...

User's Guide
Page 10
... Overlays 122 What is an Overlay 122 Creating a New Page Overlay 122 Using a Page Overlay 123 Deleting a Page Overlay 125 Copying Loading Paper for Copying 128 Selecting the Paper Tray 128 Preparing a Document 128 Loading an Original Document 129 Making Copies 131 Setting Copy Options 132 Number of Copies 132 Enlarge/Reduce... Auto Fit Copying 136 Clone Copying 137 Poster Copying 137 ID Copying 138 2-up or 4-up copying (N-up 139 Printing Copies on Both Sides of Paper 139 Changing the Default Settings 140 Scanning Scanning Overview 142 9
... Overlays 122 What is an Overlay 122 Creating a New Page Overlay 122 Using a Page Overlay 123 Deleting a Page Overlay 125 Copying Loading Paper for Copying 128 Selecting the Paper Tray 128 Preparing a Document 128 Loading an Original Document 129 Making Copies 131 Setting Copy Options 132 Number of Copies 132 Enlarge/Reduce... Auto Fit Copying 136 Clone Copying 137 Poster Copying 137 ID Copying 138 2-up or 4-up copying (N-up 139 Printing Copies on Both Sides of Paper 139 Changing the Default Settings 140 Scanning Scanning Overview 142 9

User's Guide
Page 13
... a Fax Automatically 190 Sending a Fax Directly 191 Confirming Transmissions 191 Automatic Redialing 192 Redialing fax number 192 Receiving a Fax 192 About Receiving Modes 192 Loading Paper for Receiving Faxes 193 Receiving Automatically in the Fax Mode 193 Receiving Manually in the Tel Mode 193 Receiving Automatically in the Ans/Fax Mode...
... a Fax Automatically 190 Sending a Fax Directly 191 Confirming Transmissions 191 Automatic Redialing 192 Redialing fax number 192 Receiving a Fax 192 About Receiving Modes 192 Loading Paper for Receiving Faxes 193 Receiving Automatically in the Fax Mode 193 Receiving Manually in the Tel Mode 193 Receiving Automatically in the Ans/Fax Mode...
User's Guide
Page 14
... For a Network-connected Macintosh 216 For a USB-connected Macintosh 217 Printing 218 Printing a Document 218 Changing Printer Settings 218 Printing Multiple Pages on One Sheet of Paper 219 Duplex Printing 220 Scanning 222 Linux Getting Started 224 Installing the MFP Driver 224 System Requirements 224 Installing the MFP Driver 225 Uninstalling the...
... For a Network-connected Macintosh 216 For a USB-connected Macintosh 217 Printing 218 Printing a Document 218 Changing Printer Settings 218 Printing Multiple Pages on One Sheet of Paper 219 Duplex Printing 220 Scanning 222 Linux Getting Started 224 Installing the MFP Driver 224 System Requirements 224 Installing the MFP Driver 225 Uninstalling the...
User's Guide
Page 15
... 246 Backing up Data 247 Backing up Data 247 Restoring Data 247 Cleaning Your Printer 248 Cleaning the Exterior 248 Cleaning the Interior 248 Cleaning the scanner 251 Maintaining the Toner Cartridge 252 Storing the Toner Cartridge 252 Redistributing Toner ... Supplies 257 Troubleshooting Clearing Jams in the DADF 260 Clearing Jams in the Paper Tray 264 Paper Feed Jam (tray 1 265 Paper Feed Jam (optional tray 2 266 MPF Jam 268 Fuser Area Jam 268 Paper Exit Jam 269 Duplex Jam 273 Tips for Avoiding Paper Jams 275 Clearing LCD Error Messages 276 Solving Problems 282...
... 246 Backing up Data 247 Backing up Data 247 Restoring Data 247 Cleaning Your Printer 248 Cleaning the Exterior 248 Cleaning the Interior 248 Cleaning the scanner 251 Maintaining the Toner Cartridge 252 Storing the Toner Cartridge 252 Redistributing Toner ... Supplies 257 Troubleshooting Clearing Jams in the DADF 260 Clearing Jams in the Paper Tray 264 Paper Feed Jam (tray 1 265 Paper Feed Jam (optional tray 2 266 MPF Jam 268 Fuser Area Jam 268 Paper Exit Jam 269 Duplex Jam 273 Tips for Avoiding Paper Jams 275 Clearing LCD Error Messages 276 Solving Problems 282...

User's Guide
Page 16
... Precautions When Installing Printer Accessories 300 Installing Printer Memory 300 Installing an Optional Tray 2 302 Installing Wireless Network interface card 304 Specifications General Specifications 306 Scanner and Copier Specifications 307 Printer Specifications 309 Facsimile Specifications 311 Paper Specifications 312 Overview 312 Guidelines for Using Paper 314 Paper Specifications 315 Paper Output Capacity 315 Printer and Paper Storage Environment 315...
... Precautions When Installing Printer Accessories 300 Installing Printer Memory 300 Installing an Optional Tray 2 302 Installing Wireless Network interface card 304 Specifications General Specifications 306 Scanner and Copier Specifications 307 Printer Specifications 309 Facsimile Specifications 311 Paper Specifications 312 Overview 312 Guidelines for Using Paper 314 Paper Specifications 315 Paper Output Capacity 315 Printer and Paper Storage Environment 315...

User's Guide
Page 18
...of your country's specifications. CAUTION: The printer requires at least two people to lift it . 2 In addition to the Dell 2355dn Laser MFP, ensure that you to the machine...Paper output extension 13. Optional wireless card 2 12 3 4 5 6 1. Optional tray 2 cable connector 5. Fax: Enters the fax menu. 3. b The Software and Documentation CD contains Dell printer drivers, Scan drivers, Printer Settings Utility, Set IP, Macintosh driver, Linux driver, Dell Toner Management System, SmarThru Office and a User's Guide. 17 It is a missing item, contact Dell: Toner cartridge Dell 2355dn...
...of your country's specifications. CAUTION: The printer requires at least two people to lift it . 2 In addition to the Dell 2355dn Laser MFP, ensure that you to the machine...Paper output extension 13. Optional wireless card 2 12 3 4 5 6 1. Optional tray 2 cable connector 5. Fax: Enters the fax menu. 3. b The Software and Documentation CD contains Dell printer drivers, Scan drivers, Printer Settings Utility, Set IP, Macintosh driver, Linux driver, Dell Toner Management System, SmarThru Office and a User's Guide. 17 It is a missing item, contact Dell: Toner cartridge Dell 2355dn...
User's Guide
Page 21
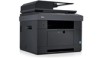
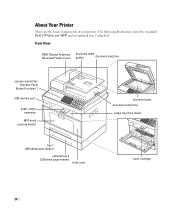
The following illustrations show the standard Dell 2355dn Laser MFP and an optional tray 2 attached: Front View DADF (Duplex Automatic Document Feeder) cover document width guides document input tray operator panel (See "Operator Panel Button Functions".) USB memory port paper output extension MPF (multi purpose feeder) tray 1 (250-sheet paper feeder) optional tray 2 (250-sheet paper feeder) front cover document glass document output tray output tray (face down) toner cartridge 20 About Your Printer These are the main components of your printer.
The following illustrations show the standard Dell 2355dn Laser MFP and an optional tray 2 attached: Front View DADF (Duplex Automatic Document Feeder) cover document width guides document input tray operator panel (See "Operator Panel Button Functions".) USB memory port paper output extension MPF (multi purpose feeder) tray 1 (250-sheet paper feeder) optional tray 2 (250-sheet paper feeder) front cover document glass document output tray output tray (face down) toner cartridge 20 About Your Printer These are the main components of your printer.

User's Guide
Page 23
.... Function Keys Press: To: Deletes characters in queue. You can copy both sides of an ID Card, such as a driver's license, to a single side of paper. Fax Keys Press: To: Dial/Enter number. 22
.... Function Keys Press: To: Deletes characters in queue. You can copy both sides of an ID Card, such as a driver's license, to a single side of paper. Fax Keys Press: To: Dial/Enter number. 22
User's Guide
Page 24
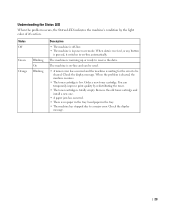
...; The machine is low. Remove the old toner cartridge and install a new one. • A paper jam has occurred. • There is pressed, it 's action. Load paper in the tray. When data is received, or any button is no paper in the tray. • The machine has stopped due to receive the data. Check...
...; The machine is low. Remove the old toner cartridge and install a new one. • A paper jam has occurred. • There is pressed, it 's action. Load paper in the tray. When data is received, or any button is no paper in the tray. • The machine has stopped due to receive the data. Check...

User's Guide
Page 29
... the cables are connected to the printer or result in bad printing quality. 28 See "Loading Paper". 6 Make sure that all the enclosed items. 3 Remove the tape holding the machine tightly. 4 Install the print cartridge. 5 Load paper. NOTE: When you move the printer, do not tilt or turn it... upside down. Otherwise, the inside of the printer may be contaminated by toner, which can cause damage to the printer. 7 Turn the printer on a flat, stable surface so that there is...
... the cables are connected to the printer or result in bad printing quality. 28 See "Loading Paper". 6 Make sure that all the enclosed items. 3 Remove the tape holding the machine tightly. 4 Install the print cartridge. 5 Load paper. NOTE: When you move the printer, do not tilt or turn it... upside down. Otherwise, the inside of the printer may be contaminated by toner, which can cause damage to the printer. 7 Turn the printer on a flat, stable surface so that there is...

User's Guide
Page 32
Loading Paper Load up to its full length. 31 NOTE: Set the paper type and size after loading paper into the paper tray. See "Setting the Paper Type" and "Setting the Paper Size" for the paper used in the paper tray. Load the paper: 1 Pull the paper tray out of the printer. 2 If you load paper that is longer than a standard (Letter or A4) size, such as Legal paper, press and unlatch the guide lock, and then slide the paper length guide out completely to extend the paper tray to 250 sheets of plain paper (75 g/m2, 20lb) in copying and faxing, or "Paper Tab" for computer printing.
Loading Paper Load up to its full length. 31 NOTE: Set the paper type and size after loading paper into the paper tray. See "Setting the Paper Type" and "Setting the Paper Size" for the paper used in the paper tray. Load the paper: 1 Pull the paper tray out of the printer. 2 If you load paper that is longer than a standard (Letter or A4) size, such as Legal paper, press and unlatch the guide lock, and then slide the paper length guide out completely to extend the paper tray to 250 sheets of plain paper (75 g/m2, 20lb) in copying and faxing, or "Paper Tab" for computer printing.

User's Guide
Page 33
3 Slide in the paper length guide until it rests against the end of the stack. 32 For paper smaller than Letter size, adjust the rear paper length guide so that it lightly touches the paper stack. 4 Pinch the paper width guide, and move it towards the stack of paper until it touches the side of the paper stack.
3 Slide in the paper length guide until it rests against the end of the stack. 32 For paper smaller than Letter size, adjust the rear paper length guide so that it lightly touches the paper stack. 4 Pinch the paper width guide, and move it towards the stack of paper until it touches the side of the paper stack.

User's Guide
Page 34
5 Flex the sheets back and forth to be printed on facing down. 7 Do not exceed the maximum stack height indicated by the paper limit marks on both the inside walls of paper guides can result in paper jams. 8 Slide the paper tray back into the paper tray with the side to loosen them, and then fan them out. Do not fold or crease the print media. Align the edges on a level surface. 6 Insert the paper stack into the printer. 33 NOTE: Overloading the paper tray may cause paper jams. NOTE: Improper adjustment of the tray.
5 Flex the sheets back and forth to be printed on facing down. 7 Do not exceed the maximum stack height indicated by the paper limit marks on both the inside walls of paper guides can result in paper jams. 8 Slide the paper tray back into the paper tray with the side to loosen them, and then fan them out. Do not fold or crease the print media. Align the edges on a level surface. 6 Insert the paper stack into the printer. 33 NOTE: Overloading the paper tray may cause paper jams. NOTE: Improper adjustment of the tray.

User's Guide
Page 35
Making Connections Connecting the Telephone Line RJ11 telephone line socket (Line) To the wall jack 1 Plug one end of a telephone line cord into the RJ11 telephone line socket (FAX) and the other end into the extension telephone socket (EXT). 34 9 Set the paper type and size. For more information, see "Setting the Paper Type" and "Setting the Paper Size". To connect a telephone and/or answering machine to your printer, remove the plug from the extension telephone socket (EXT) ( ) and plug the telephone or answering machine into an active wall jack.
Making Connections Connecting the Telephone Line RJ11 telephone line socket (Line) To the wall jack 1 Plug one end of a telephone line cord into the RJ11 telephone line socket (FAX) and the other end into the extension telephone socket (EXT). 34 9 Set the paper type and size. For more information, see "Setting the Paper Type" and "Setting the Paper Size". To connect a telephone and/or answering machine to your printer, remove the plug from the extension telephone socket (EXT) ( ) and plug the telephone or answering machine into an active wall jack.
User's Guide
Page 41
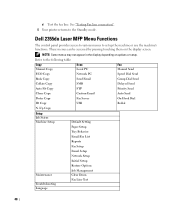
... the display screen. Refer to set up the machine or use the machine's functions. Dell 2355dn Laser MFP Menu Functions The control panel provides access to various menus to the following table: Copy...USB Redial N -Up Copy Setup Job Status Machine Setup Maintenance Troubleshooting Language Default Setting Paper Setup Tray Behavior Email/Fax List Reports Fax Setup Email Setup Network Setup Initial Setup ...Clear Drum Fax Line Test 40 See "Testing Fax line connection". 5 Your printer returns to the Standby mode. These menus can be accessed by pressing touching them on options or...
... the display screen. Refer to set up the machine or use the machine's functions. Dell 2355dn Laser MFP Menu Functions The control panel provides access to various menus to the following table: Copy...USB Redial N -Up Copy Setup Job Status Machine Setup Maintenance Troubleshooting Language Default Setting Paper Setup Tray Behavior Email/Fax List Reports Fax Setup Email Setup Network Setup Initial Setup ...Clear Drum Fax Line Test 40 See "Testing Fax line connection". 5 Your printer returns to the Standby mode. These menus can be accessed by pressing touching them on options or...

User's Guide
Page 54
... is selected. 53 Select Alerts for List 1 • Supply Alert: Select the check box to receive an E-Mail Alert for consumables. • Paper Handling Alert: Select the check box to receive an E-Mail Alert for the E-Mail Alert feature up to 255 alphanumeric characters. Select Alerts for List... 2 • Supply Alert: Select the check box to receive an E-Mail Alert for consumables. • Paper Handling Alert: Select the check box to receive an E-Mail Alert for paper handling. • Toner Low: Select the check box to receive an E-Mail Alert for toner low. • Toner...
... is selected. 53 Select Alerts for List 1 • Supply Alert: Select the check box to receive an E-Mail Alert for consumables. • Paper Handling Alert: Select the check box to receive an E-Mail Alert for the E-Mail Alert feature up to 255 alphanumeric characters. Select Alerts for List... 2 • Supply Alert: Select the check box to receive an E-Mail Alert for consumables. • Paper Handling Alert: Select the check box to receive an E-Mail Alert for paper handling. • Toner Low: Select the check box to receive an E-Mail Alert for toner low. • Toner...


