User Guide
Page 1
... on your area. Select the appropriate service or support link based on your printer. To contact Dell for information on the left for sales, technical support, or customer service issues: 1. Double-click the Dell 2335dn MFP Toner Reorder icon on your printer. Dell provides several online and telephone-based support and service options. Click Contact Us...
... on your area. Select the appropriate service or support link based on your printer. To contact Dell for information on the left for sales, technical support, or customer service issues: 1. Double-click the Dell 2335dn MFP Toner Reorder icon on your printer. Dell provides several online and telephone-based support and service options. Click Contact Us...

User Guide
Page 2
... Read and follow all safety instructions in this text: Dell and DELL logo are trademarks of Dell Inc.; Information in your Product Information Guide prior to install, uninstall, reinstall drivers and utilities or access your printer. Microsoft and Windows are registered trademarks of Adobe Systems... For? disclaims any manner whatsoever without notice. 2008-2010 Dell Inc. Trademarks used in any proprietary interest in this document is subject to avoid the problem. CAUTION: A CAUTION indicates a potential for my printer • My User's Guide DRIVERS AND UTILITIES CD &#...
... Read and follow all safety instructions in this text: Dell and DELL logo are trademarks of Dell Inc.; Information in your Product Information Guide prior to install, uninstall, reinstall drivers and utilities or access your printer. Microsoft and Windows are registered trademarks of Adobe Systems... For? disclaims any manner whatsoever without notice. 2008-2010 Dell Inc. Trademarks used in any proprietary interest in this document is subject to avoid the problem. CAUTION: A CAUTION indicates a potential for my printer • My User's Guide DRIVERS AND UTILITIES CD &#...

User Guide
Page 3
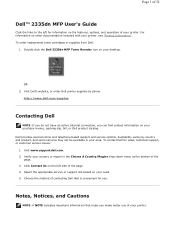
...: Owner's Manual may not be provided with your product depending on the WELCOME TO DELL SUPPORT page, and fill in all countries. • Latest drivers for my printer • Answers to access help tools and information. Drivers • Reference- Select your ... • Customer Care- Upgrade information for my printer Dell Support Website: support.dell.com The Dell Support Website provides several online tools, including: • Solutions- Printer documentation and product specifications You can access Dell Support at support.dell.com. Enter the Express Service Code to direct ...
...: Owner's Manual may not be provided with your product depending on the WELCOME TO DELL SUPPORT page, and fill in all countries. • Latest drivers for my printer • Answers to access help tools and information. Drivers • Reference- Select your ... • Customer Care- Upgrade information for my printer Dell Support Website: support.dell.com The Dell Support Website provides several online tools, including: • Solutions- Printer documentation and product specifications You can access Dell Support at support.dell.com. Enter the Express Service Code to direct ...
User Guide
Page 4
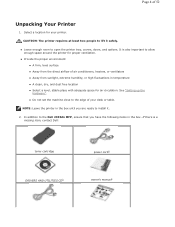
Page 4 of air conditioners, heaters, or ventilators z Away from the direct airflow of 52 Unpacking Your Printer 1. z Leave enough room to the edge of your printer. In addition to the Dell 2335dn MFP, ensure that you have the following items in the box until you are ready to install it safely. If... there is also important to lift it . 2. Select a location for air circulation. CAUTION: The printer requires at least two ...
Page 4 of air conditioners, heaters, or ventilators z Away from the direct airflow of 52 Unpacking Your Printer 1. z Leave enough room to the edge of your printer. In addition to the Dell 2335dn MFP, ensure that you have the following items in the box until you are ready to install it safely. If... there is also important to lift it . 2. Select a location for air circulation. CAUTION: The printer requires at least two ...

User Guide
Page 5
...The power cord must be repacked. 4. b. You can also use AWG#26 or lower gauge cord that is only provided in case the printer needs to be plugged into a grounded power socket. 3. Save the carton and packing material in some countries. Owner's Manual may differ according...to the unlock position as the label is pulled out. The DRIVERS AND UTILITIES CD contains Dell printer drivers, Scan drivers, Printer Settings Utility, Set IP, Macintosh driver, Linux driver, Dell Toner Management System, Dell ScanCenter, PaperPort® and an HTML User's Guide. The scan unlock switch should move ...
...The power cord must be repacked. 4. b. You can also use AWG#26 or lower gauge cord that is only provided in case the printer needs to be plugged into a grounded power socket. 3. Save the carton and packing material in some countries. Owner's Manual may differ according...to the unlock position as the label is pulled out. The DRIVERS AND UTILITIES CD contains Dell printer drivers, Scan drivers, Printer Settings Utility, Set IP, Macintosh driver, Linux driver, Dell Toner Management System, Dell ScanCenter, PaperPort® and an HTML User's Guide. The scan unlock switch should move ...
User Guide
Page 6
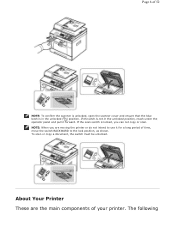
The following If the latch is in the unlocked position, reach under the operator panel and pull it for a long period of your printer. Page 6 of 52 NOTE: To confirm the scanner is unlocked, open the scanner cover and ensure that the blue latch is not in the unlocked ( ) ... or scan. If the scan switch is locked, you are the main components of time, move the switch BACKWARD to use it forward. About Your Printer These are moving the printer or do not intend to the lock position, as shown.
The following If the latch is in the unlocked position, reach under the operator panel and pull it for a long period of your printer. Page 6 of 52 NOTE: To confirm the scanner is unlocked, open the scanner cover and ensure that the blue latch is not in the unlocked ( ) ... or scan. If the scan switch is locked, you are the main components of time, move the switch BACKWARD to use it forward. About Your Printer These are moving the printer or do not intend to the lock position, as shown.
User Guide
Page 10
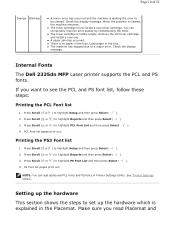
...toner cartridge. Load paper in the tray. Check the display message. Press Scroll ( or ) to highlight Reports and then press Select ( ). 3. See "Printer Settings Utility". z There is no paper in the tray. Press Scroll ( or ) to highlight Setup and then press Select ( ). 2. Press Scroll (...Printing the PS3 Font list 1. Setting up the hardware which is explained in Printer Settings Utility. You can add additional PCL fonts and PS fonts in the Placemat. Internal Fonts The Dell 2335dn MFP Laser printer supports the PCL and PS fonts. Page 10 of 52 Orange Blinking z...
...toner cartridge. Load paper in the tray. Check the display message. Press Scroll ( or ) to highlight Reports and then press Select ( ). 3. See "Printer Settings Utility". z There is no paper in the tray. Press Scroll ( or ) to highlight Setup and then press Select ( ). 2. Press Scroll (...Printing the PS3 Font list 1. Setting up the hardware which is explained in Printer Settings Utility. You can add additional PCL fonts and PS fonts in the Placemat. Internal Fonts The Dell 2335dn MFP Laser printer supports the PCL and PS fonts. Page 10 of 52 Orange Blinking z...

User Guide
Page 12
...NOTE: If toner comes into fabric. See "Loading Paper". 6. Make sure that all the cables are connected to distribute the toner evenly inside of the printer may be contaminated by toner, which can cause damage to avoid touching this area. 2. Installing the Toner Cartridge 1. CAUTION: To prevent damage, do not ...tilt or turn it upside down. Remove the toner cartridge from its bag and thoroughly shake the cartridge from side-to-side to the printer. 7. Hot water sets toner into contact with your clothing, wipe the toner off with a dry cloth and wash your clothing in cold water. ...
...NOTE: If toner comes into fabric. See "Loading Paper". 6. Make sure that all the cables are connected to distribute the toner evenly inside of the printer may be contaminated by toner, which can cause damage to avoid touching this area. 2. Installing the Toner Cartridge 1. CAUTION: To prevent damage, do not ...tilt or turn it upside down. Remove the toner cartridge from its bag and thoroughly shake the cartridge from side-to-side to the printer. 7. Hot water sets toner into contact with your clothing, wipe the toner off with a dry cloth and wash your clothing in cold water. ...
User Guide
Page 13
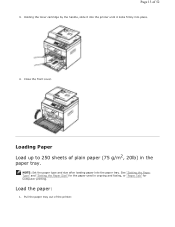
Loading Paper Load up to 250 sheets of 52 3. NOTE: Set the paper type and size after loading paper into place. 4. See "Setting the Paper Type" and "Setting the Paper Size" for the paper used in the paper tray. Page 13 of plain paper (75 g/m2, 20lb) in copying and faxing, or "Paper Tab" for Computer printing. Load the paper: 1. Holding the toner cartridge by the handle, slide it into the printer until it locks firmly into the paper tray. Close the front cover. Pull the paper tray out of the printer.
Loading Paper Load up to 250 sheets of 52 3. NOTE: Set the paper type and size after loading paper into place. 4. See "Setting the Paper Type" and "Setting the Paper Size" for the paper used in the paper tray. Page 13 of plain paper (75 g/m2, 20lb) in copying and faxing, or "Paper Tab" for Computer printing. Load the paper: 1. Holding the toner cartridge by the handle, slide it into the printer until it locks firmly into the paper tray. Close the front cover. Pull the paper tray out of the printer.

User Guide
Page 16
Page 16 of 52 NOTE: Overloading the paper tray may cause paper jams. NOTE: Improper adjustment of paper guides can result in paper jams. 8. Making Connections Connecting the Telephone Line Set the paper type and size. Slide the paper tray back into the printer. 9. For more information, see "Setting the Paper Type" and "Setting the Paper Size".
Page 16 of 52 NOTE: Overloading the paper tray may cause paper jams. NOTE: Improper adjustment of paper guides can result in paper jams. 8. Making Connections Connecting the Telephone Line Set the paper type and size. Slide the paper tray back into the printer. 9. For more information, see "Setting the Paper Type" and "Setting the Paper Size".
User Guide
Page 17
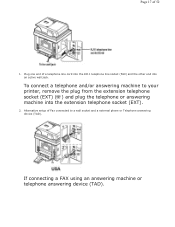
Alternative setup of 52 1. If connecting a FAX using an answering machine or telephone answering device (TAD). Plug one end of a telephone line cord into the RJ11 telephone line socket (FAX) and the other end into the extension telephone socket (EXT). 2. To connect a telephone and/or answering machine to a wall socket and a external phone or Telephone answering device (TAD). Page 17 of Fax connected to your printer, remove the plug from the extension telephone socket (EXT) ( ) and plug the telephone or answering machine into an active wall jack.
Alternative setup of 52 1. If connecting a FAX using an answering machine or telephone answering device (TAD). Plug one end of a telephone line cord into the RJ11 telephone line socket (FAX) and the other end into the extension telephone socket (EXT). 2. To connect a telephone and/or answering machine to a wall socket and a external phone or Telephone answering device (TAD). Page 17 of Fax connected to your printer, remove the plug from the extension telephone socket (EXT) ( ) and plug the telephone or answering machine into an active wall jack.
User Guide
Page 19
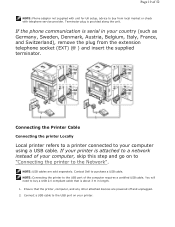
Connecting the Printer Cable Connecting the printer Locally Local printer refers to a printer connected to your country (such as Germany, Sweden, Denmark, ...1. Terminator plug is attached to the Network". You will need to buy a USB 2.0 compliant cable that the printer, computer, and any other attached devices are sold separately. Connect a USB cable to the USB port on your..., skip this step and go on to "Connecting the printer to a network instead of your printer. NOTE: Connecting the printer to purchase a USB cable. If your printer is provided along the unit. Page 19 of 52 NOTE...
Connecting the Printer Cable Connecting the printer Locally Local printer refers to a printer connected to your country (such as Germany, Sweden, Denmark, ...1. Terminator plug is attached to the Network". You will need to buy a USB 2.0 compliant cable that the printer, computer, and any other attached devices are sold separately. Connect a USB cable to the USB port on your..., skip this step and go on to "Connecting the printer to a network instead of your printer. NOTE: Connecting the printer to purchase a USB cable. If your printer is provided along the unit. Page 19 of 52 NOTE...

User Guide
Page 20
..., and any other end of the cable to the Network 1. Connect one end of your printer becomes hot once the printer is powered on. The printer automatically adjusts for the network speed. Powering On the Printer CAUTION: The fusing area at the rear part of the inside of a standard category 5 Unshielded Twisted Pair (UTP... a LAN drop or hub, and the other end to configure the network parameters on the computer, not the USB keyboard. CAUTION: Do not disassemble the printer when it may give you do, it is powered on the back of 52 3. CAUTION: Be careful not to be burned when you need to...
..., and any other end of the cable to the Network 1. Connect one end of your printer becomes hot once the printer is powered on. The printer automatically adjusts for the network speed. Powering On the Printer CAUTION: The fusing area at the rear part of the inside of a standard category 5 Unshielded Twisted Pair (UTP... a LAN drop or hub, and the other end to configure the network parameters on the computer, not the USB keyboard. CAUTION: Do not disassemble the printer when it may give you do, it is powered on the back of 52 3. CAUTION: Be careful not to be burned when you need to...
User Guide
Page 21
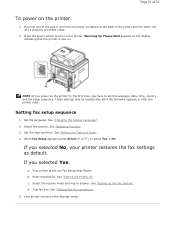
...Testing Fax line connection". 5. See "Changing the Display Language". 2. Set the date and time. If you selected No, your printer restores the fax settings as default. b. c. Your printer returns to answer. See "Setting the Time and Date". 4. a. Select the receive mode and ring to the Standby mode....Press the power switch to set the language, date, time, country and fax setup sequence. If you selected Yes. NOTE: If you power on the printer for the first time, you have to turn on . Set the language. d. See "Selecting Country". 3. When Fax Setup appears, press Scroll (...
...Testing Fax line connection". 5. See "Changing the Display Language". 2. Set the date and time. If you selected No, your printer restores the fax settings as default. b. c. Your printer returns to answer. See "Setting the Time and Date". 4. a. Select the receive mode and ring to the Standby mode....Press the power switch to set the language, date, time, country and fax setup sequence. If you selected Yes. NOTE: If you power on the printer for the first time, you have to turn on . Set the language. d. See "Selecting Country". 3. When Fax Setup appears, press Scroll (...
User Guide
Page 22
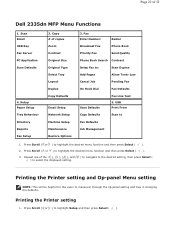
... function and then press Select ( ). 3. Press Scroll ( or ) to highlight the desired menu function and then press Select ( ). 2. Printing the Printer setting 1. Scan Email USB Key Fax Server PC Application Scan Defaults 4. USB Print From Copy Defaults Scan to highlight Setup and then press Select ( ). ... setting. Printing the Printer setting and Op-panel Menu setting NOTE: This will be helpful for the users to : Scan Duplex Add Pages Allow Toner Low Cancel Job Pending Fax On Hook Dial Fax Defaults Scan Defaults Fax Line Test 5. Page 22 of 52 Dell 2335dn MFP Menu Functions 1....
... function and then press Select ( ). 3. Press Scroll ( or ) to highlight the desired menu function and then press Select ( ). 2. Printing the Printer setting 1. Scan Email USB Key Fax Server PC Application Scan Defaults 4. USB Print From Copy Defaults Scan to highlight Setup and then press Select ( ). ... setting. Printing the Printer setting and Op-panel Menu setting NOTE: This will be helpful for the users to : Scan Duplex Add Pages Allow Toner Low Cancel Job Pending Fax On Hook Dial Fax Defaults Scan Defaults Fax Line Test 5. Page 22 of 52 Dell 2335dn MFP Menu Functions 1....

User Guide
Page 23
Press Scroll ( or ) to highlight Op-panel Menu Tree and then press Select ( ). 4. The Printer Settings page prints out. Press Scroll ( or ) to highlight Printer Settings and then press Select ( ). 4. Press Scroll ( or ) to highlight Setup and then press Select ( ). 2. Selecting Country To change the displayed language that appears on ...
Press Scroll ( or ) to highlight Op-panel Menu Tree and then press Select ( ). 4. The Printer Settings page prints out. Press Scroll ( or ) to highlight Printer Settings and then press Select ( ). 4. Press Scroll ( or ) to highlight Setup and then press Select ( ). 2. Selecting Country To change the displayed language that appears on ...
User Guide
Page 24
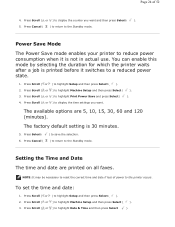
.... NOTE: It may be necessary to reset the correct time and date if loss of 52 4. Power Save Mode The Power Save mode enables your printer to reduce power consumption when it switches to display the country you want and then press Select ( ). 5. Press Select ( 6. Press Scroll ( or ) to ... ( ). Press Scroll ( or ) to highlight Machine Setup and then press Select ( ). 3. You can enable this mode by selecting the duration for which the printer waits after a job is printed before it is 30 minutes. 5. To set the time and date: 1. Press Scroll ( or ) to highlight Print Power Save...
.... NOTE: It may be necessary to reset the correct time and date if loss of 52 4. Power Save Mode The Power Save mode enables your printer to reduce power consumption when it switches to display the country you want and then press Select ( ). 5. Press Select ( 6. Press Scroll ( or ) to ... ( ). Press Scroll ( or ) to highlight Machine Setup and then press Select ( ). 3. You can enable this mode by selecting the duration for which the printer waits after a job is printed before it is 30 minutes. 5. To set the time and date: 1. Press Scroll ( or ) to highlight Print Power Save...

User Guide
Page 25
... the button. Press Select ( ) when the time and date on the display is not under the digit you to proceed to Standard time. 1. NOTE: The printer beeps and does not allow you want to correct and enter a new number. 5. Press Scroll ( or ) to a 24-hour format (e.g. 01:00 PM as 13...
... the button. Press Select ( ) when the time and date on the display is not under the digit you to proceed to Standard time. 1. NOTE: The printer beeps and does not allow you want to correct and enter a new number. 5. Press Scroll ( or ) to a 24-hour format (e.g. 01:00 PM as 13...

User Guide
Page 26
... mode. Press Cancel ( ) to return to highlight Day Light Saving and then press Select ( ). 4. Setting the Time Out Option You can set the time the printer waits before it restores the default copy or fax settings, if you want. Enter Start Date and then press Select ( ). 6. Press Scroll ( or ) to the...
... mode. Press Cancel ( ) to return to highlight Day Light Saving and then press Select ( ). 4. Setting the Time Out Option You can set the time the printer waits before it restores the default copy or fax settings, if you want. Enter Start Date and then press Select ( ). 6. Press Scroll ( or ) to the...

User Guide
Page 27
... Start ( ) to begin copying or faxing, or Cancel ( ) to cancel. 5. Press Scroll ( or ) to highlight Setup and then press Select ( ). 2. Selecting Off means that the printer does not restore the default settings until you want . 5. Activating this default mode to highlight Machine Setup and then press Select ( ). 3.
... Start ( ) to begin copying or faxing, or Cancel ( ) to cancel. 5. Press Scroll ( or ) to highlight Setup and then press Select ( ). 2. Selecting Off means that the printer does not restore the default settings until you want . 5. Activating this default mode to highlight Machine Setup and then press Select ( ). 3.


