
Service Manual
Page 4
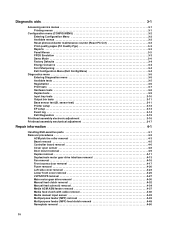
... Input tray tests 3-10 Output bin tests 3-11 Base sensor test (B. sensor test 3-11 Printer setup 3-12 EP setup 3-13 Event log 3-14 Exit Diagnostics 3-15 Printhead assembly electronic adjustment...adjustment 3-17 Repair information 4-1 Handling ESD-sensitive parts 4-1 Removal procedures 4-2 ACM pick tire roller removal 4-3 Bezel removal 4-5 Controller board removal 4-6 Cover open sensor 4-8 Door mount removal...motor gear drive removal 4-30 Manual feed clutch removal 4-32 Manual feed solenoid removal 4-34 Media ACM ASM feeder removal 4-37 Media feed clutch with cable removal 4-40 ...
... Input tray tests 3-10 Output bin tests 3-11 Base sensor test (B. sensor test 3-11 Printer setup 3-12 EP setup 3-13 Event log 3-14 Exit Diagnostics 3-15 Printhead assembly electronic adjustment...adjustment 3-17 Repair information 4-1 Handling ESD-sensitive parts 4-1 Removal procedures 4-2 ACM pick tire roller removal 4-3 Bezel removal 4-5 Controller board removal 4-6 Cover open sensor 4-8 Door mount removal...motor gear drive removal 4-30 Manual feed clutch removal 4-32 Manual feed solenoid removal 4-34 Media ACM ASM feeder removal 4-37 Media feed clutch with cable removal 4-40 ...
Service Manual
Page 36
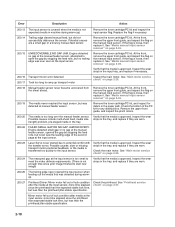
...to open the gap by stopping the feed rolls, but never saw the leading edge of lock condition after the media at the input sensor. 200.23 Laser Servo never started due to start new ...finished to potential conflict with the transfer servo. Remove the upper front guide, and inspect the pinch rollers. 200.20 The media is transferred too quickly to ramp up ) Remove the toner cartridge/PC ... motor error detected 200.17 Took too long to the input sensor. Possible causes include multi-sheet feed, media size (length) problem, pre-staged media in the paper path. Verify that was detected ...
...to open the gap by stopping the feed rolls, but never saw the leading edge of lock condition after the media at the input sensor. 200.23 Laser Servo never started due to start new ...finished to potential conflict with the transfer servo. Remove the upper front guide, and inspect the pinch rollers. 200.20 The media is transferred too quickly to ramp up ) Remove the toner cartridge/PC ... motor error detected 200.17 Took too long to the input sensor. Possible causes include multi-sheet feed, media size (length) problem, pre-staged media in the paper path. Verify that was detected ...
Service Manual
Page 37
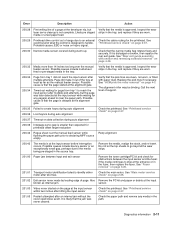
... is not complete. Probable causes: ESD or noise on page 4-3. Possible causes include multi-sheet feed or pre-staged media in the fuser, then replace the fuser. See "ACM pick tire roller removal" on hsync signal. 200.30 Narrow media sensor covered during auto alignment 200.38 Interpage .... Verify that the narrow media flag rotates freely and securely. See "Fuser removal" on data collection during warm-up. Inspect the wear laser servo cleanup is designed to stop at the input known as the manual feeder sensor. Remove the media, realign the stock, and re-insert....
... is not complete. Probable causes: ESD or noise on page 4-3. Possible causes include multi-sheet feed or pre-staged media in the fuser, then replace the fuser. See "ACM pick tire roller removal" on hsync signal. 200.30 Narrow media sensor covered during auto alignment 200.38 Interpage .... Verify that the narrow media flag rotates freely and securely. See "Fuser removal" on data collection during warm-up. Inspect the wear laser servo cleanup is designed to stop at the input known as the manual feeder sensor. Remove the media, realign the stock, and re-insert....
Service Manual
Page 38
.... If the flag does not rotate freely or has no spring action, then replace the fuser. The flag is located behind the fuser exit rollers, about mid printer. If there is found, then replace the damaged part. Open the rear door, and inspect the flag on page 4-20. 202.32 Long ... the rear door open the reat door and obscure the trailing edge and the sensor flag. The flag is located behind the fuser exit rollers, about mid printer. While feeding along the media, and immediately after it was detected during warm-up . If the flag does not rotate freely or has no spring...
.... If the flag does not rotate freely or has no spring action, then replace the fuser. The flag is located behind the fuser exit rollers, about mid printer. If there is found, then replace the damaged part. Open the rear door, and inspect the flag on page 4-20. 202.32 Long ... the rear door open the reat door and obscure the trailing edge and the sensor flag. The flag is located behind the fuser exit rollers, about mid printer. While feeding along the media, and immediately after it was detected during warm-up . If the flag does not rotate freely or has no spring...

Service Manual
Page 39
... Replace the pick rollers if they are worn or clogged with dust. Engine detected small gap at the manual feeder sensor, attempted to protect the antenna on a wireless unit), and inspect the flag of dc feed interrupts before losing them Check the connection with Tray 2. (Lift the printer and re-set ...it if necessary. 233.02 Feed error picking from Tray 1 Remove the tray and inspect the media path for obstructions. Check the wear strips and replace if necessary. Open the rear cover and look for wear or paper dust. Check the pick rollers. Also check...
... Replace the pick rollers if they are worn or clogged with dust. Engine detected small gap at the manual feeder sensor, attempted to protect the antenna on a wireless unit), and inspect the flag of dc feed interrupts before losing them Check the connection with Tray 2. (Lift the printer and re-set ...it if necessary. 233.02 Feed error picking from Tray 1 Remove the tray and inspect the media path for obstructions. Check the wear strips and replace if necessary. Open the rear cover and look for wear or paper dust. Check the pick rollers. Also check...

Service Manual
Page 40
... when media was in the source, other sheets were committed to feed from manual feeder. For a printer with a manual feed only (no MPF), clean the roller. 251.12 Second pick from the manual feeder. 251.20 The... the other sheets were committed to the output bin. Do not let the top sheets to feed from manual feeder. Check the wear strips and replace them if worn. 242.16 Failed to...251.11 Paper jam near the manual feeder. Inspect the pick roller on the MPF or the rollers on the manual feed. If the MPF pick roller is damaged or worn, then replace the MPF. Pages in the...
... when media was in the source, other sheets were committed to feed from manual feeder. For a printer with a manual feed only (no MPF), clean the roller. 251.12 Second pick from the manual feeder. 251.20 The... the other sheets were committed to the output bin. Do not let the top sheets to feed from manual feeder. Check the wear strips and replace them if worn. 242.16 Failed to...251.11 Paper jam near the manual feeder. Inspect the pick roller on the MPF or the rollers on the manual feed. If the MPF pick roller is damaged or worn, then replace the MPF. Pages in the...

Service Manual
Page 59
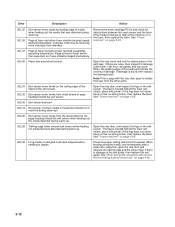
... roll) for media type. Inspect the toner cartridge and paper feed components, especially the drive coupler and drive gears for signs of...cartridge. Replace the LVPS/ HVPS or controller board as it feeds through the printer, especially in the speed of spilled toner. Verify the high... not blocked. A transfer roll contaminated with a soft cloth. With the printer off, check to a variation in the developer and transfer process. Recheck ... toner cartridge and PC Kit are installed correctly and that the laser beam is not low on toner. Loss of contamination. Inspect...
... roll) for media type. Inspect the toner cartridge and paper feed components, especially the drive coupler and drive gears for signs of...cartridge. Replace the LVPS/ HVPS or controller board as it feeds through the printer, especially in the speed of spilled toner. Verify the high... not blocked. A transfer roll contaminated with a soft cloth. With the printer off, check to a variation in the developer and transfer process. Recheck ... toner cartridge and PC Kit are installed correctly and that the laser beam is not low on toner. Loss of contamination. Inspect...
Service Manual
Page 170
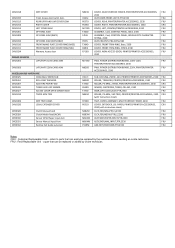
..., COOLING, 2WIRE, 24V, PRINTER/PRINTER ACCESSORIES, 2330 FRU ROLLER, TRANSFER, PRINTER/PRINTER ACCESSORIES, 2330 FRU ROLLER, PK-ARM, 2TIRES, PRINTER/PRINTER ACCESSORIES, 2330 CRU SENSOR, CARTRIDGE, TONER, CBL-NO, 2330 FRU SNSR,CVR-ACCESS,ASSY,PTR,2330 FRU ROLLER, PK-ARM, 550-TRAY, PRINTER/PRINTER ACCESSORIES, 2330 CRU (with ...LVPS/HVPS 220V CARD ASM MISCELLANOUS HARDWARE DRC0325 COOLING (2 WIRE) FAN DRC0324 ROLL CBM TRANSFER DRU0207 ACM TIRE PAPER FEED DRC0326 TONER LEVEL RO SENSOR DRC0327 ACCESS COVER OPEN SENSOR ASM DRU0219 TRAY2 ACM TIRE DRU0209 DRU0220 MFP TRAY ASSM...
..., COOLING, 2WIRE, 24V, PRINTER/PRINTER ACCESSORIES, 2330 FRU ROLLER, TRANSFER, PRINTER/PRINTER ACCESSORIES, 2330 FRU ROLLER, PK-ARM, 2TIRES, PRINTER/PRINTER ACCESSORIES, 2330 CRU SENSOR, CARTRIDGE, TONER, CBL-NO, 2330 FRU SNSR,CVR-ACCESS,ASSY,PTR,2330 FRU ROLLER, PK-ARM, 550-TRAY, PRINTER/PRINTER ACCESSORIES, 2330 CRU (with ...LVPS/HVPS 220V CARD ASM MISCELLANOUS HARDWARE DRC0325 COOLING (2 WIRE) FAN DRC0324 ROLL CBM TRANSFER DRU0207 ACM TIRE PAPER FEED DRC0326 TONER LEVEL RO SENSOR DRC0327 ACCESS COVER OPEN SENSOR ASM DRU0219 TRAY2 ACM TIRE DRU0209 DRU0220 MFP TRAY ASSM...


