
Service Manual
Page 35
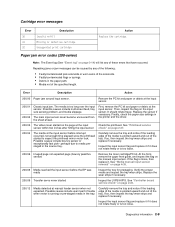
...06 Imaged page not expected page (bouncy passthru sensor) Remove the toner cartridge/PC kit. Carefully remove the tray and notice if the leading edge of the media is running or pre-staged media in the printer and the driver. 200.03 The video never started Inspect the LVPS/HVPS. ... the proper media and inspect the tray wear strips. If so, then inspect the tray wear strips and replace if necessary. Remove the PC kit and paper or debris at the input sensor. Replace the sensor if necessary. Possible causes include bouncy sensor or exceptionally fast pick- See "Controller board service check...
...06 Imaged page not expected page (bouncy passthru sensor) Remove the toner cartridge/PC kit. Carefully remove the tray and notice if the leading edge of the media is running or pre-staged media in the printer and the driver. 200.03 The video never started Inspect the LVPS/HVPS. ... the proper media and inspect the tray wear strips. If so, then inspect the tray wear strips and replace if necessary. Remove the PC kit and paper or debris at the input sensor. Replace the sensor if necessary. Possible causes include bouncy sensor or exceptionally fast pick- See "Controller board service check...
Service Manual
Page 38
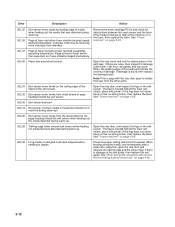
...Fuser removal" on page 4-48. 2-12 See "Fuser removal" on the trailing edge of the sheet at fuser earlier than intended Remove the toner cartridge/PC kit and check for obstructions between the input sensor and the fuser. Indicates code may be receiving more interrupts than expected, so it enters the output...and inspect the flag on the exit sensor. The flag is located behind the fuser exit rollers, about mid printer. If the flag does not rotate freely or has no spring action, then replace the fuser. See "Fuser removal" on page 4-20. 201.27 Page at the entrance or in machine ...
...Fuser removal" on page 4-48. 2-12 See "Fuser removal" on the trailing edge of the sheet at fuser earlier than intended Remove the toner cartridge/PC kit and check for obstructions between the input sensor and the fuser. Indicates code may be receiving more interrupts than expected, so it enters the output...and inspect the flag on the exit sensor. The flag is located behind the fuser exit rollers, about mid printer. If the flag does not rotate freely or has no spring action, then replace the fuser. See "Fuser removal" on page 4-20. 201.27 Page at the entrance or in machine ...
Service Manual
Page 56
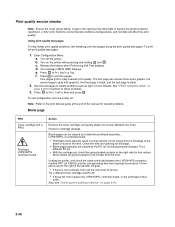
...To exit configuration, turn the printer off the printer. See "POST symptom table" on the printer while pressing and holding and . Try a different toner cartridge and PC kit. • If those fail, then replace the LVPS/HVPS, controller board, or the printhead in printer service errors unless there is blockage...Note: Refer to Prt Quality Pgs. Press to the right of the beam or dust on the right side for cartridge damage. Try a different PC kit. • With the cartridge out, check the spring loaded contacts on the lens. Print quality service checks Note: Ensure the cover closes tightly...
...To exit configuration, turn the printer off the printer. See "POST symptom table" on the printer while pressing and holding and . Try a different toner cartridge and PC kit. • If those fail, then replace the LVPS/HVPS, controller board, or the printhead in printer service errors unless there is blockage...Note: Refer to Prt Quality Pgs. Press to the right of the beam or dust on the right side for cartridge damage. Try a different PC kit. • With the cartridge out, check the spring loaded contacts on the lens. Print quality service checks Note: Ensure the cover closes tightly...
Service Manual
Page 57
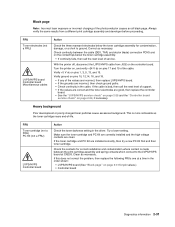
... new PC Kit first and then toner cartridge. If the toner cartridge and PC Kit are clean. Always verify the same results from J502 on pins 17 and 19 of service. With the printer off,...This is bad, then call the next level of the cable. Black page Note: Incorrect laser exposure or incorrect charging of -life. Check continuity between the print cartridge assembly and spring contacts...the photoconductor causes an all black page. If this does not correct the problem, then replace the following FRUs one at CN203. Correct as necessary. Clean as necessary. Check the contacts...
... new PC Kit first and then toner cartridge. If the toner cartridge and PC Kit are clean. Always verify the same results from J502 on pins 17 and 19 of service. With the printer off,...This is bad, then call the next level of the cable. Black page Note: Incorrect laser exposure or incorrect charging of -life. Check continuity between the print cartridge assembly and spring contacts...the photoconductor causes an all black page. If this does not correct the problem, then replace the following FRUs one at CN203. Correct as necessary. Clean as necessary. Check the contacts...
Service Manual
Page 58
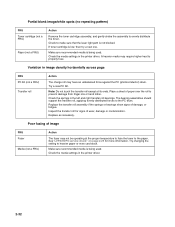
... that the laser light path is being used . Try changing the setting to evenly distribute the toner. If toner cartridge is being used . Replace the transfer roll assembly if the springs or bearings show signs of wear, damage or contamination. Check the springs in the printer driver. Inspect...its ends. Poor fusing of paper over the roll to properly fuse. Make sure recommended media is not blocked. Variation in the printer driver. 2-32 Try a new PC Kit. Place a sheet of image FRU Fuser Media (not a FRU) Action The fuser may require higher heat to prevent damage from...
... that the laser light path is being used . Try changing the setting to evenly distribute the toner. If toner cartridge is being used . Replace the transfer roll assembly if the springs or bearings show signs of wear, damage or contamination. Check the springs in the printer driver. Inspect...its ends. Poor fusing of paper over the roll to properly fuse. Make sure recommended media is not blocked. Variation in the printer driver. 2-32 Try a new PC Kit. Place a sheet of image FRU Fuser Media (not a FRU) Action The fuser may require higher heat to prevent damage from...

Service Manual
Page 59
...the printer off, check to make sure that the toner cartridge is not low on back of page FRU Photoconductor kit (not a FRU) Fuser Transfer roll HVPS or controller board Action Print a menu page found under Utilities, and check settings for signs of contamination. Recheck condition before replacing PC Kit,... Transfer roll LVPS/HVPS card Action Make sure the toner cartridge and PC Kit are installed correctly and that the laser beam is primarily due to a variation in the speed of the media as it feeds through the printer, especially in the order shown: • Transfer roll • LVPS...
...the printer off, check to make sure that the toner cartridge is not low on back of page FRU Photoconductor kit (not a FRU) Fuser Transfer roll HVPS or controller board Action Print a menu page found under Utilities, and check settings for signs of contamination. Recheck condition before replacing PC Kit,... Transfer roll LVPS/HVPS card Action Make sure the toner cartridge and PC Kit are installed correctly and that the laser beam is primarily due to a variation in the speed of the media as it feeds through the printer, especially in the order shown: • Transfer roll • LVPS...
Service Manual
Page 60
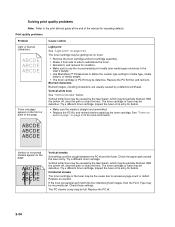
... needed. Check those settings. Print quality problems Problem Light or blurred characters. Replace the PC Kit first, and recheck. Try a different toner cartridge. Vertical or horizontal streaks appear on page 2-33. With the printer off , clear the path or clean the lens. Horizontal streaks The toner cartridge or the fuser... lines See "Vertical streaks" below. Inspect the fuser at its entry for more information. Vertical white lines may be caused by the laser beam, which may be the cause due to the print defects guide at the end of the page. The toner cartridge or fuser ...
... needed. Check those settings. Print quality problems Problem Light or blurred characters. Replace the PC Kit first, and recheck. Try a different toner cartridge. Vertical or horizontal streaks appear on page 2-33. With the printer off , clear the path or clean the lens. Horizontal streaks The toner cartridge or the fuser... lines See "Vertical streaks" below. Inspect the fuser at its entry for more information. Vertical white lines may be caused by the laser beam, which may be the cause due to the print defects guide at the end of the page. The toner cartridge or fuser ...


