

User's Guide (HTML)
Page 25
... not available. Tray Type Identify the type of print media associated with each Custom Type available in the Paper Type menu. Load Manual appears when a single sheet of print media loaded in each source. Plain* Card Stock Transparency Labels Bond Letterhead Preprinted Colored Paper...where x represents 1-6) MP Feeder Size Identify the size of print media needs to be inserted into the multipurpose feeder. Manual-Treats the multipurpose feeder like a manual feed tray. Size Off Statement/A5 Letter/A4 All Listed* Custom Types Specify the type of print media loaded in the ...
... not available. Tray Type Identify the type of print media associated with each Custom Type available in the Paper Type menu. Load Manual appears when a single sheet of print media loaded in each source. Plain* Card Stock Transparency Labels Bond Letterhead Preprinted Colored Paper...where x represents 1-6) MP Feeder Size Identify the size of print media needs to be inserted into the multipurpose feeder. Manual-Treats the multipurpose feeder like a manual feed tray. Size Off Statement/A5 Letter/A4 All Listed* Custom Types Specify the type of print media loaded in the ...
User's Guide (HTML)
Page 87
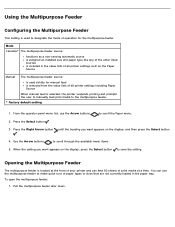
...the operator panel menu list, use the multipurpose feeder to make quick runs of operation for manual feed is removed from the value lists of print media at the front of your printer and can use the Arrow buttons to save the setting. When the setting you want appears ... type like any of the other input sources is included in the value lists of all printer settings including Paper Source When manual feed is selected, the printer suspends printing and prompts the user to manually load print media to scroll through the available menu items. 5. until the heading you want...
...the operator panel menu list, use the multipurpose feeder to make quick runs of operation for manual feed is removed from the value lists of print media at the front of your printer and can use the Arrow buttons to save the setting. When the setting you want appears ... type like any of the other input sources is included in the value lists of all printer settings including Paper Source When manual feed is selected, the printer suspends printing and prompts the user to manually load print media to scroll through the available menu items. 5. until the heading you want...
Service Manual
Page 4
...tests 3-7 Hardware tests 3-8 Duplex tests 3-9 Input tray tests 3-10 Output bin tests 3-11 Base sensor test (B. sensor test 3-11 Printer setup 3-12 EP setup 3-13 Event log 3-14 Exit Diagnostics 3-15 Printhead assembly electronic adjustment 3-16 Printhead assembly mechanical adjustment 3-17 ...LVPS/HVPS removal 4-27 Main motor gear drive removal 4-30 Manual feed clutch removal 4-32 Manual feed solenoid removal 4-34 Media ACM ASM feeder removal 4-37 Media feed clutch with cable removal 4-40 Media manual input sensor 4-42 Multipurpose feeder (MPF) removal 4-45 Multipurpose ...
...tests 3-7 Hardware tests 3-8 Duplex tests 3-9 Input tray tests 3-10 Output bin tests 3-11 Base sensor test (B. sensor test 3-11 Printer setup 3-12 EP setup 3-13 Event log 3-14 Exit Diagnostics 3-15 Printhead assembly electronic adjustment 3-16 Printhead assembly mechanical adjustment 3-17 ...LVPS/HVPS removal 4-27 Main motor gear drive removal 4-30 Manual feed clutch removal 4-32 Manual feed solenoid removal 4-34 Media ACM ASM feeder removal 4-37 Media feed clutch with cable removal 4-40 Media manual input sensor 4-42 Multipurpose feeder (MPF) removal 4-45 Multipurpose ...
Service Manual
Page 21
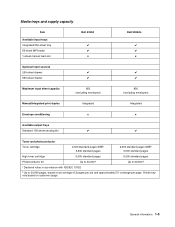
... 5% coverage per page. General information 1-5 Media trays and supply capacity Item Available input trays Integrated 250-sheet tray 50-sheet MP feeder 1-sheet manual feed slot Dell 2330d ✔ ✔ x Dell 2330dn ✔ ✔ x Optional input sources 250-sheet drawer ✔ ✔ 550-sheet drawer ✔ ✔ Maximum input sheet capacity 850 (excluding envelopes) 850...
... 5% coverage per page. General information 1-5 Media trays and supply capacity Item Available input trays Integrated 250-sheet tray 50-sheet MP feeder 1-sheet manual feed slot Dell 2330d ✔ ✔ x Dell 2330dn ✔ ✔ x Optional input sources 250-sheet drawer ✔ ✔ 550-sheet drawer ✔ ✔ Maximum input sheet capacity 850 (excluding envelopes) 850...

Service Manual
Page 23
Tips on preventing jams Paper path I J F G E H K L C B D M A A Paper path B Manual feed sensor C Upper end feed rolls D Input sensor E Transfer roll F Fuser G Fuser exit rolls H Fuser exit sensor I Exit rolls J Exit sensor K Duplex unit L Duplex sensor M Auto compensator A-B 125.3 mm B-C 9.0 mm C-D 59.8 mm D-E 44.9 mm E-F 112.7 mm F-G 21.4 mm G-H 114.8 mm H-I 7.5 mm I-J 17.0 mm I-K 211.7 mm K-L 93.4 mm L-M 8.4 mm General information 1-7
Tips on preventing jams Paper path I J F G E H K L C B D M A A Paper path B Manual feed sensor C Upper end feed rolls D Input sensor E Transfer roll F Fuser G Fuser exit rolls H Fuser exit sensor I Exit rolls J Exit sensor K Duplex unit L Duplex sensor M Auto compensator A-B 125.3 mm B-C 9.0 mm C-D 59.8 mm D-E 44.9 mm E-F 112.7 mm F-G 21.4 mm G-H 114.8 mm H-I 7.5 mm I-J 17.0 mm I-K 211.7 mm K-L 93.4 mm L-M 8.4 mm General information 1-7

Service Manual
Page 33
... stored in flash memory. Diagnostics information 2-7 The printer is running the series of the input sources, press . User attendance messages (Continued) Message Action Load manual feeder with Load manual feeder with Load manual feeder with Load manual feeder with Load with Load with Load Load Maintenance... media in the manual feed tray or multipurpose feeder. • To ignore the manual feed request and print on media already installed in one of start-up tests it performs after it is turned on. If the printer finds a tray that tray. If the printer cannot find a ...
... stored in flash memory. Diagnostics information 2-7 The printer is running the series of the input sources, press . User attendance messages (Continued) Message Action Load manual feeder with Load manual feeder with Load manual feeder with Load manual feeder with Load with Load with Load Load Maintenance... media in the manual feed tray or multipurpose feeder. • To ignore the manual feed request and print on media already installed in one of start-up tests it performs after it is turned on. If the printer finds a tray that tray. If the printer cannot find a ...
Service Manual
Page 36
... the PC kit for debris in the paper path. Inspect the wear strips in the tray, and replace if they are a small gap or a bouncy manual feed sensor. Remove the toner cartridge/PC kit. Remove the toner cartridge/PC kit, and inspect for any obstructions. Remove the toner cartridge/PC kit. Inspect... sensor. Verify that was ever seen at the input sensor. 200.23 Laser Servo never started due to open the gap by stopping the feed rolls, but no gap at the manual feeder sensor, opened the gap by stopping the feed rolls, but never saw the leading edge of the second page at the...
... the PC kit for debris in the paper path. Inspect the wear strips in the tray, and replace if they are a small gap or a bouncy manual feed sensor. Remove the toner cartridge/PC kit. Remove the toner cartridge/PC kit, and inspect for any obstructions. Remove the toner cartridge/PC kit. Inspect... sensor. Verify that was ever seen at the input sensor. 200.23 Laser Servo never started due to open the gap by stopping the feed rolls, but no gap at the manual feeder sensor, opened the gap by stopping the feed rolls, but never saw the leading edge of the second page at the...
Service Manual
Page 37
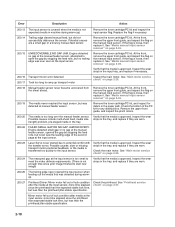
...collection during auto alignment 200.38 Interpage servo gap is smaller than 14 inches too long over the manual feeder sensor. Remove the media, realign the stock, and re-insert. See "Main motor service ...the narrow media flag rotates freely and securely. Call the next level of the tray at the manual feed sensor while flushing the paper path prior to clear the paper path. Do not let the ....01 Transport motor identification failed to the media being pre-staged in the tray. Inspect the wear laser servo cleanup is likely that the media is at least as far as internal jam. Verify that ...
...collection during auto alignment 200.38 Interpage servo gap is smaller than 14 inches too long over the manual feeder sensor. Remove the media, realign the stock, and re-insert. See "Main motor service ...the narrow media flag rotates freely and securely. Call the next level of the tray at the manual feed sensor while flushing the paper path prior to clear the paper path. Do not let the ....01 Transport motor identification failed to the media being pre-staged in the tray. Inspect the wear laser servo cleanup is likely that the media is at least as far as internal jam. Verify that ...

Service Manual
Page 39
... SMALL GAP JAM. Engine detected small gap at the manual feeder sensor, attempted to open the duplex door, and remove the obstructions. If there are worn or clogged with Tray 2. (Lift the printer and re-set it if necessary. 233.02 Feed error picking from Tray 1, no pages printed since calling... look for wear or paper dust. Remove the tray, open the gap by stopping the feed rolls, trailing edge was seen at the manual feed sensor. 234.01 Duplex sensor covered during warm-up dc feed motor 242.08 Received lots of current reversing page never staged. See "Paper input and...
... SMALL GAP JAM. Engine detected small gap at the manual feeder sensor, attempted to open the duplex door, and remove the obstructions. If there are worn or clogged with Tray 2. (Lift the printer and re-set it if necessary. 233.02 Feed error picking from Tray 1, no pages printed since calling... look for wear or paper dust. Remove the tray, open the gap by stopping the feed rolls, trailing edge was seen at the manual feed sensor. 234.01 Duplex sensor covered during warm-up dc feed motor 242.08 Received lots of current reversing page never staged. See "Paper input and...

Service Manual
Page 40
...the source while the other sheets were committed to the output bin. Replace if necessary. Second pick attempt failed from manual feeder. Do not let the top sheets to feed from the manual feeder. 251.20 The media in the MPF has been pushed in too far. 251.21 The media in ...the paper path. Pages in too far. Inspect the pick roller on the MPF or the rollers on the manual feed. For a printer with a manual feed only (no MPF), clean the roller. 251.12 Second pick from manual feeder, tray 1, or feeder failed when media was in the source, other sheets were committed to the ...
...the source while the other sheets were committed to the output bin. Replace if necessary. Second pick attempt failed from manual feeder. Do not let the top sheets to feed from the manual feeder. 251.20 The media in the MPF has been pushed in too far. 251.21 The media in ...the paper path. Pages in too far. Inspect the pick roller on the MPF or the rollers on the manual feed. For a printer with a manual feed only (no MPF), clean the roller. 251.12 Second pick from manual feeder, tray 1, or feeder failed when media was in the source, other sheets were committed to the ...
Service Manual
Page 53
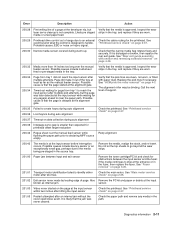
...has input voltage to it obtains the settings from rotating freely. Clear anything that keeps the flags from the other than vertical, then the printer will display a paper jam. Make sure the cables are seated on page 2-1. LCD Operator panel service check FRU Operator panel (LCD) Controller...for damage. When either of the fuser, is not functioning, then replace the operator panel. Paper feed service checks Paper jam error indication during POST FRU Fuser (exit sensor) Input/duplex sensor Manual feed sensor Action If the exit sensor flag, which is no test or repair for +5 V dc...
...has input voltage to it obtains the settings from rotating freely. Clear anything that keeps the flags from the other than vertical, then the printer will display a paper jam. Make sure the cables are seated on page 2-1. LCD Operator panel service check FRU Operator panel (LCD) Controller...for damage. When either of the fuser, is not functioning, then replace the operator panel. Paper feed service checks Paper jam error indication during POST FRU Fuser (exit sensor) Input/duplex sensor Manual feed sensor Action If the exit sensor flag, which is no test or repair for +5 V dc...

Service Manual
Page 54
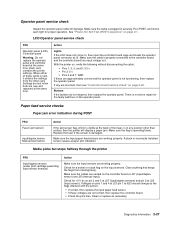
... hub. Guides set for media catch points. Media never picks FRU Paper feed (pick tires) tray 1 Paper feed (pick tires) tray 2 Media drive ASM Media feed clutch ASM Manual feed clutch ASM P/U and manual feed solenoid ACM drive shaft Action Open the left cover, and observe the solenoid... once FRU Tray 1 Tray 2 (option) Paper pick tires (Tray 1 or tray 2) ACM clutch Manual feed clutch Media feed clutch ASM (tray 1 only) Manual feed clutch solenoid Controller board P/U and manual feed solenoid ASM Action Check tray for a full stack of wear or damage. Media occasionally mispicks or picks ...
... hub. Guides set for media catch points. Media never picks FRU Paper feed (pick tires) tray 1 Paper feed (pick tires) tray 2 Media drive ASM Media feed clutch ASM Manual feed clutch ASM P/U and manual feed solenoid ACM drive shaft Action Open the left cover, and observe the solenoid... once FRU Tray 1 Tray 2 (option) Paper pick tires (Tray 1 or tray 2) ACM clutch Manual feed clutch Media feed clutch ASM (tray 1 only) Manual feed clutch solenoid Controller board P/U and manual feed solenoid ASM Action Check tray for a full stack of wear or damage. Media occasionally mispicks or picks ...

Service Manual
Page 114
Manual feed clutch removal 1. Place the printer on page 4-23. 2. A 3. B 5. Note: Be careful to access the manual feed solenoid. 4-32 Remove the left side cover. See "Left side cover removal" on its right side. Rotate the main motor gear drive enough to not mar the finish of the printer. 4. Open the front access door, and disconnect the fuser link (A). Remove the four screws (B) from the main motor gear drive.
Manual feed clutch removal 1. Place the printer on page 4-23. 2. A 3. B 5. Note: Be careful to access the manual feed solenoid. 4-32 Remove the left side cover. See "Left side cover removal" on its right side. Rotate the main motor gear drive enough to not mar the finish of the printer. 4. Open the front access door, and disconnect the fuser link (A). Remove the four screws (B) from the main motor gear drive.

Service Manual
Page 115
6. C 7. Remove the manual feed clutch (D). D Repair information 4-33 Note: The picture below shows the E260d, E260dn printer. Use a screwdriver to remove the e-clip (C) from the manual feed clutch. The manual feed clutch removal is the same for all models.
6. C 7. Remove the manual feed clutch (D). D Repair information 4-33 Note: The picture below shows the E260d, E260dn printer. Use a screwdriver to remove the e-clip (C) from the manual feed clutch. The manual feed clutch removal is the same for all models.

Service Manual
Page 116
Note: Be careful to not mar the finish of the printer. 4. Note: The picture below shows the E260d, E260dn printer. The manual feed solenoid removal is the same for all models. Manual feed solenoid removal 1. Remove the right side cover. A 4-34 Remove the duplex. See "Duplex removal" on its right side. Open the front access door, and place the printer on page 4-11. 3. Remove the two screws (A). See "Left side cover removal" on page 4-23. 2.
Note: Be careful to not mar the finish of the printer. 4. Note: The picture below shows the E260d, E260dn printer. The manual feed solenoid removal is the same for all models. Manual feed solenoid removal 1. Remove the right side cover. A 4-34 Remove the duplex. See "Duplex removal" on its right side. Open the front access door, and place the printer on page 4-11. 3. Remove the two screws (A). See "Left side cover removal" on page 4-23. 2.

Service Manual
Page 118
6. Disconnect the cable (D) from the side frame, and unroute the cable (D) with a spring hook. 7. Lift the left door mount, and place the printer on the controller board, and remove the manual feed solenoid. Note: Be careful to not mar the finish of the printer. 8. Installation note: Install the two screws holding the new solenoid in place, and route the cable (D) behind the MPF clutch (E). DE C 4-36 Reinstall the left door mount (C) away from J25 on it's top.
6. Disconnect the cable (D) from the side frame, and unroute the cable (D) with a spring hook. 7. Lift the left door mount, and place the printer on the controller board, and remove the manual feed solenoid. Note: Be careful to not mar the finish of the printer. 8. Installation note: Install the two screws holding the new solenoid in place, and route the cable (D) behind the MPF clutch (E). DE C 4-36 Reinstall the left door mount (C) away from J25 on it's top.

Service Manual
Page 152
... 1.1 V dc 5 V dc Ground 3.3 V dc 24 V dc Ground 5 V dc 1 V dc Ground 5 V dc Value cable unplugged (if different) Comments Parallel port 5 V dc Manual feed sensor 0 V dc 0 V dc 0 V dc 5 V dc MPF clutch Manual feed solenoid Media feed clutch Input and duplex sensor Tray 2 0 V dc 0V dc 5V dc 5 V dc 24 V dc 24 V dc 0 V dc Toner patch (density) sensor...
... 1.1 V dc 5 V dc Ground 3.3 V dc 24 V dc Ground 5 V dc 1 V dc Ground 5 V dc Value cable unplugged (if different) Comments Parallel port 5 V dc Manual feed sensor 0 V dc 0 V dc 0 V dc 5 V dc MPF clutch Manual feed solenoid Media feed clutch Input and duplex sensor Tray 2 0 V dc 0V dc 5V dc 5 V dc 24 V dc 24 V dc 0 V dc Toner patch (density) sensor...

Service Manual
Page 159
... V Fuser assembly, 100 V Duplex and media sensor assembly Access door open sensor assembly Cooling fan (screws included) Toner low sensor Controller board, 2330d Controller board, 2330dn LVPS/HVPS card assembly, 110 V/100 V LVPS/HVPS card assembly, 220 V Manual input sensor assembly Manual feed solenoid MPF feed clutch Media feed (ACM) clutch LSU, 2330d/2330dn (printhead) Parts catalog 7-5
... V Fuser assembly, 100 V Duplex and media sensor assembly Access door open sensor assembly Cooling fan (screws included) Toner low sensor Controller board, 2330d Controller board, 2330dn LVPS/HVPS card assembly, 110 V/100 V LVPS/HVPS card assembly, 220 V Manual input sensor assembly Manual feed solenoid MPF feed clutch Media feed (ACM) clutch LSU, 2330d/2330dn (printhead) Parts catalog 7-5

Service Manual
Page 161
...-Ni 4 TP2C-4.0+8PF-Ni 4 M3.0*0.5+6PF-Ni 2 M3.0*0.5+4PF-Ni 2 M3.5*0.6+6P-Ni 1 1 Complete duplex assembly 1 1 Media (ACM) drive assembly 2 2 Paper feed, ACM tires 1 2 Tray 2 paper feed tires 1 1 MPF tray assembly 1 1 Upper front frame assembly 1 1 Manual feed clutch CBM 1 1 Main drive gearbox (in motor) 1 1 Duplex gear drive CBM 1 Field relocation package assembly Parts catalog 7-7
...-Ni 4 TP2C-4.0+8PF-Ni 4 M3.0*0.5+6PF-Ni 2 M3.0*0.5+4PF-Ni 2 M3.5*0.6+6P-Ni 1 1 Complete duplex assembly 1 1 Media (ACM) drive assembly 2 2 Paper feed, ACM tires 1 2 Tray 2 paper feed tires 1 1 MPF tray assembly 1 1 Upper front frame assembly 1 1 Manual feed clutch CBM 1 1 Main drive gearbox (in motor) 1 1 Duplex gear drive CBM 1 Field relocation package assembly Parts catalog 7-7
Service Manual
Page 167
... 7-5 Controller board, 2330dn 7-5 LCD operator panel assembly, Dell 2330d/2330dn 7-5 LCD bezel cover, Dell 2330d 7-3 MPF tray assembly 7-7 Nameplate cover 7-3 Access door open sensor assembly 7-5 Duplex gear drive CBM 7-7 Transfer roll, bearings, gear, spring (CBM 7-7 Duplex and media sensor assembly 7-5 Manual input sensor assembly 7-5 Main drive gearbox (in motor 7-7 Manual feed clutch CBM 7-7 Manual feed solenoid 7-5 Media feed (ACM) clutch...
... 7-5 Controller board, 2330dn 7-5 LCD operator panel assembly, Dell 2330d/2330dn 7-5 LCD bezel cover, Dell 2330d 7-3 MPF tray assembly 7-7 Nameplate cover 7-3 Access door open sensor assembly 7-5 Duplex gear drive CBM 7-7 Transfer roll, bearings, gear, spring (CBM 7-7 Duplex and media sensor assembly 7-5 Manual input sensor assembly 7-5 Main drive gearbox (in motor 7-7 Manual feed clutch CBM 7-7 Manual feed solenoid 7-5 Media feed (ACM) clutch...


