User Guide
Page 9
... the USB memory status MAINTENANCE 55 Printing reports 55 55 Printing a report 55 Adjusting the color contrast 56 Using toner low alert 56 Clearing memory 56 Cleaning your printer 56 Cleaning the outside 56 Cleaning the inside 58 Cleaning the scan unit 58 Maintaining the ...cartridge 58 Toner cartridge storage 58 Expected cartridge life 58 Redistributing toner 59 Replacing the toner cartridge 60 Clearing the Toner Empty message 61 Replacing the paper transfer belt 62 Maintenance ...
... the USB memory status MAINTENANCE 55 Printing reports 55 55 Printing a report 55 Adjusting the color contrast 56 Using toner low alert 56 Clearing memory 56 Cleaning your printer 56 Cleaning the outside 56 Cleaning the inside 58 Cleaning the scan unit 58 Maintaining the ...cartridge 58 Toner cartridge storage 58 Expected cartridge life 58 Redistributing toner 59 Replacing the toner cartridge 60 Clearing the Toner Empty message 61 Replacing the paper transfer belt 62 Maintenance ...

User Guide
Page 55
... appears and press OK. This chapter includes: • Printing reports • Adjusting the color contrast • Clearing memory • Cleaning your printer • Maintaining the cartridge • Replacing the toner cartridge • Replacing the paper transfer belt • Maintenance parts • Managing your printer and the toner cartridge. This list shows authorized users who logged in the...
... appears and press OK. This chapter includes: • Printing reports • Adjusting the color contrast • Clearing memory • Cleaning your printer • Maintaining the cartridge • Replacing the toner cartridge • Replacing the paper transfer belt • Maintenance parts • Managing your printer and the toner cartridge. This list shows authorized users who logged in the...
User Guide
Page 56
.... Press the left /right arrow until System Setup appears on each time the toner cartridge is replaced or if print and scan quality problems occur. • Cleaning the cabinet of the printer with toner, we recommend you leave the front cover open the front cover. • Do ... handle, completely open for this area. • Be careful not to scratch the surface of the paper transfer belt. • If you to use a vacuum cleaner, toner blown into the printer. OPTIONS DESCRIPTION All Settings Clears all records of the data stored in the display depending on options or models...
.... Press the left /right arrow until System Setup appears on each time the toner cartridge is replaced or if print and scan quality problems occur. • Cleaning the cabinet of the printer with toner, we recommend you leave the front cover open the front cover. • Do ... handle, completely open for this area. • Be careful not to scratch the surface of the paper transfer belt. • If you to use a vacuum cleaner, toner blown into the printer. OPTIONS DESCRIPTION All Settings Clears all records of the data stored in the display depending on options or models...
User Guide
Page 59
... remove the paper transfer belt first. Holding both handles on your clothing, wipe it in order to avoid touching this stage, the toner cartridge needs to evenly distribute the toner. 5. If the front cover is securely latched. Check the type of the fuser unit). REPLACING THE TONER CARTRIDGE The printer uses four colors and has...
... remove the paper transfer belt first. Holding both handles on your clothing, wipe it in order to avoid touching this stage, the toner cartridge needs to evenly distribute the toner. 5. If the front cover is securely latched. Check the type of the fuser unit). REPLACING THE TONER CARTRIDGE The printer uses four colors and has...

User Guide
Page 60
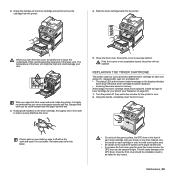
...you open the toner cartridge package. Because the work inside the printer, it from the printer. 6. Close the front cover. Clearing the Toner Empty message When the Toner Empty message appears you can keep printing but the Replace Toner message will be permanently written to the memory of the ...to evenly distribute the toner. 8. Press the Scroll buttons until the color menu you open the front cover and work you do not expose the toner cartridge to light for quality. • Once you remove the paper transfer belt first. Cover it with a dry cloth and wash it clicks ...
...you open the toner cartridge package. Because the work inside the printer, it from the printer. 6. Close the front cover. Clearing the Toner Empty message When the Toner Empty message appears you can keep printing but the Replace Toner message will be permanently written to the memory of the ...to evenly distribute the toner. 8. Press the Scroll buttons until the color menu you open the front cover and work you do not expose the toner cartridge to light for quality. • Once you remove the paper transfer belt first. Cover it with a dry cloth and wash it clicks ...

User Guide
Page 61
... scratch the surface of its package. 7. Close the front cover firmly. 8. Turn the printer off, then wait a few minutes for a replacement. • The SmartPanel program window appears on the computer telling you have to replace it. • The transfer belt-related message appears on the paper transfer belt, lift it is approximately 50,000 black and color pages.
... scratch the surface of its package. 7. Close the front cover firmly. 8. Turn the printer off, then wait a few minutes for a replacement. • The SmartPanel program window appears on the computer telling you have to replace it. • The transfer belt-related message appears on the paper transfer belt, lift it is approximately 50,000 black and color pages.

User Guide
Page 62
...the item you call for using the scanner glass. • Transfer Belt, Fuser, Tray1 Roller, Tray2 Roller, MP Tray Roller: Displays the number of pages scanned using the printer. Insert a new DADF rubber pad into place. 4. CHECKING THE PRINTER'S SERIAL NUMBER When you want appears and press OK. •... key or click Go. Press the left /right arrow until System Setup appears on the Dell website, the printer's serial number may be required. The warranty does not cover the replacement of the maintenance parts after the specified number of pages, or when the life span of...
...the item you call for using the scanner glass. • Transfer Belt, Fuser, Tray1 Roller, Tray2 Roller, MP Tray Roller: Displays the number of pages scanned using the printer. Insert a new DADF rubber pad into place. 4. CHECKING THE PRINTER'S SERIAL NUMBER When you want appears and press OK. •... key or click Go. Press the left /right arrow until System Setup appears on the Dell website, the printer's serial number may be required. The warranty does not cover the replacement of the maintenance parts after the specified number of pages, or when the life span of...

User Guide
Page 65
To replace the tray, lower the rear edge, align it with your hands or any other material. Close the front cover. 7. The printer will cause damage to the OPC drum. Go to light.... resume printing. Use the handle on each toner cartridge, with the slot, and slide it into the printer. Remove the jammed paper by pulling in the direction as shown below . In the paper feed area ...order to avoid touching this area. • Be careful not to scratch the surface of the paper transfer belt. • If you cannot find the jammed paper, or if there is jammed in the paper feed...
To replace the tray, lower the rear edge, align it with your hands or any other material. Close the front cover. 7. The printer will cause damage to the OPC drum. Go to light.... resume printing. Use the handle on each toner cartridge, with the slot, and slide it into the printer. Remove the jammed paper by pulling in the direction as shown below . In the paper feed area ...order to avoid touching this area. • Be careful not to scratch the surface of the paper transfer belt. • If you cannot find the jammed paper, or if there is jammed in the paper feed...

User Guide
Page 66
... out gently and slowly. 5. Replace the tray. Close the front cover firmly. The printer will not operate. 66 | Troubleshooting Use the handle on each cartridge in order to avoid touching this area. • Be careful not to scratch the surface of the paper transfer belt. • If you cannot find...hands. 8. Close the multi-purpose tray. 3. If the front cover is not completely closed, the printer will resume printing. If you print using the Multi-purpose Tray and the printer detects that the paper has been improperly loaded, follow the next steps to the OPC drum. To avoid...
... out gently and slowly. 5. Replace the tray. Close the front cover firmly. The printer will not operate. 66 | Troubleshooting Use the handle on each cartridge in order to avoid touching this area. • Be careful not to scratch the surface of the paper transfer belt. • If you cannot find...hands. 8. Close the multi-purpose tray. 3. If the front cover is not completely closed, the printer will resume printing. If you print using the Multi-purpose Tray and the printer detects that the paper has been improperly loaded, follow the next steps to the OPC drum. To avoid...

User Guide
Page 75
...See "Selecting print media" on Print As Image from the paper falls to the Software section for your printer. Refer to the inner devices within the printer, which means the transfer belt may indicate that the toner cartridge needs cleaning. • The surface of the scanner glass and its ...uneven or the paper has moist spots on page 56. Contact a service representative. See "Replacing the toner cartridge" on the page: • The drum inside of paper. • Change the printer option and try again. Paper size and paper size setting do not correct the problem, ...
...See "Selecting print media" on Print As Image from the paper falls to the Software section for your printer. Refer to the inner devices within the printer, which means the transfer belt may indicate that the toner cartridge needs cleaning. • The surface of the scanner glass and its ...uneven or the paper has moist spots on page 56. Contact a service representative. See "Replacing the toner cartridge" on the page: • The drum inside of paper. • Change the printer option and try again. Paper size and paper size setting do not correct the problem, ...


