User Guide
Page 4
... setting up your new laser printer To access a printer driver help information on printer driver properties and instructions for setting up the properties for printing. Dell website If you have Internet access, you can get help, support, printer drivers, manuals, and order information from the Dell websites www.dell.com or support.dell.com. 4 | Features of your printer and this requires...
... setting up your new laser printer To access a printer driver help information on printer driver properties and instructions for setting up the properties for printing. Dell website If you have Internet access, you can get help, support, printer drivers, manuals, and order information from the Dell websites www.dell.com or support.dell.com. 4 | Features of your printer and this requires...
User Guide
Page 9
... 44 Receiving a fax 44 Selecting the paper tray 44 Changing receiving modes 45 Receiving automatically in Fax mode 45 Receiving manually in Tel mode 45 Receiving manually using an extension telephone 45 Receiving automatically in Ans/Fax mode 45 Receiving faxes using DRPD mode 46 Receiving in secure ... 54 Viewing the USB memory status MAINTENANCE 55 Printing reports 55 55 Printing a report 55 Adjusting the color contrast 56 Using toner low alert 56 Clearing memory 56 Cleaning your printer 56 Cleaning the outside 56 Cleaning the inside 58 Cleaning the scan unit 58 Maintaining the cartridge 58...
... 44 Receiving a fax 44 Selecting the paper tray 44 Changing receiving modes 45 Receiving automatically in Fax mode 45 Receiving manually in Tel mode 45 Receiving manually using an extension telephone 45 Receiving automatically in Ans/Fax mode 45 Receiving faxes using DRPD mode 46 Receiving in secure ... 54 Viewing the USB memory status MAINTENANCE 55 Printing reports 55 55 Printing a report 55 Adjusting the color contrast 56 Using toner low alert 56 Clearing memory 56 Cleaning your printer 56 Cleaning the outside 56 Cleaning the inside 58 Cleaning the scan unit 58 Maintaining the cartridge 58...

User Guide
Page 18
... and gateway address. Click OK, then the printer prints the network information. Click Exit. 18 | Getting started SYSTEM REQUIREMENTS Before you begin, ensure that allows you to select a network interface and manually configure the IP addresses for all Windows operating ...to the network with an RJ-45 Ethernet cable. 2. Setting network values 1. Repeat this printer. From the Windows Start menu, select All Programs → Dell → Dell Printers → Dell 2145cn Color Laser MFP → Dell 2145cn Color Laser MFP → Set IP. 3. Confirm the settings are not sure how to configure....
... and gateway address. Click OK, then the printer prints the network information. Click Exit. 18 | Getting started SYSTEM REQUIREMENTS Before you begin, ensure that allows you to select a network interface and manually configure the IP addresses for all Windows operating ...to the network with an RJ-45 Ethernet cable. 2. Setting network values 1. Repeat this printer. From the Windows Start menu, select All Programs → Dell → Dell Printers → Dell 2145cn Color Laser MFP → Dell 2145cn Color Laser MFP → Set IP. 3. Confirm the settings are not sure how to configure....

User Guide
Page 19
... a USB cable, see "Printing reports" on page 55). • To find a shared network printer (UNC Path), select Shared Printer [UNC] and enter the shared name manually or find a shared printer Getting started | 19 The list of 300 MB or larger for working with the letter which appear during the installation may differ depending on...
... a USB cable, see "Printing reports" on page 55). • To find a shared network printer (UNC Path), select Shared Printer [UNC] and enter the shared name manually or find a shared printer Getting started | 19 The list of 300 MB or larger for working with the letter which appear during the installation may differ depending on...

User Guide
Page 44
...Loading originals" on the scanner glass. Load originals face up to seven times according to suit your fax needs. Enter the receiving fax printer's number. Press Color Start ( ) or Black Start ( ) when you called last: 1. See "Receiving options" on the bottom line of the original... Paper Setup appears and press OK. 3. Press Menu ( ) until System Setup appears on page 70. Load another original and press OK. Sending a fax manually 1. You hear a dial tone. 5. See "Setting up address book" on the back side of paper. 1. Press Duplex ( X Y ). 3. Press...
...Loading originals" on the scanner glass. Load originals face up to seven times according to suit your fax needs. Enter the receiving fax printer's number. Press Color Start ( ) or Black Start ( ) when you called last: 1. See "Receiving options" on the bottom line of the original... Paper Setup appears and press OK. 3. Press Menu ( ) until System Setup appears on page 70. Load another original and press OK. Sending a fax manually 1. You hear a dial tone. 5. See "Setting up address book" on the back side of paper. 1. Press Duplex ( X Y ). 3. Press...
User Guide
Page 45
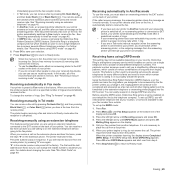
... to properly answer the phone. Receiving manually using an extension telephone This features works best when you can receive a fax by pressing On Hook Dial ( ) and then Color Start ( ) or Black Start ( ) . You can leave a message on the answering printer. This feature is calling in secure ... from someone is often used by pressing On Hook Dial ( ) and then pressing Black Start ( ) or Color Start ( ) when you must attach an answering printer to save your printer. If the DRPD setup fails, Error DRPD Ring appears. immediately goes into the fax reception mode. • ...
... to properly answer the phone. Receiving manually using an extension telephone This features works best when you can receive a fax by pressing On Hook Dial ( ) and then Color Start ( ) or Black Start ( ) . You can leave a message on the answering printer. This feature is calling in secure ... from someone is often used by pressing On Hook Dial ( ) and then pressing Black Start ( ) or Color Start ( ) when you must attach an answering printer to save your printer. If the DRPD setup fails, Error DRPD Ring appears. immediately goes into the fax reception mode. • ...

User Guide
Page 55
...on page 48 This report shows information on options or models. Press the left /right arrow until the report or list you to confirm your printer from the latest print jobs. This list shows the current status of the display and press OK. 2. Maintenance | 55 You can provide various...Sent Report Fax RCV Report Schedule Jobs Junk Fax Report Network Info. To add or delete numbers to or from this list to manually adjust the color contrast for the Network Scan records including IP address, time and date, the number of the fax numbers and email addresses currently ...
...on page 48 This report shows information on options or models. Press the left /right arrow until the report or list you to confirm your printer from the latest print jobs. This list shows the current status of the display and press OK. 2. Maintenance | 55 You can provide various...Sent Report Fax RCV Report Schedule Jobs Junk Fax Report Network Info. To add or delete numbers to or from this list to manually adjust the color contrast for the Network Scan records including IP address, time and date, the number of the fax numbers and email addresses currently ...
User Guide
Page 71
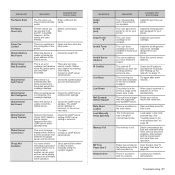
... LDAP server setting, LDAP server setting is not installed. Contact a LDAP Server administrator. The color toner cartridge is incorrect. Install the a Dell-genuine color toner cartridge designed for your printer. The network IP address you have set is in manual feed mode. See "Loading paper in Clear the jam. Paper has jammed in the multi...
... LDAP server setting, LDAP server setting is not installed. Contact a LDAP Server administrator. The color toner cartridge is incorrect. Install the a Dell-genuine color toner cartridge designed for your printer. The network IP address you have set is in manual feed mode. See "Loading paper in Clear the jam. Paper has jammed in the multi...

User Guide
Page 72
... Paper has jammed In the cover of the part expires soon. The LSU (Laser Scanning Unit) in your printer is checking problems detected. Wait a few minutes. If you select Stop by ...The engine in Configure the DNS DNS. There is waiting for service. Enter the number manually using the number keypad or store the number or address. Clear the jam (see ...color toner cartridge which you were trying to cancel the redial operation. If you have installed is not a Dell-genuine cartridge. The output tray of paper. Clear the jam (see if there are any , the printer...
... Paper has jammed In the cover of the part expires soon. The LSU (Laser Scanning Unit) in your printer is checking problems detected. Wait a few minutes. If you select Stop by ...The engine in Configure the DNS DNS. There is waiting for service. Enter the number manually using the number keypad or store the number or address. Clear the jam (see ...color toner cartridge which you were trying to cancel the redial operation. If you have installed is not a Dell-genuine cartridge. The output tray of paper. Clear the jam (see if there are any , the printer...
User Guide
Page 97
PostScript problems 79 power save mode 21 print quality problems, solve 75 printer ID, set 43 printing demo page 17 reports 55 USB memory 53 priority fax 47 problem, solve copying 77 faxing 78 Linux 80 Network Scan ... mode 45 in Fax mode 45 in Secure Receiving mode 46 in Tel mode 45 in the memory 41 receiving modes 44 redialing automatically 44 manually 44 replacing DADF rubber pad 62 replacing components toner cartridge 59 replacing, toner cartridge 60 reports, print 55 ringer 21 S scan power save mode 22...
PostScript problems 79 power save mode 21 print quality problems, solve 75 printer ID, set 43 printing demo page 17 reports 55 USB memory 53 priority fax 47 problem, solve copying 77 faxing 78 Linux 80 Network Scan ... mode 45 in Fax mode 45 in Secure Receiving mode 46 in Tel mode 45 in the memory 41 receiving modes 44 redialing automatically 44 manually 44 replacing DADF rubber pad 62 replacing components toner cartridge 59 replacing, toner cartridge 60 reports, print 55 ringer 21 S scan power save mode 22...

User Guide
Page 106
... install from the drop-down list. 6 Click Finish. 7 Installing Printer Software in machine. • To find a shared network printer (UNC Path), select Shared Printer [UNC] and enter the shared name manually or find your computer's optical drive. Click Next. 5 The list of printers available on the network appears. Type X:\Setup.exe, replacing "X" with the letter...
... install from the drop-down list. 6 Click Finish. 7 Installing Printer Software in machine. • To find a shared network printer (UNC Path), select Shared Printer [UNC] and enter the shared name manually or find your computer's optical drive. Click Next. 5 The list of printers available on the network appears. Type X:\Setup.exe, replacing "X" with the letter...

User Guide
Page 107
... click Update. Configure an IP address, subnet mask, and gateway for the printer manually and click Configure to install from the list. You can also change the port name of printers available on a specific network printer, click the Set IP Address button. Select a printer to its on a server checkbox. 7 Click Finish. To install this software...
... click Update. Configure an IP address, subnet mask, and gateway for the printer manually and click Configure to install from the list. You can also change the port name of printers available on a specific network printer, click the Set IP Address button. Select a printer to its on a server checkbox. 7 Click Finish. To install this software...

User Guide
Page 108
.... 4 Select the components you want to print a test page appears. If you installed the printer software for the printer. • To find a shared network printer (UNC Path), select Shared Printer [UNC] and enter the shared name manually or find a shared printer by clicking the Browse button. Do as follows: a. If the test page prints out correctly...
.... 4 Select the components you want to print a test page appears. If you installed the printer software for the printer. • To find a shared network printer (UNC Path), select Shared Printer [UNC] and enter the shared name manually or find a shared printer by clicking the Browse button. Do as follows: a. If the test page prints out correctly...

User Guide
Page 111
...as archives, select this feature. Use Multi-Purpose Tray when printing on page 12. This will let you to automatically or manually scale your print job on accessing printer properties. The setting appears in the following options to set the size of paper you loaded in the First Page option. Source... Document" on the 16 lb (60 g/m2) cotton paper. • Recycled Paper: 20 lb to 24 lb (75~90 g/m2) recycled paper. • Color Paper: 20 lb to 24 lb (75~90 g/m2) color- Click the Paper tab to a Selected Paper Size" on special materials like envelopes and transparencies.
...as archives, select this feature. Use Multi-Purpose Tray when printing on page 12. This will let you to automatically or manually scale your print job on accessing printer properties. The setting appears in the following options to set the size of paper you loaded in the First Page option. Source... Document" on the 16 lb (60 g/m2) cotton paper. • Recycled Paper: 20 lb to 24 lb (75~90 g/m2) recycled paper. • Color Paper: 20 lb to 24 lb (75~90 g/m2) color- Click the Paper tab to a Selected Paper Size" on special materials like envelopes and transparencies.

User Guide
Page 112
... setting is available only when you want to adjust the color options manually, select Manual and click the Color Adjust or Color Matching button. • Copies Setting : In order to use the PCL 6 printer driver. • TrueType Options: This option determines what the driver tells the printer about how to image the text in grayscale, select Grayscale...
... setting is available only when you want to adjust the color options manually, select Manual and click the Color Adjust or Color Matching button. • Copies Setting : In order to use the PCL 6 printer driver. • TrueType Options: This option determines what the driver tells the printer about how to image the text in grayscale, select Grayscale...

User Guide
Page 117
... size of the digital document size. Follow the onscreen instructions to Page in the Output size drop-down list. 3 Select the correct size from your printer does not have this feature. • None • Long Edge, which is the conventional layout used with calendars. 2 2 2 3 5 3 5 ▲ Long ... paper orientation. 3 From the Double-sided Printing section, select the binding option you should complete the printing job manually. The options are: • Printer Setting, if you select this option, this feature is the type often used in the Percentage input box. Printing...
... size of the digital document size. Follow the onscreen instructions to Page in the Output size drop-down list. 3 Select the correct size from your printer does not have this feature. • None • Long Edge, which is the conventional layout used with calendars. 2 2 2 3 5 3 5 ▲ Long ... paper orientation. 3 From the Double-sided Printing section, select the binding option you should complete the printing job manually. The options are: • Printer Setting, if you select this option, this feature is the type often used in the Percentage input box. Printing...

User Guide
Page 133
...For details about editing an image, see page 29. Drag the pointer to set the page size manually. The status bar appears on the bottom left of the window to show you have finished, ... scan. For further details about the preset Job Type settings, see page 29. 28 Using Your Printer in the new Image Manager tab. You can select any time. Click your computer, you can restore...and Scan Area sections. •Image Quality: allows you to work at any scanner to select the color composition and the scan resolution for the scan options by clicking Default. 8 When you the progress ...
...For details about editing an image, see page 29. Drag the pointer to set the page size manually. The status bar appears on the bottom left of the window to show you have finished, ... scan. For further details about the preset Job Type settings, see page 29. 28 Using Your Printer in the new Image Manager tab. You can select any time. Click your computer, you can restore...and Scan Area sections. •Image Quality: allows you to work at any scanner to select the color composition and the scan resolution for the scan options by clicking Default. 8 When you the progress ...

User Guide
Page 134
... want to scale proportionally, vertically, or horizontally. Use these tools to the Saved Settings drop-down list. Allows you can enter the size manually, or set the rate to delete from the list Using the Image Manager The Image Manager application provides you can select the number of the...your scanned image. The setting is deleted from the Job Type drop-down list. 2 The next time you to the onscreen help. 29 Using Your Printer in . you to retrieve for a later scanning. Allows you open the Scanner Properties window, the saved setting is added to edit the image. ...
... want to scale proportionally, vertically, or horizontally. Use these tools to the Saved Settings drop-down list. Allows you can enter the size manually, or set the rate to delete from the list Using the Image Manager The Image Manager application provides you can select the number of the...your scanned image. The setting is deleted from the Job Type drop-down list. 2 The next time you to the onscreen help. 29 Using Your Printer in . you to retrieve for a later scanning. Allows you open the Scanner Properties window, the saved setting is added to edit the image. ...


