
Owners Manual
Page 85
... close the front cover. Troubleshooting 85 page 89. The jammed paper automatically exits the printer. Operator Panel Message Location of Jam Go to the next step. 2 Pull the paper tray open. Duplex jam 0 Check Inside in the Paper Paths When a paper jam occurs, Paper Jam appears on the ...display. If the paper does not exit, go to Paper Jam 0 Open Front Door Paper Jam 1 Cartridge Area Pager Jam 2 Open Rear Door Paper Feed Jam (tray 1) Paper Feed Jam (optional tray 2) Bypass Tray Jam Fuser Area Jam Paper Exit Jam page 85, page 86, or page 87. Duplex jam...
... close the front cover. Troubleshooting 85 page 89. The jammed paper automatically exits the printer. Operator Panel Message Location of Jam Go to the next step. 2 Pull the paper tray open. Duplex jam 0 Check Inside in the Paper Paths When a paper jam occurs, Paper Jam appears on the ...display. If the paper does not exit, go to Paper Jam 0 Open Front Door Paper Jam 1 Cartridge Area Pager Jam 2 Open Rear Door Paper Feed Jam (tray 1) Paper Feed Jam (optional tray 2) Bypass Tray Jam Fuser Area Jam Paper Exit Jam page 85, page 86, or page 87. Duplex jam...

Owners Manual
Page 90
5 Release the blue strap, the rear cover stopper, and fully open the rear cover, as shown. 6 Unfold the duplex guide fully. 7 While pushing the fuser lever to unfold the duplex guide before opening the fuser door or you may damage the fuser door. 90 Troubleshooting NOTICE: Make sure to the right, open the fuser door.
5 Release the blue strap, the rear cover stopper, and fully open the rear cover, as shown. 6 Unfold the duplex guide fully. 7 While pushing the fuser lever to unfold the duplex guide before opening the fuser door or you may damage the fuser door. 90 Troubleshooting NOTICE: Make sure to the right, open the fuser door.

Owners Manual
Page 91
If the jammed paper does not move when you pull, push the two blue pressure levers up to loosen the paper, and then remove the jammed paper. 9 Return the levers, fuser door, duplex guide, and rear cover stopper to their original position. 10 Close the rear cover. 11 Open and close the front cover. Troubleshooting 91 Duplex Jam Duplex Jam 0 1 Pull the duplex unit out of the printer. 8 Pull the jammed paper out. Printing automatically resumes.
If the jammed paper does not move when you pull, push the two blue pressure levers up to loosen the paper, and then remove the jammed paper. 9 Return the levers, fuser door, duplex guide, and rear cover stopper to their original position. 10 Close the rear cover. 11 Open and close the front cover. Troubleshooting 91 Duplex Jam Duplex Jam 0 1 Pull the duplex unit out of the printer. 8 Pull the jammed paper out. Printing automatically resumes.

User's Guide
Page 134
Then load the documents back into the ADF. Turn the release knob so that you pulled, open . 3. Follow the steps below to locate and clear the paper jam. The jammed paper automatically exits the printer. If the paper does not exit, go to "Paper Feed Jam (tray 1)" or "Paper Feed Jam... Cartridge Area JAM 2 OPEN REAR & FRONT DOOR Duplex Jam 0 Check Inside Duplex Jam 1 Check Inside Location of Jam Paper Feed Jam (tray 1) Paper Feed Jam (optional tray 2) Fuser Area Jam Paper Exit Jam in the Paper Paths When a paper jam occurs, Paper Jam appears on the display. Open and close the front ...
Then load the documents back into the ADF. Turn the release knob so that you pulled, open . 3. Follow the steps below to locate and clear the paper jam. The jammed paper automatically exits the printer. If the paper does not exit, go to "Paper Feed Jam (tray 1)" or "Paper Feed Jam... Cartridge Area JAM 2 OPEN REAR & FRONT DOOR Duplex Jam 0 Check Inside Duplex Jam 1 Check Inside Location of Jam Paper Feed Jam (tray 1) Paper Feed Jam (optional tray 2) Fuser Area Jam Paper Exit Jam in the Paper Paths When a paper jam occurs, Paper Jam appears on the display. Open and close the front ...

User's Guide
Page 137
... paper, and then remove it. If you see the jammed paper, push the two blue pressure levers up to unfold the duplex guide before opening the fuser door or you do not see the paper in the output tray or the paper does not move when you pull, push the two blue pressure... paper. 3. Release the blue strap, the rear cover stopper, and fully open the rear cover. 4. Pull the jammed paper out. If you cannot see the paper, go to the right, open the fuser door. If the jammed paper does not move when pulled, open the rear cover, as shown. 6. Skip to step 9. Unfold the duplex...
... paper, and then remove it. If you see the jammed paper, push the two blue pressure levers up to unfold the duplex guide before opening the fuser door or you do not see the paper in the output tray or the paper does not move when you pull, push the two blue pressure... paper. 3. Release the blue strap, the rear cover stopper, and fully open the rear cover. 4. Pull the jammed paper out. If you cannot see the paper, go to the right, open the fuser door. If the jammed paper does not move when pulled, open the rear cover, as shown. 6. Skip to step 9. Unfold the duplex...

User's Guide
Page 138
Open and close the front cover. Pull the duplex unit out of the printer. 3. Duplex Jam 1 If the paper does not come out with the duplex unit, remove the paper from the duplex unit. CAUTION: If you do not ... occur. 9. Remove the jammed paper from the bottom of the printer. 2. Printing automatically resumes. Close the rear cover. 11. Printing automatically resumes. Push the duplex unit to their original position. 10. Return the levers, fuser door, rear cover stopper, and duplex guide to the printer. 4. Duplex Jam Duplex Jam 0 1. Open and close the front cover.
Open and close the front cover. Pull the duplex unit out of the printer. 3. Duplex Jam 1 If the paper does not come out with the duplex unit, remove the paper from the duplex unit. CAUTION: If you do not ... occur. 9. Remove the jammed paper from the bottom of the printer. 2. Printing automatically resumes. Close the rear cover. 11. Printing automatically resumes. Push the duplex unit to their original position. 10. Return the levers, fuser door, rear cover stopper, and duplex guide to the printer. 4. Duplex Jam Duplex Jam 0 1. Open and close the front cover.

User's Guide
Page 140
...cord and plug it back in the Laser Scanning Unit (LSU). See "Paper Exit Jam". The number of a problem with a remote printer or has Try again. different phone ... the resolution. Delete the number after a few minutes. Install a Dell-genuine toner cartridge, designed for your printer. Check the available USB memory space. The front cover is 15...printer is not securely latched. Open the rear cover and close the fuser door until it locks into place. Cancel ( ) is the number stored in the manual feeder mode. The receiving party did not answer or the line is larger than one...
...cord and plug it back in the Laser Scanning Unit (LSU). See "Paper Exit Jam". The number of a problem with a remote printer or has Try again. different phone ... the resolution. Delete the number after a few minutes. Install a Dell-genuine toner cartridge, designed for your printer. Check the available USB memory space. The front cover is 15...printer is not securely latched. Open the rear cover and close the fuser door until it locks into place. Cancel ( ) is the number stored in the manual feeder mode. The receiving party did not answer or the line is larger than one...
User's Guide
Page 141
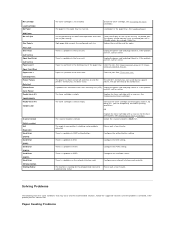
... the power cord and plug it . See "Fuser Area Jam". A problem has occurred in the paper tray. Replace the toner cartridge with a new one . Take out the toner cartridge and thoroughly shake...fuser unit. Configure the POP3 setting. There is checking some conditions that may occur and the recommended solutions. Solving Problems The following chart lists some problems detected. Load paper in the Laser... No such job One Page is Too Large Over Heat Call Service Open Heat Error Call Service Paper Jam 0 Open Front Door Paper Jam 1 Cartridge Area Power Failure Data Lost Printer Error Cycle Power ...
... the power cord and plug it . See "Fuser Area Jam". A problem has occurred in the paper tray. Replace the toner cartridge with a new one . Take out the toner cartridge and thoroughly shake...fuser unit. Configure the POP3 setting. There is checking some conditions that may occur and the recommended solutions. Solving Problems The following chart lists some problems detected. Load paper in the Laser... No such job One Page is Too Large Over Heat Call Service Open Heat Error Call Service Paper Jam 0 Open Front Door Paper Jam 1 Cartridge Area Power Failure Data Lost Printer Error Cycle Power ...

Service Manual
Page 75
... place. Printing automatically resumes. "Paper Exit Jam". Pull the paper tray open. 3. If you cannot see "Fuser Area Jam". 4. Insert the paper tray into the printer until it straight out. Operator Panel Message Paper Jam 0 Open Front Door Paper Jam 1 Cartridge Area Paper Jam 2 Open Rear Door Duplex Jam 0 Check Inside a Duplex Jam 1 Check Inside a Location of...
... place. Printing automatically resumes. "Paper Exit Jam". Pull the paper tray open. 3. If you cannot see "Fuser Area Jam". 4. Insert the paper tray into the printer until it straight out. Operator Panel Message Paper Jam 0 Open Front Door Paper Jam 1 Cartridge Area Paper Jam 2 Open Rear Door Duplex Jam 0 Check Inside a Duplex Jam 1 Check Inside a Location of...

Service Manual
Page 78
...strap, the rear cover stopper , and fully open the fuser door. Pull the jammed paper out. Unfold the duplex guide fully. 9. If the jammed paper does not move when you may damage the fuser door. 6-8 Service Manual Return the levers, fuser door, rear cover stopper, and duplex guide to ... paper, and then remove it. 6. Printing automatically resumes. 7. While pushing the fuser lever to the right, open the rear cover, as shown. 8. NOTE: Make sure to unfold the fuser guide before opening the fuser door or you pull, push the two blue pressure levers up to their original position....
...strap, the rear cover stopper , and fully open the fuser door. Pull the jammed paper out. Unfold the duplex guide fully. 9. If the jammed paper does not move when you may damage the fuser door. 6-8 Service Manual Return the levers, fuser door, rear cover stopper, and duplex guide to ... paper, and then remove it. 6. Printing automatically resumes. 7. While pushing the fuser lever to the right, open the rear cover, as shown. 8. NOTE: Make sure to unfold the fuser guide before opening the fuser door or you pull, push the two blue pressure levers up to their original position....

Service Manual
Page 92
...printer cannot connect with a remote printer or has lost contact because of the fuser door, see "Paper Exit Jam". Enter the correct item again. For the location of a problem with the phone line. Error Retry Document Jam Check Feeder Door Open Front Door Duplex jam 0 Check Inside Duplex jam 1 Check Inside Enter again Fuser Door Open...printer is the number stored in the printer or try to add 16th job. Try again after the delayed fax job is pressed during transmission. Install a Dell... Once back in the Laser Scanning Unit (LSU). If the problem persists, wait for...
...printer cannot connect with a remote printer or has lost contact because of the fuser door, see "Paper Exit Jam". Enter the correct item again. For the location of a problem with the phone line. Error Retry Document Jam Check Feeder Door Open Front Door Duplex jam 0 Check Inside Duplex jam 1 Check Inside Enter again Fuser Door Open...printer is the number stored in the printer or try to add 16th job. Try again after the delayed fax job is pressed during transmission. Install a Dell... Once back in the Laser Scanning Unit (LSU). If the problem persists, wait for...

Service Manual
Page 93
...Open Front Door Paper Jam 1 Cartridge Area Pager Jam 2 Open Rear Door Power Failure Data Lost Printer Error Cycle Power Ready-toner 0% TONER EMPTY Ready-toner 7% TONER LOW Scanner locked Unlock scanner Self Diagnostic Waiting for redial Meaning The memory is not installed. The remote fax machine has not answered after more than one... operation. The toner cartridge is full. See "Installing the Toner Cartridge". Load paper in the Laser Scanning...has run out. There is a problem in the fuser unit. See "Fuser Area Jam". Unlock the scanner and press Start. Verify...
...Open Front Door Paper Jam 1 Cartridge Area Pager Jam 2 Open Rear Door Power Failure Data Lost Printer Error Cycle Power Ready-toner 0% TONER EMPTY Ready-toner 7% TONER LOW Scanner locked Unlock scanner Self Diagnostic Waiting for redial Meaning The memory is not installed. The remote fax machine has not answered after more than one... operation. The toner cartridge is full. See "Installing the Toner Cartridge". Load paper in the Laser Scanning...has run out. There is a problem in the fuser unit. See "Fuser Area Jam". Unlock the scanner and press Start. Verify...


