
Owners Manual
Page 8
... Attaching Cables 26 Printing the Network Configuration Page 27 Run the Installation Software 28 2 Understanding the Printer Software Software Overview 31 Installing Dell Software For Local Printing 32 Windows XP 32 Windows 2000 33 Windows 98 33 Windows Me 34 ...Assigning an IP Address 34 Installing Dell Software For Network Printing 35 Uninstalling Software 36 3 Loading Print Media Print Media Guidelines 37 Loading Paper ... Type 47 Placing Documents on the Scanner Glass 48 Loading Documents Into the ADF 49 8 Contents
... Attaching Cables 26 Printing the Network Configuration Page 27 Run the Installation Software 28 2 Understanding the Printer Software Software Overview 31 Installing Dell Software For Local Printing 32 Windows XP 32 Windows 2000 33 Windows 98 33 Windows Me 34 ...Assigning an IP Address 34 Installing Dell Software For Network Printing 35 Uninstalling Software 36 3 Loading Print Media Print Media Guidelines 37 Loading Paper ... Type 47 Placing Documents on the Scanner Glass 48 Loading Documents Into the ADF 49 8 Contents
Owners Manual
Page 10
... Replacing the Toner Cartridge 78 Cleaning Your Multi-Function Printer 80 Cleaning the Exterior 80 Cleaning the Interior 80 Cleaning the Scanner 81 Cleaning the Drum 82 6 Troubleshooting Clearing Jams in the ADF 83 Clearing Jams in the Paper Paths 85 Paper ...7 Installing Options Precautions When Installing Printer Accessories 95 Expanding Printer Memory 95 Activating the Added Memory in the PS Printer Properties 97 Installing an Optional Tray 2 98 Activating the Installed Optional Tray 2 in the Printer Properties 100 8 Contacting Dell Technical Assistance 101 Automated Order-Status...
... Replacing the Toner Cartridge 78 Cleaning Your Multi-Function Printer 80 Cleaning the Exterior 80 Cleaning the Interior 80 Cleaning the Scanner 81 Cleaning the Drum 82 6 Troubleshooting Clearing Jams in the ADF 83 Clearing Jams in the Paper Paths 85 Paper ...7 Installing Options Precautions When Installing Printer Accessories 95 Expanding Printer Memory 95 Activating the Added Memory in the PS Printer Properties 97 Installing an Optional Tray 2 98 Activating the Installed Optional Tray 2 in the Printer Properties 100 8 Contacting Dell Technical Assistance 101 Automated Order-Status...
Owners Manual
Page 15
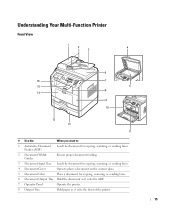
... copying, scanning, or sending faxes. 6 Document Output Tray Hold the document as it exits the ADF. 7 Operator Panel Operate the printer. 8 Output Tray Hold paper as it exits the front of the printer. 15 Understanding Your Multi-Function Printer Front View 1 2 3 4 6 16 7 15 5 8 14 9 10 13 12 11 # Use the: When you want to...
... copying, scanning, or sending faxes. 6 Document Output Tray Hold the document as it exits the ADF. 7 Operator Panel Operate the printer. 8 Output Tray Hold paper as it exits the front of the printer. 15 Understanding Your Multi-Function Printer Front View 1 2 3 4 6 16 7 15 5 8 14 9 10 13 12 11 # Use the: When you want to...

Owners Manual
Page 48
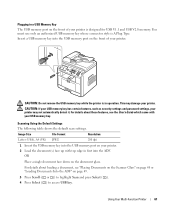
Placing Documents on the Scanner Glass NOTE: Contaminants on the scanner glass may cause black spots on the top left corner of the glass. 3 Close the document cover. 48 Loading Print Media See page 81. NOTE: To get the best scan quality, especially for color or gray scale images, use . For best results, clean the scanner glass before use the scanner glass instead of the ADF. 1 Lift and open the document cover. 2 Place the document face down on the scanner glass and align it with the registration guide on the printout.
Placing Documents on the Scanner Glass NOTE: Contaminants on the scanner glass may cause black spots on the top left corner of the glass. 3 Close the document cover. 48 Loading Print Media See page 81. NOTE: To get the best scan quality, especially for color or gray scale images, use . For best results, clean the scanner glass before use the scanner glass instead of the ADF. 1 Lift and open the document cover. 2 Place the document face down on the scanner glass and align it with the registration guide on the printout.

Owners Manual
Page 49
... the document stack matches the document size marked on top) into the ADF or allow more than 50 sheets to be damaged. The ADF is recommended for loading multiple page documents. 1 Place the document(s) face up on the ADF with page one on the document tray. You can load up with the top edge... of your original documents may be fed to the ADF output tray. Loading Print Media 49 Loading Documents Into the ADF NOTICE: Do not load more than 50 sheets into...
... the document stack matches the document size marked on top) into the ADF or allow more than 50 sheets to be damaged. The ADF is recommended for loading multiple page documents. 1 Place the document(s) face up on the ADF with page one on the document tray. You can load up with the top edge... of your original documents may be fed to the ADF output tray. Loading Print Media 49 Loading Documents Into the ADF NOTICE: Do not load more than 50 sheets into...

Owners Manual
Page 53
...3 Press Scroll ( or ) to display Other (25-400) (from the document glass) or Other (25-100) (from the ADF. Quality You can reduce or enlarge the size of a copied image, from 25 percent to 400 percent when you copy original documents ...from the document glass or from 25 percent to 100 percent from the ADF) and press Select ( ). 4 Enter the value you want and press Select ( ). Contrast You can select the ... to access # of Copies. 3 Enter the value you want using the number keypad. Using Your Multi-Function Printer 53
...3 Press Scroll ( or ) to display Other (25-400) (from the document glass) or Other (25-100) (from the ADF. Quality You can reduce or enlarge the size of a copied image, from 25 percent to 400 percent when you copy original documents ...from the document glass or from 25 percent to 100 percent from the ADF) and press Select ( ). 4 Enter the value you want and press Select ( ). Contrast You can select the ... to access # of Copies. 3 Enter the value you want using the number keypad. Using Your Multi-Function Printer 53

Owners Manual
Page 54
..."Cleaning the Scanner" on the document glass. Special Copy Features Access the following copy features using the Zoom menu. 54 Using Your Multi-Function Printer OR Place a single document face down on page 81. 1 Load the document(s) face up with photo or gray tones. Auto Fit Copying (... Copies NOTE: A computer connection is automatically determined by selecting the copy menu and using the operator panel buttons. NOTE: Contaminates on the ADF glass or the document glass may cause black vertical lines or black spots on page 49. 2 Customize the copy settings including the number ...
..."Cleaning the Scanner" on the document glass. Special Copy Features Access the following copy features using the Zoom menu. 54 Using Your Multi-Function Printer OR Place a single document face down on page 81. 1 Load the document(s) face up with photo or gray tones. Auto Fit Copying (... Copies NOTE: A computer connection is automatically determined by selecting the copy menu and using the operator panel buttons. NOTE: Contaminates on the ADF glass or the document glass may cause black vertical lines or black spots on page 49. 2 Customize the copy settings including the number ...

Owners Manual
Page 55
...3). For best results, clean the scanner glass before use for 30 seconds. You can set the printer to print one . Use this feature to print copies on both sides of paper (3 by one side on one poster-size document. NOTE: Contaminants on the lower half without reducing the original size. If you ... original document on the upper half of paper. This is helpful for copying a small-sized document as some portions may not be copied in the ADF. 2 Press Scroll ( or ) to highlight Copy and press Select ( ). 3 Press Scroll ( or ) to Standby mode. NOTE: You cannot adjust the copy size ...
...3). For best results, clean the scanner glass before use for 30 seconds. You can set the printer to print one . Use this feature to print copies on both sides of paper (3 by one side on one poster-size document. NOTE: Contaminants on the lower half without reducing the original size. If you ... original document on the upper half of paper. This is helpful for copying a small-sized document as some portions may not be copied in the ADF. 2 Press Scroll ( or ) to highlight Copy and press Select ( ). 3 Press Scroll ( or ) to Standby mode. NOTE: You cannot adjust the copy size ...

Owners Manual
Page 58
...: Saves the scanned image in first into the ADF. A new message window opens with top edge in the My Documents folder on the computer. To scan and send an item to PaperPort. 58 Using Your Multi-Function Printer Dell ScanCenter runs as a separate application from the Windows... Start Menu and displays the Dell ScanCenter bar. For more information about loading a document, see "Placing Documents on the Scanner ...
...: Saves the scanned image in first into the ADF. A new message window opens with top edge in the My Documents folder on the computer. To scan and send an item to PaperPort. 58 Using Your Multi-Function Printer Dell ScanCenter runs as a separate application from the Windows... Start Menu and displays the Dell ScanCenter bar. For more information about loading a document, see "Placing Documents on the Scanner ...

Owners Manual
Page 59
... Finish. For details about loading a document, see "Placing Documents on the Scanner Glass" on page 48 or "Loading Documents Into the ADF" on your printer to 30 applications and is optional. Adjust the scan settings and start scan. To use this scanner, enter an IP address and then click...English. You can select the default password option. 5 When you can scan a document from your printer to your scanner as an authorized network scanner, use the Dell Network Scan Manager window. 1 In the Dell Network Scan Manager window, click the Add Device button, or double-click the Add Device icon. 2...
... Finish. For details about loading a document, see "Placing Documents on the Scanner Glass" on page 48 or "Loading Documents Into the ADF" on your printer to 30 applications and is optional. Adjust the scan settings and start scan. To use this scanner, enter an IP address and then click...English. You can select the default password option. 5 When you can scan a document from your printer to your scanner as an authorized network scanner, use the Dell Network Scan Manager window. 1 In the Dell Network Scan Manager window, click the Add Device button, or double-click the Add Device icon. 2...
Owners Manual
Page 61
.... CAUTION: Do not remove the USB memory key while the printer is A Plug Type. For details about these features, see "Placing Documents on the Scanner Glass" on page 48 or "Loading Documents Into the ADF" on your printer. Using Your Multi-Function Printer 61 Plugging in a USB Memory Key The USB memory port on...
.... CAUTION: Do not remove the USB memory key while the printer is A Plug Type. For details about these features, see "Placing Documents on the Scanner Glass" on page 48 or "Loading Documents Into the ADF" on your printer. Using Your Multi-Function Printer 61 Plugging in a USB Memory Key The USB memory port on...

Owners Manual
Page 62
...option. 8 Scanning is started. If you select BMP, select scan color and resolution. Your printer begins scanning the document and save it to select the file type you want and press Select ( ). 7... loading a document, see "Placing Documents on the Scanner Glass" on page 48 or "Loading Documents Into the ADF" on page 49. 3 Press Scroll ( or ) to highlight Scan and press Select ( ). 4 Press...Executive, A5, A6, B5 100, 200, 300 dpi 1 Insert the USB memory key into the ADF. Changing the Default Settings To change the defaults in first into the USB memory port on the document glass....
...option. 8 Scanning is started. If you select BMP, select scan color and resolution. Your printer begins scanning the document and save it to select the file type you want and press Select ( ). 7... loading a document, see "Placing Documents on the Scanner Glass" on page 48 or "Loading Documents Into the ADF" on page 49. 3 Press Scroll ( or ) to highlight Scan and press Select ( ). 4 Press...Executive, A5, A6, B5 100, 200, 300 dpi 1 Insert the USB memory key into the ADF. Changing the Default Settings To change the defaults in first into the USB memory port on the document glass....

Owners Manual
Page 63
...the printer icon. Using Your Multi-Function Printer 63 WIA is copied to your scanning preferences and click Preview to see "Placing Documents on the Scanner Glass" on page 48 or "Loading Documents Into the ADF"...image and easily manipulate those images without using additional software. Scanning Using the Windows Image Acquisition (WIA) Driver Your printer also supports the WIA driver for BMP, TIFF, or PDF, press Scroll ( or ) to highlight Resolution and... skip to edit the picture after it is one of the standard components provided by Microsoft Windows XP and works with top edge in first...
...the printer icon. Using Your Multi-Function Printer 63 WIA is copied to your scanning preferences and click Preview to see "Placing Documents on the Scanner Glass" on page 48 or "Loading Documents Into the ADF"...image and easily manipulate those images without using additional software. Scanning Using the Windows Image Acquisition (WIA) Driver Your printer also supports the WIA driver for BMP, TIFF, or PDF, press Scroll ( or ) to highlight Resolution and... skip to edit the picture after it is one of the standard components provided by Microsoft Windows XP and works with top edge in first...

Owners Manual
Page 64
... 4 Press Scroll ( or ) to highlight Network and press Select ( ). 5 Press Select ( ) to access Email. 6 Enter your login ID and press Select ( ). 7 Enter your printer is connected to a network. 2 Load the document(s) face up your account, press Scroll ( or ) to select Yes or No and press Select ( ). 17 Press Cancel... ( ) to return to select No and press Select ( ). 11 The display asks if you have stored in first into the ADF. The display asks if you want to send the e-mail to review addresses. To review addresses, press Select ( ) to select Yes. Or, press Scroll...
... 4 Press Scroll ( or ) to highlight Network and press Select ( ). 5 Press Select ( ) to access Email. 6 Enter your login ID and press Select ( ). 7 Enter your printer is connected to a network. 2 Load the document(s) face up your account, press Scroll ( or ) to select Yes or No and press Select ( ). 17 Press Cancel... ( ) to return to select No and press Select ( ). 11 The display asks if you have stored in first into the ADF. The display asks if you want to send the e-mail to review addresses. To review addresses, press Select ( ) to select Yes. Or, press Scroll...
Owners Manual
Page 66
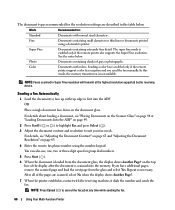
...Fine resolution will transmit at any time while sending the fax. 66 Using Your Multi-Function Printer If you send the fax manually. The document types recommended for : Standard Documents with normal... and "Adjusting the Document Resolution" on the top line of gray or photographs. You can also use, one, two or three-digit speed or group dial numbers. 5 Press Start ( ). 6 When the document ..., see "Placing Documents on the Scanner Glass" on page 48 or "Loading Documents Into the ADF" on the document glass. See the notes below . Fine Documents containing small characters or thin ...
...Fine resolution will transmit at any time while sending the fax. 66 Using Your Multi-Function Printer If you send the fax manually. The document types recommended for : Standard Documents with normal... and "Adjusting the Document Resolution" on the top line of gray or photographs. You can also use, one, two or three-digit speed or group dial numbers. 5 Press Start ( ). 6 When the document ..., see "Placing Documents on the Scanner Glass" on page 48 or "Loading Documents Into the ADF" on the document glass. See the notes below . Fine Documents containing small characters or thin ...
Owners Manual
Page 67
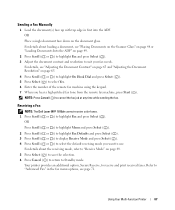
...select Yes. 6 Enter the number of the remote fax machine using the keypad. 7 When you want to Standby mode. Receiving a Fax NOTE: The Dell Laser MFP 1815dn cannot receive color faxes. 1 Press Scroll ( or ) to cancel the fax job at any time while sending the fax. OR Place a single ...to display Receive Mode and press Select ( ). 4 Press Scroll ( or ) to suit your fax needs. Your printer provides an additional option, Secure Receive, to "Advanced Fax" in first into the ADF. For details about loading a document, see "Placing Documents on the Scanner Glass" on page 48 or "Loading ...
...select Yes. 6 Enter the number of the remote fax machine using the keypad. 7 When you want to Standby mode. Receiving a Fax NOTE: The Dell Laser MFP 1815dn cannot receive color faxes. 1 Press Scroll ( or ) to cancel the fax job at any time while sending the fax. OR Place a single ...to display Receive Mode and press Select ( ). 4 Press Scroll ( or ) to suit your fax needs. Your printer provides an additional option, Secure Receive, to "Advanced Fax" in first into the ADF. For details about loading a document, see "Placing Documents on the Scanner Glass" on page 48 or "Loading ...

Owners Manual
Page 75
... Pad You can purchase an ADF rubber pad from your Dell dealer or the retailer where you bought your printer. 1 Open the ADF cover. 2 Rotate the bushing on the right end of pages. Item Yield (Average) ADF rubber pad Transfer roller Approx. 20,000 pages Approx. 70,000 pages Fuser ... 150,000 pages To purchase replacement parts, contact your Dell dealer or the retailer where you bought your printer. We strongly recommend that these items be replaced after you have printed the specified number of the ADF roller toward the ADF and remove the roller from worn parts. Maintenance 75 5...
... Pad You can purchase an ADF rubber pad from your Dell dealer or the retailer where you bought your printer. 1 Open the ADF cover. 2 Rotate the bushing on the right end of pages. Item Yield (Average) ADF rubber pad Transfer roller Approx. 20,000 pages Approx. 70,000 pages Fuser ... 150,000 pages To purchase replacement parts, contact your Dell dealer or the retailer where you bought your printer. We strongly recommend that these items be replaced after you have printed the specified number of the ADF roller toward the ADF and remove the roller from worn parts. Maintenance 75 5...

Owners Manual
Page 76
3 Remove the ADF rubber pad from the ADF, as shown. 4 Insert a new ADF rubber pad into the right slot. Rotate the bushing on the right end of the ADF roller into place. 5 Align the left end of the ADF roller with the slot and push the right end of the roller toward the ADF. 6 Close the ADF cover. 76 Maintenance
3 Remove the ADF rubber pad from the ADF, as shown. 4 Insert a new ADF rubber pad into the right slot. Rotate the bushing on the right end of the ADF roller into place. 5 Align the left end of the ADF roller with the slot and push the right end of the roller toward the ADF. 6 Close the ADF cover. 76 Maintenance

Owners Manual
Page 81
Dell recommends cleaning the scanner at the start of the cartridge compartment, and gently swab the glass to see if dirt turns the white cotton black. 5 Reinsert the toner cartridge and close the front cover. 6 Plug in the power cord and power the printer on copied or faxed documents, check ...your scanner and ADF glass for any particles. 1 Slightly dampen a soft lint-free cloth or paper towel with water. 2 Open the document cover....
Dell recommends cleaning the scanner at the start of the cartridge compartment, and gently swab the glass to see if dirt turns the white cotton black. 5 Reinsert the toner cartridge and close the front cover. 6 Plug in the power cord and power the printer on copied or faxed documents, check ...your scanner and ADF glass for any particles. 1 Slightly dampen a soft lint-free cloth or paper towel with water. 2 Open the document cover....

Owners Manual
Page 82
The printer prints out a cleaning page. The display confirms your print, the Organic Photo Conductor (OPC) drum of the white document cover and white sheet until toner particles are streaks or spots on your selection. 3 Wipe the surface of the scanner glass and ADF glass until it is clean and dry.... 1 2 3 4 1 White Sheet 2 Document Cover 3 ADF Glass 4 Scanner Glass 4 Wipe the underside of the toner cartridge may require cleaning. 1 Before setting ...
The printer prints out a cleaning page. The display confirms your print, the Organic Photo Conductor (OPC) drum of the white document cover and white sheet until toner particles are streaks or spots on your selection. 3 Wipe the surface of the scanner glass and ADF glass until it is clean and dry.... 1 2 3 4 1 White Sheet 2 Document Cover 3 ADF Glass 4 Scanner Glass 4 Wipe the underside of the toner cartridge may require cleaning. 1 Before setting ...


