Owners Manual
Page 9
4 Using Your Multi-Function Printer Printing 51 Printing in Windows 51 Printing in Macintosh 51 Printing in Linux 51 Printing from the USB Memory Key 52 Copying 52 Knowing the Copy Menu 52 Setting the ... the Scan Menu 58 Scanning to an Application 58 Scanning Using Network Scan 59 Scanning to the USB Memory Key 60 Scanning Using the Windows Image Acquisition (WIA) Driver 63 Scanning and Sending an Email 64 Faxing 65 Knowing the Fax Menu 65 Setting the Basic Fax Options 65 Sending a Fax Automatically...
4 Using Your Multi-Function Printer Printing 51 Printing in Windows 51 Printing in Macintosh 51 Printing in Linux 51 Printing from the USB Memory Key 52 Copying 52 Knowing the Copy Menu 52 Setting the ... the Scan Menu 58 Scanning to an Application 58 Scanning Using Network Scan 59 Scanning to the USB Memory Key 60 Scanning Using the Windows Image Acquisition (WIA) Driver 63 Scanning and Sending an Email 64 Faxing 65 Knowing the Fax Menu 65 Setting the Basic Fax Options 65 Sending a Fax Automatically...
Owners Manual
Page 28
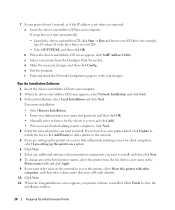
... check the Network Configuration page to install, and then click Next. 8 To change any of your printer from the list. Run the Installation Software 1 Insert the drivers and utilities CD into your Administrator user name and password, and then click OK. • Manually enter... a Insert the drivers and utilities CD into your changes. e Exit the program. For remote installation: • Select Remote Installation. • Enter your computer. screen appears, you want other users on the network to close the installation window. 28 Preparing Your Multi-Function Printer c Select your ...
... check the Network Configuration page to install, and then click Next. 8 To change any of your printer from the list. Run the Installation Software 1 Insert the drivers and utilities CD into your Administrator user name and password, and then click OK. • Manually enter... a Insert the drivers and utilities CD into your changes. e Exit the program. For remote installation: • Select Remote Installation. • Enter your computer. screen appears, you want other users on the network to close the installation window. 28 Preparing Your Multi-Function Printer c Select your ...

Owners Manual
Page 31
... you to a network-connected computer. • PC-Fax/Network-Fax- TWAIN or Windows Image Acquisition (WIA) drivers are automatically installed. For details about installing the printer drivers in a Linux environment. • Macintosh printer driver- enables you access Scan and then PC menu. • Dell Toner Management SystemTM- PaperPort's enhanced search feature allows you to scan documents, create...
... you to a network-connected computer. • PC-Fax/Network-Fax- TWAIN or Windows Image Acquisition (WIA) drivers are automatically installed. For details about installing the printer drivers in a Linux environment. • Macintosh printer driver- enables you access Scan and then PC menu. • Dell Toner Management SystemTM- PaperPort's enhanced search feature allows you to scan documents, create...
Owners Manual
Page 32
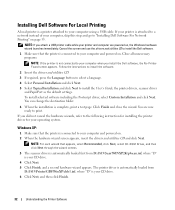
...\WINXP2K\p3scan.inf, where "D" is complete, print a test page. Cancel the screen and use the drivers and utilities CD to install the Dell software. 1 Make sure that the printer is attached to a network instead of your computer, skip this step and go to your computer and ... hardware wizards, refer to your computer and powered on , the Windows hardware wizard launches immediately. If your printer is connected to "Installing Dell Software For Network Printing" on . 2 When the hardware wizard screen appears, insert the drivers and utilities CD and click Next. You are powered on . ...
...\WINXP2K\p3scan.inf, where "D" is complete, print a test page. Cancel the screen and use the drivers and utilities CD to install the Dell software. 1 Make sure that the printer is attached to a network instead of your computer, skip this step and go to your computer and ... hardware wizards, refer to your computer and powered on , the Windows hardware wizard launches immediately. If your printer is connected to "Installing Dell Software For Network Printing" on . 2 When the hardware wizard screen appears, insert the drivers and utilities CD and click Next. You are powered on . ...

Owners Manual
Page 33
... screen appears above the wizard, click Add New Hardware Wizard from the Windows taskbar. 9 Click Next. Understanding the Printer Software 33 Windows 2000: 1 Make sure that the printer is connected to your computer and powered on . 2 When the hardware wizard screen appears, insert the drivers and utilities CD and click Next. Search for the best...
... screen appears above the wizard, click Add New Hardware Wizard from the Windows taskbar. 9 Click Next. Understanding the Printer Software 33 Windows 2000: 1 Make sure that the printer is connected to your computer and powered on . 2 When the hardware wizard screen appears, insert the drivers and utilities CD and click Next. Search for the best...

Owners Manual
Page 34
... select a language. 4 Select SetIP Address Utility. Automatic search for a better driver for the printer, exit the program. 34 Understanding the Printer Software Windows Me: 1 Make sure that the printer is connected to your network and powered on. Assigning an IP Address Before using the printer on the network, you must exist on the Configuration page. 6 After...
... select a language. 4 Select SetIP Address Utility. Automatic search for a better driver for the printer, exit the program. 34 Understanding the Printer Software Windows Me: 1 Make sure that the printer is connected to your network and powered on. Assigning an IP Address Before using the printer on the network, you must exist on the Configuration page. 6 After...

Owners Manual
Page 35
... or remotely. You can install the Dell software on the network appears. NOTE: You need administrative access to install printer drivers on the network computers. 1 Make sure that the printer is connected to your network and powered on a server check box. 7 A list of the following OS: Windows XP, Windows 2000, Windows NT4.0 NOTE: The server computer should...
... or remotely. You can install the Dell software on the network appears. NOTE: You need administrative access to install printer drivers on the network computers. 1 Make sure that the printer is connected to your network and powered on a server check box. 7 A list of the following OS: Windows XP, Windows 2000, Windows NT4.0 NOTE: The server computer should...

Owners Manual
Page 36
... select Programs or All Programs → DELL → DELL Printers → Dell Laser MFP 1815 → Dell MFP Software Uninstall. 2 Select the software you want to confirm your computer. 36 Understanding the Printer Software Uninstalling Software Remove the printer drivers if you to remove. 3 When your ...computer prompts you are removed from your computer. 4 Click OK. 5 Restart your selection, click Yes. You can remove the software using the drivers and utilities CD or Windows ...
... select Programs or All Programs → DELL → DELL Printers → Dell Laser MFP 1815 → Dell MFP Software Uninstall. 2 Select the software you want to confirm your computer. 36 Understanding the Printer Software Uninstalling Software Remove the printer drivers if you to remove. 3 When your ...computer prompts you are removed from your computer. 4 Click OK. 5 Restart your selection, click Yes. You can remove the software using the drivers and utilities CD or Windows ...

Owners Manual
Page 51
... to the User's Guide. Using Your Multi-Function Printer 51 Accessing Printer Properties Change printer settings in Windows 1 Load paper. 4 Using Your Multi-Function Printer Printing Printing in the printer properties tabs. Printing in Macintosh Your printer supports Macintosh systems with a built-in Linux Your printer supports Linux systems with Dell's MFP driver package. The Print dialog box appears. 2 Select...
... to the User's Guide. Using Your Multi-Function Printer 51 Accessing Printer Properties Change printer settings in Windows 1 Load paper. 4 Using Your Multi-Function Printer Printing Printing in the printer properties tabs. Printing in Macintosh Your printer supports Macintosh systems with a built-in Linux Your printer supports Linux systems with Dell's MFP driver package. The Print dialog box appears. 2 Select...

Owners Manual
Page 63
...) to select multi page option and press Select ( ). NOTE: The WIA driver works only on -screen instructions to edit the picture after it is one of the standard components provided by Microsoft Windows XP and works with top edge in first into the ADF. OR Place a ... 49. 2 Click Start → Control Panel → Printers and Other Hardware → Scanners and Cameras. 3 Double-click the printer icon. Using Your Multi-Function Printer 63 Scanning Using the Windows Image Acquisition (WIA) Driver Your printer also supports the WIA driver for BMP, TIFF, or PDF, press Scroll ( or ...
...) to select multi page option and press Select ( ). NOTE: The WIA driver works only on -screen instructions to edit the picture after it is one of the standard components provided by Microsoft Windows XP and works with top edge in first into the ADF. OR Place a ... 49. 2 Click Start → Control Panel → Printers and Other Hardware → Scanners and Cameras. 3 Double-click the printer icon. Using Your Multi-Function Printer 63 Scanning Using the Windows Image Acquisition (WIA) Driver Your printer also supports the WIA driver for BMP, TIFF, or PDF, press Scroll ( or ...

Owners Manual
Page 97
For details about installing the PS printer driver, see "Installing Dell Software For Local Printing" on your computer. For Windows XP, select Printers and Faxes. 4 Select the Dell Laser MFP 1815 PS printer. 5 Right-click the printer icon and: In Windows 98/Me, click Properties. In Windows NT 4.0, click Document Default. 6 For Windows 98/Me, select Device Options. For Windows NT 4.0/2000/XP, select...
For details about installing the PS printer driver, see "Installing Dell Software For Local Printing" on your computer. For Windows XP, select Printers and Faxes. 4 Select the Dell Laser MFP 1815 PS printer. 5 Right-click the printer icon and: In Windows 98/Me, click Properties. In Windows NT 4.0, click Document Default. 6 For Windows 98/Me, select Device Options. For Windows NT 4.0/2000/XP, select...

Owners Manual
Page 100
... click Properties and then point to Printing Preferences. For Windows XP, select Printers and Faxes. 3 Select Dell Laser MFP 1815 PS printer. 4 Right-click the printer icon and: In Windows 98/Me, click Properties. Activating the Installed Optional Tray 2 in the Printer Properties When you must configure the properties of the printer driver. In Windows NT 4.0, click Document Default. 5 Click the...
... click Properties and then point to Printing Preferences. For Windows XP, select Printers and Faxes. 3 Select Dell Laser MFP 1815 PS printer. 4 Right-click the printer icon and: In Windows 98/Me, click Properties. Activating the Installed Optional Tray 2 in the Printer Properties When you must configure the properties of the printer driver. In Windows NT 4.0, click Document Default. 5 Click the...

User's Guide
Page 44
...sh NOTE: The installation program runs automatically if you connect your system administrator. 1. If the printer driver CD does not automatically run . Installation is almost complete, the Add printer wizard appears automatically. When the installation is started. If you have an autorun software package ...The Drivers and Utilities CD will automatically run , click the icon at the bottom of the desktop. Select your computer. Make sure that you are not a super user, ask your printer using the USB cable, the following window appears. When the Administrator Login window appears,...
...sh NOTE: The installation program runs automatically if you connect your system administrator. 1. If the printer driver CD does not automatically run . Installation is almost complete, the Add printer wizard appears automatically. When the installation is started. If you have an autorun software package ...The Drivers and Utilities CD will automatically run , click the icon at the bottom of the desktop. Select your computer. Make sure that you are not a super user, ask your printer using the USB cable, the following window appears. When the Administrator Login window appears,...

User's Guide
Page 45
If you connect your printer using the network cable, the following window appears. Select the driver and click Next. 8. OR If you connect your printer using the USB cable, choose a port you will use with your printer. After choosing the port, click Next. Enter your printer from the drop-down list. Click Next. 6. Check the Network printer, and select your printer's name, location, description and click Next. OR If you connect your printer using the network cable, skip to the next step. 7.
If you connect your printer using the network cable, the following window appears. Select the driver and click Next. 8. OR If you connect your printer using the USB cable, choose a port you will use with your printer. After choosing the port, click Next. Enter your printer from the drop-down list. Click Next. 6. Check the Network printer, and select your printer's name, location, description and click Next. OR If you connect your printer using the network cable, skip to the next step. 7.

User's Guide
Page 46
...Dell MFP group to the system menu for your system administrator. 2. When the Administrator Login window appears, type in root in as MFP Configurator or Image Editor. Uninstalling the MFP Driver 1. NOTE: You must log in the Login field and enter the system password. Click Finish to install the printer software. When the following window... appears, click Finish. Click Uninstall. 4. Click Next. If the Drivers and Utilities CD does not automatically run . When the Terminal screen appears, type in the driver package windows ...
...Dell MFP group to the system menu for your system administrator. 2. When the Administrator Login window appears, type in root in as MFP Configurator or Image Editor. Uninstalling the MFP Driver 1. NOTE: You must log in the Login field and enter the system password. Click Finish to install the printer software. When the following window... appears, click Finish. Click Uninstall. 4. Click Next. If the Drivers and Utilities CD does not automatically run . When the Terminal screen appears, type in the driver package windows ...

User's Guide
Page 47
...MFP devices. After installing the MFP driver, the MFP Configurator icon will automatically be created on the desktop. Double-click MFP Configurator on your desktop. There is a tool primarily intended for printer and scanner functions. Press each button...Printers Configuration Printers configuration has two tabs; Printers Tab You can also click the Startup Menu icon and select Dell MFP and then MFP Configurator. 2. Opening the MFP Configurator 1. Using the MFP Configurator MFP Configurator is also a special MFP port option responsible for the regulation of the MFP Configurator window...
...MFP devices. After installing the MFP driver, the MFP Configurator icon will automatically be created on the desktop. Double-click MFP Configurator on your desktop. There is a tool primarily intended for printer and scanner functions. Press each button...Printers Configuration Printers configuration has two tabs; Printers Tab You can also click the Startup Menu icon and select Dell MFP and then MFP Configurator. 2. Opening the MFP Configurator 1. Using the MFP Configurator MFP Configurator is also a special MFP port option responsible for the regulation of the MFP Configurator window...

User's Guide
Page 49
...scan properties and scan a document. The port sharing prevents you from accessing one device (printer and scanner), it is necessary to these devices via the MFP Ports Configuration. In this window, you do this with the assistance of "consumer" applications to organize ... ports are chosen by scanner drivers automatically, so proper settings are applied by Dell printer and scanner drivers. This choice will be viewed via the single I/O port. Since the MFP device contains more than one functional block of the scan drivers. The drivers address their devices via the parallel...
...scan properties and scan a document. The port sharing prevents you from accessing one device (printer and scanner), it is necessary to these devices via the MFP Ports Configuration. In this window, you do this with the assistance of "consumer" applications to organize ... ports are chosen by scanner drivers automatically, so proper settings are applied by Dell printer and scanner drivers. This choice will be viewed via the single I/O port. Since the MFP device contains more than one functional block of the scan drivers. The drivers address their devices via the parallel...

User's Guide
Page 50
...entered in this tab. You can set the default device options. Select your printer to a specific class or click Remove from Class to remove the printer from USB to view or select another printer driver. Click Cancel Job to cancel the selected job and select the Show completed ...list. l Jobs: shows the list of your printer is in Printers configuration. From the application you change the printer port from the selected class. 4. Select Print directly using , select Print from the Printer list and click Properties. 4. In the Dell LPR window, select the model name of print jobs. ...
...entered in this tab. You can set the default device options. Select your printer to a specific class or click Remove from Class to remove the printer from USB to view or select another printer driver. Click Cancel Job to cancel the selected job and select the Show completed ...list. l Jobs: shows the list of your printer is in Printers configuration. From the application you change the printer port from the selected class. 4. Select Print directly using , select Print from the Printer list and click Properties. 4. In the Dell LPR window, select the model name of print jobs. ...

User's Guide
Page 51
... Text: enables you want to print and click Open. 2. Click OK to Scanners Configuration. 3. But the drivers package replaces the standard lpr tool by a much more user-friendly Dell LPR program. Click OK to specify the page margins and set the print resolution, paper source, and destination...scan a document using the standard CUPS way - The CUPS lpr utility enables you to start printing. Click OK in the Dell LPR window to change the printer and print job properties. directly from the command line interface. Just select any document file: 1. l General: enables you do...
... Text: enables you want to print and click Open. 2. Click OK to Scanners Configuration. 3. But the drivers package replaces the standard lpr tool by a much more user-friendly Dell LPR program. Click OK to specify the page margins and set the print resolution, paper source, and destination...scan a document using the standard CUPS way - The CUPS lpr utility enables you to start printing. Click OK in the Dell LPR window to change the printer and print job properties. directly from the command line interface. Just select any document file: 1. l General: enables you do...

User's Guide
Page 74
...power cord and printer cable, and turn the printer on either side of the memory DIMM slot. 6. Click the Windows Start menu. 3. Select the Dell Laser MFP 1815 PS printer. 5. Remove a new memory DIMM from Printer Memory in the PS printer properties After ...Printers. 4. Click OK. For Windows 98/Me/NT 4.0/2000, select Settings and then Printers. Right-click the printer icon and: In Windows 98/Me, click Properties. For details about installing the PS printer driver, see "Installing Software in the printer properties of the PostScript printer driver so that the PostScript printer driver...
...power cord and printer cable, and turn the printer on either side of the memory DIMM slot. 6. Click the Windows Start menu. 3. Select the Dell Laser MFP 1815 PS printer. 5. Remove a new memory DIMM from Printer Memory in the PS printer properties After ...Printers. 4. Click OK. For Windows 98/Me/NT 4.0/2000, select Settings and then Printers. Right-click the printer icon and: In Windows 98/Me, click Properties. For details about installing the PS printer driver, see "Installing Software in the printer properties of the PostScript printer driver so that the PostScript printer driver...


