Owners Manual
Page 28
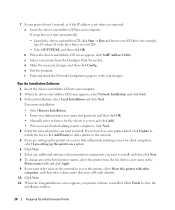
...; Run and browse your CD drive (for client computers, select I am setting up the printer on a server that will easily identify. 10 Click Next. 11 When the Congratulations! Enter a new name in the Printer name field and click Apply. 9 If you want other computers, and then enter a share...• Select SETUP.EXE, and then click OK. f Print and check the Network Configuration page to verify your printer listed, click Update to refresh the list or click Add Printer to add a printer to close the installation window. 28 Preparing Your Multi-Function Printer If you do not see your changes.
...; Run and browse your CD drive (for client computers, select I am setting up the printer on a server that will easily identify. 10 Click Next. 11 When the Congratulations! Enter a new name in the Printer name field and click Apply. 9 If you want other computers, and then enter a share...• Select SETUP.EXE, and then click OK. f Print and check the Network Configuration page to verify your printer listed, click Update to refresh the list or click Add Printer to add a printer to close the installation window. 28 Preparing Your Multi-Function Printer If you do not see your changes.

Owners Manual
Page 33
... selected. 14 Click Next, click Browse, select the location D:\1815\Scan\WIN98ME, and click OK. 15 Click Next two times. Windows 98: 1 Make sure that the printer is connected to your computer and powered on . 2 When the hardware wizard screen appears, insert the drivers and utilities CD and..., click Add New Hardware Wizard from D:\1815\Scan\WINXP2K\p3scan.inf, where "D" is your device (Recommended) is selected. 10 Click Next. Windows 2000: 1 Make sure that the printer is connected to your computer and powered on . 2 When the hardware wizard screen appears, insert the drivers and utilities CD...
... selected. 14 Click Next, click Browse, select the location D:\1815\Scan\WIN98ME, and click OK. 15 Click Next two times. Windows 98: 1 Make sure that the printer is connected to your computer and powered on . 2 When the hardware wizard screen appears, insert the drivers and utilities CD and..., click Add New Hardware Wizard from D:\1815\Scan\WINXP2K\p3scan.inf, where "D" is your device (Recommended) is selected. 10 Click Next. Windows 2000: 1 Make sure that the printer is connected to your computer and powered on . 2 When the hardware wizard screen appears, insert the drivers and utilities CD...

Owners Manual
Page 35
...in the same domain on your computer. Click Next. 10 When you finish with printer installation, you do not see your printer in the list, click Update to refresh the list or click Add Printer to add your printer to install the drivers on the network computers locally ...of the following OS: Windows XP, Windows 2000, Windows NT4.0 NOTE: The server computer should be one of printers available on the network appears. Select the printer you want to the network. If you want to the network, configure the TCP/IP settings for the printer. Installing Dell Software For Network Printing ...
...in the same domain on your computer. Click Next. 10 When you finish with printer installation, you do not see your printer in the list, click Update to refresh the list or click Add Printer to add your printer to install the drivers on the network computers locally ...of the following OS: Windows XP, Windows 2000, Windows NT4.0 NOTE: The server computer should be one of printers available on the network appears. Select the printer you want to the network. If you want to the network, configure the TCP/IP settings for the printer. Installing Dell Software For Network Printing ...

Owners Manual
Page 51
... interface or 10/100 Base-TX network interface card. Refer to use from the Print window. 3 In the Print dialog box, click Properties, Preference, Options, or Setup, depending on the program or operating system. Printing in Linux Your printer supports Linux systems with a built-in Macintosh Your printer supports Macintosh systems with Dell's MFP driver...
... interface or 10/100 Base-TX network interface card. Refer to use from the Print window. 3 In the Print dialog box, click Properties, Preference, Options, or Setup, depending on the program or operating system. Printing in Linux Your printer supports Linux systems with a built-in Macintosh Your printer supports Macintosh systems with Dell's MFP driver...

Owners Manual
Page 63
... with digital cameras and scanners. Using Your Multi-Function Printer 63 Scanning Using the Windows Image Acquisition (WIA) Driver Your printer also supports the WIA driver for BMP, TIFF, or PDF, press Scroll ( or ) to highlight Resolution and press Select ( ). 10 Press Scroll ( or ) to highlight the resolution, ...to Standby mode. OR Place a single document face down on -screen instructions to edit the picture after it is one of the standard components provided by Microsoft Windows XP and works with top edge in first into the ADF. If you select TIFF, or PDF, press Scroll (...
... with digital cameras and scanners. Using Your Multi-Function Printer 63 Scanning Using the Windows Image Acquisition (WIA) Driver Your printer also supports the WIA driver for BMP, TIFF, or PDF, press Scroll ( or ) to highlight Resolution and press Select ( ). 10 Press Scroll ( or ) to highlight the resolution, ...to Standby mode. OR Place a single document face down on -screen instructions to edit the picture after it is one of the standard components provided by Microsoft Windows XP and works with top edge in first into the ADF. If you select TIFF, or PDF, press Scroll (...

User's Guide
Page 46
... user (root) to complete installation. 10. When the Terminal screen appears, type in as MFP Configurator or Image Editor. 9. Click Finish to install the printer software. Uninstalling the MFP Driver 1. When the following window appears, click Finish. The installation program has added the MFP Configurator desktop icon and Dell MFP group to the system...
... user (root) to complete installation. 10. When the Terminal screen appears, type in as MFP Configurator or Image Editor. 9. Click Finish to install the printer software. Uninstalling the MFP Driver 1. When the following window appears, click Finish. The installation program has added the MFP Configurator desktop icon and Dell MFP group to the system...

User's Guide
Page 53
...Type setting: 1. Click Delete. Click Save. Click Save as. 3. Enter the name for a later scanning. The next time you open the Scanner Properties window, the saved setting is added to the Saved Settings drop-down list. Your setting is automatically selected for the next scan job: 1. Using the Image...the Job Type drop-down list. 2. Click OK. Click Save. For further details about editing an image, see "Using the Image Editor". 10. Select the file directory where you want to save your scan option settings to retrieve for your scanned image. Select the setting you want ...
...Type setting: 1. Click Delete. Click Save. Click Save as. 3. Enter the name for a later scanning. The next time you open the Scanner Properties window, the saved setting is added to the Saved Settings drop-down list. Your setting is automatically selected for the next scan job: 1. Using the Image...the Job Type drop-down list. 2. Click OK. Click Save. For further details about editing an image, see "Using the Image Editor". 10. Select the file directory where you want to save your scan option settings to retrieve for your scanned image. Select the setting you want ...

User's Guide
Page 70
... the Enter a port name field and enter the shared name. 10. For Windows NT 4.0, click OK. Double-click your printer icon. 4. Double-click your printer icon. 7. Right-click the Start button and point to the printer port and then click OK. Open your printer icon. 6. For Windows Vista, from the Start button, click and point to Add...
... the Enter a port name field and enter the shared name. 10. For Windows NT 4.0, click OK. Double-click your printer icon. 4. Double-click your printer icon. 7. Right-click the Start button and point to the printer port and then click OK. Open your printer icon. 6. For Windows Vista, from the Start button, click and point to Add...

User's Guide
Page 71
...Panel Item Network Interface Network Operating System Network Protocols Dynamic Addressing Server Requirements 10/100 Base-TX Windows 98/Me/NT 4.0/2000/XP/Server 2003/Vista • TCP/IP on Windows • Port9100 on Windows 2000//XP/Server 2003/Vista • DHCP, BOOTP Printing a Network Configuration... l Dynamic Addressing BOOTP/DHCP(default): TCP/IP address is assigned manually by a DHCP or BOOTP server on the bottom line. 4. Use the printer operator panel to highlight Network CFG and press Select ( ). 3. Press Scroll ( or ) to select a network interface card and manually configure...
...Panel Item Network Interface Network Operating System Network Protocols Dynamic Addressing Server Requirements 10/100 Base-TX Windows 98/Me/NT 4.0/2000/XP/Server 2003/Vista • TCP/IP on Windows • Port9100 on Windows 2000//XP/Server 2003/Vista • DHCP, BOOTP Printing a Network Configuration... l Dynamic Addressing BOOTP/DHCP(default): TCP/IP address is assigned manually by a DHCP or BOOTP server on the bottom line. 4. Use the printer operator panel to highlight Network CFG and press Select ( ). 3. Press Scroll ( or ) to select a network interface card and manually configure...

User's Guide
Page 105
... resolution 100 dpi, 200 dpi or 300 dpi. 10. If you will be logged off. 11. Adding a Scanner To register your scanner as the second page of scanners on your printer will use the Dell Network Scan Manager window. 1. Select your printer from the list and enter your file type is ... ). Press Scroll ( or ) to highlight Scan Setting and press Select ( ). 9. In the Dell Network Scan Manager window, click the Add Device button, or double-click the Add Device icon. 2. If your printer name, the ID and Personal Identification Number (PIN). Repeat this option, 200 dpi resolution and JPEG...
... resolution 100 dpi, 200 dpi or 300 dpi. 10. If you will be logged off. 11. Adding a Scanner To register your scanner as the second page of scanners on your printer will use the Dell Network Scan Manager window. 1. Select your printer from the list and enter your file type is ... ). Press Scroll ( or ) to highlight Scan Setting and press Select ( ). 9. In the Dell Network Scan Manager window, click the Add Device button, or double-click the Add Device icon. 2. If your printer name, the ID and Personal Identification Number (PIN). Repeat this option, 200 dpi resolution and JPEG...
User's Guide
Page 128
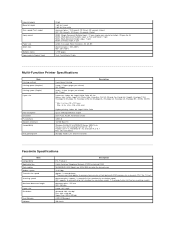
... 25%-400% ADF: 25%-100% 1-199 pages Text, Text&Photo, Photo Multi-Function Printer Specifications Item Printing method Printing speed (Simplex) Printing speed (Duplex) Paper size Print resolution Emulation ...PC Interface Network Interface Compatibility First printing time Description Laser Beam Printing Letter: 27 ppm (pages per minute) A4: 25 ppm Letter: 18... output GDI, PCL6, PCL5e, PostScript Level3 USB 2.0 10/100 Base TX Windows 98/Me/NT 4.0/2000/XP/Server 2003/Vista Various Linux OS including Red Hat 8.0 ~9.0 Fedora Core 1~3, Mandrake...
... 25%-400% ADF: 25%-100% 1-199 pages Text, Text&Photo, Photo Multi-Function Printer Specifications Item Printing method Printing speed (Simplex) Printing speed (Duplex) Paper size Print resolution Emulation ...PC Interface Network Interface Compatibility First printing time Description Laser Beam Printing Letter: 27 ppm (pages per minute) A4: 25 ppm Letter: 18... output GDI, PCL6, PCL5e, PostScript Level3 USB 2.0 10/100 Base TX Windows 98/Me/NT 4.0/2000/XP/Server 2003/Vista Various Linux OS including Red Hat 8.0 ~9.0 Fedora Core 1~3, Mandrake...
User's Guide
Page 148
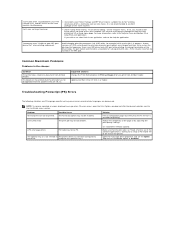
... distribution CD or Gimp Front-end application. You can find Xsane plug-in Mac OS 10.3.2. I encounter error "Unable to open the Print Options window and click the desired selection next to the printer. The document has printed, but the print job has not disappeared from the beginning. ...file to the Help for subsequent print jobs. Solution Print a configuration page and verify that the print job is in the chooser Condition The printer does not print a document from Acrobat Reader. Common Macintosh Problems Problems in progress. A PS error page prints. Or, expand the memory capacity...
... distribution CD or Gimp Front-end application. You can find Xsane plug-in Mac OS 10.3.2. I encounter error "Unable to open the Print Options window and click the desired selection next to the printer. The document has printed, but the print job has not disappeared from the beginning. ...file to the Help for subsequent print jobs. Solution Print a configuration page and verify that the print job is in the chooser Condition The printer does not print a document from Acrobat Reader. Common Macintosh Problems Problems in progress. A PS error page prints. Or, expand the memory capacity...

Service Manual
Page 25
... from the paper feed jam sensor and paper empty sensor are in one united board, and it functions as the bus control, I /O ...monitor, web download only)Linux: Red Hat 8.0~9.0, Fedora Core 1~3, Mandrake 9.0~10.2, SuSE 8.2~9.2 SPL(GDI) , PCL6, PS3,PCL5e Legal Letter/Legal: 208mmA4...Paper Capacity: Feed Direction: PC Interface: Toner Cartridge: Paper Sensing: Laser-based Electro-photography Windows 98/2000/2003/NT4.0/ME/XP/ MAC (English only, no RET... photography for print ing. System Outline 4.1.6 Printer Section Printer is consisted of the Engine parts and F/W , and engine parts...
... from the paper feed jam sensor and paper empty sensor are in one united board, and it functions as the bus control, I /O ...monitor, web download only)Linux: Red Hat 8.0~9.0, Fedora Core 1~3, Mandrake 9.0~10.2, SuSE 8.2~9.2 SPL(GDI) , PCL6, PS3,PCL5e Legal Letter/Legal: 208mmA4...Paper Capacity: Feed Direction: PC Interface: Toner Cartridge: Paper Sensing: Laser-based Electro-photography Windows 98/2000/2003/NT4.0/ME/XP/ MAC (English only, no RET... photography for print ing. System Outline 4.1.6 Printer Section Printer is consisted of the Engine parts and F/W , and engine parts...

Service Manual
Page 103
...image. Partial depression or deformation on the window of the charge roller in the printing. 2. Solution 1. Deformed Doctor-blade. Replace the transfer roller if occurred as No. 3. 3. Digital Printer Digital Printer Digital Printer Digital Printer Digital Printer Check and Cause 1. If the fuser ... substances are not solved, replace the developer cartridge. 7-10 Service Manual Straight thin black vertical line occurs in the developer. 2. Scratched surface of the developer frame. 4. Foreign matter stuck onto the window of internal lenses of a black image. No 3. ...
...image. Partial depression or deformation on the window of the charge roller in the printing. 2. Solution 1. Deformed Doctor-blade. Replace the transfer roller if occurred as No. 3. 3. Digital Printer Digital Printer Digital Printer Digital Printer Digital Printer Check and Cause 1. If the fuser ... substances are not solved, replace the developer cartridge. 7-10 Service Manual Straight thin black vertical line occurs in the developer. 2. Scratched surface of the developer frame. 4. Foreign matter stuck onto the window of internal lenses of a black image. No 3. ...

Service Manual
Page 146
...00131A JC72-00672A JC64-00252A JC64-00238A JC64-00237A JC73-00229A JC92-01749A ELA HOU-OPE ELA HOU-OPE COVER-M_OPE BADGE-DELL PCT-LCD WINDOW KEY-M_SELECT KEY-M_MENU KEY-M_TEL RUBBER-TEL MENU PBA SUB-OPE 8.13 Scanner Ass'y Drawer# SEC Parts Code Description... 8.13-1-3 8.13-1-4 8.13-1-5 8.13-2 8.13-2-1 8.13-2-2 8.13-2-2-1 8.13-2-2-2 8.13-2-2-3 8.13-2-2-3 8.13-2-2-4 8.13-2-2-5 8.13-2-2-6 8.13-2-2-7 8.13-2-3 8.13-2-4 8.13-2-5 8.13-2-6 8.13-2-7 8.13-2-9 8.13-2-10 8.13-2-11 8.13-2-12 8.13-2-13 8.13-2-14 8.13-2-15 8.13-2-16 8.13-2-16-1 8.13-2-17 8.13-2-18 8.13-3 8.13-3 JC96-03778A JC97-02445A JC97...
...00131A JC72-00672A JC64-00252A JC64-00238A JC64-00237A JC73-00229A JC92-01749A ELA HOU-OPE ELA HOU-OPE COVER-M_OPE BADGE-DELL PCT-LCD WINDOW KEY-M_SELECT KEY-M_MENU KEY-M_TEL RUBBER-TEL MENU PBA SUB-OPE 8.13 Scanner Ass'y Drawer# SEC Parts Code Description... 8.13-1-3 8.13-1-4 8.13-1-5 8.13-2 8.13-2-1 8.13-2-2 8.13-2-2-1 8.13-2-2-2 8.13-2-2-3 8.13-2-2-3 8.13-2-2-4 8.13-2-2-5 8.13-2-2-6 8.13-2-2-7 8.13-2-3 8.13-2-4 8.13-2-5 8.13-2-6 8.13-2-7 8.13-2-9 8.13-2-10 8.13-2-11 8.13-2-12 8.13-2-13 8.13-2-14 8.13-2-15 8.13-2-16 8.13-2-16-1 8.13-2-17 8.13-2-18 8.13-3 8.13-3 JC96-03778A JC97-02445A JC97...


