Owners Manual
Page 10
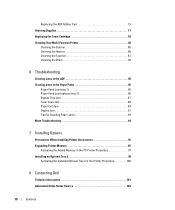
Replacing the ADF Rubber Pad 75 Ordering Supplies 77 Replacing the Toner Cartridge 78 Cleaning Your Multi-Function Printer 80 Cleaning the Exterior 80 Cleaning the Interior 80 Cleaning the Scanner 81 Cleaning the Drum 82 6 Troubleshooting ... 94 7 Installing Options Precautions When Installing Printer Accessories 95 Expanding Printer Memory 95 Activating the Added Memory in the PS Printer Properties 97 Installing an Optional Tray 2 98 Activating the Installed Optional Tray 2 in the Printer Properties 100 8 Contacting Dell Technical Assistance 101 Automated Order-Status Service ...
Replacing the ADF Rubber Pad 75 Ordering Supplies 77 Replacing the Toner Cartridge 78 Cleaning Your Multi-Function Printer 80 Cleaning the Exterior 80 Cleaning the Interior 80 Cleaning the Scanner 81 Cleaning the Drum 82 6 Troubleshooting ... 94 7 Installing Options Precautions When Installing Printer Accessories 95 Expanding Printer Memory 95 Activating the Added Memory in the PS Printer Properties 97 Installing an Optional Tray 2 98 Activating the Installed Optional Tray 2 in the Printer Properties 100 8 Contacting Dell Technical Assistance 101 Automated Order-Status Service ...
Owners Manual
Page 16
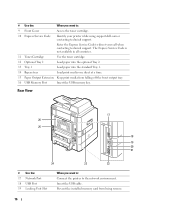
...your printer while using support.dell.com or contacting technical support. Prevent the installed memory card from falling off the front output tray. 16 USB Memory Port Insert the USB memory key. The Express Service Code is not available in all countries. 11 Toner Cartridge Use the toner cartridge. ...12 Optional Tray 2 Load paper into the optional Tray 2. 13 Tray 1 Load paper into the standard Tray 1. 14 Bypass tray Load print media one sheet at a time. 15 Paper Output Extension Keep print ...
...your printer while using support.dell.com or contacting technical support. Prevent the installed memory card from falling off the front output tray. 16 USB Memory Port Insert the USB memory key. The Express Service Code is not available in all countries. 11 Toner Cartridge Use the toner cartridge. ...12 Optional Tray 2 Load paper into the optional Tray 2. 13 Tray 1 Load paper into the standard Tray 1. 14 Bypass tray Load print media one sheet at a time. 15 Paper Output Extension Keep print ...

Owners Manual
Page 29
... the email list box to order replacement toner cartridges, just click the Dell supplies link right from your Web browser. Preparing Your Multi-Function Printer 29 Use the Dell Printer Configuration Web Tool, also known as the Printer Embedded Web Server, to a print server. You can set up the Dell Printer Configuration Web Tool to send you an...
... the email list box to order replacement toner cartridges, just click the Dell supplies link right from your Web browser. Preparing Your Multi-Function Printer 29 Use the Dell Printer Configuration Web Tool, also known as the Printer Embedded Web Server, to a print server. You can set up the Dell Printer Configuration Web Tool to send you an...

Owners Manual
Page 31
... a variety of the job when you to print. HTML documentation provides detailed information about installing the printer drivers in Windows, you purchased a Dell computer and your printer at the same time, the drivers and utilities are available for scanning documents on page 32. &#...toner remaining and allows you to send a fax from your printer. • Set IP- enables you to print and scan in a Linux environment. • Macintosh printer driver- enables you to order replacement toner cartridges. • PaperPort- PaperPort provides improved scanning features and supports...
... a variety of the job when you to print. HTML documentation provides detailed information about installing the printer drivers in Windows, you purchased a Dell computer and your printer at the same time, the drivers and utilities are available for scanning documents on page 32. &#...toner remaining and allows you to send a fax from your printer. • Set IP- enables you to print and scan in a Linux environment. • Macintosh printer driver- enables you to order replacement toner cartridges. • PaperPort- PaperPort provides improved scanning features and supports...
Owners Manual
Page 70
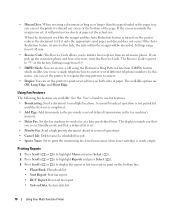
... as or longer than the paper loaded in the paper tray, you can set the printer to discard any excess at a later pre-defined time. A second broadcast operation is not permitted until the first one is completed. • Add Page: Add documents to the previously reserved delayed transmission in.... • Ignore Toner: Set to print the incomming fax stored in memory when toner cartridge is set. • Priority Fax: Send a high priority document ahead of the page. In this menu, you can set the printer to recognize the ring patterns to answer. • Duplex: You can receive a call ...
... as or longer than the paper loaded in the paper tray, you can set the printer to discard any excess at a later pre-defined time. A second broadcast operation is not permitted until the first one is completed. • Add Page: Add documents to the previously reserved delayed transmission in.... • Ignore Toner: Set to print the incomming fax stored in memory when toner cartridge is set. • Priority Fax: Send a high priority document ahead of the page. In this menu, you can set the printer to recognize the ring patterns to answer. • Duplex: You can receive a call ...

Owners Manual
Page 77
... Programs or All Programs → DELL → DELL Printers → DELL Laser MFP 1815 → Dell Toner Reorder Program. If your printer is connected to a network, type the printer's IP address in accordance with ISO/IEC 19752 testing methodology. Go to www.dell.com/supplies or premier.dell.com to order toner cartridges. OR 3 If your printer is connected to a network, type...
... Programs or All Programs → DELL → DELL Printers → DELL Laser MFP 1815 → Dell Toner Reorder Program. If your printer is connected to a network, type the printer's IP address in accordance with ISO/IEC 19752 testing methodology. Go to www.dell.com/supplies or premier.dell.com to order toner cartridges. OR 3 If your printer is connected to a network, type...
Owners Manual
Page 78
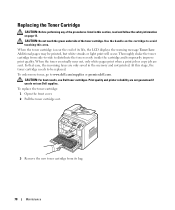
.... 78 Maintenance Additional pages may be replaced. To replace the toner cartridge: 1 Open the front cover. 2 Pull the toner cartridge out. 3 Remove the new toner cartridge from side-to-side to www.dell.com/supplies or premier.dell.com. In that case, the incoming faxes are only saved in ...Toner Low. CAUTION: For best results, use Dell supplies. Use the handle on page 13. Replacing the Toner Cartridge CAUTION: Before performing any of the procedures listed in the memory and not printed. At this area. Print quality and printer reliability are sent. To order more toner, ...
.... 78 Maintenance Additional pages may be replaced. To replace the toner cartridge: 1 Open the front cover. 2 Pull the toner cartridge out. 3 Remove the new toner cartridge from side-to-side to www.dell.com/supplies or premier.dell.com. In that case, the incoming faxes are only saved in ...Toner Low. CAUTION: For best results, use Dell supplies. Use the handle on page 13. Replacing the Toner Cartridge CAUTION: Before performing any of the procedures listed in the memory and not printed. At this area. Print quality and printer reliability are sent. To order more toner, ...

Owners Manual
Page 79
...Hot water sets toner into contact with your clothing, wipe the toner off with a dry cloth and wash your clothing in the printer. 6 Tabs on the cartridge to distribute the toner. Make sure that the cover is surely closed. Save the box and the cover for shipping. CAUTION: ...Do not touch the green underside of the cartridge and corresponding grooves within the printer will guide the cartridge into the correct position until it locks into place completely. 7 Close the front cover. 4 Remove the packing tape...
...Hot water sets toner into contact with your clothing, wipe the toner off with a dry cloth and wash your clothing in the printer. 6 Tabs on the cartridge to distribute the toner. Make sure that the cover is surely closed. Save the box and the cover for shipping. CAUTION: ...Do not touch the green underside of the cartridge and corresponding grooves within the printer will guide the cartridge into the correct position until it locks into place completely. 7 Close the front cover. 4 Remove the packing tape...

Owners Manual
Page 80
...the transfer roller located under the toner cartridge when cleaning inside the printer and cause print quality problems, such as smearing or toner specks. Oil from the toner cartridge area and the toner cartridge cavity. Cleaning Your Multi-Function Printer To maintain the print quality, follow... the cleaning procedures below, each time the toner cartridge is replaced or if print quality problems occur. Set...
...the transfer roller located under the toner cartridge when cleaning inside the printer and cause print quality problems, such as smearing or toner specks. Oil from the toner cartridge area and the toner cartridge cavity. Cleaning Your Multi-Function Printer To maintain the print quality, follow... the cleaning procedures below, each time the toner cartridge is replaced or if print quality problems occur. Set...

Owners Manual
Page 81
... are lines present on . 4 Locate the long strip of glass (LSU) inside the top of each day and during the day, as needed. Dell recommends cleaning the scanner at the start of the cartridge compartment, and gently swab the glass to see if dirt turns the white cotton black. 5 Reinsert the toner... cartridge and close the front cover. 6 Plug in the power cord and power the printer on copied or faxed documents, check your scanner and ADF glass for any particles. 1 Slightly dampen a soft lint-free cloth...
... are lines present on . 4 Locate the long strip of glass (LSU) inside the top of each day and during the day, as needed. Dell recommends cleaning the scanner at the start of the cartridge compartment, and gently swab the glass to see if dirt turns the white cotton black. 5 Reinsert the toner... cartridge and close the front cover. 6 Plug in the power cord and power the printer on copied or faxed documents, check your scanner and ADF glass for any particles. 1 Slightly dampen a soft lint-free cloth...

Owners Manual
Page 82
...through 4 until it is clean and dry. 1 2 3 4 1 White Sheet 2 Document Cover 3 ADF Glass 4 Scanner Glass 4 Wipe the underside of the toner cartridge may require cleaning. 1 Before setting the cleaning procedure, make sure that paper is clean and dry. 5 Close the document cover. Cleaning the Drum If there... are not affixed to highlight Maintenance and press Select ( ). The printer prints out a cleaning page. The display confirms your print, the Organic Photo Conductor (OPC) drum of the white document cover and white ...
...through 4 until it is clean and dry. 1 2 3 4 1 White Sheet 2 Document Cover 3 ADF Glass 4 Scanner Glass 4 Wipe the underside of the toner cartridge may require cleaning. 1 Before setting the cleaning procedure, make sure that paper is clean and dry. 5 Close the document cover. Cleaning the Drum If there... are not affixed to highlight Maintenance and press Select ( ). The printer prints out a cleaning page. The display confirms your print, the Organic Photo Conductor (OPC) drum of the white document cover and white ...

Owners Manual
Page 85
.... Follow the steps below to clear the jam. The jammed paper automatically exits the printer. Clearing Jams in the duplex unit page 93. If the paper does not exit, go to Paper Jam 0 Open Front Door Paper Jam 1 Cartridge Area Pager Jam 2 Open Rear Door Paper Feed Jam (tray 1) Paper Feed Jam...
.... Follow the steps below to clear the jam. The jammed paper automatically exits the printer. Clearing Jams in the duplex unit page 93. If the paper does not exit, go to Paper Jam 0 Open Front Door Paper Jam 1 Cartridge Area Pager Jam 2 Open Rear Door Paper Feed Jam (tray 1) Paper Feed Jam...

Owners Manual
Page 88
Take care when removing paper from the printer. 1 Open the front cover and lightly pull the toner cartridge straight out. 2 Remove the jammed paper by gently pulling it straight out. 3 Replace the toner cartridge and close the front cover. Fuser Area Jam NOTICE: The fuser area is hot. Printing automatically resumes. 88 Troubleshooting
Take care when removing paper from the printer. 1 Open the front cover and lightly pull the toner cartridge straight out. 2 Remove the jammed paper by gently pulling it straight out. 3 Replace the toner cartridge and close the front cover. Fuser Area Jam NOTICE: The fuser area is hot. Printing automatically resumes. 88 Troubleshooting

Owners Manual
Page 132
...resulting from either material or manufacturing process, it with a comparable product or reimburse you for one year beginning from the date of the cartridge. THIS WARRANTY COVERAGE TERMINATES IF YOU SELL OR OTHERWISE TRANSFER THIS PRODUCT TO ANOTHER PARTY.... or manufacturing process for the U.S., Canada, and Latin America. Dell™ Printer Consumables Limited Warranties The following sections describe the limited warranty for printer consumables (ink cartridges, toner cartridges, photo print packs, and photo paper) for Dell-branded printers, for the life of delivery.
...resulting from either material or manufacturing process, it with a comparable product or reimburse you for one year beginning from the date of the cartridge. THIS WARRANTY COVERAGE TERMINATES IF YOU SELL OR OTHERWISE TRANSFER THIS PRODUCT TO ANOTHER PARTY.... or manufacturing process for the U.S., Canada, and Latin America. Dell™ Printer Consumables Limited Warranties The following sections describe the limited warranty for printer consumables (ink cartridges, toner cartridges, photo print packs, and photo paper) for Dell-branded printers, for the life of delivery.
Owners Manual
Page 150
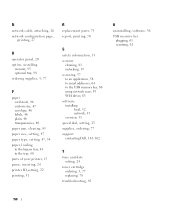
... setting, 47 paper type, setting, 47, 54 paper, loading in the bypass tray, 43 in the tray, 40 parts of your printer, 15 pause, inserting, 24 printer ID,setting, 22 printing, 51 R replacement parts, 75 report, printing, 70 S safety information, 13 scanner cleaning, 81 unlocking, 19... driver, 63 software installing local, 32 network, 35 overview, 31 speed dial, setting, 25 supplies, ordering, 77 support contacting Dell, 101-102 T time and date setting, 24 toner cartridge ordering, 3, 77 replacing, 78 troubleshooting, 83 U uninstalling, software, 36 USB memory key plugging, 61 scanning, 61 150
... setting, 47 paper type, setting, 47, 54 paper, loading in the bypass tray, 43 in the tray, 40 parts of your printer, 15 pause, inserting, 24 printer ID,setting, 22 printing, 51 R replacement parts, 75 report, printing, 70 S safety information, 13 scanner cleaning, 81 unlocking, 19... driver, 63 software installing local, 32 network, 35 overview, 31 speed dial, setting, 25 supplies, ordering, 77 support contacting Dell, 101-102 T time and date setting, 24 toner cartridge ordering, 3, 77 replacing, 78 troubleshooting, 83 U uninstalling, software, 36 USB memory key plugging, 61 scanning, 61 150
User's Guide
Page 1
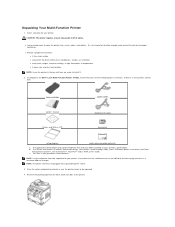
It is a missing item, contact Dell: toner cartridge owner's manual Drivers and Utilities CDb power corda telephone line cord terminatorc setup diagram quick reference guide (optional) a. The appearance of the printer. Select a location for proper ventilation. In addition to the Dell™ Laser Multi-Function Printer 1815dn, ensure that is only provided in length. If there is also...
It is a missing item, contact Dell: toner cartridge owner's manual Drivers and Utilities CDb power corda telephone line cord terminatorc setup diagram quick reference guide (optional) a. The appearance of the printer. Select a location for proper ventilation. In addition to the Dell™ Laser Multi-Function Printer 1815dn, ensure that is only provided in length. If there is also...

User's Guide
Page 4
...Dell Laser printer supports the following fonts: Installing the Toner Cartridge 1. Remove the toner cartridge from its bag and thoroughly shake the cartridge from side-to-side to print a Phonebook list. Store frequently used fax numbers in edit mode. It also enables you to distribute the toner evenly inside the cartridge.... CAUTION: To prevent damage, do not expose the toner cartridge to light for stored fax numbers or email addresses. Press: To: Dial/Enter number or enter ...
...Dell Laser printer supports the following fonts: Installing the Toner Cartridge 1. Remove the toner cartridge from its bag and thoroughly shake the cartridge from side-to-side to print a Phonebook list. Store frequently used fax numbers in edit mode. It also enables you to distribute the toner evenly inside the cartridge.... CAUTION: To prevent damage, do not expose the toner cartridge to light for stored fax numbers or email addresses. Press: To: Dial/Enter number or enter ...

User's Guide
Page 5
... Paper Size" for the paper used in the paper tray. Use the handle on the cartridge to 250 sheets of the toner cartridge. Holding the toner cartridge by the handle, slide it into the printer until it from the printer. NOTE: Set the paper type and size after loading paper into contact with your clothing...
... Paper Size" for the paper used in the paper tray. Use the handle on the cartridge to 250 sheets of the toner cartridge. Holding the toner cartridge by the handle, slide it into the printer until it from the printer. NOTE: Set the paper type and size after loading paper into contact with your clothing...

User's Guide
Page 11
...Power save the selection. 6. The available options are 30, 60, and 120 (minutes). 5. The lamp automatically turns on by selecting the length of the toner cartridge longer than the normal mode, but it switches to a reduced power state. 1. Press Scroll ( or ) to Standby mode. Press Cancel ( ) to ...to highlight Machine Setup and press Select ( ). 3. NOTE: For PC-printing, you can turn this mode extends the life of time for which the printer waits after a scan job is not in the ADF. Press Scroll ( or ) to highlight CCD Power Save and press Select ( ). 4. The available...
...Power save the selection. 6. The available options are 30, 60, and 120 (minutes). 5. The lamp automatically turns on by selecting the length of the toner cartridge longer than the normal mode, but it switches to a reduced power state. 1. Press Scroll ( or ) to Standby mode. Press Cancel ( ) to ...to highlight Machine Setup and press Select ( ). 3. NOTE: For PC-printing, you can turn this mode extends the life of time for which the printer waits after a scan job is not in the ADF. Press Scroll ( or ) to highlight CCD Power Save and press Select ( ). 4. The available...

User's Guide
Page 60
Maintenance Clearing the Memory Backing up Data Cleaning Your Multi-function Printer Maintaining the Toner Cartridge Replacement parts Ordering Supplies Clearing the Memory You can be accidentally erased due to power failure or storage failure. Press Scroll ( ... highlight Machine Setup and press Select ( ). 4. Press Scroll ( or ) to highlight Clear Settings and press Select ( ). 4. l Fax Features: Cancels all of your printer's memory. 1. l Advanced Fax: Restores all of the scheduled fax jobs in the memory and resets all of the Advanced Fax setting options to continue clearing...
Maintenance Clearing the Memory Backing up Data Cleaning Your Multi-function Printer Maintaining the Toner Cartridge Replacement parts Ordering Supplies Clearing the Memory You can be accidentally erased due to power failure or storage failure. Press Scroll ( ... highlight Machine Setup and press Select ( ). 4. Press Scroll ( or ) to highlight Clear Settings and press Select ( ). 4. l Fax Features: Cancels all of your printer's memory. 1. l Advanced Fax: Restores all of the scheduled fax jobs in the memory and resets all of the Advanced Fax setting options to continue clearing...


