Owners Manual
Page 1
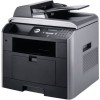
Dell™ Laser Multi-Function Printer 1815dn Owner's Manual Look Inside For: • Preparing Your Multi-Function Printer • Understanding the Printer Software • Loading Print Media • Using Your Multi-Function Printer • Maintenance • Troubleshooting • Installing Options • Contacting Dell Temporary www.dell.com | support.dell.com
Dell™ Laser Multi-Function Printer 1815dn Owner's Manual Look Inside For: • Preparing Your Multi-Function Printer • Understanding the Printer Software • Loading Print Media • Using Your Multi-Function Printer • Maintenance • Troubleshooting • Installing Options • Contacting Dell Temporary www.dell.com | support.dell.com
Owners Manual
Page 9
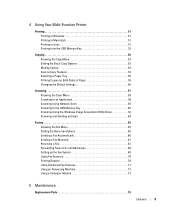
4 Using Your Multi-Function Printer Printing 51 Printing in Windows 51 Printing in Macintosh 51 Printing in Linux 51 Printing from the USB Memory Key 52 Copying 52 Knowing the ... the Fax System 68 Using Fax Features 70 Printing Reports 70 Using Advanced Fax Features 71 Using an Answering Machine 72 Using a Computer Modem 73 5 Maintenance Replacement Parts 75 Contents 9
4 Using Your Multi-Function Printer Printing 51 Printing in Windows 51 Printing in Macintosh 51 Printing in Linux 51 Printing from the USB Memory Key 52 Copying 52 Knowing the ... the Fax System 68 Using Fax Features 70 Printing Reports 70 Using Advanced Fax Features 71 Using an Answering Machine 72 Using a Computer Modem 73 5 Maintenance Replacement Parts 75 Contents 9
Owners Manual
Page 21
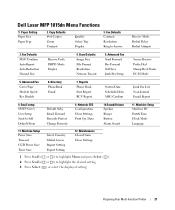
... Fax Send Forward Rcv Forward Toll Save Junk Fax Setup 5. Advanced Fax Cover Page Modem Speed Rcv Disable 6. Network CFG Configuration Clear Settings Print Sys. Maintenance Clean Drum Clear Settings 1 Press Scroll ( or ) to highlight Menu and press Select ( ). 2 Press Scroll ( or ) to Self Default From Default Subj... Select Country Global Access Import Setting Export Setting 12. Machine Setup Machine ID Date&Time Clock Mode Language Preparing Your Multi-Function Printer 21 Dell Laser MFP 1815dn Menu Functions 1. Data 10.Sound/Volume Speaker Ringer Button Alarm Sound 11.
... Fax Send Forward Rcv Forward Toll Save Junk Fax Setup 5. Advanced Fax Cover Page Modem Speed Rcv Disable 6. Network CFG Configuration Clear Settings Print Sys. Maintenance Clean Drum Clear Settings 1 Press Scroll ( or ) to highlight Menu and press Select ( ). 2 Press Scroll ( or ) to Self Default From Default Subj... Select Country Global Access Import Setting Export Setting 12. Machine Setup Machine ID Date&Time Clock Mode Language Preparing Your Multi-Function Printer 21 Dell Laser MFP 1815dn Menu Functions 1. Data 10.Sound/Volume Speaker Ringer Button Alarm Sound 11.

Owners Manual
Page 75
...Rubber Pad You can purchase an ADF rubber pad from your Dell dealer or the retailer where you need to replace the rollers and fuser unit to maintain top performance and to time, you bought your Dell dealer or the retailer where you have printed the specified number... Approx. 150,000 pages To purchase replacement parts, contact your printer. We strongly recommend that these items be replaced after you bought your printer. 1 Open the ADF cover. 2 Rotate the bushing on the right end of pages. Maintenance 75 The following items should be installed by a trained service professional...
...Rubber Pad You can purchase an ADF rubber pad from your Dell dealer or the retailer where you need to replace the rollers and fuser unit to maintain top performance and to time, you bought your Dell dealer or the retailer where you have printed the specified number... Approx. 150,000 pages To purchase replacement parts, contact your printer. We strongly recommend that these items be replaced after you bought your printer. 1 Open the ADF cover. 2 Rotate the bushing on the right end of pages. Maintenance 75 The following items should be installed by a trained service professional...

Owners Manual
Page 76
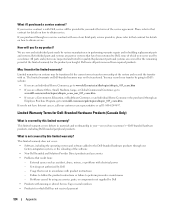
3 Remove the ADF rubber pad from the ADF, as shown. 4 Insert a new ADF rubber pad into place. 5 Align the left end of the ADF roller with the slot and push the right end of the roller toward the ADF. 6 Close the ADF cover. 76 Maintenance Rotate the bushing on the right end of the ADF roller into the right slot.
3 Remove the ADF rubber pad from the ADF, as shown. 4 Insert a new ADF rubber pad into place. 5 Align the left end of the ADF roller with the slot and push the right end of the roller toward the ADF. 6 Close the ADF cover. 76 Maintenance Rotate the bushing on the right end of the ADF roller into the right slot.

Owners Manual
Page 77
... 2 From the Start menu, click Programs or All Programs → DELL → DELL Printers → DELL Laser MFP 1815 → Dell Toner Reorder Program. The Order Toner Cartridges window appears. NOTE: Refer to the following table to order supplies online. NOTE: premier.dell.com is 5,000 pages. Maintenance 77 Dell Standard Capacity Toner Cartridge life is 3,000 pages and...
... 2 From the Start menu, click Programs or All Programs → DELL → DELL Printers → DELL Laser MFP 1815 → Dell Toner Reorder Program. The Order Toner Cartridges window appears. NOTE: Refer to the following table to order supplies online. NOTE: premier.dell.com is 5,000 pages. Maintenance 77 Dell Standard Capacity Toner Cartridge life is 3,000 pages and...
Owners Manual
Page 78
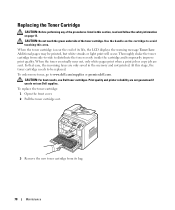
CAUTION: Do not touch the green underside of the toner cartridge. When the toner cartridge is near the end of its bag. 78 Maintenance To order more toner, go to be printed, but white streaks or light print will occur. To replace the toner cartridge: 1 Open the front cover. 2.... At this area. Print quality and printer reliability are sent. Additional pages may be replaced. Use the handle on page 13. When the toner eventually runs out, only white pages print when a print job or copy job are not guaranteed if you do not use Dell toner cartridges. Replacing the Toner Cartridge...
CAUTION: Do not touch the green underside of the toner cartridge. When the toner cartridge is near the end of its bag. 78 Maintenance To order more toner, go to be printed, but white streaks or light print will occur. To replace the toner cartridge: 1 Open the front cover. 2.... At this area. Print quality and printer reliability are sent. Additional pages may be replaced. Use the handle on page 13. When the toner eventually runs out, only white pages print when a print job or copy job are not guaranteed if you do not use Dell toner cartridges. Replacing the Toner Cartridge...

Owners Manual
Page 79
NOTE: If toner comes into contact with your clothing, wipe the toner off with a dry cloth and wash your clothing in the printer. 6 Tabs on the sides of the toner cartridge. Make sure that the cover is surely closed. 4 Remove the packing tape and thoroughly shake the ... by the handle and slowly insert the cartridge into fabric. CAUTION: Do not touch the green underside of the cartridge and corresponding grooves within the printer will guide the cartridge into the correct position until it locks into place completely. 7 Close the front cover. Use the handle on the cartridge ...
NOTE: If toner comes into contact with your clothing, wipe the toner off with a dry cloth and wash your clothing in the printer. 6 Tabs on the sides of the toner cartridge. Make sure that the cover is surely closed. 4 Remove the packing tape and thoroughly shake the ... by the handle and slowly insert the cartridge into fabric. CAUTION: Do not touch the green underside of the cartridge and corresponding grooves within the printer will guide the cartridge into the correct position until it locks into place completely. 7 Close the front cover. Use the handle on the cartridge ...

Owners Manual
Page 80
...alcohol or other strong substances may cause print quality problems. 80 Maintenance Do not let water drip onto the printer or inside the printer. CAUTION: Do not touch the transfer roller inside the printer. Cleaning the Exterior Clean the printer cabinet with a soft, damp, lint-free cloth. Oil ...if print quality problems occur. Specify the length of the toner cartridge. Oil from your fingers may discolor or crack the printer cabinet. Clean inside the printer to cool down. 2 Open the front cover and lightly pull the toner cartridge straight out. Use the handle on ...
...alcohol or other strong substances may cause print quality problems. 80 Maintenance Do not let water drip onto the printer or inside the printer. CAUTION: Do not touch the transfer roller inside the printer. Cleaning the Exterior Clean the printer cabinet with a soft, damp, lint-free cloth. Oil ...if print quality problems occur. Specify the length of the toner cartridge. Oil from your fingers may discolor or crack the printer cabinet. Clean inside the printer to cool down. 2 Open the front cover and lightly pull the toner cartridge straight out. Use the handle on ...

Owners Manual
Page 81
Cleaning the Scanner Keeping the scanner and ADF glass clean ensure the highest quality copies and sent faxes. Maintenance 81 NOTE: If there are lines present on . Dell recommends cleaning the scanner at the start of the cartridge compartment, and gently swab the glass to see if dirt turns the white... cotton black. 5 Reinsert the toner cartridge and close the front cover. 6 Plug in the power cord and power the printer on copied or ...
Cleaning the Scanner Keeping the scanner and ADF glass clean ensure the highest quality copies and sent faxes. Maintenance 81 NOTE: If there are lines present on . Dell recommends cleaning the scanner at the start of the cartridge compartment, and gently swab the glass to see if dirt turns the white... cotton black. 5 Reinsert the toner cartridge and close the front cover. 6 Plug in the power cord and power the printer on copied or ...

Owners Manual
Page 82
The printer prints out a cleaning page. The display confirms your print, the Organic Photo Conductor (OPC) drum of the white document cover and white sheet until toner particles are not affixed to the paper. 82 Maintenance Toner particles on the drum surface are streaks or spots on the bottom line. 4 Press Select ( ) ...procedure, make sure that paper is loaded in the paper tray. 2 Press Scroll ( or ) to highlight Menu and press Select ( ). 3 Press Scroll ( or ) to highlight Maintenance and press Select ( ). The first available menu item, Clean Drum, displays on your selection.
The printer prints out a cleaning page. The display confirms your print, the Organic Photo Conductor (OPC) drum of the white document cover and white sheet until toner particles are not affixed to the paper. 82 Maintenance Toner particles on the drum surface are streaks or spots on the bottom line. 4 Press Select ( ) ...procedure, make sure that paper is loaded in the paper tray. 2 Press Scroll ( or ) to highlight Menu and press Select ( ). 3 Press Scroll ( or ) to highlight Maintenance and press Select ( ). The first available menu item, Clean Drum, displays on your selection.

Owners Manual
Page 121
... the manufacturer guarantee for Dell-Branded Hardware Products (U.S. Failure to follow the product instructions or failure to perform preventive maintenance - Box 50191, Minneapolis, MN 55405. (REV 8/11) Limited Warranties and Return Policy Dell-branded hardware products purchased in... in materials and workmanship in accordance with product instructions - successors, assigns, affiliates (collectively for purposes of this paragraph, "Dell") arising from or relating to this Agreement, its interpretation, or the breach, termination or validity thereof, the relationships which result...
... the manufacturer guarantee for Dell-Branded Hardware Products (U.S. Failure to follow the product instructions or failure to perform preventive maintenance - Box 50191, Minneapolis, MN 55405. (REV 8/11) Limited Warranties and Return Policy Dell-branded hardware products purchased in... in materials and workmanship in accordance with product instructions - successors, assigns, affiliates (collectively for purposes of this paragraph, "Dell") arising from or relating to this Agreement, its interpretation, or the breach, termination or validity thereof, the relationships which result...
Owners Manual
Page 124
How will be provided to perform preventive maintenance - The limited warranty on Dell-branded memory may not be transferred if the current owner transfers ownership of the system and records the transfer with us a service contract with one of our third-party service providers, please refer... to that result from repaired products. You may be transferred. Problems caused by using accessories, parts, or components not supplied by Dell • Products with product instructions - ...
How will be provided to perform preventive maintenance - The limited warranty on Dell-branded memory may not be transferred if the current owner transfers ownership of the system and records the transfer with us a service contract with one of our third-party service providers, please refer... to that result from repaired products. You may be transferred. Problems caused by using accessories, parts, or components not supplied by Dell • Products with product instructions - ...

Owners Manual
Page 129
...apply to defects resulting from other contracts concluded by the end user with Dell and/or any other seller. or normal wear and tear. Dell World Trade LP One Dell Way, Round Rock, TX 78682, USA Dell Computadores do Sul - accidental or willful damage; This Guarantee does not impair... that its affiliates shall be free from defects in materials, workmanship, and design affecting normal use , or maintenance; Chile Dell Computer de Colombia Corporation Carrera 7 #115-33 Oficina 603 Bogota, Colombia Dell Computer de Mexico SA de CV Paseo de la Reforma 2620 - 11° Piso Col...
...apply to defects resulting from other contracts concluded by the end user with Dell and/or any other seller. or normal wear and tear. Dell World Trade LP One Dell Way, Round Rock, TX 78682, USA Dell Computadores do Sul - accidental or willful damage; This Guarantee does not impair... that its affiliates shall be free from defects in materials, workmanship, and design affecting normal use , or maintenance; Chile Dell Computer de Colombia Corporation Carrera 7 #115-33 Oficina 603 Bogota, Colombia Dell Computer de Mexico SA de CV Paseo de la Reforma 2620 - 11° Piso Col...

Owners Manual
Page 149
...82 exterior, 80 interior, 80 scanner, 81 clearing document jams, 83 paper jams, 85 computer modem, 73 contacting, Dell, 102 copying, 52 canceling, 54 contrast, 53 default setting, 56 duplex, 55 number of pages, 53 quality, ...53 size, 53 special features, 54 tray selecting, 55 D date and time, setting, 24 Dell contacting, 101 Dell,contacting, 102 DIMM, installing, 95 display language, changing, 22 document jam clearing, 83 loading ADF, 49 scanner ... 48 loading, paper in the bypass tray, 43 in the tray, 40 M maintenance, 75 memory, installing, 95 menu functions/menu tree, 21 149
...82 exterior, 80 interior, 80 scanner, 81 clearing document jams, 83 paper jams, 85 computer modem, 73 contacting, Dell, 102 copying, 52 canceling, 54 contrast, 53 default setting, 56 duplex, 55 number of pages, 53 quality, ...53 size, 53 special features, 54 tray selecting, 55 D date and time, setting, 24 Dell contacting, 101 Dell,contacting, 102 DIMM, installing, 95 display language, changing, 22 document jam clearing, 83 loading ADF, 49 scanner ... 48 loading, paper in the bypass tray, 43 in the tray, 40 M maintenance, 75 memory, installing, 95 menu functions/menu tree, 21 149

User's Guide
Page 10
... that appears on the operator panel, follow these steps: 1. Sent Report RCV Report System Data Scheduled Jobs Junk Fax List Scan Journal Email Report 10. Maintenance Clean Drum Clear Settings Changing the Display Language To change the country that the operator panel displays, follow these steps: 1. Press Scroll ( or ) to highlight...
... that appears on the operator panel, follow these steps: 1. Sent Report RCV Report System Data Scheduled Jobs Junk Fax List Scan Journal Email Report 10. Maintenance Clean Drum Clear Settings Changing the Display Language To change the country that the operator panel displays, follow these steps: 1. Press Scroll ( or ) to highlight...

User's Guide
Page 60
Maintenance Clearing the Memory Backing up Data Cleaning Your Multi-function Printer Maintaining the Toner Cartridge Replacement parts Ordering Supplies Clearing the Memory You can be accidentally erased due to highlight Menu and press Select ( ). ... as backup files on your printer's memory. 1. Backing up Data Date in the printer's memory can selectively clear information stored in the printer's memory. Backing up to the factory default. Press Scroll ( or ) to power failure or storage failure. OR Press Cancel ( ) to return to highlight Maintenance and press Select ( ). ...
Maintenance Clearing the Memory Backing up Data Cleaning Your Multi-function Printer Maintaining the Toner Cartridge Replacement parts Ordering Supplies Clearing the Memory You can be accidentally erased due to highlight Menu and press Select ( ). ... as backup files on your printer's memory. 1. Backing up Data Date in the printer's memory can selectively clear information stored in the printer's memory. Backing up to the factory default. Press Scroll ( or ) to power failure or storage failure. OR Press Cancel ( ) to return to highlight Maintenance and press Select ( ). ...

User's Guide
Page 65
...) to highlight Maintenance and press Select ( ). We strongly recommend that the cover is surely closed. Press Scroll ( or ) to select the desired status and press Select ( ). 5. The printer prints out a cleaning page. If you want to print the fax when toner is nearly empty, the printer saves the incoming... affixed to the paper. 5. Replacing the ADF rubber pad You can set the printer to highlight Fax and press Select ( ). 2. Press Scroll ( or ) to continue printing incoming faxes from your Dell dealer or the retailer where you have printed the specified number of the cartridge and...
...) to highlight Maintenance and press Select ( ). We strongly recommend that the cover is surely closed. Press Scroll ( or ) to select the desired status and press Select ( ). 5. The printer prints out a cleaning page. If you want to print the fax when toner is nearly empty, the printer saves the incoming... affixed to the paper. 5. Replacing the ADF rubber pad You can set the printer to highlight Fax and press Select ( ). 2. Press Scroll ( or ) to continue printing incoming faxes from your Dell dealer or the retailer where you have printed the specified number of the cartridge and...

Service Manual
Page 3
... FOR STR LNING. This printer should always be serviced by a suitably trained and qualified service engineer. (2) Use only Dell replacement parts There are designed so there is never any unauthorized changes or additions to the printer, these basic safety pre-... DO NOT OPEN THIS COVER. ATTENZIONE - VARNING - The laser system and printer are no user serviceable parts inside this product, these could cause the printer to laser radiation above a Class I level during normal operation, user maintenance, or prescribed service condition. The reflected beam, although invisible...
... FOR STR LNING. This printer should always be serviced by a suitably trained and qualified service engineer. (2) Use only Dell replacement parts There are designed so there is never any unauthorized changes or additions to the printer, these basic safety pre-... DO NOT OPEN THIS COVER. ATTENZIONE - VARNING - The laser system and printer are no user serviceable parts inside this product, these could cause the printer to laser radiation above a Class I level during normal operation, user maintenance, or prescribed service condition. The reflected beam, although invisible...

Service Manual
Page 71
It includes the contents of manual. 6.1 Paper path Scanner Part Roller-ADF Roller-Pickup Roller-Feed Roller-Exit Engine Part Roller-REGI Roller-MP OPC Roller-Transfer Roller-Feed Roller-Pickup Roller-Exit Roller-Heat Duplex Roller-Pressure Service Manual 6-1 Alignment and Adjustments This chapter describes the main functions for service, such as the product maintenance method, the test output related to maintenance and repair , DCU using method, Jam removing method, and so on. Alignment & Adjustments 66.
It includes the contents of manual. 6.1 Paper path Scanner Part Roller-ADF Roller-Pickup Roller-Feed Roller-Exit Engine Part Roller-REGI Roller-MP OPC Roller-Transfer Roller-Feed Roller-Pickup Roller-Exit Roller-Heat Duplex Roller-Pressure Service Manual 6-1 Alignment and Adjustments This chapter describes the main functions for service, such as the product maintenance method, the test output related to maintenance and repair , DCU using method, Jam removing method, and so on. Alignment & Adjustments 66.


