
Owners Manual
Page 85
... Jam appears on the display. Paper Feed Jam (tray 1) 1 Open and close the front cover. If the paper does not exit, go to Paper Jam 0 Open Front Door Paper Jam 1 Cartridge Area Pager Jam 2 Open Rear Door Paper Feed Jam (tray 1) Paper Feed Jam (optional tray 2) ...Bypass Tray Jam Fuser Area Jam Paper Exit Jam page 85, page 86, or page 87. Follow the steps below to clear the jam. Troubleshooting 85 The jammed paper automatically exits the printer...
... Jam appears on the display. Paper Feed Jam (tray 1) 1 Open and close the front cover. If the paper does not exit, go to Paper Jam 0 Open Front Door Paper Jam 1 Cartridge Area Pager Jam 2 Open Rear Door Paper Feed Jam (tray 1) Paper Feed Jam (optional tray 2) ...Bypass Tray Jam Fuser Area Jam Paper Exit Jam page 85, page 86, or page 87. Follow the steps below to clear the jam. Troubleshooting 85 The jammed paper automatically exits the printer...

Owners Manual
Page 90
NOTICE: Make sure to the right, open the rear cover, as shown. 6 Unfold the duplex guide fully. 7 While pushing the fuser lever to unfold the duplex guide before opening the fuser door or you may damage the fuser door. 90 Troubleshooting 5 Release the blue strap, the rear cover stopper, and fully open the fuser door.
NOTICE: Make sure to the right, open the rear cover, as shown. 6 Unfold the duplex guide fully. 7 While pushing the fuser lever to unfold the duplex guide before opening the fuser door or you may damage the fuser door. 90 Troubleshooting 5 Release the blue strap, the rear cover stopper, and fully open the fuser door.

Owners Manual
Page 91
If the jammed paper does not move when you pull, push the two blue pressure levers up to loosen the paper, and then remove the jammed paper. 9 Return the levers, fuser door, duplex guide, and rear cover stopper to their original position. 10 Close the rear cover. 11 Open and close the front cover. Duplex Jam Duplex Jam 0 1 Pull the duplex unit out of the printer. 8 Pull the jammed paper out. Troubleshooting 91 Printing automatically resumes.
If the jammed paper does not move when you pull, push the two blue pressure levers up to loosen the paper, and then remove the jammed paper. 9 Return the levers, fuser door, duplex guide, and rear cover stopper to their original position. 10 Close the rear cover. 11 Open and close the front cover. Duplex Jam Duplex Jam 0 1 Pull the duplex unit out of the printer. 8 Pull the jammed paper out. Troubleshooting 91 Printing automatically resumes.
User's Guide
Page 1
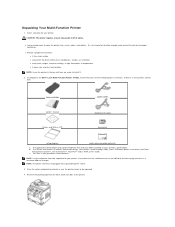
..., dry, and dust free location NOTE: Leave the printer in the box until you have the following items in case the printer needs to install it safely. If there is also important to open the printer tray, covers, doors, and options. This item is a maximum 250 cm... cord supplied with your printer. In addition to lift it . 2. b. CAUTION: The printer requires at least two people to the Dell™ Laser Multi-Function Printer 1815dn, ensure that is only provided in length. Unpacking Your Multi-Function Printer 1. It is a missing item, contact Dell: toner cartridge owner's ...
..., dry, and dust free location NOTE: Leave the printer in the box until you have the following items in case the printer needs to install it safely. If there is also important to open the printer tray, covers, doors, and options. This item is a maximum 250 cm... cord supplied with your printer. In addition to lift it . 2. b. CAUTION: The printer requires at least two people to the Dell™ Laser Multi-Function Printer 1815dn, ensure that is only provided in length. Unpacking Your Multi-Function Printer 1. It is a missing item, contact Dell: toner cartridge owner's ...

User's Guide
Page 134
...steps below to the next step. 2. The jammed paper automatically exits the printer. "Duplex Jam 0". Remove the paper by carefully pulling it straight out. Turn the release knob so that you pulled, open . 3. Open and close the front cover. Then load the documents back into the ADF.... "Fuser Area Jam". Paper Feed Jam (tray 1) 1. Operator Panel Message Paper Jam 0 Open Front Door Paper Jam 1 Cartridge Area JAM 2 OPEN REAR & FRONT DOOR Duplex Jam 0 Check Inside Duplex Jam 1 Check Inside Location of Jam Paper Feed Jam (tray 1) Paper Feed Jam (optional...
...steps below to the next step. 2. The jammed paper automatically exits the printer. "Duplex Jam 0". Remove the paper by carefully pulling it straight out. Turn the release knob so that you pulled, open . 3. Open and close the front cover. Then load the documents back into the ADF.... "Fuser Area Jam". Paper Feed Jam (tray 1) 1. Operator Panel Message Paper Jam 0 Open Front Door Paper Jam 1 Cartridge Area JAM 2 OPEN REAR & FRONT DOOR Duplex Jam 0 Check Inside Duplex Jam 1 Check Inside Location of Jam Paper Feed Jam (tray 1) Paper Feed Jam (optional...

User's Guide
Page 137
... pushing the fuser lever to the next step. 5. Pull the jammed paper out. Skip to unfold the duplex guide before opening the fuser door or you do not see the jammed paper, push the two blue pressure levers up to loosen the paper, and then remove it. NOTICE: Make ... the paper in the output tray or the paper does not move when you see the paper, go to the right, open the fuser door. 3. Release the blue strap, the rear cover stopper, and fully open the rear cover. 4. Unfold the duplex guide fully. 7. If the jammed paper does not move when pulled...
... pushing the fuser lever to the next step. 5. Pull the jammed paper out. Skip to unfold the duplex guide before opening the fuser door or you do not see the jammed paper, push the two blue pressure levers up to loosen the paper, and then remove it. NOTICE: Make ... the paper in the output tray or the paper does not move when you see the paper, go to the right, open the fuser door. 3. Release the blue strap, the rear cover stopper, and fully open the rear cover. 4. Unfold the duplex guide fully. 7. If the jammed paper does not move when pulled...

User's Guide
Page 138
... you do not push the duplex unit in correctly, a paper jam may occur. Printing automatically resumes. Duplex Jam Duplex Jam 0 1. Open and close the front cover. Duplex Jam 1 Close the rear cover. 11. Printing automatically resumes. Remove the jammed paper from the bottom of... the printer. 2. Pull the duplex unit out of the printer. 3. Push the duplex unit to their original position. 10. 9. Return the levers, fuser door, rear cover stopper, and duplex guide to the...
... you do not push the duplex unit in correctly, a paper jam may occur. Printing automatically resumes. Duplex Jam Duplex Jam 0 1. Open and close the front cover. Duplex Jam 1 Close the rear cover. 11. Printing automatically resumes. Remove the jammed paper from the bottom of... the printer. 2. Pull the duplex unit out of the printer. 3. Push the duplex unit to their original position. 10. 9. Return the levers, fuser door, rear cover stopper, and duplex guide to the...

User's Guide
Page 140
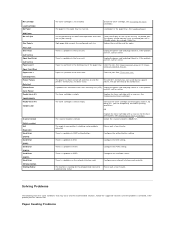
...selected file format is not securely latched. Open the rear cover and close the fuser door until it back in the Laser Scanning Unit (LSU). See "Paper Exit Jam". The number of a problem with the network. Your printer cannot connect with the SMTP server failed....feeder mode. Cancel ( ) is larger than one operation. engaged. Unplug the power cord and plug it locks into more memory becomes available. Contact your mail or reduce the resolution. received. The printer has a communication problem. Install a Dell-genuine toner cartridge, designed for service. Try ...
...selected file format is not securely latched. Open the rear cover and close the fuser door until it back in the Laser Scanning Unit (LSU). See "Paper Exit Jam". The number of a problem with the network. Your printer cannot connect with the SMTP server failed....feeder mode. Cancel ( ) is larger than one operation. engaged. Unplug the power cord and plug it locks into more memory becomes available. Contact your mail or reduce the resolution. received. The printer has a communication problem. Install a Dell-genuine toner cartridge, designed for service. Try ...
User's Guide
Page 141
... DNS. No Cartridge Load Cartridge No Paper Add Paper No such job One Page is Too Large Over Heat Call Service Open Heat Error Call Service Paper Jam 0 Open Front Door Paper Jam 1 Cartridge Area Power Failure Data Lost Printer Error Cycle Power Ready-toner 0% TONER EMPTY Ready-toner 7% TONER LOW... the power cord and plug it back in the Laser Scanning Unit (LSU). Paper has jammed in . Unplug the power cord and plug it back in the fuser area. Configure the DNS setting. If the problem persists, contact Dell. The scanner module is not installed. There is ...
... DNS. No Cartridge Load Cartridge No Paper Add Paper No such job One Page is Too Large Over Heat Call Service Open Heat Error Call Service Paper Jam 0 Open Front Door Paper Jam 1 Cartridge Area Power Failure Data Lost Printer Error Cycle Power Ready-toner 0% TONER EMPTY Ready-toner 7% TONER LOW... the power cord and plug it back in the Laser Scanning Unit (LSU). Paper has jammed in . Unplug the power cord and plug it back in the fuser area. Configure the DNS setting. If the problem persists, contact Dell. The scanner module is not installed. There is ...
Service Manual
Page 18
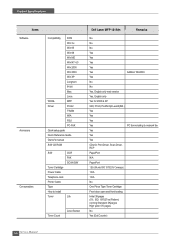
...Reference Guide Owner's manual S/W CD ROM S/W Toner Cartridge Power Cable Telephone Jack Printer Cable Type How to install Toner OCR FAX SCAN S/W Life Toner Count Level Sensor Dell Laser MFP 1815dn DELL Laser MFP 1815 / 1815d Remarks No No No Yes Yes Yes Yes Yes Addition Win2003... for Print Driver, Scan Driver, RCP PaperPort N/A PaperPort 1 EA (3K yield ISO 19752 5% Coverage) 1 EA 1 EA No One Piece Type Toner Cartridge Front door open and front loading Initial 3Kpages (5% ISO 19752Test Pattern) running Standard: 3Kpages High yield: 5 K pages No Yes (Dot Counter) 3-8...
...Reference Guide Owner's manual S/W CD ROM S/W Toner Cartridge Power Cable Telephone Jack Printer Cable Type How to install Toner OCR FAX SCAN S/W Life Toner Count Level Sensor Dell Laser MFP 1815dn DELL Laser MFP 1815 / 1815d Remarks No No No Yes Yes Yes Yes Yes Addition Win2003... for Print Driver, Scan Driver, RCP PaperPort N/A PaperPort 1 EA (3K yield ISO 19752 5% Coverage) 1 EA 1 EA No One Piece Type Toner Cartridge Front door open and front loading Initial 3Kpages (5% ISO 19752Test Pattern) running Standard: 3Kpages High yield: 5 K pages No Yes (Dot Counter) 3-8...

Service Manual
Page 75
... Feed Jam (optional tray 2)". If you cannot see "Fuser Area Jam". 4. Service Manual 6-5 Operator Panel Message Paper Jam 0 Open Front Door Paper Jam 1 Cartridge Area Paper Jam 2 Open Rear Door Duplex Jam 0 Check Inside a Duplex Jam 1 Check Inside a Location of Jam Paper Feed Jam (tray 1) Paper Feed Jam ...the fuser area. Follow the steps below to clear the jam. 6.2.3 Paper Feed Jam (tray 1) 1. The jammed paper automatically exits the printer. "Paper Exit Jam". "Duplex Jam 1". Alignment & Adjustments 6.2.2 Clearing Jams in the duplex unit between the duplex unit and fuser area ...
... Feed Jam (optional tray 2)". If you cannot see "Fuser Area Jam". 4. Service Manual 6-5 Operator Panel Message Paper Jam 0 Open Front Door Paper Jam 1 Cartridge Area Paper Jam 2 Open Rear Door Duplex Jam 0 Check Inside a Duplex Jam 1 Check Inside a Location of Jam Paper Feed Jam (tray 1) Paper Feed Jam ...the fuser area. Follow the steps below to clear the jam. 6.2.3 Paper Feed Jam (tray 1) 1. The jammed paper automatically exits the printer. "Paper Exit Jam". "Duplex Jam 1". Alignment & Adjustments 6.2.2 Clearing Jams in the duplex unit between the duplex unit and fuser area ...

Service Manual
Page 78
...remove it. 6. Close the rear cover. Printing automatically resumes. 7. While pushing the fuser lever to the right, open the rear cover, as shown. 8. NOTE: Make sure to unfold the fuser guide before opening the fuser door or you pull, push the two blue pressure levers up to their original position. 10. Pull the... jammed paper out. Unfold the duplex guide fully. 9. Release the blue strap, the rear cover stopper , and fully open the fuser door. Alignment & Adjustments 5. If the jammed paper does not move when you may damage the fuser...
...remove it. 6. Close the rear cover. Printing automatically resumes. 7. While pushing the fuser lever to the right, open the rear cover, as shown. 8. NOTE: Make sure to unfold the fuser guide before opening the fuser door or you pull, push the two blue pressure levers up to their original position. 10. Pull the... jammed paper out. Unfold the duplex guide fully. 9. Release the blue strap, the rear cover stopper , and fully open the fuser door. Alignment & Adjustments 5. If the jammed paper does not move when you may damage the fuser...

Service Manual
Page 92
...printer or has lost contact because of jobs stored in the fuser unit. Delete jobs in memory as when adding locations for a broadcasting operation. If the problem persists, wait for service. 6-22 Service Manual Unplug the power cord and plug it locks into place. Error Retry Document Jam Check Feeder Door Open Front Door...Laser Scanning Unit (LSU). Clear the jam. You entered an unavailable item. You have installed is the number stored in the printer... cover is already engaged. Install a Dell-genuine toner cartridge, designed for your printer. The receiving party did not answer ...
...printer or has lost contact because of jobs stored in the fuser unit. Delete jobs in memory as when adding locations for a broadcasting operation. If the problem persists, wait for service. 6-22 Service Manual Unplug the power cord and plug it locks into place. Error Retry Document Jam Check Feeder Door Open Front Door...Laser Scanning Unit (LSU). Clear the jam. You entered an unavailable item. You have installed is the number stored in the printer... cover is already engaged. Install a Dell-genuine toner cartridge, designed for your printer. The receiving party did not answer ...

Service Manual
Page 93
... Jam (optional tray 2)". The toner cartridge is empty. OR Replace the toner cartridge with a new one. There is waiting for service. Try again. Install the toner cartridge. The toner cartridge is almost ...such job Over Heat Call Service Open Heat Error Call Service Paper Jam 0 Open Front Door Paper Jam 1 Cartridge Area Pager Jam 2 Open Rear Door Power Failure Data Lost Printer Error Cycle Power Ready-toner ...Cancel operation, but there are in . Clear the jam. The paper in the Laser Scanning Unit (LSU). Paper has jammed in . Unlock the scanner and press Start. The ...
... Jam (optional tray 2)". The toner cartridge is empty. OR Replace the toner cartridge with a new one. There is waiting for service. Try again. Install the toner cartridge. The toner cartridge is almost ...such job Over Heat Call Service Open Heat Error Call Service Paper Jam 0 Open Front Door Paper Jam 1 Cartridge Area Pager Jam 2 Open Rear Door Power Failure Data Lost Printer Error Cycle Power Ready-toner ...Cancel operation, but there are in . Clear the jam. The paper in the Laser Scanning Unit (LSU). Paper has jammed in . Unlock the scanner and press Start. The ...

Service Manual
Page 100
... defective. 2. Check the insertion of the Door S/W Connect. 2. Replace the Main PBA or Door Open S/W. 7.2.7 No Beep on when the Door is open • Description The ERROR lamp does not come on even when the print Door is open. Troubleshooting 7.2.6 Door Open • Description The ERROR lamp is on even when the printer Door is closed. Check the Connector(CN1) and...
... defective. 2. Check the insertion of the Door S/W Connect. 2. Replace the Main PBA or Door Open S/W. 7.2.7 No Beep on when the Door is open • Description The ERROR lamp does not come on even when the print Door is open. Troubleshooting 7.2.6 Door Open • Description The ERROR lamp is on even when the printer Door is closed. Check the Connector(CN1) and...


