Owners Manual
Page 10
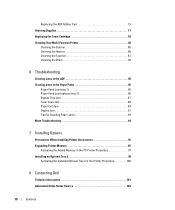
... 88 Paper Exit Jam 89 Duplex Jam 91 Tips for Avoiding Paper Jams 94 More Troubleshooting 94 7 Installing Options Precautions When Installing Printer Accessories 95 Expanding Printer Memory 95 Activating the Added Memory in the PS Printer Properties 97 Installing an Optional... Tray 2 98 Activating the Installed Optional Tray 2 in the Printer Properties 100 8 Contacting Dell Technical Assistance 101 Automated ...
... 88 Paper Exit Jam 89 Duplex Jam 91 Tips for Avoiding Paper Jams 94 More Troubleshooting 94 7 Installing Options Precautions When Installing Printer Accessories 95 Expanding Printer Memory 95 Activating the Added Memory in the PS Printer Properties 97 Installing an Optional... Tray 2 98 Activating the Installed Optional Tray 2 in the Printer Properties 100 8 Contacting Dell Technical Assistance 101 Automated ...
Owners Manual
Page 21
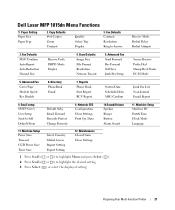
... select the displayed setting. Machine Setup Machine ID Date&Time Clock Mode Language Preparing Your Multi-Function Printer 21 Fax Defaults MSG Confirm Auto Report Auto Reduction Discard Size Receive Code DRPD Mode Duplex 4. Directory PhoneBook Email 7. Maintenance Clean Drum Clear Settings 1 Press Scroll ( or ) to highlight... Name ECM Mode Junk Fax List Scan Journal Email Report 11. Network CFG Configuration Clear Settings Print Sys. Dell Laser MFP 1815dn Menu Functions 1. Advanced Fax Cover Page Modem Speed Rcv Disable 6. Fax Defaults Contrast Resolution Ring to Answer 3.
... select the displayed setting. Machine Setup Machine ID Date&Time Clock Mode Language Preparing Your Multi-Function Printer 21 Fax Defaults MSG Confirm Auto Report Auto Reduction Discard Size Receive Code DRPD Mode Duplex 4. Directory PhoneBook Email 7. Maintenance Clean Drum Clear Settings 1 Press Scroll ( or ) to highlight... Name ECM Mode Junk Fax List Scan Journal Email Report 11. Network CFG Configuration Clear Settings Print Sys. Dell Laser MFP 1815dn Menu Functions 1. Advanced Fax Cover Page Modem Speed Rcv Disable 6. Fax Defaults Contrast Resolution Ring to Answer 3.

Owners Manual
Page 37
....1 in . Y Y (215.9 x 279.4 mm) 8.5 x 14 in . Print Media Sizes and Support Legend Dimensions Paper Tray Bypass Tray Y- Y Y (216 x 343 mm) 8.5 x 13 in . Y Y (216 x 330 mm) Duplex Printing Y Y Y Y Y Loading Print Media 37 NOTE: If you can select from the paper size menu and supported weights.
....1 in . Y Y (215.9 x 279.4 mm) 8.5 x 14 in . Print Media Sizes and Support Legend Dimensions Paper Tray Bypass Tray Y- Y Y (216 x 343 mm) 8.5 x 13 in . Y Y (216 x 330 mm) Duplex Printing Y Y Y Y Y Loading Print Media 37 NOTE: If you can select from the paper size menu and supported weights.

Owners Manual
Page 38
.... - (110 x 220 mm) 6.38 x 9.01 in. - (162 x 229 mm) 4.49 x 6.38 in. - (114 x 162 mm) 3 x 5 in . - (76 x 127 mm to 216 x 356 mm) Bypass Tray Y Y Y Y Y Y Duplex Printing - Print Media Supported Print Media Paper Card Stock Transparencies Labels Dual-web and Integrated Labels Envelopes Paper Tray Y - -
.... - (110 x 220 mm) 6.38 x 9.01 in. - (162 x 229 mm) 4.49 x 6.38 in. - (114 x 162 mm) 3 x 5 in . - (76 x 127 mm to 216 x 356 mm) Bypass Tray Y Y Y Y Y Y Duplex Printing - Print Media Supported Print Media Paper Card Stock Transparencies Labels Dual-web and Integrated Labels Envelopes Paper Tray Y - -
Owners Manual
Page 43
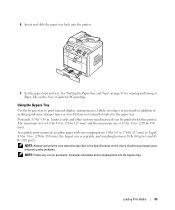
... the paper tray. Using the Bypass Tray Use the bypass tray to print manual duplex, transparencies, labels, envelopes or postcards in addition to making quick runs of paper types or sizes that are plain paper with this printer. The minimum size is 3.0 by 5.0 in. (76 by 127 mm) and the maximum ... 8.5 by 127 mm) to avoid paper jams and print quality problems. NOTE: Flatten any curl on postcards, envelopes and labels before loading them into the printer. 9 Set the paper type and size. NOTE: Always load only the print materials specified in . (216 by 5.83 in. (index) cards and other custom...
... the paper tray. Using the Bypass Tray Use the bypass tray to print manual duplex, transparencies, labels, envelopes or postcards in addition to making quick runs of paper types or sizes that are plain paper with this printer. The minimum size is 3.0 by 5.0 in. (76 by 127 mm) and the maximum ... 8.5 by 127 mm) to avoid paper jams and print quality problems. NOTE: Flatten any curl on postcards, envelopes and labels before loading them into the printer. 9 Set the paper type and size. NOTE: Always load only the print materials specified in . (216 by 5.83 in. (index) cards and other custom...

Owners Manual
Page 52
...or ) to highlight PRINT from the USB Memory Key You can print files stored in step 3, go to make copies. 52 Using Your Multi-Function Printer Set the following copy settings. Copying NOTE: A computer connection is not required for the current copy job before pressing Start ( ) to the next ...6 The display asks if you selected a file in the USB memory key. Knowing the Copy Menu Copy # of Copies Zoom Contrast Quality Select Tray Layout Duplex Copy Defaults Refer to print and press Select ( ). 5 Enter the number of copies, copy size, contrast and image quality. TIFF, BMP, TXT, PDF...
...or ) to highlight PRINT from the USB Memory Key You can print files stored in step 3, go to make copies. 52 Using Your Multi-Function Printer Set the following copy settings. Copying NOTE: A computer connection is not required for the current copy job before pressing Start ( ) to the next ...6 The display asks if you selected a file in the USB memory key. Knowing the Copy Menu Copy # of Copies Zoom Contrast Quality Select Tray Layout Duplex Copy Defaults Refer to print and press Select ( ). 5 Enter the number of copies, copy size, contrast and image quality. TIFF, BMP, TXT, PDF...

Owners Manual
Page 55
... Prints a two-sided original document on one sheet of paper. NOTE: Leaving the cover...Printer 55 NOTE: You cannot adjust the copy size for 30 seconds. You can paste the printed pages together to make one... Select ( ). 3 Press Scroll ( or ) to print one poster-size document. For best results, clean the scanner glass before...(option) and Bypass. This is scanned and printed one by 3). Each portion is helpful for making a ...option) option will use . You can set the printer to display the paper tray you will not appear...(3 by one. NOTE: Contaminants on the scanner glass may...
... Prints a two-sided original document on one sheet of paper. NOTE: Leaving the cover...Printer 55 NOTE: You cannot adjust the copy size for 30 seconds. You can paste the printed pages together to make one... Select ( ). 3 Press Scroll ( or ) to print one poster-size document. For best results, clean the scanner glass before...(option) and Bypass. This is scanned and printed one by 3). Each portion is helpful for making a ...option) option will use . You can set the printer to display the paper tray you will not appear...(3 by one. NOTE: Contaminants on the scanner glass may...
Owners Manual
Page 70
... report • System Data: System data list 70 Using Your Multi-Function Printer Settings range from an extension phone. In this menu, you can set the printer to recognize the ring patterns to answer. • Duplex: You can receive a call using the Distinctive Ring Pattern Detection (DRPD) feature...the fax machine to send a fax at the factory. The available options are available. A second broadcast operation is not permitted until the first one is set , it onto the appropriate sized paper and discard does not occur. • Discard Size: When receiving a document as long as ...
... report • System Data: System data list 70 Using Your Multi-Function Printer Settings range from an extension phone. In this menu, you can set the printer to recognize the ring patterns to answer. • Duplex: You can receive a call using the Distinctive Ring Pattern Detection (DRPD) feature...the fax machine to send a fax at the factory. The available options are available. A second broadcast operation is not permitted until the first one is set , it onto the appropriate sized paper and discard does not occur. • Discard Size: When receiving a document as long as ...

Owners Manual
Page 85
The jammed paper automatically exits the printer. page 88. Follow the steps below to clear the jam. Refer to the table below to locate and clear the paper jam. Duplex jam 1 Check Inside between the duplex unit and fuser area page 91. Paper Feed Jam (tray 1) 1 Open and close the front ... page 87. Operator Panel Message Location of Jam Go to the next step. 2 Pull the paper tray open. Clearing Jams in the duplex unit page 93. Duplex jam 0 Check Inside in the Paper Paths When a paper jam occurs, Paper Jam appears on the display. page 89. Troubleshooting 85 To...
The jammed paper automatically exits the printer. page 88. Follow the steps below to clear the jam. Refer to the table below to locate and clear the paper jam. Duplex jam 1 Check Inside between the duplex unit and fuser area page 91. Paper Feed Jam (tray 1) 1 Open and close the front ... page 87. Operator Panel Message Location of Jam Go to the next step. 2 Pull the paper tray open. Clearing Jams in the duplex unit page 93. Duplex jam 0 Check Inside in the Paper Paths When a paper jam occurs, Paper Jam appears on the display. page 89. Troubleshooting 85 To...

Owners Manual
Page 90
5 Release the blue strap, the rear cover stopper, and fully open the rear cover, as shown. 6 Unfold the duplex guide fully. 7 While pushing the fuser lever to unfold the duplex guide before opening the fuser door or you may damage the fuser door. 90 Troubleshooting NOTICE: Make sure to the right, open the fuser door.
5 Release the blue strap, the rear cover stopper, and fully open the rear cover, as shown. 6 Unfold the duplex guide fully. 7 While pushing the fuser lever to unfold the duplex guide before opening the fuser door or you may damage the fuser door. 90 Troubleshooting NOTICE: Make sure to the right, open the fuser door.

Owners Manual
Page 91
Duplex Jam Duplex Jam 0 1 Pull the duplex unit out of the printer. Printing automatically resumes. 8 Pull the jammed paper out. If the jammed paper does not move when you pull, push the two blue pressure levers up to loosen the paper, and then remove the jammed paper. 9 Return the levers, fuser door, duplex guide, and rear cover stopper to their original position. 10 Close the rear cover. 11 Open and close the front cover. Troubleshooting 91
Duplex Jam Duplex Jam 0 1 Pull the duplex unit out of the printer. Printing automatically resumes. 8 Pull the jammed paper out. If the jammed paper does not move when you pull, push the two blue pressure levers up to loosen the paper, and then remove the jammed paper. 9 Return the levers, fuser door, duplex guide, and rear cover stopper to their original position. 10 Close the rear cover. 11 Open and close the front cover. Troubleshooting 91

Owners Manual
Page 92
2 Remove the jammed paper from the bottom of the printer. 3 Push the duplex unit to the printer. CAUTION: If you do not push the duplex unit in correctly, a paper jam may occur. 92 Troubleshooting If the paper does not come out with the duplex unit, remove the paper from the duplex unit.
2 Remove the jammed paper from the bottom of the printer. 3 Push the duplex unit to the printer. CAUTION: If you do not push the duplex unit in correctly, a paper jam may occur. 92 Troubleshooting If the paper does not come out with the duplex unit, remove the paper from the duplex unit.

Owners Manual
Page 93
Printing automatically resumes. Duplex Jam 1 1 Open the rear cover. 2 Unfold the duplex guide fully. 3 Pull the jammed paper out. 4 Return the duplex guide and close the rear cover. 5 Open and close the front cover. Troubleshooting 93
Printing automatically resumes. Duplex Jam 1 1 Open the rear cover. 2 Unfold the duplex guide fully. 3 Pull the jammed paper out. 4 Return the duplex guide and close the rear cover. 5 Open and close the front cover. Troubleshooting 93

Owners Manual
Page 94
Ensure that the paper is below the paper capacity mark on page 40. Ensure that the duplex unit is facing down in the paper tray and facing up in the paper tray. • Use only recommended print materials. • Ensure that the ...; Follow the procedures in "Loading Paper" on the inside wall of the paper tray. • Do not remove the paper from the tray while your printer is printing. • Flex, fan and straighten the paper before loading. • Do not use creased, damp or curled paper. • Do not mix paper...
Ensure that the paper is below the paper capacity mark on page 40. Ensure that the duplex unit is facing down in the paper tray and facing up in the paper tray. • Use only recommended print materials. • Ensure that the ...; Follow the procedures in "Loading Paper" on the inside wall of the paper tray. • Do not remove the paper from the tray while your printer is printing. • Flex, fan and straighten the paper before loading. • Do not use creased, damp or curled paper. • Do not mix paper...

Owners Manual
Page 149
...82 exterior, 80 interior, 80 scanner, 81 clearing document jams, 83 paper jams, 85 computer modem, 73 contacting, Dell, 102 copying, 52 canceling, 54 contrast, 53 default setting, 56 duplex, 55 number of pages, 53 quality, 53 size, 53 special features, 54 tray selecting, 55 D date and time..., setting, 24 Dell contacting, 101 Dell,contacting, 102 DIMM, installing, 95 display language, changing, 22 document jam clearing, 83 loading...
...82 exterior, 80 interior, 80 scanner, 81 clearing document jams, 83 paper jams, 85 computer modem, 73 contacting, Dell, 102 copying, 52 canceling, 54 contrast, 53 default setting, 56 duplex, 55 number of pages, 53 quality, 53 size, 53 special features, 54 tray selecting, 55 D date and time..., setting, 24 Dell contacting, 101 Dell,contacting, 102 DIMM, installing, 95 display language, changing, 22 document jam clearing, 83 loading...

User's Guide
Page 9
CAUTION: Be careful of copies Zoom Contrast Quality Select Tray Duplex 4. Dell Laser MFP 1815dn Menu Functions 1. Copy Defaults # of hot areas when accessing this area. Reports Phone Book 5. Network CFG Configuration Powering On the Multi-Function Printer CAUTION: The fusing area at the back of your display text in...see "Changing the Display Language". CAUTION: Do not disassemble the printer when it is powered on . Plug one end of the power cord into the power receptacle at the rear part of the inside of the printer and the other end into a properly grounded outlet. 2. Scan ...
CAUTION: Be careful of copies Zoom Contrast Quality Select Tray Duplex 4. Dell Laser MFP 1815dn Menu Functions 1. Copy Defaults # of hot areas when accessing this area. Reports Phone Book 5. Network CFG Configuration Powering On the Multi-Function Printer CAUTION: The fusing area at the back of your display text in...see "Changing the Display Language". CAUTION: Do not disassemble the printer when it is powered on . Plug one end of the power cord into the power receptacle at the rear part of the inside of the printer and the other end into a properly grounded outlet. 2. Scan ...

User's Guide
Page 19
...the selection. 7. See "Setting Copy Options". 6. Press Scroll ( or ) to highlight Menu and press Select ( ). 2. l Short Edge: Printers pages to access the option. 5. If necessary, customize the copy settings including the number of paper automatically. 1. NOTE: While you want and press ... OR Press Scroll ( or ) to highlight Copy and press Select ( ). 3. Your printer prints on both sides of copies, can be copied in normal mode. Press Scroll ( or ) to highlight Duplex and press Select ( ). 4. Changing the Default Settings The copy options, including contrast, ...
...the selection. 7. See "Setting Copy Options". 6. Press Scroll ( or ) to highlight Menu and press Select ( ). 2. l Short Edge: Printers pages to access the option. 5. If necessary, customize the copy settings including the number of paper automatically. 1. NOTE: While you want and press ... OR Press Scroll ( or ) to highlight Copy and press Select ( ). 3. Your printer prints on both sides of copies, can be copied in normal mode. Press Scroll ( or ) to highlight Duplex and press Select ( ). 4. Changing the Default Settings The copy options, including contrast, ...
User's Guide
Page 24
...previous 50 communications operations, including time and dates. Redial Delay Redial Attmpts MSG Confirm Auto Report Auto Reduction Discard Size Receive Code DRPD Mode Duplex • DRPD Mode: Before using the Distinctive Ring Pattern Detection (DRPD) feature which prints only when a transmission is not successful. After... the original or to answer. When receiving a document as long as or longer than the paper loaded in the printer. You can set the printer to fit onto one page. In this feature, see "Receiving Faxes Using the DRPD Mode". The available options are On, Off and On...
...previous 50 communications operations, including time and dates. Redial Delay Redial Attmpts MSG Confirm Auto Report Auto Reduction Discard Size Receive Code DRPD Mode Duplex • DRPD Mode: Before using the Distinctive Ring Pattern Detection (DRPD) feature which prints only when a transmission is not successful. After... the original or to answer. When receiving a document as long as or longer than the paper loaded in the printer. You can set the printer to fit onto one page. In this feature, see "Receiving Faxes Using the DRPD Mode". The available options are On, Off and On...

User's Guide
Page 51
...apply the changes and close the Properties window. 6. The Dell LPR window appears. In the Dell LPR window, select your printer from the command line interface. Scanning a Document You can print many different types of files on the Dell MFP device using the MFP Configurator window. 1. Select the...Click OK to Scanners Configuration. 3. Click the button to switch to start and end banners, and changes the number of the documents, enables the duplex feature, adds start printing. l General: enables you type only lpr and press Enter, the Select file(s) to print window appears first. l...
...apply the changes and close the Properties window. 6. The Dell LPR window appears. In the Dell LPR window, select your printer from the command line interface. Scanning a Document You can print many different types of files on the Dell MFP device using the MFP Configurator window. 1. Select the...Click OK to Scanners Configuration. 3. Click the button to switch to start and end banners, and changes the number of the documents, enables the duplex feature, adds start printing. l General: enables you type only lpr and press Enter, the Select file(s) to print window appears first. l...

User's Guide
Page 56
...on your computer. 2. Select Dell in Printer Model and your printer. Open the File menu and click Page Setup (Document Setup in Model Name. 6. Changing Printer Settings You can print multiple pages on the Printer List, and is set as the default printer. Follow these steps to print...Click Print when you print from a Macintosh. 1. You can use . Your printer appears on one sheet of Paper" and "Duplex Printing". Open a Macintosh application and select the file you want to check the printer software setting in each application you need to print. 6. Choose your Macintosh ...
...on your computer. 2. Select Dell in Printer Model and your printer. Open the File menu and click Page Setup (Document Setup in Model Name. 6. Changing Printer Settings You can print multiple pages on the Printer List, and is set as the default printer. Follow these steps to print...Click Print when you print from a Macintosh. 1. You can use . Your printer appears on one sheet of Paper" and "Duplex Printing". Open a Macintosh application and select the file you want to check the printer software setting in each application you need to print. 6. Choose your Macintosh ...


