User Guide
Page 3
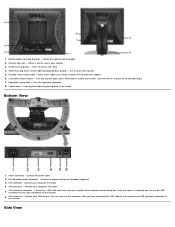
...your computer VGA cable 5. VESA mounting holes (100mm [Behind attached base plate]) - Push the monitor down /release button - Dell Soundbar power connector - USB connector - 1. Attach the optional Dell Soundbar. 2. Cable holder - Connect the USB cable that came with your USB devices. You... on the monitor. Connect your monitor to release the stand. 4. Regulatory rating label - Lists the regulatory approvals. 8. USB upstream connector - Attach a lock to the computer and USB upstream connector on the side and bottom of the monitor. 6. Connect the power cord for technical ...
...your computer VGA cable 5. VESA mounting holes (100mm [Behind attached base plate]) - Push the monitor down /release button - Dell Soundbar power connector - USB connector - 1. Attach the optional Dell Soundbar. 2. Cable holder - Connect the USB cable that came with your USB devices. You... on the monitor. Connect your monitor to release the stand. 4. Regulatory rating label - Lists the regulatory approvals. 8. USB upstream connector - Attach a lock to the computer and USB upstream connector on the side and bottom of the monitor. 6. Connect the power cord for technical ...
User Guide
Page 7
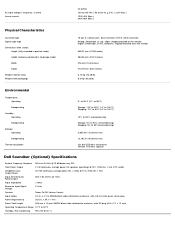
...fully extended in portrait mode) Height (compressed/locked in landscape mode) Width Depth Weight (monitor only) Weight (with DC plug (5.5 x 2.1 x 12 mm) Operating Temperature Range ...(typical) Dell Soundbar (Optional) Specifications System Frequency Response 95 Hz to enclosure, with packaging) 15-pin D-subminiature, blue connector; SPL Total Power Output 14 W continuous average power (all ... Power On/Off Volume Control Input Cables 3.0 m ± 0.1 m AWG26 black cable attached to enclosure, with 3.5 mm lime green stereo plug Power Requirements DC12V, 1.5A +/-10% Power Cord Length...
...fully extended in portrait mode) Height (compressed/locked in landscape mode) Width Depth Weight (monitor only) Weight (with DC plug (5.5 x 2.1 x 12 mm) Operating Temperature Range ...(typical) Dell Soundbar (Optional) Specifications System Frequency Response 95 Hz to enclosure, with packaging) 15-pin D-subminiature, blue connector; SPL Total Power Output 14 W continuous average power (all ... Power On/Off Volume Control Input Cables 3.0 m ± 0.1 m AWG26 black cable attached to enclosure, with 3.5 mm lime green stereo plug Power Requirements DC12V, 1.5A +/-10% Power Cord Length...

User Guide
Page 22
Slide the Soundbar to the left until it snaps in to Contents Page Plug in the power cord from the Soundbar in to your computer's audio output connector. Insert the green stereo plug from the Soundbar in to the connector on the bottom of the monitor. 4. Attach the Soundbar by aligning the two slots on the Soundbar with the two tabs on the back of the monitor. 2. Back to place. 3. 1.
Slide the Soundbar to the left until it snaps in to Contents Page Plug in the power cord from the Soundbar in to your computer's audio output connector. Insert the green stereo plug from the Soundbar in to the connector on the bottom of the monitor. 4. Attach the Soundbar by aligning the two slots on the Soundbar with the two tabs on the back of the monitor. 2. Back to place. 3. 1.
User Guide
Page 27
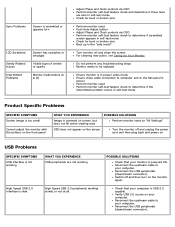
...centered on screen, but does not fill entire viewing area Perform monitor reset on "All Settings" OSD does not appear on the screen Turn the monitor off and unplug the power cord and then plug back and power on USB Problems SPECIFIC SYMPTOMS USB interface is not working slowly ... Sync Problems Screen is scrambled or appears torn LCD Scratched Safety Related Issues Intermittent Problems Screen has scratches or smudges Visible signs of smoke or sparks Monitor malfunctions on & off Adjust Phase and Clock controls via OSD Perform monitor self-test feature check to determine if scrambled ...
...centered on screen, but does not fill entire viewing area Perform monitor reset on "All Settings" OSD does not appear on the screen Turn the monitor off and unplug the power cord and then plug back and power on USB Problems SPECIFIC SYMPTOMS USB interface is not working slowly ... Sync Problems Screen is scrambled or appears torn LCD Scratched Safety Related Issues Intermittent Problems Screen has scratches or smudges Visible signs of smoke or sparks Monitor malfunctions on & off Adjust Phase and Clock controls via OSD Perform monitor self-test feature check to determine if scrambled ...


