User Guide
Page 1
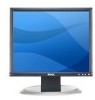
...-up Guide Information in this document to refer to change without the written permission of Dell Inc; Dell™ 1704FPV Flat Panel Monitor About Your Monitor Front View Back View Side View Bottom View Monitor Specifications Dell Soundbar (Optional) Specifications Caring for energy efficiency. Reproduction in this document is strictly forbidden. Microsoft, Windows and Windows NT are...
...-up Guide Information in this document to refer to change without the written permission of Dell Inc; Dell™ 1704FPV Flat Panel Monitor About Your Monitor Front View Back View Side View Bottom View Monitor Specifications Dell Soundbar (Optional) Specifications Caring for energy efficiency. Reproduction in this document is strictly forbidden. Microsoft, Windows and Windows NT are...
User Guide
Page 2
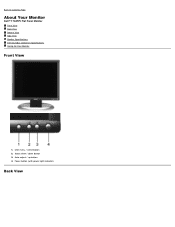
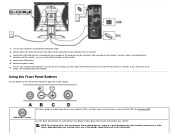
Auto-adjust / up button 4. OSD menu / select button 2. Power button (with power light indicator) Back View Back to Contents Page About Your Monitor Dell™ 1704FPV Flat Panel Monitor Front View Back View Bottom View Side View Monitor Specifications Dell Soundbar (Optional) Specifications Caring for Your Monitor Front View 1. Input select / down button 3.
Auto-adjust / up button 4. OSD menu / select button 2. Power button (with power light indicator) Back View Back to Contents Page About Your Monitor Dell™ 1704FPV Flat Panel Monitor Front View Back View Bottom View Side View Monitor Specifications Dell Soundbar (Optional) Specifications Caring for Your Monitor Front View 1. Input select / down button 3.
User Guide
Page 3
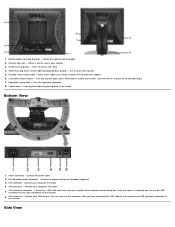
...VESA mounting holes (100mm [Behind attached base plate]) - Lock down , press the button to unlock the monitor, and then lift the monitor to contact Dell for the Soundbar (optional) 3. Push the monitor down /release button - Bottom View 1. Connect the power cable 2. Connect your computer DVI cable 4. Once... this connector after you have connected the USB cable to secure your monitor. 3. Barcode serial number label - Refer to this label if you can only use the USB connectors on the monitor. Dell Soundbar power connector - DVI connector - You can use this cable is...
...VESA mounting holes (100mm [Behind attached base plate]) - Lock down , press the button to unlock the monitor, and then lift the monitor to contact Dell for the Soundbar (optional) 3. Push the monitor down /release button - Bottom View 1. Connect the power cable 2. Connect your computer DVI cable 4. Once... this connector after you have connected the USB cable to secure your monitor. 3. Barcode serial number label - Refer to this label if you can only use the USB connectors on the monitor. Dell Soundbar power connector - DVI connector - You can use this cable is...
User Guide
Page 4
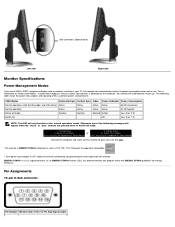
... Key on Keyboard or Move Mouse Activate the computer and 'wake up ". As an ENERGY STAR® Partner, DELL has determined that this automatic power saving feature: VESA Modes Horizontal Sync Vertical Sync Video Power Indicator Power Consumption Normal operation( with...* Zero power consumption in Active-off - - - ENERGY STAR® is referred to the OSD. Pin Assignments 15-pin D-Sub connector: Pin Number Monitor Side of this product meets the ENERGY STAR® guidelines for energy efficiency. Off Less than 3 W Switch off mode. 1. USB connectors (downstream) ...
... Key on Keyboard or Move Mouse Activate the computer and 'wake up ". As an ENERGY STAR® Partner, DELL has determined that this automatic power saving feature: VESA Modes Horizontal Sync Vertical Sync Video Power Indicator Power Consumption Normal operation( with...* Zero power consumption in Active-off - - - ENERGY STAR® is referred to the OSD. Pin Assignments 15-pin D-Sub connector: Pin Number Monitor Side of this product meets the ENERGY STAR® guidelines for energy efficiency. Off Less than 3 W Switch off mode. 1. USB connectors (downstream) ...
User Guide
Page 5
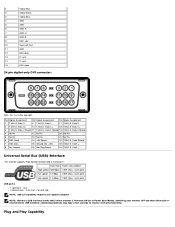
...Assignment 1 T.M.D.S. Data 2- 9 T.M.D.S. Data 2 Shield 11 T.M.D.S. Clock - Plug and Play Capability Universal Serial Bus (USB) Interface This monitor supports High-Speed Certified USB 2.0 interface.* Data Rate Power Consumption High speed 480 Mbps 2.5W (Max., each port) Full speed 12 Mbps...Pin 5 No Pin 13 No Pin 21 No Pin 6 DDC Clock 14 +5V Power 22 T.M.D.S. Data 1- 17 T.M.D.S. Clock + 8 No Connect 16 Hot Plug Detect 24 T.M.D.S. Switching your monitor OFF and then ON would reenumerate its USB interface; 1 Video-Red 2 Video-Green 3 Video-Blue 4 ...
...Assignment 1 T.M.D.S. Data 2- 9 T.M.D.S. Data 2 Shield 11 T.M.D.S. Clock - Plug and Play Capability Universal Serial Bus (USB) Interface This monitor supports High-Speed Certified USB 2.0 interface.* Data Rate Power Consumption High speed 480 Mbps 2.5W (Max., each port) Full speed 12 Mbps...Pin 5 No Pin 13 No Pin 21 No Pin 6 DDC Clock 14 +5V Power 22 T.M.D.S. Data 1- 17 T.M.D.S. Clock + 8 No Connect 16 Hot Plug Detect 24 T.M.D.S. Switching your monitor OFF and then ON would reenumerate its USB interface; 1 Video-Red 2 Video-Green 3 Video-Blue 4 ...
User Guide
Page 6
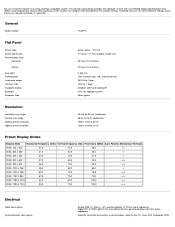
If desired, the user can configure itself and optimize the monitor settings. General Model number 1704FPV Flat Panel Screen type Screen dimensions Preset display area: Horizontal Vertical Pixel pitch Viewing angle Luminance output Contrast ratio Faceplate coating Backlight Response ..., SOG (Composite SYNC VESA, 800 x 600 37.9 60.3 49.5 +/+ VESA, 800 x 600 46.9 75.0 49.5 +/+ VESA, 1024 x 768 48.4 60.0 65.0 -/- TFT LCD 17 inches (17-inch viewable image size) 337 mm (13.3 inches) 270 mm (10.6 inches) 0.264 mm 178° (vertical) typ, 178° (horizontal) typ 280 CD/m ²...
If desired, the user can configure itself and optimize the monitor settings. General Model number 1704FPV Flat Panel Screen type Screen dimensions Preset display area: Horizontal Vertical Pixel pitch Viewing angle Luminance output Contrast ratio Faceplate coating Backlight Response ..., SOG (Composite SYNC VESA, 800 x 600 37.9 60.3 49.5 +/+ VESA, 800 x 600 46.9 75.0 49.5 +/+ VESA, 1024 x 768 48.4 60.0 65.0 -/- TFT LCD 17 inches (17-inch viewable image size) 337 mm (13.3 inches) 270 mm (10.6 inches) 0.264 mm 178° (vertical) typ, 178° (horizontal) typ 280 CD/m ²...
User Guide
Page 7
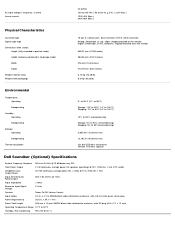
...with packaging) 15-pin D-subminiature, blue connector; DVI-D, white connector Analog: Detachable, D-sub, 15pin, shipped attached to the monitor Digital: Detachable, DVI-D, Solid pins, shipped detached from the monitor 548.21 mm (21.58 inches) 384.36 mm (15.13 inches) 376 mm (14.8 inches) 213.79 mm ...%(noncondensing) 3,657.6m (12,000 ft) max 12,192 m (40,000 ft) max 221.937 BTU/hour (maximum) 109.261 BTU/hour (typical) Dell Soundbar (Optional) Specifications System Frequency Response 95 Hz to 40°C Humidity, Non-condensing 95% RH @ 40 °C AC input voltage / frequency / current...
...with packaging) 15-pin D-subminiature, blue connector; DVI-D, white connector Analog: Detachable, D-sub, 15pin, shipped attached to the monitor Digital: Detachable, DVI-D, Solid pins, shipped detached from the monitor 548.21 mm (21.58 inches) 384.36 mm (15.13 inches) 376 mm (14.8 inches) 213.79 mm ...%(noncondensing) 3,657.6m (12,000 ft) max 12,192 m (40,000 ft) max 221.937 BTU/hour (maximum) 109.261 BTU/hour (typical) Dell Soundbar (Optional) Specifications System Frequency Response 95 Hz to 40°C Humidity, Non-condensing 95% RH @ 40 °C AC input voltage / frequency / current...

User Guide
Page 8
... plastics. Do not use a special screen-cleaning tissue or solution suitable for Your Monitor CAUTION: Read and follow the safety instructions before cleaning the monitor. Avoid using detergent of the monitor. Handle your monitor, wipe it off with water. Back to clean the plastics. Caring for the antistatic...white powder occurs during the shipping of any kind as darker-colored plastics may scratch and show white scuff marks more than lighter-colored monitor. To clean your antistatic screen, lightly dampen a soft, clean cloth with a cloth. Use a lightly-dampened, warm cloth to Contents...
... plastics. Do not use a special screen-cleaning tissue or solution suitable for Your Monitor CAUTION: Read and follow the safety instructions before cleaning the monitor. Avoid using detergent of the monitor. Handle your monitor, wipe it off with water. Back to clean the plastics. Caring for the antistatic...white powder occurs during the shipping of any kind as darker-colored plastics may scratch and show white scuff marks more than lighter-colored monitor. To clean your antistatic screen, lightly dampen a soft, clean cloth with a cloth. Use a lightly-dampened, warm cloth to Contents...
User Guide
Page 9
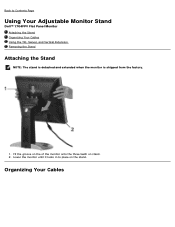
Organizing Your Cables Lower the monitor until it locks in to Contents Page Using Your Adjustable Monitor Stand Dell™ 1704FPV Flat Panel Monitor Attaching the Stand Organizing Your Cables Using the Tilt, Swivel, and Vertical Extension Removing the Stand Attaching the Stand NOTE: The stand is detached and extended when the monitor is shipped from the factory. 1. Back to place on stand. 2. Fit the groove on the of the monitor onto the three teeth on the stand.
Organizing Your Cables Lower the monitor until it locks in to Contents Page Using Your Adjustable Monitor Stand Dell™ 1704FPV Flat Panel Monitor Attaching the Stand Organizing Your Cables Using the Tilt, Swivel, and Vertical Extension Removing the Stand Attaching the Stand NOTE: The stand is detached and extended when the monitor is shipped from the factory. 1. Back to place on stand. 2. Fit the groove on the of the monitor onto the three teeth on the stand.

User Guide
Page 10
Using the Tilt, Swivel, and Vertical Extension Adjusting Your Monitor Using Tilt, Swivel, and Vertical Extension. You can adjust your monitor to best fit your monitor and computer, (See Connecting Your Monitor for cable attachment,) use the cable holder to neatly organize all necessary cables to 5.12 inches (130mm).../release button. You can adjust the stand vertically, up to your viewing needs. NOTE: Before you move the monitor to a new location, lock the stand by lowering monitor until in clicks in to the desired position. Press the stand lock/release button on the back of the...
Using the Tilt, Swivel, and Vertical Extension Adjusting Your Monitor Using Tilt, Swivel, and Vertical Extension. You can adjust your monitor to best fit your monitor and computer, (See Connecting Your Monitor for cable attachment,) use the cable holder to neatly organize all necessary cables to 5.12 inches (130mm).../release button. You can adjust the stand vertically, up to your viewing needs. NOTE: Before you move the monitor to a new location, lock the stand by lowering monitor until in clicks in to the desired position. Press the stand lock/release button on the back of the...
User Guide
Page 11
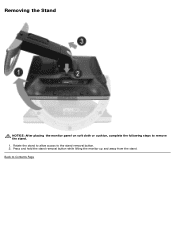
Press and hold the stand removal button while lifting the monitor up and away from the stand. Back to the stand removal button. 2. Rotate the stand to allow access to Contents Page Removing the Stand NOTICE: After placing the monitor panel on soft cloth or cushion, complete the following steps to remove the stand. 1.
Press and hold the stand removal button while lifting the monitor up and away from the stand. Back to the stand removal button. 2. Rotate the stand to allow access to Contents Page Removing the Stand NOTICE: After placing the monitor panel on soft cloth or cushion, complete the following steps to remove the stand. 1.
User Guide
Page 12
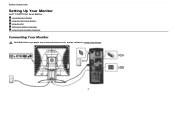
or Back to Contents Page Setting Up Your Monitor Dell™ 1704FPV Flat Panel Monitor Connecting Your Monitor Using the Front Panel Buttons Using the OSD Setting the Optimal Resolution Using the Dell Soundbar (Optional) Connecting Your Monitor CAUTION: Before you begin any of the procedures in this section, follow the safety instructions.
or Back to Contents Page Setting Up Your Monitor Dell™ 1704FPV Flat Panel Monitor Connecting Your Monitor Using the Front Panel Buttons Using the OSD Setting the Optimal Resolution Using the Dell Soundbar (Optional) Connecting Your Monitor CAUTION: Before you begin any of the procedures in this section, follow the safety instructions.
User Guide
Page 13
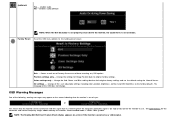
...monitor to your monitor and computer. Connect the USB cable that may be connected to adjust the image settings. Connect any USB devices. 5. Turn off your monitor... to the connectors on the front of the dialogs shown below will scroll continually. Connect the power cables 6. Turn on the monitor... connector on your monitor. The Menu button...cable is connected to open the on the monitor. 4. If you do not see an ...monitor, you still do not see Troubleshooting Your Monitor. self-test Feature Check' dialog appears (against a black background) if the monitor...
...monitor to your monitor and computer. Connect the USB cable that may be connected to adjust the image settings. Connect any USB devices. 5. Turn off your monitor... to the connectors on the front of the dialogs shown below will scroll continually. Connect the power cables 6. Turn on the monitor... connector on your monitor. The Menu button...cable is connected to open the on the monitor. 4. If you do not see an ...monitor, you still do not see Troubleshooting Your Monitor. self-test Feature Check' dialog appears (against a black background) if the monitor...
User Guide
Page 14
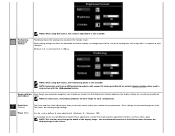
...NOTE: If you have made. Main Menu for Analog (VGA) Input Main Menu for the OSD to another menu, or exit the OSD, the monitor automatically saves any adjustments you make an adjustment and then wait for Digital (DVI) Input Down (-) and Up (+) Use this button to adjust (...decrease/increase ranges) items in the OSD. If you can further tune your monitor by using the Pixel Clock (Coarse), Phase (Fine) controls in the OSD. An amber light indicates power save mode. After using Auto Adjustment, you ...
...NOTE: If you have made. Main Menu for Analog (VGA) Input Main Menu for the OSD to another menu, or exit the OSD, the monitor automatically saves any adjustments you make an adjustment and then wait for Digital (DVI) Input Down (-) and Up (+) Use this button to adjust (...decrease/increase ranges) items in the OSD. If you can further tune your monitor by using the Pixel Clock (Coarse), Phase (Fine) controls in the OSD. An amber light indicates power save mode. After using Auto Adjustment, you ...
User Guide
Page 15
...another option or push the Menu button two or three times to decrease the contrast (min 0 ~ max 100). See the table below for the monitor. 3. Push menu to decrease luminance (min 0 ~ max 100). Adjust Brightness first, then adjust Contrast only if further adjustment is highlighted. button ... to the main menu to select another , the option name is necessary. Icon Menu and Submenus Exit Description Select to the indicators on the monitor screen. Push the - Push - and + buttons, according to exit the Main menu Brightness/ Contrast Brightness adjusts the luminance of all the ...
...another option or push the Menu button two or three times to decrease the contrast (min 0 ~ max 100). See the table below for the monitor. 3. Push menu to decrease luminance (min 0 ~ max 100). Adjust Brightness first, then adjust Contrast only if further adjustment is highlighted. button ... to the main menu to select another , the option name is necessary. Icon Menu and Submenus Exit Description Select to the indicators on the monitor screen. Push the - Push - and + buttons, according to exit the Main menu Brightness/ Contrast Brightness adjusts the luminance of all the ...
User Guide
Page 16
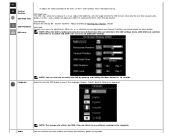
...DVI source, the contrast adjustment is 100 (+). and + buttons to center the display image on the monitor screen. Image settings: Auto Adjust Even though your computer recognizes your monitor on startup, the Auto Adjustment function optimizes the display settings for your preference. Pixel Clock (Coarse) ...Phase (Fine) The Phase and Pixel Clock adjustments allow you to more closely adjust your monitor to your particular setup. NOTE: When using the Phase adjustment, use the Pixel Clock (course) adjustment and then use with respect ...
...DVI source, the contrast adjustment is 100 (+). and + buttons to center the display image on the monitor screen. Image settings: Auto Adjust Even though your computer recognizes your monitor on startup, the Auto Adjustment function optimizes the display settings for your preference. Pixel Clock (Coarse) ...Phase (Fine) The Phase and Pixel Clock adjustments allow you to more closely adjust your monitor to your particular setup. NOTE: When using the Phase adjustment, use the Pixel Clock (course) adjustment and then use with respect ...
User Guide
Page 18
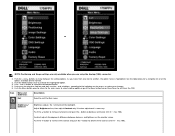
... one of five languages (English, French, Spanish, German or Japanese). When Yes (+) is selected, no effect on any software running on or off when the monitor is locked, pressing the menu button takes the user directly to have the audio on the computer. OSD Hold Time: The OSD stays active for... and holding the Menu button for as long as it has no user adjustments are locked except the menu button. Adjust according to Rotating Your Monitor setction OSD Lock: Controls user access to all applicable settings. Select to the OSD settings menu, with OSD Lock selected.
... one of five languages (English, French, Spanish, German or Japanese). When Yes (+) is selected, no effect on any software running on or off when the monitor is locked, pressing the menu button takes the user directly to have the audio on the computer. OSD Hold Time: The OSD stays active for... and holding the Menu button for as long as it has no user adjustments are locked except the menu button. Adjust according to Rotating Your Monitor setction OSD Lock: Controls user access to all applicable settings. Select to the OSD settings menu, with OSD Lock selected.
User Guide
Page 19
(optional) Yes - Change the settings for the monitor to use. Either the signal is out of Factory Reset menu without resetting any OSD options. See Specifications for Normal Preset. Position settings only - NOTE: The floating Dell Self-test Feature Check dialog appears on the screen...values. OSD Warning Messages One of the following warning messages may appear on -screen if the monitor cannot sense a video signal. disables audio (default) NOTE: When the Dell Soundbar is not available. Exit - Recommended mode is receiving from the computer. The language ...
(optional) Yes - Change the settings for the monitor to use. Either the signal is out of Factory Reset menu without resetting any OSD options. See Specifications for Normal Preset. Position settings only - NOTE: The floating Dell Self-test Feature Check dialog appears on the screen...values. OSD Warning Messages One of the following warning messages may appear on -screen if the monitor cannot sense a video signal. disables audio (default) NOTE: When the Dell Soundbar is not available. Exit - Recommended mode is receiving from the computer. The language ...
User Guide
Page 20
..., enter you can be attached to support.dell.com, enter your service tag, and download the latest driver for your graphics card. or Occasionally, no warning message appears, but the screen is blank, this could also indicate that the monitor is a four-speaker, two-channel speaker that can...download the latest driver for your graphics card. Select the Settings tab. 3. If you do the following: Go to your monitor. Located on the Soundbar are using a non-Dell computer: Go to the support site for you may need to adjust the overall system level, a green LED for more information...
..., enter you can be attached to support.dell.com, enter your service tag, and download the latest driver for your graphics card. or Occasionally, no warning message appears, but the screen is blank, this could also indicate that the monitor is a four-speaker, two-channel speaker that can...download the latest driver for your graphics card. Select the Settings tab. 3. If you do the following: Go to your monitor. Located on the Soundbar are using a non-Dell computer: Go to the support site for you may need to adjust the overall system level, a green LED for more information...
User Guide
Page 21
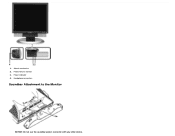
1. Power indicator 4. Power/volume control 3. Attach mechanism 2. Headphone connectors Soundbar Attachment to the Monitor NOTICE: Do not use the soundbar power connector with any other device.
1. Power indicator 4. Power/volume control 3. Attach mechanism 2. Headphone connectors Soundbar Attachment to the Monitor NOTICE: Do not use the soundbar power connector with any other device.


