

Projector 1550 - User Guide
Page 2
... claiming the marks and names or their products. DLP and DLP logo are not followed. Microsoft and Windows are trademarks of Dell Inc.; A02 Notes, Cautions, and Warnings NOTE: A NOTE indicates important information that helps you make better use of your projector CAUTION: A CAUTION indicates potential damage to hardware or loss of data if instructions are trademarks of TEXAS INSTRUMENTS INCORPORATED; is...
... claiming the marks and names or their products. DLP and DLP logo are not followed. Microsoft and Windows are trademarks of Dell Inc.; A02 Notes, Cautions, and Warnings NOTE: A NOTE indicates important information that helps you make better use of your projector CAUTION: A CAUTION indicates potential damage to hardware or loss of data if instructions are trademarks of TEXAS INSTRUMENTS INCORPORATED; is...

Projector 1550 - User Guide
Page 3
Contents 1 About Your Dell Projector 4 Projector Box Contents 4 Projector Top and Bottom View 5 Projector Connections 6 Using Remote Control 8 2 Adjusting Projector Image 12 Adjusting Projected Zoom 12 Adjusting Projector Focus 13 Adjusting Image Size 14 3 Troubleshooting 19 Troubleshooting Tips 19 Guiding Signals 23 4 Maintenance 24 Changing the Lamp 24 Replacing Remote Control Batteries 26 5 Specifications 27 6 Additional Information 31 7 Contacting Dell 32 Contents | 3
Contents 1 About Your Dell Projector 4 Projector Box Contents 4 Projector Top and Bottom View 5 Projector Connections 6 Using Remote Control 8 2 Adjusting Projector Image 12 Adjusting Projected Zoom 12 Adjusting Projector Focus 13 Adjusting Image Size 14 3 Troubleshooting 19 Troubleshooting Tips 19 Guiding Signals 23 4 Maintenance 24 Changing the Lamp 24 Replacing Remote Control Batteries 26 5 Specifications 27 6 Additional Information 31 7 Contacting Dell 32 Contents | 3

Projector 1550 - User Guide
Page 5
About Your Dell Projector 5 82.30 Projector Top and Bottom View Top View 1 Bottom View 9 10 8 7 2 3 4 5 6 55.00 110.00 1 IR receivers 2 Power button 3 Status indicators 4 Zoom tab 5 Focus ring 6 Lens 7 Lamp cover 8 10W speaker 9 Mounting holes for ceiling mount 10 Tilt adjustment wheel NOTE: Ceiling mount screw hole M3 x 6.5 mm depth. Recommended torque < 15 kgf-cm.
About Your Dell Projector 5 82.30 Projector Top and Bottom View Top View 1 Bottom View 9 10 8 7 2 3 4 5 6 55.00 110.00 1 IR receivers 2 Power button 3 Status indicators 4 Zoom tab 5 Focus ring 6 Lens 7 Lamp cover 8 10W speaker 9 Mounting holes for ceiling mount 10 Tilt adjustment wheel NOTE: Ceiling mount screw hole M3 x 6.5 mm depth. Recommended torque < 15 kgf-cm.

Projector 1550 - User Guide
Page 7
... to melt or burn. 9 Do not use the projector in areas where there is an excessive amount of the projector or cover its lens while the projector is on as the heat may cause injury to your projector. • The 1550/1650 projector can only be installed by yourself. CAUTION: Safety Instructions 1 Do not use the projector near or in front of dust...
... to melt or burn. 9 Do not use the projector in areas where there is an excessive amount of the projector or cover its lens while the projector is on as the heat may cause injury to your projector. • The 1550/1650 projector can only be installed by yourself. CAUTION: Safety Instructions 1 Do not use the projector near or in front of dust...

Projector 1550 - User Guide
Page 8
Press to navigate through the On-Screen Display (OSD) Menu items. Press to navigate through the On-Screen Display (OSD) Menu items. Press to confirm the selection. Using Remote Control POWER 1 14 2 15 3 MENU 4 ASPECT 16 5 17 SOURCE VOL VIDEO MODE 6 18 MUTE 7 19 KEYSTONE PAGE 20 VOL 8 21 9 AUTO ADJ. FREEZE BLANK 10 22 11 ZOOM ZOOM INFO 23 12 24 VGA VIDEO HDMI 25 13 26 1 Power 2 Enter 3 Right 4 Down 5 Aspect Ratio Turns the projector on or off. Press to change the aspect ratio of a displayed image. 8 About Your Dell Projector
Press to navigate through the On-Screen Display (OSD) Menu items. Press to navigate through the On-Screen Display (OSD) Menu items. Press to confirm the selection. Using Remote Control POWER 1 14 2 15 3 MENU 4 ASPECT 16 5 17 SOURCE VOL VIDEO MODE 6 18 MUTE 7 19 KEYSTONE PAGE 20 VOL 8 21 9 AUTO ADJ. FREEZE BLANK 10 22 11 ZOOM ZOOM INFO 23 12 24 VGA VIDEO HDMI 25 13 26 1 Power 2 Enter 3 Right 4 Down 5 Aspect Ratio Turns the projector on or off. Press to change the aspect ratio of a displayed image. 8 About Your Dell Projector

Projector 1550 - User Guide
Page 9
... Mini USB cable must be connected if you want to the previous page. Press to pause the screen image, then press "Freeze" again to hide/unhide the image. Press to the next page. About Your Dell Projector 9 Pressing the Video Mode button once will switch between Analog RGB, Composite, Component (YPbPr, via VGA), HDMI 1, and HDMI 2 source. Press to unfreeze the image. Press to provide projector native resolution information...
... Mini USB cable must be connected if you want to the previous page. Press to pause the screen image, then press "Freeze" again to hide/unhide the image. Press to the next page. About Your Dell Projector 9 Pressing the Video Mode button once will switch between Analog RGB, Composite, Component (YPbPr, via VGA), HDMI 1, and HDMI 2 source. Press to unfreeze the image. Press to provide projector native resolution information...
Projector 1550 - User Guide
Page 19
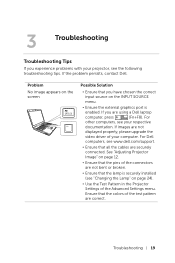
... upgrade the video driver of the Advanced Settings menu. If the problem persists, contact Dell. Problem No image appears on the INPUT SOURCE menu. • Ensure the external graphics port is securely installed (see www.dell.com/support. • Ensure that the lamp is enabled. If you have chosen the correct input source on the screen F8 CRT/LCD Fn Possible Solution • Ensure that the colors of the test pattern are using a Dell laptop...
... upgrade the video driver of the Advanced Settings menu. If the problem persists, contact Dell. Problem No image appears on the INPUT SOURCE menu. • Ensure the external graphics port is securely installed (see www.dell.com/support. • Ensure that the lamp is enabled. If you have chosen the correct input source on the screen F8 CRT/LCD Fn Possible Solution • Ensure that the colors of the test pattern are using a Dell laptop...

Projector 1550 - User Guide
Page 20
... are using a Dell laptop computer, see www.dell.com/support. Problem (continued) Possible Solution (continued) Partial, scrolling, or incorrectly displayed image 1 Press the Auto Adjust button on the remote control. 2 If you are not displayed properly, please upgrade the video driver of your computer. For a Dell computer, see your monitor freezes, restart all the equipment and the projector. The screen does not If you experience difficulty in PC Mode only). 20 Troubleshooting
... are using a Dell laptop computer, see www.dell.com/support. Problem (continued) Possible Solution (continued) Partial, scrolling, or incorrectly displayed image 1 Press the Auto Adjust button on the remote control. 2 If you are not displayed properly, please upgrade the video driver of your computer. For a Dell computer, see your monitor freezes, restart all the equipment and the projector. The screen does not If you experience difficulty in PC Mode only). 20 Troubleshooting

Projector 1550 - User Guide
Page 21
... adjust the projector mode. It will maintain the aspect ratio of the Advanced Settings menu in [1020 cm] The projector automatically detects the input signal format. When the lamp reaches its end of the test pattern are correct. 1 Adjust the focus ring on the projector lens. 2 Ensure that the colors of life, it may burn out and may make a loud popping sound. Troubleshooting 21 To replace the lamp, see "Changing...
... adjust the projector mode. It will maintain the aspect ratio of the Advanced Settings menu in [1020 cm] The projector automatically detects the input signal format. When the lamp reaches its end of the test pattern are correct. 1 Adjust the focus ring on the projector lens. 2 Ensure that the colors of life, it may burn out and may make a loud popping sound. Troubleshooting 21 To replace the lamp, see "Changing...
Projector 1550 - User Guide
Page 22
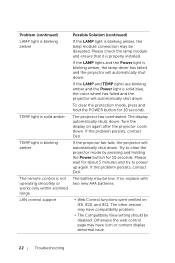
... problem persists, contact Dell. If so, replace with two new AAA batteries. • Web Control functions were verified on again after the projector cools down . Problem (continued) LAMP light is blinking amber TEMP light is solid amber TEMP light is blinking amber The remote control is not operating smoothly or works only within a limited range LAN control support Possible Solution (continued) If the LAMP light is blinking amber, the lamp driver has failed and the projector will automatically shut...
... problem persists, contact Dell. If so, replace with two new AAA batteries. • Web Control functions were verified on again after the projector cools down . Problem (continued) LAMP light is blinking amber TEMP light is solid amber TEMP light is blinking amber The remote control is not operating smoothly or works only within a limited range LAN control support Possible Solution (continued) If the LAMP light is blinking amber, the lamp driver has failed and the projector will automatically shut...
Projector 1550 - User Guide
Page 23
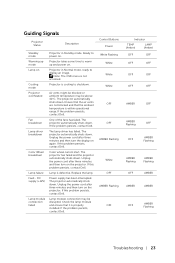
... this problem persists, contact Dell. Color wheel cannot start. Note: The OSD menu is properly installed. The projector automatically shuts down . Check the lamp module and ensure that the ambient temperature is defective. The lamp driver has failed. If the problem persists, contact Dell. If this problem persists, contact Dell. The projector automatically shuts down. If this problem persists, contact Dell. Power supply has been interrupted. Projector in Standby mode. Ready to display an image. Unplug the power cord after three...
... this problem persists, contact Dell. Color wheel cannot start. Note: The OSD menu is properly installed. The projector automatically shuts down . Check the lamp module and ensure that the ambient temperature is defective. The lamp driver has failed. If the problem persists, contact Dell. If this problem persists, contact Dell. The projector automatically shuts down. If this problem persists, contact Dell. Power supply has been interrupted. Projector in Standby mode. Ready to display an image. Unplug the power cord after three...
Projector 1550 - User Guide
Page 24
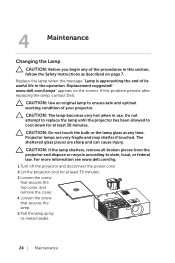
... top cover, and remove the cover. 4 Loosen the screw that secures the lamp. 5 Pull the lamp up by its useful life in the operation. For more information see www.dell.com/hg. 1 Turn off the projector and disconnect the power cord. 2 Let the projector cool for at least 30 minutes. CAUTION: Use an original lamp to ensure safe and optimal working condition of the procedures in use. www.dell.com/lamps...
... top cover, and remove the cover. 4 Loosen the screw that secures the lamp. 5 Pull the lamp up by its useful life in the operation. For more information see www.dell.com/hg. 1 Turn off the projector and disconnect the power cord. 2 Let the projector cool for at least 30 minutes. CAUTION: Use an original lamp to ensure safe and optimal working condition of the procedures in use. www.dell.com/lamps...
Projector 1550 - User Guide
Page 25
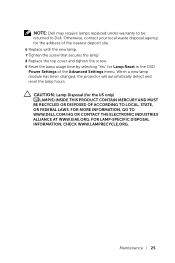
... OF ACCORDING TO LOCAL, STATE, OR FEDERAL LAWS. FOR LAMP-SPECIFIC DISPOSAL INFORMATION, CHECK WWW.LAMPRECYCLE.ORG. When a new lamp module has been changed, the projector will automatically detect and reset the lamp hours. Maintenance 25 CAUTION: Lamp Disposal (for Lamp Reset in the OSD Power Settings of the Advanced Settings menu. FOR MORE INFORMATION, GO TO WWW.DELL.COM/HG OR CONTACT THE ELECTRONIC INDUSTRIES ALLIANCE AT...
... OF ACCORDING TO LOCAL, STATE, OR FEDERAL LAWS. FOR LAMP-SPECIFIC DISPOSAL INFORMATION, CHECK WWW.LAMPRECYCLE.ORG. When a new lamp module has been changed, the projector will automatically detect and reset the lamp hours. Maintenance 25 CAUTION: Lamp Disposal (for Lamp Reset in the OSD Power Settings of the Advanced Settings menu. FOR MORE INFORMATION, GO TO WWW.DELL.COM/HG OR CONTACT THE ELECTRONIC INDUSTRIES ALLIANCE AT...

Projector 1550 - User Guide
Page 29
... / 1.8 A output for supporting HDMI 1.4a. Composite Video input: One Yellow RCA jack for network control. Analog Audio input: One 3.5 mm stereo mini phone jack (Blue). RJ-45 port: One RJ-45 connector for build-in for CVBS signal. PHILIPS 260 W user-replaceable lamp Normal mode: Up to 3000 hours Eco mode: Up to 140 °F) Humidity: 90% maximum Power: One AC power socket (3-pin - specification HDCP compliant. Environmental I/O Connectors Lamp Lamp life Operating temperature: 5 °C - 40...
... / 1.8 A output for supporting HDMI 1.4a. Composite Video input: One Yellow RCA jack for network control. Analog Audio input: One 3.5 mm stereo mini phone jack (Blue). RJ-45 port: One RJ-45 connector for build-in for CVBS signal. PHILIPS 260 W user-replaceable lamp Normal mode: Up to 3000 hours Eco mode: Up to 140 °F) Humidity: 90% maximum Power: One AC power socket (3-pin - specification HDCP compliant. Environmental I/O Connectors Lamp Lamp life Operating temperature: 5 °C - 40...

Projector 1550 - User Guide
Page 30
The actual operating life span of a projector lamp will most likely result in a lamp's shortened operating life span or possible lamp failure. 30 Specifications The lamp life rating is not guaranteed in stressful conditions which may include dusty environments, under high temperatures, many hours per day, and abrupt powering-off will vary according to operating conditions and usage patterns. Lamp life is not a specification for the time it takes for more than...
The actual operating life span of a projector lamp will most likely result in a lamp's shortened operating life span or possible lamp failure. 30 Specifications The lamp life rating is not guaranteed in stressful conditions which may include dusty environments, under high temperatures, many hours per day, and abrupt powering-off will vary according to operating conditions and usage patterns. Lamp life is not a specification for the time it takes for more than...

Projector 1550 - User Guide
Page 33
... C Changing the Lamp 24 Connection Ports + 5V/1A DC out connector 6 Audio input connector 6 Audio output connector 6 Composite Video connector 6 HDMI-1 connector 6 HDMI-2 connector 6 Mini USB (mini type B) connector for firmware upgrade 6 Power cord connector 6 RJ-45 connector 6 RS232 connector 6 Security cable slot 6 VGA input connector 6 VGA output (monitor loop through) connector 6 Contact Dell 4, 24 D Dell contacting 31, 32 M Main Unit 5 10W speaker 5 Focus ring 5 IR receivers 5 Lamp cover 5 Lens 5 Mounting holes for ceiling mount 5 Power button 5 Status indicators 5 Tilt adjustment wheel...
... C Changing the Lamp 24 Connection Ports + 5V/1A DC out connector 6 Audio input connector 6 Audio output connector 6 Composite Video connector 6 HDMI-1 connector 6 HDMI-2 connector 6 Mini USB (mini type B) connector for firmware upgrade 6 Power cord connector 6 RJ-45 connector 6 RS232 connector 6 Security cable slot 6 VGA input connector 6 VGA output (monitor loop through) connector 6 Contact Dell 4, 24 D Dell contacting 31, 32 M Main Unit 5 10W speaker 5 Focus ring 5 IR receivers 5 Lamp cover 5 Lens 5 Mounting holes for ceiling mount 5 Power button 5 Status indicators 5 Tilt adjustment wheel...

Projector 1550 - User Guide
Page 34
R Remote Control 8 S Specifications Aspect Ratio 27 Audio 28 Brightness 27 Color Wheel Speed 27 Contrast Ratio 27 Dimensions 28 Displayable Color 27 Environmental 29 I/O Connectors 29 Light Valve 27 Noise Level 28 Number of Pixels 27 Power Consumption 28 Power Supply 28 Projection Distance 27 Projection Lens 27 Projection Screen Size 27 Projector Weight 28 Uniformity 27 Video Compatibility 28 support contacting Dell 31, 32 T telephone numbers 32 34 Index
R Remote Control 8 S Specifications Aspect Ratio 27 Audio 28 Brightness 27 Color Wheel Speed 27 Contrast Ratio 27 Dimensions 28 Displayable Color 27 Environmental 29 I/O Connectors 29 Light Valve 27 Noise Level 28 Number of Pixels 27 Power Consumption 28 Power Supply 28 Projection Distance 27 Projection Lens 27 Projection Screen Size 27 Projector Weight 28 Uniformity 27 Video Compatibility 28 support contacting Dell 31, 32 T telephone numbers 32 34 Index
Projector 1550 - User Guide
Page 36
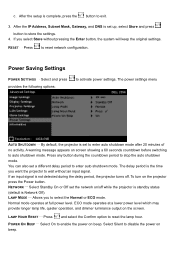
... during the countdown period to auto shutdown mode. A warning message appears on the projector press the Power button. To turn on screen showing a 60 seconds countdown before switching to stop the auto shutdown mode. LAMP HOUR RESET Press and select the Confirm option to enter auto shutdown mode after 20 minutes of no activity. The power settings menu AUTO SHUTDOWN By default, the projector is complete, press the button to select the Normal or...
... during the countdown period to auto shutdown mode. A warning message appears on the projector press the Power button. To turn on screen showing a 60 seconds countdown before switching to stop the auto shutdown mode. LAMP HOUR RESET Press and select the Confirm option to enter auto shutdown mode after 20 minutes of no activity. The power settings menu AUTO SHUTDOWN By default, the projector is complete, press the button to select the Normal or...

Projector 1550 - User Guide
Page 37
LAN Control Enable LAN on your projector control panel or remote control. Press the Menu button on Projector 1. NOTE: Use , , , and buttons to navigate and to the projector and the computer via a hub. NOTE: You can also connect the LAN cable to select. 3. Follow these steps to the projector and the computer. DHCP option from LAN Settings of Advanced Settings menu. 4. Connect the LAN cable to settings: a. Ensure DHCP option is Odd from Off change to On. Steps: Advanced Settings LAN Settings DHCP On. Connect the power cable and press the power button. 2.
LAN Control Enable LAN on your projector control panel or remote control. Press the Menu button on Projector 1. NOTE: Use , , , and buttons to navigate and to the projector and the computer via a hub. NOTE: You can also connect the LAN cable to select. 3. Follow these steps to the projector and the computer. DHCP option from LAN Settings of Advanced Settings menu. 4. Connect the LAN cable to settings: a. Ensure DHCP option is Odd from Off change to On. Steps: Advanced Settings LAN Settings DHCP On. Connect the power cable and press the power button. 2.

Projector 1550 - User Guide
Page 39
... Projection-Desktop, and Rear Projection-Ceiling Mount. Source Select: Allows you to select the Enable or Disable. Blank Screen: Allows you power on your projector s input source. To exit the protection mode, click Clear to clear the Alert Status before you to select the Enable or Disable. Brightness: Select the value (0~100) to adjust the display contrast. Movie: For viewing movies and photos. - Custom: User-preferred settings. Image Status Projector Mode...
... Projection-Desktop, and Rear Projection-Ceiling Mount. Source Select: Allows you to select the Enable or Disable. Blank Screen: Allows you power on your projector s input source. To exit the protection mode, click Clear to clear the Alert Status before you to select the Enable or Disable. Brightness: Select the value (0~100) to adjust the display contrast. Movie: For viewing movies and photos. - Custom: User-preferred settings. Image Status Projector Mode...


