User Guide
Page 9
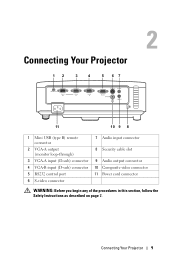
2 Connecting Your Projector 12 3 4 5 67 11 10 9 8 1 Mini USB (type B) remote connector 2 VGA-A output (monitor loop-through) 3 VGA-A input (D-sub) connector 4 VGA-B input (D-sub) connector 5 RS232 control port 6 S-video connector 7 Audio input connector 8 Security cable slot 9 Audio output connector 10 Composite video connector 11 Power cord connector WARNING: Before you begin any of the procedures in this section, follow the Safety Instructions as described on page 7. Connecting Your Projector 9
2 Connecting Your Projector 12 3 4 5 67 11 10 9 8 1 Mini USB (type B) remote connector 2 VGA-A output (monitor loop-through) 3 VGA-A input (D-sub) connector 4 VGA-B input (D-sub) connector 5 RS232 control port 6 S-video connector 7 Audio input connector 8 Security cable slot 9 Audio output connector 10 Composite video connector 11 Power cord connector WARNING: Before you begin any of the procedures in this section, follow the Safety Instructions as described on page 7. Connecting Your Projector 9
User Guide
Page 10
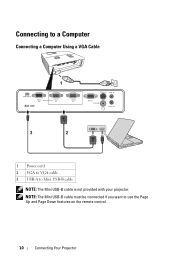
Connecting to a Computer Connecting a Computer Using a VGA Cable 1 3 2 1 Power cord 2 VGA to VGA cable 3 USB-A to use the Page Up and Page Down features on the remote control. 10 Connecting Your Projector NOTE: The Mini USB-B cable must be connected if you want to Mini USB-B cable NOTE: The Mini USB-B cable is not provided with your projector.
Connecting to a Computer Connecting a Computer Using a VGA Cable 1 3 2 1 Power cord 2 VGA to VGA cable 3 USB-A to use the Page Up and Page Down features on the remote control. 10 Connecting Your Projector NOTE: The Mini USB-B cable must be connected if you want to Mini USB-B cable NOTE: The Mini USB-B cable is not provided with your projector.

User Guide
Page 23
NOTE: The Mini USB-B cable must be connected if you want to use the Page Up feature. 11 Page up Press to move to next page. Using Your Projector 23 Press to move to previous page. 12 Page down NOTE: The Mini USB-B cable must be connected if you want to adjust image distortion... caused by tilting the projector (+40/-40 degrees). 23 Keystone adjustment Press to use the Page...
NOTE: The Mini USB-B cable must be connected if you want to use the Page Up feature. 11 Page up Press to move to next page. Using Your Projector 23 Press to move to previous page. 12 Page down NOTE: The Mini USB-B cable must be connected if you want to adjust image distortion... caused by tilting the projector (+40/-40 degrees). 23 Keystone adjustment Press to use the Page...

User Guide
Page 61
... C Changing the Lamp 49 Connecting the Projector Composite video cable 13 Connecting with a Component Cable 14 Connecting with a Composite Cable 13 Connecting with an S-video Cable 12 Power cord 10, 11, 12, 13, 14 S-video cable 12 To Computer 10 USB to USB cable 10 VGA to VGA cable 10, 11 VGA to YPbPr cable 14 Connection Ports Audio output connector...
... C Changing the Lamp 49 Connecting the Projector Composite video cable 13 Connecting with a Component Cable 14 Connecting with a Composite Cable 13 Connecting with an S-video Cable 12 Power cord 10, 11, 12, 13, 14 S-video cable 12 To Computer 10 USB to USB cable 10 VGA to VGA cable 10, 11 VGA to YPbPr cable 14 Connection Ports Audio output connector...


