User's Guide
Page 9
Cleaning Inside the Printer 122 Cleaning the Color Toner Density (CTD) Sensor . . . . 125 Adjusting Color Registration 126 Performing Auto Correct 127 Printing the Color Registration Chart 127 Determining Values 128 Entering ...Values 129 17 Clearing Jams 131 Avoiding Jams 131 Identifying the Location of Paper Jams 132 Clearing Paper Jams From the Front of the Printer...
Cleaning Inside the Printer 122 Cleaning the Color Toner Density (CTD) Sensor . . . . 125 Adjusting Color Registration 126 Performing Auto Correct 127 Printing the Color Registration Chart 127 Determining Values 128 Entering ...Values 129 17 Clearing Jams 131 Avoiding Jams 131 Identifying the Location of Paper Jams 132 Clearing Paper Jams From the Front of the Printer...
User's Guide
Page 25
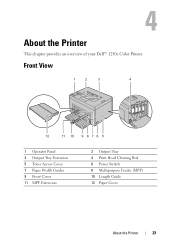
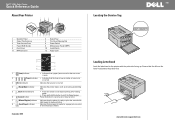
Front View 1 2 3 4 12 11 10 9 8 7 6 5 1 Operator Panel 3 Output Tray Extension 5 Toner Access Cover 7 Paper Width Guides 9 Front Cover 11 MPF Extension 2 Output Tray 4 Print Head Cleaning Rod 6 Power Switch 8 Multipurpose Feeder (MPF) 10 Length Guide 12 Paper Cover About the Printer 23 4 About the Printer This chapter provides an overview of your Dell™ 1250c Color Printer.
Front View 1 2 3 4 12 11 10 9 8 7 6 5 1 Operator Panel 3 Output Tray Extension 5 Toner Access Cover 7 Paper Width Guides 9 Front Cover 11 MPF Extension 2 Output Tray 4 Print Head Cleaning Rod 6 Power Switch 8 Multipurpose Feeder (MPF) 10 Length Guide 12 Paper Cover About the Printer 23 4 About the Printer This chapter provides an overview of your Dell™ 1250c Color Printer.

User's Guide
Page 55
... of pre-punched paper. • Paper should be possible to print on the paper to depending on the placement of holes and in the printer with the print side facing up. Selecting Pre-Punched Paper Pre-punched paper brands can cause jams when multiple sheets feed through the... be punched at the paper manufacturer and not drilled into paper already packaged in a paper jam. • Pre-punched paper can include more frequent cleaning and feed reliability may require more paper dust than standard paper. Drilled paper can differ in the number and placement of holes on the letter...
... of pre-punched paper. • Paper should be possible to print on the paper to depending on the placement of holes and in the printer with the print side facing up. Selecting Pre-Punched Paper Pre-punched paper brands can cause jams when multiple sheets feed through the... be punched at the paper manufacturer and not drilled into paper already packaged in a paper jam. • Pre-punched paper can include more frequent cleaning and feed reliability may require more paper dust than standard paper. Drilled paper can differ in the number and placement of holes on the letter...
User's Guide
Page 102
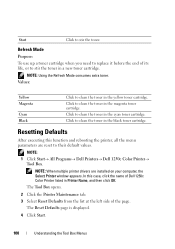
...Click to stir the toner in Printer Name, and then click OK. Click to clean the toner in the cyan toner cartridge. The Tool Box opens. 2 Click the Printer Maintenance tab. 3 Select Reset Defaults from the list at the left side of Dell 1250c Color Printer listed in a new toner cartridge.... The Reset Defaults page is displayed. 4 Click Start. 100 Understanding the Tool Box Menus Click to clean the toner in the yellow toner cartridge. Click to clean the toner in the magenta toner cartridge...
...Click to stir the toner in Printer Name, and then click OK. Click to clean the toner in the cyan toner cartridge. The Tool Box opens. 2 Click the Printer Maintenance tab. 3 Select Reset Defaults from the list at the left side of Dell 1250c Color Printer listed in a new toner cartridge.... The Reset Defaults page is displayed. 4 Click Start. 100 Understanding the Tool Box Menus Click to clean the toner in the yellow toner cartridge. Click to clean the toner in the magenta toner cartridge...
User's Guide
Page 124
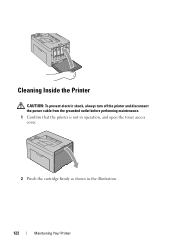
Y Cleaning Inside the Printer CAUTION: To prevent electric shock, always turn off the printer and disconnect the power cable from the grounded outlet before performing maintenance. 1 Confirm that the printer is not in operation, and open the toner access cover. 2 Pinch the cartridge firmly as shown in the illustration. 122 Maintaining Your Printer
Y Cleaning Inside the Printer CAUTION: To prevent electric shock, always turn off the printer and disconnect the power cable from the grounded outlet before performing maintenance. 1 Confirm that the printer is not in operation, and open the toner access cover. 2 Pinch the cartridge firmly as shown in the illustration. 122 Maintaining Your Printer
User's Guide
Page 125
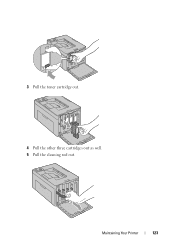
3 Pull the toner cartridge out. 4 Pull the other three cartridges out as well. 5 Pull the cleaning rod out. Maintaining Your Printer 123
3 Pull the toner cartridge out. 4 Pull the other three cartridges out as well. 5 Pull the cleaning rod out. Maintaining Your Printer 123

User's Guide
Page 126
6 Insert the cleaning rod fully into the hole beside the arrow on the printer until its tip reaches the interior of the printer as illustrated below, and then pull it out. 7 Repeat the same procedure for the other three holes. 8 Return the cleaning rod to its original location. 9 Replace the black cartridge by adjusting it to the associated cartridge holder, and then insert it firmly by pressing near the center of the label until the cartridge clicks. 124 Maintaining Your Printer
6 Insert the cleaning rod fully into the hole beside the arrow on the printer until its tip reaches the interior of the printer as illustrated below, and then pull it out. 7 Repeat the same procedure for the other three holes. 8 Return the cleaning rod to its original location. 9 Replace the black cartridge by adjusting it to the associated cartridge holder, and then insert it firmly by pressing near the center of the label until the cartridge clicks. 124 Maintaining Your Printer
User's Guide
Page 127
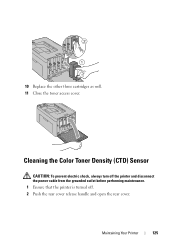
10 Replace the other three cartridges as well. 11 Close the toner access cover. Y Cleaning the Color Toner Density (CTD) Sensor CAUTION: To prevent electric shock, always turn off the printer and disconnect the power cable from the grounded outlet before performing maintenance. 1 Ensure that the printer is turned off. 2 Push the rear cover release handle and open the rear cover. Maintaining Your Printer 125
10 Replace the other three cartridges as well. 11 Close the toner access cover. Y Cleaning the Color Toner Density (CTD) Sensor CAUTION: To prevent electric shock, always turn off the printer and disconnect the power cable from the grounded outlet before performing maintenance. 1 Ensure that the printer is turned off. 2 Push the rear cover release handle and open the rear cover. Maintaining Your Printer 125
User's Guide
Page 128
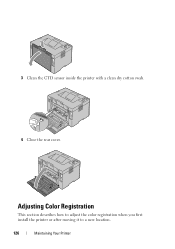
3 Clean the CTD sensor inside the printer with a clean dry cotton swab. 4 Close the rear cover. Adjusting Color Registration This section describes how to adjust the color registration when you first install the printer or after moving it to a new location. 126 Maintaining Your Printer
3 Clean the CTD sensor inside the printer with a clean dry cotton swab. 4 Close the rear cover. Adjusting Color Registration This section describes how to adjust the color registration when you first install the printer or after moving it to a new location. 126 Maintaining Your Printer

User's Guide
Page 150
Action Yes 1 Adjust the transfer bias. Printer Maintenance tab. 2 Adjust the setting for the printer. Contact Dell. 148 Troubleshooting Action Yes 1 Clean inside the printer by using the cleaning rod. Mottle No Contact Dell. complete. See "Cleaning Inside the Printer" on the complete. Is the problem recovered? Ghosting No Go to action 2. Is the problem recovered? The task is the...
Action Yes 1 Adjust the transfer bias. Printer Maintenance tab. 2 Adjust the setting for the printer. Contact Dell. 148 Troubleshooting Action Yes 1 Clean inside the printer by using the cleaning rod. Mottle No Contact Dell. complete. See "Cleaning Inside the Printer" on the complete. Is the problem recovered? Ghosting No Go to action 2. Is the problem recovered? The task is the...

User's Guide
Page 156
... of alignment Action 1 Execute auto color registration adjustment. 1 Launch the Tool Box, and click Color Registration Adjustment on the Printer Maintenance tab. 3 Click the Start button next to action 3. 154 Troubleshooting See "Cleaning the Color Toner Density (CTD) Sensor" on page 125. 2 Launch the Tool Box, and click Color Registration Adjustment on...
... of alignment Action 1 Execute auto color registration adjustment. 1 Launch the Tool Box, and click Color Registration Adjustment on the Printer Maintenance tab. 3 Click the Start button next to action 3. 154 Troubleshooting See "Cleaning the Color Toner Density (CTD) Sensor" on page 125. 2 Launch the Tool Box, and click Color Registration Adjustment on...
User's Guide
Page 157
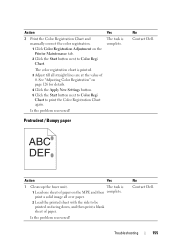
Action Yes 1 Clean up the fuser unit. No Contact Dell. print a solid image all straight lines are at the value of 0. Protrudent / Bumpy paper No Contact Dell. Troubleshooting 155 Yes The task is 1 Load one sheet of paper. See "Adjusting Color Registration" on ... problem recovered? Action 3 Print the Color Registration Chart and manually correct the color registration. 1 Click Color Registration Adjustment on the Printer Maintenance tab. 2 Click the Start button next to print the Color Registration Chart again. The task is complete. The color registration...
Action Yes 1 Clean up the fuser unit. No Contact Dell. print a solid image all straight lines are at the value of 0. Protrudent / Bumpy paper No Contact Dell. Troubleshooting 155 Yes The task is 1 Load one sheet of paper. See "Adjusting Color Registration" on ... problem recovered? Action 3 Print the Color Registration Chart and manually correct the color registration. 1 Click Color Registration Adjustment on the Printer Maintenance tab. 2 Click the Start button next to print the Color Registration Chart again. The task is complete. The color registration...
User's Guide
Page 169
... Cable, 113 Cancel button, 70 Canceling a job, 80 Canceling ajob from the computer running windows, 80 Carbonless copy paper, 51 CCP, 51 Chart Print, 98 Cleaning Inside the Printer, 122 Cleaning the Color Toner Density (CTD) Sensor, 125 Clearing jam, 131 Clearing Paper Jams From the Back of the...
... Cable, 113 Cancel button, 70 Canceling a job, 80 Canceling ajob from the computer running windows, 80 Carbonless copy paper, 51 CCP, 51 Chart Print, 98 Cleaning Inside the Printer, 122 Cleaning the Color Toner Density (CTD) Sensor, 125 Clearing jam, 131 Clearing Paper Jams From the Back of the...
User's Guide
Page 172
..., 92-93 Power supply, 111 Power Switch, 23 Print Head Cleaning Rod, 23 Print Media Dimensions, 59 Print media, 49, 117 Print quality guarantee, 112 Print Quality Problems, 143 Printer, 15 Printer drivers Installing, 41, 45 Printer Information, 87 Printer paper, 49 Printer software, 103 Printer specification, 111 Printer Status Window, 103 Printing, 79 Printing on letterhead, 52...
..., 92-93 Power supply, 111 Power Switch, 23 Print Head Cleaning Rod, 23 Print Media Dimensions, 59 Print media, 49, 117 Print quality guarantee, 112 Print Quality Problems, 143 Printer, 15 Printer drivers Installing, 41, 45 Printer Information, 87 Printer paper, 49 Printer software, 103 Printer specification, 111 Printer Status Window, 103 Printing, 79 Printing on letterhead, 52...
Quick Reference Guide
Page 1
... button to start duplex printing after loading paper. • Press and hold this button to print the Report pages. Dell™ 1250c Color Printer Quick Reference Guide About Your Printer 1 2 3 4 12 1 Operator Panel 3 Output Tray Extension 5 Toner Access Cover 7 Paper Width Guides 9 ...Cleaning Rod 6 Power Switch 8 Multipurpose Feeder (MPF) 10 Length Guide 12 Paper Cover 1 2 3 5 4 1 (Jam) indicator • Indicates that a paper jam occurred or the rear cover is open. 2 (Toner) indicator • Indicates that the toner is loaded or a paper jam occurred in the printer...
... button to start duplex printing after loading paper. • Press and hold this button to print the Report pages. Dell™ 1250c Color Printer Quick Reference Guide About Your Printer 1 2 3 4 12 1 Operator Panel 3 Output Tray Extension 5 Toner Access Cover 7 Paper Width Guides 9 ...Cleaning Rod 6 Power Switch 8 Multipurpose Feeder (MPF) 10 Length Guide 12 Paper Cover 1 2 3 5 4 1 (Jam) indicator • Indicates that a paper jam occurred or the rear cover is open. 2 (Toner) indicator • Indicates that the toner is loaded or a paper jam occurred in the printer...
Quick Reference Guide
Page 2
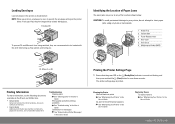
...the Location of the locations shown below : NOTE: When you . Cleaning the Printer Vertical blanks in prints Æ See "Maintaining Your Printer" in the User's Guide An alert for the CTD sensor appears Æ See "Maintaining Your Printer" in the User's Guide Replacing Toners To replace toners Æ See... "Maintaining Your Printer" in the User's Guide support.dell.com Loading Envelopes Load envelopes in the printer as shown below : CAUTION: To avoid permanent damage to your printer, do not attempt to clear paper jams using any of Paper ...
...the Location of the locations shown below : NOTE: When you . Cleaning the Printer Vertical blanks in prints Æ See "Maintaining Your Printer" in the User's Guide An alert for the CTD sensor appears Æ See "Maintaining Your Printer" in the User's Guide Replacing Toners To replace toners Æ See... "Maintaining Your Printer" in the User's Guide support.dell.com Loading Envelopes Load envelopes in the printer as shown below : CAUTION: To avoid permanent damage to your printer, do not attempt to clear paper jams using any of Paper ...


