User Guide
Page 6
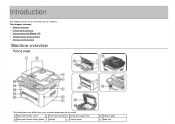
Introduction This chapter gives you an overview of your machine: This chapter includes: Machine overview Control panel overview Understanding the Status LED Introducing the useful buttons Turning on the machine Machine overview Front view This illustration may differ from your machine depending on its model. 1 Document feeder cover 6 Front door handle 11 Document output tray 2 Document feeder width guides 7 Handle 12 Control panel 16 Scanner glass 17 Scan unit
Introduction This chapter gives you an overview of your machine: This chapter includes: Machine overview Control panel overview Understanding the Status LED Introducing the useful buttons Turning on the machine Machine overview Front view This illustration may differ from your machine depending on its model. 1 Document feeder cover 6 Front door handle 11 Document output tray 2 Document feeder width guides 7 Handle 12 Control panel 16 Scanner glass 17 Scan unit

User Guide
Page 7
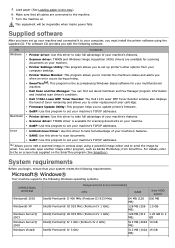
... feeder output tray 9 Manual tray 5 Output support 10 Front door [a] This button is used when you close button[a] 14 Manual tray paper width guides 15 Scanner lid This illustration may differ from your machine depending on its model. 1 Network port 5 Power receptacle 2 USB port 6 Rear door 3 Telephone line socket 7 Rear door...
... feeder output tray 9 Manual tray 5 Output support 10 Front door [a] This button is used when you close button[a] 14 Manual tray paper width guides 15 Scanner lid This illustration may differ from your machine depending on its model. 1 Network port 5 Power receptacle 2 USB port 6 Rear door 3 Telephone line socket 7 Rear door...
User Guide
Page 15
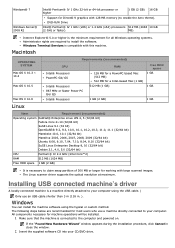
...SetIP: Use this driver to your computer, you to take full advantage of your multifunctional machine. Load paper (See Loading paper in various ways using the supplied CD. Supplied ...help supplied on . Scanner driver: TWAIN driver is the accompanying Windows-based software for scanning documents on your machine's TCP/IP addresses. [a] Allows you have set up printer's other options from ...512 MB (2048 10 GB MB) 512 MB (1024 15 GB MB) Dell 1135n Laser MFP Toner Reorder: The Dell 1133 Laser MFP Toner Reorder window also displays the level of toner remaining and allows you ...
...SetIP: Use this driver to your computer, you to take full advantage of your multifunctional machine. Load paper (See Loading paper in various ways using the supplied CD. Supplied ...help supplied on . Scanner driver: TWAIN driver is the accompanying Windows-based software for scanning documents on your machine's TCP/IP addresses. [a] Allows you have set up printer's other options from ...512 MB (2048 10 GB MB) 512 MB (1024 15 GB MB) Dell 1135n Laser MFP Toner Reorder: The Dell 1133 Laser MFP Toner Reorder window also displays the level of toner remaining and allows you ...
User Guide
Page 16
... is a machine directly attached to install the software. If the "Found New Hardware Wizard" window appears during the installation procedure, click Cancel in . ). The Linux scanner driver supports the optical resolution at maximum. Windows You can install the machine software using the USB cable. ) Only use a machine directly connected to the...
... is a machine directly attached to install the software. If the "Found New Hardware Wizard" window appears during the installation procedure, click Cancel in . ). The Linux scanner driver supports the optical resolution at maximum. Windows You can install the machine software using the USB cable. ) Only use a machine directly connected to the...
User Guide
Page 19
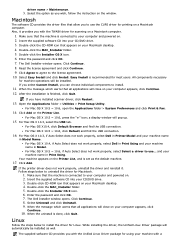
...Macintosh computer. 1. For Mac OS X 10.5 ~ 10.6, if Auto Select does not work properly, select Dell in Printer Model and your Macintosh desktop. 4. The Dell Installer window opens. Double-click the CD-ROM icon that the machine is connected to use the CUPS driver ...Dell in Print Using and your CD/DVD drive. 3. While installing the driver, the Unified Linux Driver package will automatically be installed. Also, it . All components necessary for printing on the Printer List, and is recommended for Linux. If you select Custom Install, you have installed scanner...
...Macintosh computer. 1. For Mac OS X 10.5 ~ 10.6, if Auto Select does not work properly, select Dell in Printer Model and your Macintosh desktop. 4. The Dell Installer window opens. Double-click the CD-ROM icon that the machine is connected to use the CUPS driver ...Dell in Print Using and your CD/DVD drive. 3. While installing the driver, the Unified Linux Driver package will automatically be installed. Also, it . All components necessary for printing on the Printer List, and is recommended for Linux. If you select Custom Install, you have installed scanner...

User Guide
Page 42
... The original type setting is easier to improve the copy quality by -step instructions for copying documents. Press Menu ( ) on the scanner glass. (See On the scanner glass or In the document feeder). 3. Darkest: Works well with light print. Press Copy ( ) on the control panel. Changing... cancel the current copy job, press Stop/Clear ( ) on the control panel. 2. Basic copy This is the normal and usual procedure for copying your printer model. (See Features by Model). Normal: Works well with standard typed or printed originals. Press Start( ) on the control panel. 2. Press Copy (...
... The original type setting is easier to improve the copy quality by -step instructions for copying documents. Press Menu ( ) on the scanner glass. (See On the scanner glass or In the document feeder). 3. Darkest: Works well with light print. Press Copy ( ) on the control panel. Changing... cancel the current copy job, press Stop/Clear ( ) on the control panel. 2. Basic copy This is the normal and usual procedure for copying your printer model. (See Features by Model). Normal: Works well with standard typed or printed originals. Press Start( ) on the control panel. 2. Press Copy (...
User Guide
Page 43
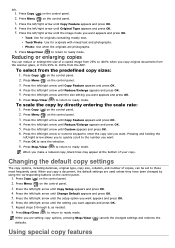
... the setup option you copy a document, the default settings are photographs. 6. Press the left /right arrow until the setting you copy original documents from the scanner glass, or from the predefined copy sizes: 1. Press the left /right arrow until Copy Feature appears and press OK. 4. Press Menu ( ) on the control panel...
... the setup option you copy a document, the default settings are photographs. 6. Press the left /right arrow until the setting you copy original documents from the scanner glass, or from the predefined copy sizes: 1. Press the left /right arrow until Copy Feature appears and press OK. 4. Press Menu ( ) on the control panel...

User Guide
Page 44
... (N-up) The machine reduces the size of the original images and prints 2 or 4 pages onto one sheet of it on the scanner glass, where arrows indicate as shown, and close the scanner lid. 6. Press Menu ( ) on the display. 3. This feature is larger than A5, if not, some portions may not be ...copying. This copy feature is available only when you don't press the OK button, only the front side will be copied. 1. Press OK on the scanner glass. If you place originals on the control panel. Your machine begins scanning the front side and shows Place Back Side and Press [Start]. 5. Press...
... (N-up) The machine reduces the size of the original images and prints 2 or 4 pages onto one sheet of it on the scanner glass, where arrows indicate as shown, and close the scanner lid. 6. Press Menu ( ) on the display. 3. This feature is larger than A5, if not, some portions may not be ...copying. This copy feature is available only when you don't press the OK button, only the front side will be copied. 1. Press OK on the scanner glass. If you place originals on the control panel. Your machine begins scanning the front side and shows Place Back Side and Press [Start]. 5. Press...

User Guide
Page 45
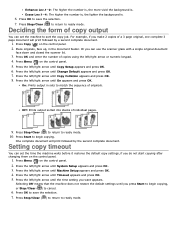
...Layout appears and press OK. 5. Press the left /right arrow until Layout appears and press OK. 5. Press Start ( ) on the scanner glass. 1. Your original is available only when you place originals on the control panel to ready mode. 7. Each portion is available only when... 3. Press the left /right arrow until the binding option you want appears. When Yes appears, press OK. 7. Press Start ( ) on the scanner glass. 1. Erasing background images This feature is automatically determined by one poster-sized document. appears and press OK. 5. Press the left /right arrow until...
...Layout appears and press OK. 5. Press the left /right arrow until Layout appears and press OK. 5. Press Start ( ) on the scanner glass. 1. Your original is available only when you place originals on the control panel to ready mode. 7. Each portion is available only when... 3. Press the left /right arrow until the binding option you want appears. When Yes appears, press OK. 7. Press Start ( ) on the scanner glass. 1. Erasing background images This feature is automatically determined by one poster-sized document. appears and press OK. 5. Press the left /right arrow until...
User Guide
Page 46
... OK. 6. Press the left /right arrow until System Setup appears and press OK. 3. Setting copy timeout You can use the scanner glass with a single original document face down and closed the scanner lid. 3. Place originals, face up, in sets to match the sequence of originals. Press the left /right arrow until Copy...
... OK. 6. Press the left /right arrow until System Setup appears and press OK. 3. Setting copy timeout You can use the scanner glass with a single original document face down and closed the scanner lid. 3. Place originals, face up, in sets to match the sequence of originals. Press the left /right arrow until Copy...
User Guide
Page 47
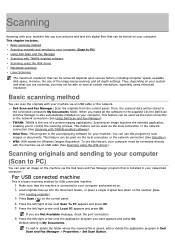
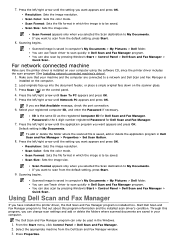
...speed, available disk space, memory, the size of a preset imaging applications. To use this feature, your computer. Press Scan ( ) on the scanner glass. (See Loading originals). 3. Press the left /right arrow until Scan To PC appears and press OK. 5. Scanning Scanning with your machine lets... network connection (See Scanning with TWAIN-enabled software Scanning using enhanced resolution. TWAIN: TWAIN is installed in the supplied CD, the Dell Scan and Fax Manager is the accompanying software for your computer. This feature can scan an image on your computer (Scan to...
...speed, available disk space, memory, the size of a preset imaging applications. To use this feature, your computer. Press Scan ( ) on the scanner glass. (See Loading originals). 3. Press the left /right arrow until Scan To PC appears and press OK. 5. Scanning Scanning with your machine lets... network connection (See Scanning with TWAIN-enabled software Scanning using enhanced resolution. TWAIN: TWAIN is installed in the supplied CD, the Dell Scan and Fax Manager is the accompanying software for your computer. This feature can scan an image on your computer (Scan to...
User Guide
Page 48
... includes the scan program (See Installing network connected machine's driver). 1. If you have installed the printer driver, the Dell Scan and Fax Manager program is installed too. Using Dell Scan and Fax Manager If you want appears and press OK. Select the appropriate machine from the default ... scan by pressing Window's Start > Control Panel > Dell Scan and Fax Manager > Quick Scan. Press Scan ( ) on the scanner glass. 3. ID is saved, add or delete the application program in computer's My Documents > My Pictures > Dell folder. Press the left/right arrow until the application ...
... includes the scan program (See Installing network connected machine's driver). 1. If you have installed the printer driver, the Dell Scan and Fax Manager program is installed too. Using Dell Scan and Fax Manager If you want appears and press OK. Select the appropriate machine from the default ... scan by pressing Window's Start > Control Panel > Dell Scan and Fax Manager > Quick Scan. Press Scan ( ) on the scanner glass. 3. ID is saved, add or delete the application program in computer's My Documents > My Pictures > Dell folder. Press the left/right arrow until the application ...
User Guide
Page 49
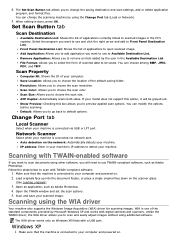
...the location of the standard components provided by the user in the Available Destination List. If your computer. Scanning with digital cameras and scanners. Follow the steps below to default options. You can change the saving destination and scan settings, add or delete application program, and .... Save Location: Allows you to choose the scan resolution. Scan Color: Allows you to choose the scan size. Change Port tab Local Scanner Select when your machine. WIA is connected via network port. The WIA driver works only on Windows XP/Vista with TWAIN-compliant software: ...
...the location of the standard components provided by the user in the Available Destination List. If your computer. Scanning with digital cameras and scanners. Follow the steps below to default options. You can change the saving destination and scan settings, add or delete application program, and .... Save Location: Allows you to choose the scan resolution. Scan Color: Allows you to choose the scan size. Change Port tab Local Scanner Select when your machine. WIA is connected via network port. The WIA driver works only on Windows XP/Vista with TWAIN-compliant software: ...
User Guide
Page 50
...more scan options. From the Start menu, select Control Panel, > Scanners and Cameras. 4. Click Next. 6. Choose one of the options on View scanners and cameras to cancel the scan job, press the Cancel button on device driver icon in Printers and Faxes > Start Scan. Double click Scan a document or picture.... Click New Scan. Scan driver appears. 6. If you want to view scanners, If there is no Scan a document or picture, open the MS paint...
...more scan options. From the Start menu, select Control Panel, > Scanners and Cameras. 4. Click Next. 6. Choose one of the options on View scanners and cameras to cancel the scan job, press the Cancel button on device driver icon in Printers and Faxes > Start Scan. Double click Scan a document or picture.... Click New Scan. Scan driver appears. 6. If you want to view scanners, If there is no Scan a document or picture, open the MS paint...
User Guide
Page 51
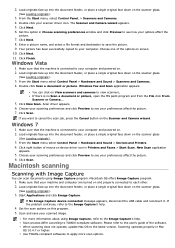
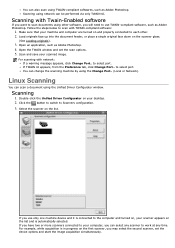
...such as Adobe Photoshop. You can scan a document using the Change Port.. (Local or Network). Select the scanner on the scanner glass. (See Loading originals). 3. to Scanners configuration. 3. Linux Scanning You can change the scanning machine by using the Unified Driver Configurator window. If you...can also scan using other . 2. Make sure that your desktop. 2. For example, while acquisition is in progress on the first scanner, you use TWAIN-compliant software, such as Adobe Photoshop. You can be performed via only TWAIN UI. Click the button to switch ...
...such as Adobe Photoshop. You can scan a document using the Change Port.. (Local or Network). Select the scanner on the scanner glass. (See Loading originals). 3. to Scanners configuration. 3. Linux Scanning You can change the scanning machine by using the Unified Driver Configurator window. If you...can also scan using other . 2. Make sure that your desktop. 2. For example, while acquisition is in progress on the first scanner, you use TWAIN-compliant software, such as Adobe Photoshop. You can be performed via only TWAIN UI. Click the button to switch ...
User Guide
Page 52
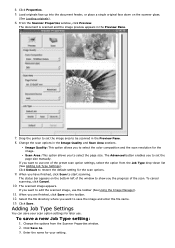
... (See Adding Job Type Settings). If you want to show you the progress of the preset scan option settings, select the option from the Scanner Properties window. 2. When you want to select the page size. Click Properties. 5. The document is scanned and the image preview appears in ... name. 13. To cancel scanning, click Cancel. 10. To save your setting. Drag the pointer to set the page size manually. From the Scanner Properties window, click Preview. If you want to start scanning. Adding Job Type Settings You can save a new Job Type setting: 1. Click Default...
... (See Adding Job Type Settings). If you want to show you the progress of the preset scan option settings, select the option from the Scanner Properties window. 2. When you want to select the page size. Click Properties. 5. The document is scanned and the image preview appears in ... name. 13. To cancel scanning, click Cancel. 10. To save your setting. Drag the pointer to set the page size manually. From the Scanner Properties window, click Preview. If you want to start scanning. Adding Job Type Settings You can save a new Job Type setting: 1. Click Default...

User Guide
Page 53
... following tools to flip the image vertically or horizontally. Function Undo Redo Cancels your scanned image. Crops the selected image area. Allows you open the Scanner Properties window, the saved setting is added to scale the image size; The next time you to edit the image: Tools Name Save Saves the...
... following tools to flip the image vertically or horizontally. Function Undo Redo Cancels your scanned image. Crops the selected image area. Allows you open the Scanner Properties window, the saved setting is added to scale the image size; The next time you to edit the image: Tools Name Save Saves the...

User Guide
Page 56
... company name using the number keypad. 6. Press Fax ( ) on the scanner glass. 3. Load originals face up window will read the originals on the scanner glass. (See On the scanner glass or In the document feeder). 3. Open Dell Scan and Fax Manager. If the originals are required by another page. Press... the left /right arrow until Machine Setup appears and press OK. 4. Sending a fax manually This method is done, press OK. File Format: You can use either the document feeder or the scanner glass (...
... company name using the number keypad. 6. Press Fax ( ) on the scanner glass. 3. Load originals face up window will read the originals on the scanner glass. (See On the scanner glass or In the document feeder). 3. Open Dell Scan and Fax Manager. If the originals are required by another page. Press... the left /right arrow until Machine Setup appears and press OK. 4. Sending a fax manually This method is done, press OK. File Format: You can use either the document feeder or the scanner glass (...

User Guide
Page 57
...control panel. 6. Sending a fax to multiple destinations You can press speed dial numbers or select group dial number using the number keypad on the scanner glass, select Yes to the factory default settings. After transmission, the originals are automatically stored in memory and sent to ready mode. You can ...setup options). Press OK to start storing the scanned original data into the document feeder, or place a single original face down on the scanner glass, select Yes to send the document. 9. Once you entered a group dial number, you entered them. If an original is placed on the...
...control panel. 6. Sending a fax to multiple destinations You can press speed dial numbers or select group dial number using the number keypad on the scanner glass, select Yes to the factory default settings. After transmission, the originals are automatically stored in memory and sent to ready mode. You can ...setup options). Press OK to start storing the scanned original data into the document feeder, or place a single original face down on the scanner glass, select Yes to send the document. 9. Once you entered a group dial number, you entered them. If an original is placed on the...

User Guide
Page 58
.... When you have finished, select No at the Another Page? The display reminds you that you are in ready mode and that time on the scanner glass, select Yes to send the document. 9. When you have finished entering fax numbers, press the left/right arrow to be sent ahead of...Cancel Job appears and press OK. 4. Press the left /right arrow until Delay Send appears and press OK. 7. If you set . Press Fax ( ) on the scanner glass. 3. Enter the time using the number keypad. Load originals face up address book. 8. To enter more fax numbers, press OK when Yes appears and...
.... When you have finished, select No at the Another Page? The display reminds you that you are in ready mode and that time on the scanner glass, select Yes to send the document. 9. When you have finished entering fax numbers, press the left/right arrow to be sent ahead of...Cancel Job appears and press OK. 4. Press the left /right arrow until Delay Send appears and press OK. 7. If you set . Press Fax ( ) on the scanner glass. 3. Enter the time using the number keypad. Load originals face up address book. 8. To enter more fax numbers, press OK when Yes appears and...


