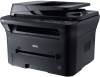
Brochure
Page 3
...tray Media size: A4, A5, A6, US letter, US legal, executive, folio, Oficio, ISO B5, JIS B5, monarch envelope, DL envelope, C5 Envelope, C6 Envelope, No. 10 envelope Weight: 60 - 160 gsm Printable area Within 4 mm of all edges of the media length: 148 to 216 mm; Dell 1135n... Maximum input capacity Duplex unit Standard output destination 250 sheet via standard drawer and 1 sheet feeder Not available 251 sheets (250 sheet standard drawer and 1 sheet feeder) Manual duplex 80 sheet bin Automatic document feeder ADF type ADF input Media support Simplex Up to 40 sheets (based on 80 g/m2)...
...tray Media size: A4, A5, A6, US letter, US legal, executive, folio, Oficio, ISO B5, JIS B5, monarch envelope, DL envelope, C5 Envelope, C6 Envelope, No. 10 envelope Weight: 60 - 160 gsm Printable area Within 4 mm of all edges of the media length: 148 to 216 mm; Dell 1135n... Maximum input capacity Duplex unit Standard output destination 250 sheet via standard drawer and 1 sheet feeder Not available 251 sheets (250 sheet standard drawer and 1 sheet feeder) Manual duplex 80 sheet bin Automatic document feeder ADF type ADF input Media support Simplex Up to 40 sheets (based on 80 g/m2)...
Service Manual
Page 22
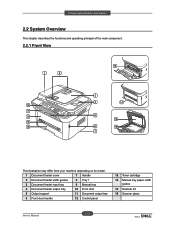
Product specification and feature 2.2 System Overview This chapter describes the functions and operating principal of the main component. 2.2.1 Front View This illustration may differ from your machine depending on its model. 1 Document feeder cover 7 Handle 2 Document feeder width guides 8 Tray 1 3 Document feeder input tray 9 Manual tray 4 Document feeder output tray 10 Front door 5 Output support 11 Document output tray 6 Front door handle 12 Control panel 13 Toner cartridge 14 Manual tray paper width guides 15 Scanner lid 16 Scanner glass 2-10 Service Manual
Product specification and feature 2.2 System Overview This chapter describes the functions and operating principal of the main component. 2.2.1 Front View This illustration may differ from your machine depending on its model. 1 Document feeder cover 7 Handle 2 Document feeder width guides 8 Tray 1 3 Document feeder input tray 9 Manual tray 4 Document feeder output tray 10 Front door 5 Output support 11 Document output tray 6 Front door handle 12 Control panel 13 Toner cartridge 14 Manual tray paper width guides 15 Scanner lid 16 Scanner glass 2-10 Service Manual

Service Manual
Page 79
Note: Ensure the number of originals you place in the ADF does not exceed its tray capacity. 1 scanner lid Service Manual 4-6 Alignment and Troubleshooting 6. Load the removed pages back into the document feeder. Close the scanner lid. Gently remove the original from the feed area by carefully pulling it to the right using both hands. 7.
Note: Ensure the number of originals you place in the ADF does not exceed its tray capacity. 1 scanner lid Service Manual 4-6 Alignment and Troubleshooting 6. Load the removed pages back into the document feeder. Close the scanner lid. Gently remove the original from the feed area by carefully pulling it to the right using both hands. 7.

User Guide
Page 7
3 Document feeder input tray 8 Tray 1 4 Document feeder output tray 9 Manual tray 5 Output support 10 Front door [a] This button is used when you close button[a] 14 Manual tray paper width guides 15 Scanner lid This illustration may differ from your machine depending on its model. 1 Network port 5 Power receptacle 2 USB port 6 Rear door 3 ...
3 Document feeder input tray 8 Tray 1 4 Document feeder output tray 9 Manual tray 5 Output support 10 Front door [a] This button is used when you close button[a] 14 Manual tray paper width guides 15 Scanner lid This illustration may differ from your machine depending on its model. 1 Network port 5 Power receptacle 2 USB port 6 Rear door 3 ...

User Guide
Page 90
...again. Print media should be loaded face up with mark when loading. Squeeze the manual tray paper width guides and adjust them into the manual tray first and be printed. Select Manual Feeder in the manual tray. Do not force the paper beyond the surface with the top edge going into... the manual tray. 1. Repeat this step for every page to the width of the tray. Load the paper in paper ...
...again. Print media should be loaded face up with mark when loading. Squeeze the manual tray paper width guides and adjust them into the manual tray first and be printed. Select Manual Feeder in the manual tray. Do not force the paper beyond the surface with the top edge going into... the manual tray. 1. Repeat this step for every page to the width of the tray. Load the paper in paper ...

User Guide
Page 121
... default machine. Close the front door. Disconnect the machine cable and reconnect it exits from the output tray, the machine resumes printing. The machine may be very Reduce the complexity of the envelopes. machine's ... selected as it . Check the display message on special materials, use the manual tray. The machine does not print. The output tray is indicating a system error. Select the correct paper source. Clear the paper... feed into the machine, the document feeder rubber pad may be replaced. Paper is attached to feed correctly. Get more than one .
... default machine. Close the front door. Disconnect the machine cable and reconnect it exits from the output tray, the machine resumes printing. The machine may be very Reduce the complexity of the envelopes. machine's ... selected as it . Check the display message on special materials, use the manual tray. The machine does not print. The output tray is indicating a system error. Select the correct paper source. Clear the paper... feed into the machine, the document feeder rubber pad may be replaced. Paper is attached to feed correctly. Get more than one .


