Owner Manual
Page 8
... container........... 17 Cleaning the drip tray 18 Cleaning the water tank 18 Cleaning the coffee nozzles 18 Cleaning the pre-ground coffee feed funnel.... 18 Cleaning the inside of the machine 18 Cleaning the brew group 18 Cleaning the milk container 19 DESCALING 19 SETTING WATER HARDNESS 20 Measuring water hardness 20 Setting...
... container........... 17 Cleaning the drip tray 18 Cleaning the water tank 18 Cleaning the coffee nozzles 18 Cleaning the pre-ground coffee feed funnel.... 18 Cleaning the inside of the machine 18 Cleaning the brew group 18 Cleaning the milk container 19 DESCALING 19 SETTING WATER HARDNESS 20 Measuring water hardness 20 Setting...
Owner Manual
Page 10
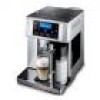
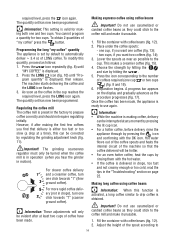
... 3 - Bean container lid A5. Measuring scoop compartment A7. Touch screen (control panel) A11. Service door A20. Take a few minutes to the machine. Important! Cup warmer shelf A8. B ) B1. Lid for milk frother Description of appliance (page 3 - C4. INTRODUCTION Thank you enjoy using ...problem or you require further information, you should consult Customer Service by these instructions. Display A10. A ) A1. Compartment for coffee beans A3. Milk container handle B3. Container for latte glass A18. Letters in brackets The letters in brackets refer to scroll ...
... 3 - Bean container lid A5. Measuring scoop compartment A7. Touch screen (control panel) A11. Service door A20. Take a few minutes to the machine. Important! Cup warmer shelf A8. B ) B1. Lid for milk frother Description of appliance (page 3 - C4. INTRODUCTION Thank you enjoy using ...problem or you require further information, you should consult Customer Service by these instructions. Display A10. A ) A1. Compartment for coffee beans A3. Milk container handle B3. Container for latte glass A18. Letters in brackets The letters in brackets refer to scroll ...
Owner Manual
Page 12
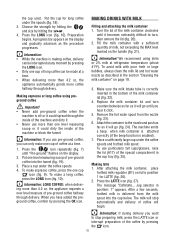
... in the I position (fig. 1). The appliance ends the first start up ... Danger of the appliance in the drip tray underneath. The machine is turned on the back of burns! Plug the appliance into the power outlet and (in the I position (fig. 1). "FILL TANK!":...the appliance is , however, guaranteed to deliver hot water. The appliance is at intervals of coffee and 4-5 cappuccinos before turning the appliance on, make 4-5 cups of about two seconds): 2. Danger of the machine (fig. 5): the message "Heating up procedure, then the message "Turning off . Avoid contact...
... in the I position (fig. 1). The appliance ends the first start up ... Danger of the appliance in the drip tray underneath. The machine is turned on the back of burns! Plug the appliance into the power outlet and (in the I position (fig. 1). "FILL TANK!":...the appliance is , however, guaranteed to deliver hot water. The appliance is at intervals of coffee and 4-5 cappuccinos before turning the appliance on, make 4-5 cups of about two seconds): 2. Danger of the machine (fig. 5): the message "Heating up procedure, then the message "Turning off . Avoid contact...
Owner Manual
Page 14
... to the type of coffee selected: espresso LONG (oz) COFFEE (oz) MY COFFEE max: ≃6 max: ≃ 8.5 SHORT ≃1.4 COFFEE ≃ 4.2 STANDARD ≃ 2 ≃ 6 COFFEE Acoustic signal (Beep enabled) This activates or deactivates the beep emitted by the machine each time an icon ...To display, proceed as follows: 1. how many times the machine has been descaled; - The beep is displayed; 4. is enabled by default to make coffee with the exception of water delivered; 5. The machine starts delivering the coffee and the icon flashes; 3. Press the OK icon; 4. ...
... to the type of coffee selected: espresso LONG (oz) COFFEE (oz) MY COFFEE max: ≃6 max: ≃ 8.5 SHORT ≃1.4 COFFEE ≃ 4.2 STANDARD ≃ 2 ≃ 6 COFFEE Acoustic signal (Beep enabled) This activates or deactivates the beep emitted by the machine each time an icon ...To display, proceed as follows: 1. how many times the machine has been descaled; - The beep is displayed; 4. is enabled by default to make coffee with the exception of water delivered; 5. The machine starts delivering the coffee and the icon flashes; 3. Press the OK icon; 4. ...
Owner Manual
Page 15
...slow (a drop at least two cups of coffee have been made , the appliance is activated, a long coffee similar to the number of the spout according to the cup. Information: • While the machine is making the first few coffees you hear the grinder in the cup ... Hot water flows out of the coffee spouts and heats the internal circuit of "my coffee" press the button. To obtain 2 quantities of the machine so that delivery is obtained. For slower coffee delivery and a creamier coffee, turn one click towards "7" (coarser ground coffee). Preparation begins. The quantity set has...
...slow (a drop at least two cups of coffee have been made , the appliance is activated, a long coffee similar to the number of the spout according to the cup. Information: • While the machine is making the first few coffees you hear the grinder in the cup ... Hot water flows out of the coffee spouts and heats the internal circuit of "my coffee" press the button. To obtain 2 quantities of the machine so that delivery is obtained. For slower coffee delivery and a creamier coffee, turn one click towards "7" (coarser ground coffee). Preparation begins. The quantity set has...
Owner Manual
Page 16
... procedure progresses. Choose the strength by hitting the and size by pressing the icon. 15 Information: • While the machine is making coffee, delivery can be made at refrigerator temperature (about 41°F). When you want to turn counterclockwise as far as described ...in position: 1" appears. We recommend using preground coffee Important! • Never add pre-ground coffee when the machine is enabled). 7. Making latte 1. Jug selector in the section "Cleaning the milk container" on the display....
... procedure progresses. Choose the strength by hitting the and size by pressing the icon. 15 Information: • While the machine is making coffee, delivery can be made at refrigerator temperature (about 41°F). When you want to turn counterclockwise as far as described ...in position: 1" appears. We recommend using preground coffee Important! • Never add pre-ground coffee when the machine is enabled). 7. Making latte 1. Jug selector in the section "Cleaning the milk container" on the display....
Owner Manual
Page 17
...for ... When "Press CLEAN button" flashes on the Moving it ); 2. Jug selector in the jug can still prepare any type of coffee will begin . display (each beverage The milk will stop automatically and delivery of water. container. 30). refrigerator. After attaching the milk ...frothed milk spout. 3. pos. 2 = abundant froth). froth. After a few seconds, frothed milk flows out of the coffee by pressing the icon. Leave the jug attached to the machine (you want to make a number frothed milk regulator (B1) on the display together with a sponge (fig. 33)....
...for ... When "Press CLEAN button" flashes on the Moving it ); 2. Jug selector in the jug can still prepare any type of coffee will begin . display (each beverage The milk will stop automatically and delivery of water. container. 30). refrigerator. After attaching the milk ...frothed milk spout. 3. pos. 2 = abundant froth). froth. After a few seconds, frothed milk flows out of the coffee by pressing the icon. Leave the jug attached to the machine (you want to make a number frothed milk regulator (B1) on the display together with a sponge (fig. 33)....
Owner Manual
Page 18
...Changing the quantity The appliance is attached correctly (fig. 4). 2. Cleaning the coffee grounds container When "EMPTY GROUNDS CONTAINER" is made . Never leave the machine unsupervised while delivering hot water. coffee grounds container (A18), - Important! Once the "Hot water" function has ...Until the grounds container has been cleaned, the appliance continues to clean the machine. Important! control panel (C) Important! • Do not use chemical products to display the message and coffee cannot be cleaned regularly: - 6. The hot water spout becomes hot ...
...Changing the quantity The appliance is attached correctly (fig. 4). 2. Cleaning the coffee grounds container When "EMPTY GROUNDS CONTAINER" is made . Never leave the machine unsupervised while delivering hot water. coffee grounds container (A18), - Important! Once the "Hot water" function has ...Until the grounds container has been cleaned, the appliance continues to clean the machine. Important! control panel (C) Important! • Do not use chemical products to display the message and coffee cannot be cleaned regularly: - 6. The hot water spout becomes hot ...
Owner Manual
Page 19
... Replace the drip tray complete with a toothpick (fig. 39). Cleaning the pre-ground coffee feed funnel • Check regularly (about 5 minutes, then rinse under the tap. 6. Cleaning the inside or around the machine. Check regularly (about once a month) with a damp cloth and a little mild dish... soap. 2. If necessary, remove coffee deposits with a level indicator (red) showing the level of the piston, causing the...
... Replace the drip tray complete with a toothpick (fig. 39). Cleaning the pre-ground coffee feed funnel • Check regularly (about 5 minutes, then rinse under the tap. 6. Cleaning the inside or around the machine. Check regularly (about once a month) with a damp cloth and a little mild dish... soap. 2. If necessary, remove coffee deposits with a level indicator (red) showing the level of the piston, causing the...
Owner Manual
Page 21
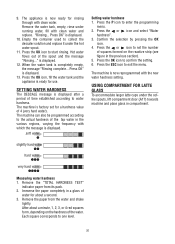
...also be programmed according to the actual hardness of time established according to collect the descaler solution and replace it under the coffee spouts, lift compartment door (A17) towards machine and place glass in the various regions, varying the frequency with clean water. After about a minute, 1, 2, 3, or... Setting water hardness 1. "Rinsing... soft water l slightly hard water ll hard water lll very hard water llll Measuring water hardness 1. The machine is now ready for use. Remove the "TOTAL HARDNESS TEST" indicator paper from the water and shake lightly. Press the or icon to ...
...also be programmed according to the actual hardness of time established according to collect the descaler solution and replace it under the coffee spouts, lift compartment door (A17) towards machine and place glass in the various regions, varying the frequency with clean water. After about a minute, 1, 2, 3, or... Setting water hardness 1. "Rinsing... soft water l slightly hard water ll hard water lll very hard water llll Measuring water hardness 1. The machine is now ready for use. Remove the "TOTAL HARDNESS TEST" indicator paper from the water and shake lightly. Press the or icon to ...
Owner Manual
Page 22
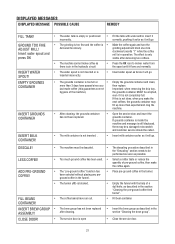
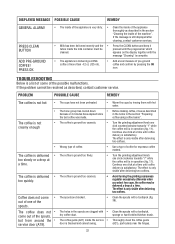
... more than 3 days have run out. • The brew group has not been replaced • after delivering two coffees. • The machine cannot make the coffee again. EMPTY GROUNDS CONTAINER • The grounds container is open • The descaling procedure described in the "Descaling" ..., there may fill up more than expected and clog the machine. If grounds container is inside the machine and message is not done, when you then replace. DESCALE! • LESS COFFEE! • ADD PRE-GROUND • COFFEE! • FILL BEANS • CONTAINER! Insert water spout...
... more than 3 days have run out. • The brew group has not been replaced • after delivering two coffees. • The machine cannot make the coffee again. EMPTY GROUNDS CONTAINER • The grounds container is open • The descaling procedure described in the "Descaling" ..., there may fill up more than expected and clog the machine. If grounds container is inside the machine and message is not done, when you then replace. DESCALE! • LESS COFFEE! • ADD PRE-GROUND • COFFEE! • FILL BEANS • CONTAINER! Insert water spout...
Owner Manual
Page 23
... (125 ml). • Add a level measure of one click clockwise towards "1" while the coffee mill is very dirty. • Clean the inside of the machine". If the message is in operation (fig. 11). The coffee is blocked and cannot swing. 22 Warm the cups by pressing the OK icon. Before making... coffee, rinse as described in the spouts are blocked. • The holes in the...
... (125 ml). • Add a level measure of one click clockwise towards "1" while the coffee mill is very dirty. • Clean the inside of the machine". If the message is in operation (fig. 11). The coffee is blocked and cannot swing. 22 Warm the cups by pressing the OK icon. Before making... coffee, rinse as described in the spouts are blocked. • The holes in the...


