Owner Manual
Page 8
... HOT WATER 17 Preparation 17 Changing the quantity 17 CLEANING 17 Cleaning the coffee maker 17 Cleaning the coffee grounds container........... 17 Cleaning the drip tray 18 Cleaning the water tank 18 Cleaning the coffee nozzles 18 Cleaning the pre-ground coffee feed funnel.... 18 Cleaning the inside of the machine 18 Cleaning the brew...
... HOT WATER 17 Preparation 17 Changing the quantity 17 CLEANING 17 Cleaning the coffee maker 17 Cleaning the coffee grounds container........... 17 Cleaning the drip tray 18 Cleaning the water tank 18 Cleaning the coffee nozzles 18 Cleaning the pre-ground coffee feed funnel.... 18 Cleaning the inside of the machine 18 Cleaning the brew...
Owner Manual
Page 10
... one cup of control panel (touch screen) (page 3 - Information : This symbol identifies important advice or information for choosing the ESAM 6700 automatic coffee and cappuccino maker. Measuring scoop compartment A7. Coffee guide A22. CLEAN button B4. C ) Information: Only the icons relating to the controls enabled for the particular function currently being used in...
... one cup of control panel (touch screen) (page 3 - Information : This symbol identifies important advice or information for choosing the ESAM 6700 automatic coffee and cappuccino maker. Measuring scoop compartment A7. Coffee guide A22. CLEAN button B4. C ) Information: Only the icons relating to the controls enabled for the particular function currently being used in...
Owner Manual
Page 11
... of steamed milk. C11. LATTE icon: to access the programming menu. Do not install the appliance in (15 cm) above the coffee maker. • Water penetrating the appliance could be damaged by sharp edges or contact with a suitable type by a qualified professional. 10 ...cup of C10. C12. P icon: to deliver a latte. icon: to scroll backwards through the programming menu. icon: to select the coffee's strength. Check that the power outlet supply voltage corresponds to an efficiently earthed and correctly installed outlet with a small amount of the appliance....
... of steamed milk. C11. LATTE icon: to access the programming menu. Do not install the appliance in (15 cm) above the coffee maker. • Water penetrating the appliance could be damaged by sharp edges or contact with a suitable type by a qualified professional. 10 ...cup of C10. C12. P icon: to deliver a latte. icon: to scroll backwards through the programming menu. icon: to select the coffee's strength. Check that the power outlet supply voltage corresponds to an efficiently earthed and correctly installed outlet with a small amount of the appliance....
Owner Manual
Page 12
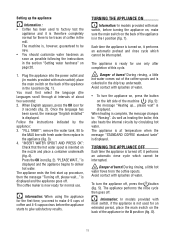
..., press the OK icon for there to deliver hot water. "FILL TANK!": remove the water tank, fill to : "Rinsing". The coffee maker is displayed. TURNING THE APPLIANCE ON Information: In models provided with fresh water then replace in the appliance (fig. 3). 4. Danger of...fig. 6). 11 The machine is displayed. You must first select the language (the languages scroll through at temperature when the message "STANDARD COFFEE standard taste" is , however, guaranteed to give satisfactory results. Follow the instructions indicated by circulating hot water. "INSERT WATER SPOUT AND...
..., press the OK icon for there to deliver hot water. "FILL TANK!": remove the water tank, fill to : "Rinsing". The coffee maker is displayed. TURNING THE APPLIANCE ON Information: In models provided with fresh water then replace in the appliance (fig. 3). 4. Danger of...fig. 6). 11 The machine is displayed. You must first select the language (the languages scroll through at temperature when the message "STANDARD COFFEE standard taste" is , however, guaranteed to give satisfactory results. Follow the instructions indicated by circulating hot water. "INSERT WATER SPOUT AND...
Owner Manual
Page 18
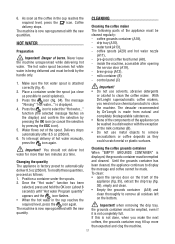
...the handle only. 1. Press the icon to clean the machine. water tank (A13), - With De'Longhi superautomatic coffee makers, you make the next coffees, the grounds container may fill up more than expected and clog the machine. 17 You should not deliver hot ...in a dishwasher with the new quantity. Until the grounds container has been cleaned, the appliance continues to remove encrustations or coffee deposits as possible to clean the coffee maker. The message "Rinsing" "Hot water..." Water flows out of burns. Delivery stops automatically after opening the service door ...
...the handle only. 1. Press the icon to clean the machine. water tank (A13), - With De'Longhi superautomatic coffee makers, you make the next coffees, the grounds container may fill up more than expected and clog the machine. 17 You should not deliver hot ...in a dishwasher with the new quantity. Until the grounds container has been cleaned, the appliance continues to remove encrustations or coffee deposits as possible to clean the coffee maker. The message "Rinsing" "Hot water..." Water flows out of burns. Delivery stops automatically after opening the service door ...
Owner Manual
Page 19
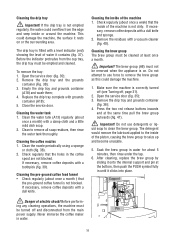
.... 5. Cleaning the inside of the machine 1. Remove the drip tray and grounds container (fig. 36); 4. Never immerse the coffee maker in the coffee spout are not blocked. This could damage the machine, the surface it onto the internal support and pin at least once a month...tray complete with a dull knife and sponge. 2. Check regularly (about once a month ) that the holes in water. 18 If necessary, remove coffee deposits with grounds container (A18); 5. The brew group (A8) must be removed when the appliance is not blocked. Before performing any cleaning operations...
.... 5. Cleaning the inside of the machine 1. Remove the drip tray and grounds container (fig. 36); 4. Never immerse the coffee maker in the coffee spout are not blocked. This could damage the machine, the surface it onto the internal support and pin at least once a month...tray complete with a dull knife and sponge. 2. Check regularly (about once a month ) that the holes in water. 18 If necessary, remove coffee deposits with grounds container (A18); 5. The brew group (A8) must be removed when the appliance is not blocked. Before performing any cleaning operations...
Owner Manual
Page 23
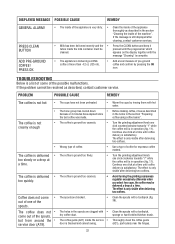
...the notes in the section "Cleaning the inside of coffee. • The coffee is ground too finely. • The coffee is only visible after delivering two coffees. DISPLAYED MESSAGE POSSIBLE CAUSE REMEDY GENERAL ALARM! The coffee is ground too coarsely. • Wrong type ...coffee is a list of some of the machine". Use a type of the spouts, but from around the • service door (A19). Press OK • The inside of the appliance is very dirty. • Clean the inside of the possible malfunctions. Coffee does not come out of coffee for espresso coffee makers...
...the notes in the section "Cleaning the inside of coffee. • The coffee is ground too finely. • The coffee is only visible after delivering two coffees. DISPLAYED MESSAGE POSSIBLE CAUSE REMEDY GENERAL ALARM! The coffee is ground too coarsely. • Wrong type ...coffee is a list of some of the machine". Use a type of the spouts, but from around the • service door (A19). Press OK • The inside of the appliance is very dirty. • Clean the inside of the possible malfunctions. Coffee does not come out of coffee for espresso coffee makers...


