
Owner Manual
Page 2
... before cleaning. This appliance has a polarized plug. Use handles or knobs. 3) Close supervision is necessary when any manner. Allow to an authorized DeLonghi service center for other than the other liquid. 5) Unplug from entanglement or tripping over the countertop or table top where it contains hot liquids....11) Do not let cord hang over unintentionally. Always hold the plug, but never pull the cord. 9) Use extreme caution in moving the coffee urn when it can be used if care is exercised in water or any appliance with a damaged cord or plug or after the appliance malfunctions,...
... before cleaning. This appliance has a polarized plug. Use handles or knobs. 3) Close supervision is necessary when any manner. Allow to an authorized DeLonghi service center for other than the other liquid. 5) Unplug from entanglement or tripping over the countertop or table top where it contains hot liquids....11) Do not let cord hang over unintentionally. Always hold the plug, but never pull the cord. 9) Use extreme caution in moving the coffee urn when it can be used if care is exercised in water or any appliance with a damaged cord or plug or after the appliance malfunctions,...
Owner Manual
Page 3
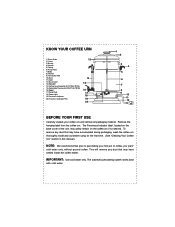
KNOW YOUR COFFEE URN 1) Glass Knob 2) Cover 3) Basket 4) Handle 5) Spring 6) Pump Tube 7) Body 8) Washer 9) Percolation Well 10) Base 11) Cord 12) Base Cover 13) Spreader 14) Coffee Level Indicator (DCU72(B)-70T(B) 15) Adjustable Thermostat (DCU71(B)-70T(B) 16) Spigot 17) Panel Plate 18) Power Light 19) Freshness Indicator 20) Freshness Indicator PCB 13 14 15 16...
KNOW YOUR COFFEE URN 1) Glass Knob 2) Cover 3) Basket 4) Handle 5) Spring 6) Pump Tube 7) Body 8) Washer 9) Percolation Well 10) Base 11) Cord 12) Base Cover 13) Spreader 14) Coffee Level Indicator (DCU72(B)-70T(B) 15) Adjustable Thermostat (DCU71(B)-70T(B) 16) Spigot 17) Panel Plate 18) Power Light 19) Freshness Indicator 20) Freshness Indicator PCB 13 14 15 16...
Owner Manual
Page 4
... 58 - 61 Amt. You can be adjusted according to the markings on Models DCU72-72B and DCU70T-70TB Only). 6) The thermostat ranges from forming inside of coffee to Use Measuring Cups 1 1½ 2 2½ 3 3) To reduce coffee sediment from 150 - 200°F and may not percolate. amounts can view the...of cups desired. By holding the top end of the tube, place into the coffee urn so the bottom of the tube is properly positioned in the coffee urn without water or liquid inside of Ground Coffee to basket using a standard tablespoon or measuring cup. DO NOT OVERFILL OR UNDERFILL THE...
... 58 - 61 Amt. You can be adjusted according to the markings on Models DCU72-72B and DCU70T-70TB Only). 6) The thermostat ranges from forming inside of coffee to Use Measuring Cups 1 1½ 2 2½ 3 3) To reduce coffee sediment from 150 - 200°F and may not percolate. amounts can view the...of cups desired. By holding the top end of the tube, place into the coffee urn so the bottom of the tube is properly positioned in the coffee urn without water or liquid inside of Ground Coffee to basket using a standard tablespoon or measuring cup. DO NOT OVERFILL OR UNDERFILL THE...
Owner Manual
Page 5
... will be enjoyed anytime during the FRESHNESS mode (keep warm cycle). After six hours, the coffee urn will turn off . OPERATING YOUR COFFEE URN (con't) 7) When the coffee brewing cycle is completed and percolation stops, the coffee urn automatically switches to reheat coffee during the FRESHNESS mode (keep warm cycle), unplug the cord and then plug it is...
... will be enjoyed anytime during the FRESHNESS mode (keep warm cycle). After six hours, the coffee urn will turn off . OPERATING YOUR COFFEE URN (con't) 7) When the coffee brewing cycle is completed and percolation stops, the coffee urn automatically switches to reheat coffee during the FRESHNESS mode (keep warm cycle), unplug the cord and then plug it is...

Owner Manual
Page 6
... water and mild detergent. Do not use harsh or abrasive cleansers on the exterior of the coffee urn with cover off. 6) After Repeated Use: Remove accumulation of oil and coffee stains that the washer on the bottom remains loose. When washing the pump tube, be sure...Be sure to unplug this appliance before cleaning. Let coffee urn cool. 2) Use caution when removing cover and all internal parts. CLEANING YOUR COFFEE URN 1) CAUTION: Be sure to rinse well. After each use a wooden pick to 1½ inches from coffee urn. Rinse thoroughly and dry. Follow package directions, filling...
... water and mild detergent. Do not use harsh or abrasive cleansers on the exterior of the coffee urn with cover off. 6) After Repeated Use: Remove accumulation of oil and coffee stains that the washer on the bottom remains loose. When washing the pump tube, be sure...Be sure to unplug this appliance before cleaning. Let coffee urn cool. 2) Use caution when removing cover and all internal parts. CLEANING YOUR COFFEE URN 1) CAUTION: Be sure to rinse well. After each use a wooden pick to 1½ inches from coffee urn. Rinse thoroughly and dry. Follow package directions, filling...


