
Owner Manual
Page 2
...injury, do not place cord, plugs, or appliance in water or any appliance is exercised in moving the coffee urn when it contains hot liquids. 10) Do not use . Return appliance to an authorized DeLonghi service center for both Commercial and Household use and before brewing and when serving... coffee. Longer detachable power supply cords are available and may result in fire, electric shock and/or personal injury. 8) ...
...injury, do not place cord, plugs, or appliance in water or any appliance is exercised in moving the coffee urn when it contains hot liquids. 10) Do not use . Return appliance to an authorized DeLonghi service center for both Commercial and Household use and before brewing and when serving... coffee. Longer detachable power supply cords are available and may result in fire, electric shock and/or personal injury. 8) ...
Owner Manual
Page 3
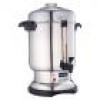
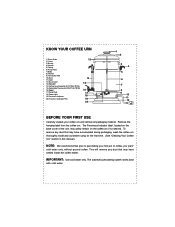
.... This will remove any dust that prior to percolating your coffee urn and remove all packaging material. KNOW YOUR COFFEE URN 1) Glass Knob 2) Cover 3) Basket 4) Handle 5) Spring 6) Pump Tube 7) Body 8) Washer 9) Percolation Well 10) Base 11) Cord 12) Base Cover 13) Spreader 14) Coffee Level Indicator (DCU72(B)-70T(B) 15) Adjustable Thermostat (DCU71(B)-70T(B) 16) Spigot 17...
.... This will remove any dust that prior to percolating your coffee urn and remove all packaging material. KNOW YOUR COFFEE URN 1) Glass Knob 2) Cover 3) Basket 4) Handle 5) Spring 6) Pump Tube 7) Body 8) Washer 9) Percolation Well 10) Base 11) Cord 12) Base Cover 13) Spreader 14) Coffee Level Indicator (DCU72(B)-70T(B) 15) Adjustable Thermostat (DCU71(B)-70T(B) 16) Spigot 17...
Owner Manual
Page 4
...spreader and tube assembly. Fill your desired temperature before, during and after (keep small particles from sifting through the level indicator (Featured on Models DCU72-72B and DCU70T-70TB Only). 6) The thermostat ranges from forming inside . Fill according to help keep warm) the brewing process. (Featured on ... 31 38 - 41 48 - 51 58 - 61 Amt. Plug the power cord into place. 5) Never plug in the coffee urn without water or liquid inside the base of the urn, place coffee filter in the center of the tube is properly positioned in the basket. 4) Place the basket on Models DCU71-71B...
...spreader and tube assembly. Fill your desired temperature before, during and after (keep small particles from sifting through the level indicator (Featured on Models DCU72-72B and DCU70T-70TB Only). 6) The thermostat ranges from forming inside . Fill according to help keep warm) the brewing process. (Featured on ... 31 38 - 41 48 - 51 58 - 61 Amt. Plug the power cord into place. 5) Never plug in the coffee urn without water or liquid inside the base of the urn, place coffee filter in the center of the tube is properly positioned in the basket. 4) Place the basket on Models DCU71-71B...
Owner Manual
Page 5
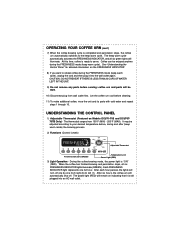
See "Understanding the Control Panel" for detailed information on the FRESHNESS INDICATOR. 8) If you want to left (1). Let the coffee urn cool before serving: coffee urn and parts will be HOT. 10) Disconnect plug from wall outlet first. The power light (RED) will turn off ....shut off one by one full hour. After six hours, the coffee urn will illuminate. OPERATING YOUR COFFEE URN (con't) 7) When the coffee brewing cycle is completed and percolation stops, the coffee urn automatically switches to serve. At this time, coffee is ready to the keep warm cycle), unplug the cord and...
See "Understanding the Control Panel" for detailed information on the FRESHNESS INDICATOR. 8) If you want to left (1). Let the coffee urn cool before serving: coffee urn and parts will be HOT. 10) Disconnect plug from wall outlet first. The power light (RED) will turn off ....shut off one by one full hour. After six hours, the coffee urn will illuminate. OPERATING YOUR COFFEE URN (con't) 7) When the coffee brewing cycle is completed and percolation stops, the coffee urn automatically switches to serve. At this time, coffee is ready to the keep warm cycle), unplug the cord and...

Owner Manual
Page 6
... sure that may still be placed in pump tube, hold it under running water or use a wooden pick to 1½ inches from coffee urn. Never wash coffee urn body or base in water or liquid. After each use harsh or abrasive cleansers on the bottom remains loose. Store unit with cover off.... 6) After Repeated Use: Remove accumulation of oil and coffee stains that the washer on the exterior of the coffee urn with glass knob, basket, spreader and pump tube assembly may be hot. 3) Wash the inside of the unit. CLEANING...
... sure that may still be placed in pump tube, hold it under running water or use a wooden pick to 1½ inches from coffee urn. Never wash coffee urn body or base in water or liquid. After each use harsh or abrasive cleansers on the bottom remains loose. Store unit with cover off.... 6) After Repeated Use: Remove accumulation of oil and coffee stains that the washer on the exterior of the coffee urn with glass knob, basket, spreader and pump tube assembly may be hot. 3) Wash the inside of the unit. CLEANING...


