
Product Manual
Page 3
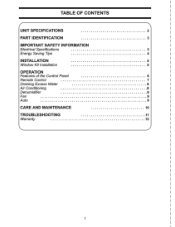
TABLE OF CONTENTS UNIT SPECIFICATIONS 2 PART IDENTIFICATION 3 IMPORTANT SAFETY INFORMATION Electrical Specifications 3 Energy Saving Tips 4 INSTALLATION 5 Window Kit Installation 5 OPERATION Features of the Control Panel 6 Remote Control 7 Draining Excess Water 8 Air Conditioning 8 Dehumidifier 9 Fan 9 Auto 9 CARE AND MAINTENANCE 10 TROUBLESHOOTING 11 Warranty 12 K I 1
TABLE OF CONTENTS UNIT SPECIFICATIONS 2 PART IDENTIFICATION 3 IMPORTANT SAFETY INFORMATION Electrical Specifications 3 Energy Saving Tips 4 INSTALLATION 5 Window Kit Installation 5 OPERATION Features of the Control Panel 6 Remote Control 7 Draining Excess Water 8 Air Conditioning 8 Dehumidifier 9 Fan 9 Auto 9 CARE AND MAINTENANCE 10 TROUBLESHOOTING 11 Warranty 12 K I 1
Product Manual
Page 4
... Fan. This Owner's Use and Care Guide will provide you many years of 4 Season Home Comfort at your home, cottage, or office. Model Number: Serial Number Date of ; Your Danby Portable Air-Conditioner is featured with valuable information necessary for general inquiries. Imagine the convenience of trouble free operation. To contact a Customer Service Representative, call Danby TOLL FREE: 1-800-26- (1- If properly maintained, your Danby appliance will be conveniently moved from room...
... Fan. This Owner's Use and Care Guide will provide you many years of 4 Season Home Comfort at your home, cottage, or office. Model Number: Serial Number Date of ; Your Danby Portable Air-Conditioner is featured with valuable information necessary for general inquiries. Imagine the convenience of trouble free operation. To contact a Customer Service Representative, call Danby TOLL FREE: 1-800-26- (1- If properly maintained, your Danby appliance will be conveniently moved from room...
Product Manual
Page 5
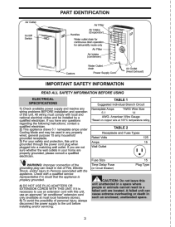
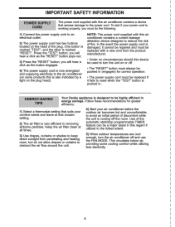
... wall outlets in a space where people or animals cannot react to Persons associated with local and national electrical codes and be used in any wiring problems BEFORE installation and operation of this unit, use an approved "air conditioner extension cord only (available at 105°C temperature rating. 7 - Air Outlet On/Off Switch PART IDENTIFICATION Air Filter Handles Air Intake (Evaporator) Water outlet drain for continuous drain operation for dehumidify mode only Air Filter Air Intake (condenser) Castors Water Outlet drain Power Supply Cord Air Outlet (Heat Exhaust...
... wall outlets in a space where people or animals cannot react to Persons associated with local and national electrical codes and be used in any wiring problems BEFORE installation and operation of this unit, use an approved "air conditioner extension cord only (available at 105°C temperature rating. 7 - Air Outlet On/Off Switch PART IDENTIFICATION Air Filter Handles Air Intake (Evaporator) Water outlet drain for continuous drain operation for dehumidify mode only Air Filter Air Intake (condenser) Castors Water Outlet drain Power Supply Cord Air Outlet (Heat Exhaust...
Product Manual
Page 6
... air filter is working properly, you must be replaced with a new cord from penetrating and heating room, but do the following: 1) Connect the power supply cord to an electrical outlet. 2) The power supply cord has two buttons located on or off and use the FAN MODE. One button is marked "TEST", and the other is designed to be used to turn the unit on the head of the plug. Use of the automatic start/stop programmable TIMER...
... air filter is working properly, you must be replaced with a new cord from penetrating and heating room, but do the following: 1) Connect the power supply cord to an electrical outlet. 2) The power supply cord has two buttons located on or off and use the FAN MODE. One button is marked "TEST", and the other is designed to be used to turn the unit on the head of the plug. Use of the automatic start/stop programmable TIMER...
Product Manual
Page 7
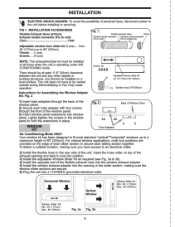
... Adapters Air Conditioning Mode ONLY Your window kit has been designed to fit most standard "verticalThorizontal" windows up to be vented outside during Dehumidifying or Fan Only mode operation. The unit does not have access to an electrical outlet. 2) Install the flexible hose to secure each tube adapter with four screws through the front of the window panel. 3) Insert window panel extensions into window panel. Insert the hose collar on top of the exhaust opening...
... Adapters Air Conditioning Mode ONLY Your window kit has been designed to fit most standard "verticalThorizontal" windows up to be vented outside during Dehumidifying or Fan Only mode operation. The unit does not have access to an electrical outlet. 2) Install the flexible hose to secure each tube adapter with four screws through the front of the window panel. 3) Insert window panel extensions into window panel. Insert the hose collar on top of the exhaust opening...
Product Manual
Page 8
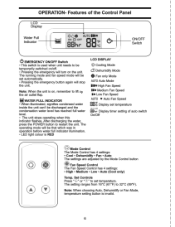
... Mode AUTO Auto Mode Mit High Fan Speed II* Medium Fan Speed Ilk Low Fan Speed AUTO * Auto Fan Speed B8:g Display set temperature ON® OFF 88hr Display timer setting of the Control Panel LCD Display Water Full Indicator 88. *0. Features of auto switch On/Off C) A V @Mode Control The Mode Control has 4 settings: • Cool • Dehumidify • Fan • Auto The settings are adjusted by the Mode Control button 0 Fan Speed Control The Fan Speed Control has 4 settings: • High • Medium • Low • Auto (Cool only) Temp. The operating mode...
... Mode AUTO Auto Mode Mit High Fan Speed II* Medium Fan Speed Ilk Low Fan Speed AUTO * Auto Fan Speed B8:g Display set temperature ON® OFF 88hr Display timer setting of the Control Panel LCD Display Water Full Indicator 88. *0. Features of auto switch On/Off C) A V @Mode Control The Mode Control has 4 settings: • Cool • Dehumidify • Fan • Auto The settings are adjusted by the Mode Control button 0 Fan Speed Control The Fan Speed Control has 4 settings: • High • Medium • Low • Auto (Cool only) Temp. The operating mode...
Product Manual
Page 9
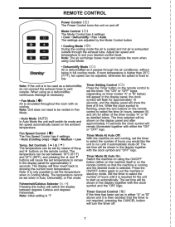
... in Auto, Dehumidify, or Fan mode. Set the timer to select the number of 8 hrs. If room temperature is required for approximately 10 seconds, and the display panel will be set when in the display together with the clock symbol and the "ON" logo. Note: Initial setting is exhausted outside . The set time will remain illuminated together with no cooling. REMOTE CONTROL Power Control [01 The Power Control turns the unit on and off Mode Control...
... in Auto, Dehumidify, or Fan mode. Set the timer to select the number of 8 hrs. If room temperature is required for approximately 10 seconds, and the display panel will be set when in the display together with the clock symbol and the "ON" logo. Note: Initial setting is exhausted outside . The set time will remain illuminated together with no cooling. REMOTE CONTROL Power Control [01 The Power Control turns the unit on and off Mode Control...
Product Manual
Page 10
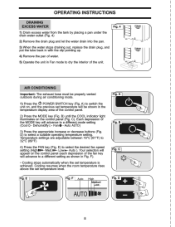
.... 3) When the water stops draining out, replace the drain plug, and put the tube back in with the clip pointing up. 4) Remove the pan of water. 5) Operate the unit in Fan mode to dry the interior of the MODE key will advance to a different mode setting (Cools- B) until the COOL indicator light illuminates on the control panel (each depression of the control panel. 2) Press the MODE key (Fig. Each depression of the unit. Auto AUTO) 3) Press the...
.... 3) When the water stops draining out, replace the drain plug, and put the tube back in with the clip pointing up. 4) Remove the pan of water. 5) Operate the unit in Fan mode to dry the interior of the MODE key will advance to a different mode setting (Cools- B) until the COOL indicator light illuminates on the control panel (each depression of the control panel. 2) Press the MODE key (Fig. Each depression of the unit. Auto AUTO) 3) Press the...
Product Manual
Page 11
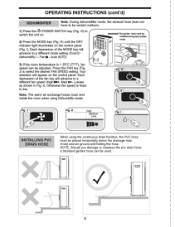
Each depression of the fan key will appear on the control panel (Fig. Auto AUTO) 3) If the room temperature is fixed to switch the unit on. 2) Press the MODE key (Fig. Press the FAN key (Fig. J) to a different mode setting (CoolCtDehumidify0- G Fig H Fig. K High Medium Low Fig. t=t 9 G) to low. I INSTALLING PVC DRAIN HOSE When using Dehumidify mode. Fan• - Your selection will advance to be vented outdoors. 1) Press the a POWER SWITCH key (Fig. Low...
Each depression of the fan key will appear on the control panel (Fig. Auto AUTO) 3) If the room temperature is fixed to switch the unit on. 2) Press the MODE key (Fig. Press the FAN key (Fig. J) to a different mode setting (CoolCtDehumidify0- G Fig H Fig. K High Medium Low Fig. t=t 9 G) to low. I INSTALLING PVC DRAIN HOSE When using Dehumidify mode. Fan• - Your selection will advance to be vented outdoors. 1) Press the a POWER SWITCH key (Fig. Low...

Product Manual
Page 12
... frequent cleaning may be cleaned every two (2) weeks. Auto AUTO) 3) Press the FAN key (Fig. J) to select the desired FAN SPEED setting. DO NOT put heavy objects on the control panel. Allow time to dry before reinstalling into the unit 5) Replace the air filter and cover. \ 6) Replacement air filter information is recommended. 4) Rinse the filter well using clean water. L). Fan • - Each depression of the FI H MODE key will change automatically according to ambient temperature. Clean the unit...
... frequent cleaning may be cleaned every two (2) weeks. Auto AUTO) 3) Press the FAN key (Fig. J) to select the desired FAN SPEED setting. DO NOT put heavy objects on the control panel. Allow time to dry before reinstalling into the unit 5) Replace the air filter and cover. \ 6) Replacement air filter information is recommended. 4) Rinse the filter well using clean water. L). Fan • - Each depression of the FI H MODE key will change automatically according to ambient temperature. Clean the unit...

Product Manual
Page 13
... is ON; C PROBLEM • Unit does not work POSSIBLE CAUSE • Power is out • The plug is not plugged in the room • Air intake grill is clogged • Filter is too dirty • Temperature setting is too high • The tank is nearly full • Reset the temperature level • Reset the timer • Remove drain water from room • Clean air intake grill • Replace the filter • Lower temp. Use this troubleshooting guide for assistance...
... is ON; C PROBLEM • Unit does not work POSSIBLE CAUSE • Power is out • The plug is not plugged in the room • Air intake grill is clogged • Filter is too dirty • Temperature setting is too high • The tank is nearly full • Reset the temperature level • Reset the timer • Remove drain water from room • Clean air intake grill • Replace the filter • Lower temp. Use this troubleshooting guide for assistance...
Product Manual
Page 14
(or LIMITED IN-HOME APPLIANCE WARRANTY Y• ) C41.,) This quality product is warranted to be free from manufacturer's defects in material and worimanship, provided that the unit is used fa oxnmercial application, al 0.A. • obligations of purchase)a a service depot fa repair. Danby reserves the right to limit the boundaries of 'In Home Service' to the proodmity of Denby, and is...
(or LIMITED IN-HOME APPLIANCE WARRANTY Y• ) C41.,) This quality product is warranted to be free from manufacturer's defects in material and worimanship, provided that the unit is used fa oxnmercial application, al 0.A. • obligations of purchase)a a service depot fa repair. Danby reserves the right to limit the boundaries of 'In Home Service' to the proodmity of Denby, and is...
Product Manual
Page 28
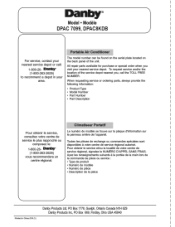
.... Danby® Model • Modele DPAC 7099, DPAC8KDB For service, contact your nearest service depot. All repair parts available for purchase or special order when you , call : 1-800-26- Pour obtenir le service et/ou la localite de votre centre de service regional, signalez le NUMERO D'APPEL SANS FRAIS. paler (1-800-263-2629) to recommend a depot in your area. Portable Air Conditioner The model number...
.... Danby® Model • Modele DPAC 7099, DPAC8KDB For service, contact your nearest service depot. All repair parts available for purchase or special order when you , call : 1-800-26- Pour obtenir le service et/ou la localite de votre centre de service regional, signalez le NUMERO D'APPEL SANS FRAIS. paler (1-800-263-2629) to recommend a depot in your area. Portable Air Conditioner The model number...


