Product Manual
Page 2
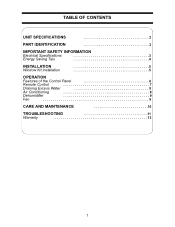
TABLE OF CONTENTS UNIT SPECIFICATIONS 2 PART IDENTIFICATION 3 IMPORTANT SAFETY INFORMATION Electrical Specifications 3 Energy Saving Tips 4 INSTALLATION Window Kit Installation 5 5 OPERATION Features of the Control Panel 6 Remote Control 7 Draining Excess Water 8 Air Conditioning 8 Dehumidifier 9 Fan 9 CARE AND MAINTENANCE 10 TROUBLESHOOTING 11 Warranty 12 1
TABLE OF CONTENTS UNIT SPECIFICATIONS 2 PART IDENTIFICATION 3 IMPORTANT SAFETY INFORMATION Electrical Specifications 3 Energy Saving Tips 4 INSTALLATION Window Kit Installation 5 5 OPERATION Features of the Control Panel 6 Remote Control 7 Draining Excess Water 8 Air Conditioning 8 Dehumidifier 9 Fan 9 CARE AND MAINTENANCE 10 TROUBLESHOOTING 11 Warranty 12 1
Product Manual
Page 3
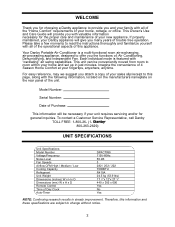
... page, along with the following information, located on the manufacturers nameplate on the rear panel of the unit. To contact a Customer Service Representative, call Danby TOLL FREE: 1-800-26- (1800-263-2629) UNIT SPECIFICATIONS Unit Specifications Model Number Voltage/Frequency Noise Level Fan Speeds Airflow CFM High / Medium / Low Cooling Capacity Refrigerant Unit Weight Dimensions (inches) W x H x D Dimensions (mm) W x H x D Remote Control Time of ; This Owner's Use and Care Guide will provide you with valuable information necessary...
... page, along with the following information, located on the manufacturers nameplate on the rear panel of the unit. To contact a Customer Service Representative, call Danby TOLL FREE: 1-800-26- (1800-263-2629) UNIT SPECIFICATIONS Unit Specifications Model Number Voltage/Frequency Noise Level Fan Speeds Airflow CFM High / Medium / Low Cooling Capacity Refrigerant Unit Weight Dimensions (inches) W x H x D Dimensions (mm) W x H x D Remote Control Time of ; This Owner's Use and Care Guide will provide you with valuable information necessary...
Product Manual
Page 4
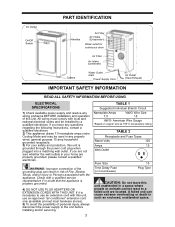
.... 4) DO NOT USE PLUG ADAPTERS OR EXTENSION CORDS WITH THIS UNIT. PART IDENTIFICATION Air Outlet On/Off Switch Handles Air Filter Air Intake (Evaporator) Water outlet for continuous drain Air Filter Air Intake (condenser) Castors Water Outlet drain Power Supply Cord Air Outlet (Heat Exhaust) IMPORTANT SAFETY INFORMATION READ ALL SAFETY INFORMATION BEFORE USING ELECTRICAL SPECIFICATIONS 1) Check available power supply and resolve any wiring problems BEFORE installation and operation of this unit is grounded through the power cord plug when plugged into a matching wall outlet. If you...
.... 4) DO NOT USE PLUG ADAPTERS OR EXTENSION CORDS WITH THIS UNIT. PART IDENTIFICATION Air Outlet On/Off Switch Handles Air Filter Air Intake (Evaporator) Water outlet for continuous drain Air Filter Air Intake (condenser) Castors Water Outlet drain Power Supply Cord Air Outlet (Heat Exhaust) IMPORTANT SAFETY INFORMATION READ ALL SAFETY INFORMATION BEFORE USING ELECTRICAL SPECIFICATIONS 1) Check available power supply and resolve any wiring problems BEFORE installation and operation of this unit is grounded through the power cord plug when plugged into a matching wall outlet. If you...
Product Manual
Page 5
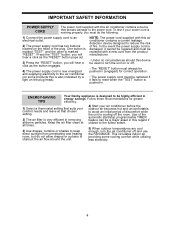
... the unit. 4) Start your power cord is working properly, you will hear a click as the "RESET" button pops out. 3) Press the "RESET" button; In the event the power supply cord is now energized and supplying electricity to the air conditioner (on the plug head). Keep the air filter clean at that suits your comfort needs and leave at all times. 3) Use drapes, curtains or shades to keep direct sunlight from the product...
... the unit. 4) Start your power cord is working properly, you will hear a click as the "RESET" button pops out. 3) Press the "RESET" button; In the event the power supply cord is now energized and supplying electricity to the air conditioner (on the plug head). Keep the air filter clean at that suits your comfort needs and leave at all times. 3) Use drapes, curtains or shades to keep direct sunlight from the product...
Product Manual
Page 6
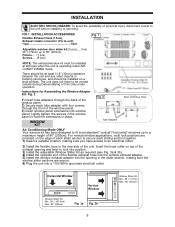
... Air Conditioning Mode ONLY Your window kit has been designed to fit most standard "vertical"/"horizontal" windows up to unit) (1pc 1/set Fig. 1 Adjustable window door slider kit (3 pcs)..... FIG 1. Insert the hose collar on a level surface. INSTALLATION ELECTRIC SHOCK HAZARD: To avoid the possibility of personal injury, disconnect power to hold the extensions in place. Lightly tighten the screws in the window panel to the unit before installing...
... Air Conditioning Mode ONLY Your window kit has been designed to fit most standard "vertical"/"horizontal" windows up to unit) (1pc 1/set Fig. 1 Adjustable window door slider kit (3 pcs)..... FIG 1. Insert the hose collar on a level surface. INSTALLATION ELECTRIC SHOCK HAZARD: To avoid the possibility of personal injury, disconnect power to hold the extensions in place. Lightly tighten the screws in the window panel to the unit before installing...
Product Manual
Page 7
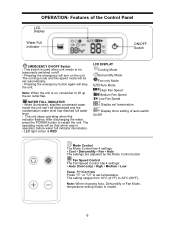
... water, press the POWER button to 32°C (89°F). Set Controls Press " " or " " to set automatically. • Pressing the emergency button again will turn on , remember to be that which was in operation before water full indicator illumination. • LED light colour is RED LCD DISPLAY Cooling Mode Dehumidify Mode Fan only Mode Auto Mode High Fan Speed Medium Fan Speed Low Fan Speed Display set temperature Display timer setting of the Control Panel LCD Display Water Full Indicator ON/OFF Switch...
... water, press the POWER button to 32°C (89°F). Set Controls Press " " or " " to set automatically. • Pressing the emergency button again will turn on , remember to be that which was in operation before water full indicator illumination. • LED light colour is RED LCD DISPLAY Cooling Mode Dehumidify Mode Fan only Mode Auto Mode High Fan Speed Medium Fan Speed Low Fan Speed Display set temperature Display timer setting of the Control Panel LCD Display Water Full Indicator ON/OFF Switch...
Product Manual
Page 8
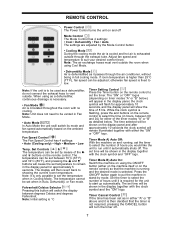
REMOTE CONTROL Power Control The Power Control turns the unit on the ambient temperature. Note: The air exchange hoses must vent outside the room when using Cool Mode. • Dehumidify Mode Air is dehumidified as it is then decided that the machine is running , set by mode. Note: If the unit is exhausted outside . Note: Unit does not need to select the number of the timer modes "A" or "B" as in Fan Mode. • Auto Mode In Auto Mode the unit swill switch its mode and fan speed automatically...
REMOTE CONTROL Power Control The Power Control turns the unit on the ambient temperature. Note: The air exchange hoses must vent outside the room when using Cool Mode. • Dehumidify Mode Air is dehumidified as it is then decided that the machine is running , set by mode. Note: If the unit is exhausted outside . Note: Unit does not need to select the number of the timer modes "A" or "B" as in Fan Mode. • Auto Mode In Auto Mode the unit swill switch its mode and fan speed automatically...
Product Manual
Page 9
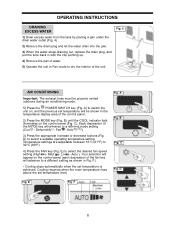
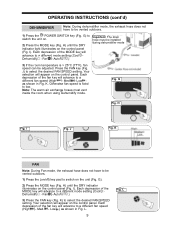
... the control panel. 2) Press the MODE key (Fig. Cooling resumes when the room temperature rises above the set temperature is achieved. E) to a different mode setting (Cool - Dehumidify - Low - C Fig. A) to dry the interior of the unit. Fan - D Fig. Each depression of the MODE key will advance to select the desired fan speed setting (High - OPERATING INSTRUCTIONS DRAINING EXCESS WATER 1) Drain excess water from the tank by placing a pan under the drain water outlet (Fig. 4) 2) Remove the drain plug...
... the control panel. 2) Press the MODE key (Fig. Cooling resumes when the room temperature rises above the set temperature is achieved. E) to a different mode setting (Cool - Dehumidify - Low - C Fig. A) to dry the interior of the unit. Fan - D Fig. Each depression of the MODE key will advance to select the desired fan speed setting (High - OPERATING INSTRUCTIONS DRAINING EXCESS WATER 1) Drain excess water from the tank by placing a pan under the drain water outlet (Fig. 4) 2) Remove the drain plug...
Product Manual
Page 10
... mode setting (Cool - Auto ) Important: The drain hose must vent inside the room when using Dehumidify mode. Med. - H) until the DRY indicator light illuminates on the control panel (Fig. Each depression of the fan key will advance to switch the unit on. 2) Press the MODE key (Fig. Your selection will appear on the control panel. Fan - Low ) as shown in Fig. K FAN Note: During Fan mode, the exhaust hose does not have to be vented outdoors. 1) Press the POWER SWITCH key...
... mode setting (Cool - Auto ) Important: The drain hose must vent inside the room when using Dehumidify mode. Med. - H) until the DRY indicator light illuminates on the control panel (Fig. Each depression of the fan key will advance to switch the unit on. 2) Press the MODE key (Fig. Your selection will appear on the control panel. Fan - Low ) as shown in Fig. K FAN Note: During Fan mode, the exhaust hose does not have to be vented outdoors. 1) Press the POWER SWITCH key...
Product Manual
Page 11
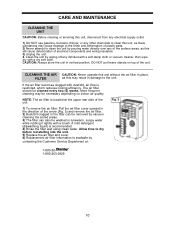
... dry before reinstalling into the unit. 5) Replace the air filter and cover. 6) Replacement air filter information is located at : 1-800-261-800-263-2629 10 Fig. 5 1) To remove the air filter: Pull the air filter cover upward in lukewarm, soapy water while rubbing it lightly with a dry soft cloth. More frequent cleaning may result in vertical position. If the air filter becomes clogged with dust/dirt, air flow is recommended. 4) Rinse the filter well using clean water...
... dry before reinstalling into the unit. 5) Replace the air filter and cover. 6) Replacement air filter information is located at : 1-800-261-800-263-2629 10 Fig. 5 1) To remove the air filter: Pull the air filter cover upward in lukewarm, soapy water while rubbing it lightly with a dry soft cloth. More frequent cleaning may result in vertical position. If the air filter becomes clogged with dust/dirt, air flow is recommended. 4) Rinse the filter well using clean water...

Product Manual
Page 12
... is open in room • There is a heat source or too many people in properly • The full-tank indicator is minor, and a service call an authorized service depot or Danby's Toll Free Number for a possible solution. TROUBLESHOOTING Occasionally, a problem may not be necessary. If the unit continues to return • Plug in properly • Remove drain water from room • Clean air intake grill • Replace the filter • Lower temp.
... is open in room • There is a heat source or too many people in properly • The full-tank indicator is minor, and a service call an authorized service depot or Danby's Toll Free Number for a possible solution. TROUBLESHOOTING Occasionally, a problem may not be necessary. If the unit continues to return • Plug in properly • Remove drain water from room • Clean air intake grill • Replace the filter • Lower temp.


