Product Manual
Page 2
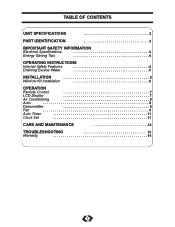
TABLE OF CONTENTS UNIT SPECIFICATIONS 2 PART IDENTIFICATION 3 IMPORTANT SAFETY INFORMATION Electrical Specifications 3 Energy Saving Tips 4 OPERATING INSTRUCTIONS Internal Safety Features 4 Draining Excess Water 5 INSTALLATION 5 Window Kit Installation 6 OPERATION Remote Control 7 LCD Display 7 Air Conditioning 8 Auto 8 Dehumidifier 9 Fan 9 Auto Timer 11 Clock Set 11 CARE AND MAINTENANCE 12 TROUBLESHOOTING 13 Warranty 14 1
TABLE OF CONTENTS UNIT SPECIFICATIONS 2 PART IDENTIFICATION 3 IMPORTANT SAFETY INFORMATION Electrical Specifications 3 Energy Saving Tips 4 OPERATING INSTRUCTIONS Internal Safety Features 4 Draining Excess Water 5 INSTALLATION 5 Window Kit Installation 6 OPERATION Remote Control 7 LCD Display 7 Air Conditioning 8 Auto 8 Dehumidifier 9 Fan 9 Auto Timer 11 Clock Set 11 CARE AND MAINTENANCE 12 TROUBLESHOOTING 13 Warranty 14 1
Product Manual
Page 3
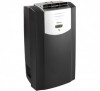
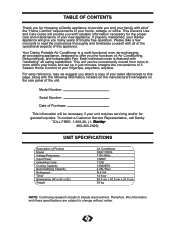
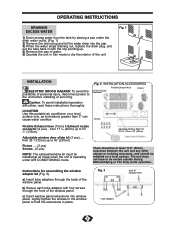
..., anytime. Your Danby Portable Air-Conditioner is featured with "oscillating" air swing capabilities. For easy reference, may we suggest you attach a copy of your sales slip/receipt to this appliance. Please take a few moments to read the instructions thoroughly and familiarize yourself... Date of Product Model Voltage/Frequency Input Power Operating Cycle Cooling Capacity Dehumidifying Capacity Refrigerant Timer Dimensions (W) x (H) x (D) Weight Air Conditioner DPAC13009 115V-60Hz 1320W 11.5A 13000BTU 4.25L/Hour R-410A 12 hour 50.8 cm x 91.5 cm x 41.8 cm 38 kg NOTE: Continuing...
..., anytime. Your Danby Portable Air-Conditioner is featured with "oscillating" air swing capabilities. For easy reference, may we suggest you attach a copy of your sales slip/receipt to this appliance. Please take a few moments to read the instructions thoroughly and familiarize yourself... Date of Product Model Voltage/Frequency Input Power Operating Cycle Cooling Capacity Dehumidifying Capacity Refrigerant Timer Dimensions (W) x (H) x (D) Weight Air Conditioner DPAC13009 115V-60Hz 1320W 11.5A 13000BTU 4.25L/Hour R-410A 12 hour 50.8 cm x 91.5 cm x 41.8 cm 38 kg NOTE: Continuing...
Product Manual
Page 4
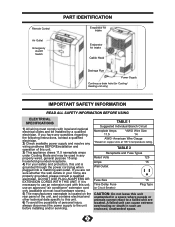
If you have any questions regarding the following instructions, contact a qualified electrician. 2) Check available power supply and resolve any wiring problems BEFOREinstallation and operation of personal injury, always disconnect the power supply to a failed ...
If you have any questions regarding the following instructions, contact a qualified electrician. 2) Check available power supply and resolve any wiring problems BEFOREinstallation and operation of personal injury, always disconnect the power supply to a failed ...
Product Manual
Page 6
... connector (2 pcs)... Fig. 2 INSTALLATION ACCESSORIES Exhaust Nozzle Connector Flexible Exhaust Hose Fixture Caution: To avoid installation/operation difficulties, read these instructions thoroughly. Fig. 3 Tube Adapters Back of the window panel. Adjustable Window Slider Kit: 28 1/3" (72cm)- 80" (203cm) There...is operating under the drain water outlet. (Fig. 1) 2) Remove the drain plug and let the water drain into window panel. Instructions for assembling the window adapter kit (Fig. 3). b) Secure each tube adapter with the clip pointing up to 80" (203cm) Fixture...
... connector (2 pcs)... Fig. 2 INSTALLATION ACCESSORIES Exhaust Nozzle Connector Flexible Exhaust Hose Fixture Caution: To avoid installation/operation difficulties, read these instructions thoroughly. Fig. 3 Tube Adapters Back of the window panel. Adjustable Window Slider Kit: 28 1/3" (72cm)- 80" (203cm) There...is operating under the drain water outlet. (Fig. 1) 2) Remove the drain plug and let the water drain into window panel. Instructions for assembling the window adapter kit (Fig. 3). b) Secure each tube adapter with the clip pointing up to 80" (203cm) Fixture...
Product Manual
Page 9
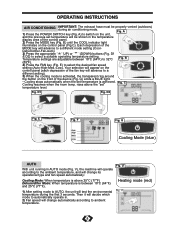
... Fig. D2 Fig. F Auto High Med. U Cooling Mode: When temperature is above the "set temperature will test the environmental temperature during air conditioning mode. OPERATING INSTRUCTIONS AIR CONDITIONING IMPORTANT: The exhaust hose must be shown in the temperature display area of the control panel. 2) Press the MODE key (Fig. Temperature settings...
... Fig. D2 Fig. F Auto High Med. U Cooling Mode: When temperature is above the "set temperature will test the environmental temperature during air conditioning mode. OPERATING INSTRUCTIONS AIR CONDITIONING IMPORTANT: The exhaust hose must be shown in the temperature display area of the control panel. 2) Press the MODE key (Fig. Temperature settings...
Product Manual
Page 10
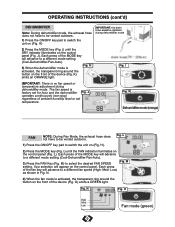
... MODE key will appear on (Fig. Fig. L 1) Press the ON/OFF key pad to switch the unit on the control panel (Fig. O High Med. OPERATING INSTRUCTIONS (cont'd) DEHUMIDIFIER Note: During dehumidifier mode, the exhaust hose does not have to be vented outdoors. Fig. Fig. Each press of the device (Fig. Fig...
... MODE key will appear on (Fig. Fig. L 1) Press the ON/OFF key pad to switch the unit on the control panel (Fig. O High Med. OPERATING INSTRUCTIONS (cont'd) DEHUMIDIFIER Note: During dehumidifier mode, the exhaust hose does not have to be vented outdoors. Fig. Fig. Each press of the device (Fig. Fig...
Product Manual
Page 11
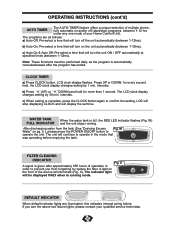
... to prevent you see the above two failure lights, please contact your Home Comfort Unit. intervals. W) FULL INDICATOR and the unit stops running mode. OPERATING INSTRUCTIONS (cont'd) AUTO TIMER The AUTO-TIMER feature offers a unique selection of multiple choice, fully automatic on and/or off the unit automatically (between 1-12 hrs...
... to prevent you see the above two failure lights, please contact your Home Comfort Unit. intervals. W) FULL INDICATOR and the unit stops running mode. OPERATING INSTRUCTIONS (cont'd) AUTO TIMER The AUTO-TIMER feature offers a unique selection of multiple choice, fully automatic on and/or off the unit automatically (between 1-12 hrs...