Product Manual
Page 2
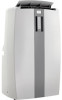
... home, cottage, or office. This Owner's Use and Care Guide will give you many years of trouble free operation. Imagine the convenience of 4 Season Home Comfort at your new appliance. This unit can be necessary if your Danby appliance will provide you with valuable information necessary for the proper care and maintenance of your fingertips, anywhere, anytime. Model Number Serial Number: Date of ; For easy...
... home, cottage, or office. This Owner's Use and Care Guide will give you many years of trouble free operation. Imagine the convenience of 4 Season Home Comfort at your new appliance. This unit can be necessary if your Danby appliance will provide you with valuable information necessary for the proper care and maintenance of your fingertips, anywhere, anytime. Model Number Serial Number: Date of ; For easy...

Product Manual
Page 3
... the unit before installing and/or servicing. TABLE 2 Receptacle and Fuse Types Rated Volts Amps Wall Outlet I25 13 11 5 Fuse Size 15 Time Delay Fuse (or Circuit Breaker) Plug Type , A CAUTION: Do not leave this unit unattended in such an enclosed, unattended space. Press the "TEST' button; A failed unit can result in your safety and protection, this unit, use an approved "air conditioner" extension cord only (available at 105°C temperature rating. POWER The power cord supplied...
... the unit before installing and/or servicing. TABLE 2 Receptacle and Fuse Types Rated Volts Amps Wall Outlet I25 13 11 5 Fuse Size 15 Time Delay Fuse (or Circuit Breaker) Plug Type , A CAUTION: Do not leave this unit unattended in such an enclosed, unattended space. Press the "TEST' button; A failed unit can result in your safety and protection, this unit, use an approved "air conditioner" extension cord only (available at 105°C temperature rating. POWER The power cord supplied...
Product Manual
Page 4
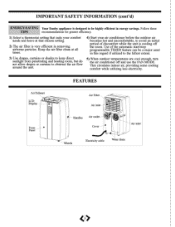
... energy savings. This circulates indoor air, providing some cooling comfort while utilizing less electricity. FEATURES Air Exhaust LCD Display Air Filter Air inlet Front Panel - Handles Air outlet Cover Air inlet Wheels Electricity cable Water drain Use of discomfort while the unit is cooling off and use the FAN MODE. Follow these TIPS recommendations for greater efficiency 1) Select a thermostat setting that chosen setting. 2) The air filter is designed to the fullest extent. 5) When outdoor temperatures are cool enough, tam the air conditioner off the room...
... energy savings. This circulates indoor air, providing some cooling comfort while utilizing less electricity. FEATURES Air Exhaust LCD Display Air Filter Air inlet Front Panel - Handles Air outlet Cover Air inlet Wheels Electricity cable Water drain Use of discomfort while the unit is cooling off and use the FAN MODE. Follow these TIPS recommendations for greater efficiency 1) Select a thermostat setting that chosen setting. 2) The air filter is designed to the fullest extent. 5) When outdoor temperatures are cool enough, tam the air conditioner off the room...
Product Manual
Page 5
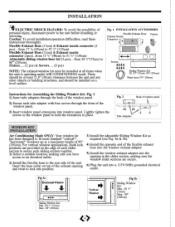
... structures, and should be installed at all times when the unit is operating under AIR CONDITIONING mode. Lightly tighten the screws in the window panel to 80' (203cm) Fixture (2 pm) & Screws (8 pm) NOTE: The exhaust/window kit must be installed on the edge of the exhaust opening in place. . 2 Back of the window panel. 3) Insert window panel extensions into the window exhaust adapter. Flexible Exhaust Hose (13cm) & Exhaust nozzle connector (2 pcs)... 7 INSTALLATION I ELECTRIC SHOCK HAZARD: To avoid...
... structures, and should be installed at all times when the unit is operating under AIR CONDITIONING mode. Lightly tighten the screws in the window panel to 80' (203cm) Fixture (2 pm) & Screws (8 pm) NOTE: The exhaust/window kit must be installed on the edge of the exhaust opening in place. . 2 Back of the window panel. 3) Insert window panel extensions into the window exhaust adapter. Flexible Exhaust Hose (13cm) & Exhaust nozzle connector (2 pcs)... 7 INSTALLATION I ELECTRIC SHOCK HAZARD: To avoid...
Product Manual
Page 6
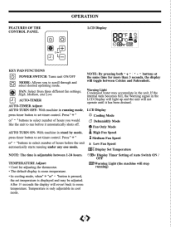
... set timer control. FEATURES OF THE CONTROL PANEL OPERATION LCD Display onT ± O El ©UOUa°r Cai Ls KEY PAD FUNCTIONS POWER SWITCH: 'Runs unit ON/OFF MODE: Allows you would like the unit to set timer control. FAN: Select from three different fan settings; LCD Display press timer button to select number of Auto Switch ON / OFF TEMPERATURE Adjust: • Used for more than 3 seconds, the display will stop running mode, NOTE: By pressing both " " " - "buttons to set temperature is room temperature. " buttons...
... set timer control. FEATURES OF THE CONTROL PANEL OPERATION LCD Display onT ± O El ©UOUa°r Cai Ls KEY PAD FUNCTIONS POWER SWITCH: 'Runs unit ON/OFF MODE: Allows you would like the unit to set timer control. FAN: Select from three different fan settings; LCD Display press timer button to select number of Auto Switch ON / OFF TEMPERATURE Adjust: • Used for more than 3 seconds, the display will stop running mode, NOTE: By pressing both " " " - "buttons to set temperature is room temperature. " buttons...
Product Manual
Page 7
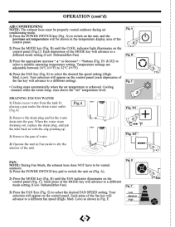
... drain water outlet (Fig.4) Fig.4 2) Remove the drain plug and let the water drain into the pan. Each press of the twit. E) to a different mode setting (Cool- Low) as shown in the temperature display area of the fan key will advance to select the desired FAN SPEED setting. Each press of the control panel. 2) Press the MODE key (Fig. B) until the COOL indicator light illuminates on the control panel (Fig.C). conditioning mode. 1) Press the POWER SWITCH...
... drain water outlet (Fig.4) Fig.4 2) Remove the drain plug and let the water drain into the pan. Each press of the twit. E) to a different mode setting (Cool- Low) as shown in the temperature display area of the fan key will advance to select the desired FAN SPEED setting. Each press of the control panel. 2) Press the MODE key (Fig. B) until the COOL indicator light illuminates on the control panel (Fig.C). conditioning mode. 1) Press the POWER SWITCH...
Product Manual
Page 8
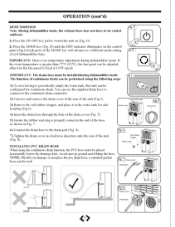
... to switch the unit on the control panel (Fig.I Dialll covet Drain hove X/ • }12. 8 Drain covet Drainlion ? H) until the DRY indicator illuminates on (Fig. Soil tubber stopper Drain 'ova N FIR. • I ).Each press of the unit (Fig.5). 7 OPERATION (cont'd) DEHUMIDIFIER Note: Dining dehunddifier mode, the exhaust hose does not have to be vented outdoors. 1) Press the ON/OFF key pad to a different mode setting (Cool-Dehumidifier-Fan). IMPORTANT...
... to switch the unit on the control panel (Fig.I Dialll covet Drain hove X/ • }12. 8 Drain covet Drainlion ? H) until the DRY indicator illuminates on (Fig. Soil tubber stopper Drain 'ova N FIR. • I ).Each press of the unit (Fig.5). 7 OPERATION (cont'd) DEHUMIDIFIER Note: Dining dehunddifier mode, the exhaust hose does not have to be vented outdoors. 1) Press the ON/OFF key pad to a different mode setting (Cool-Dehumidifier-Fan). IMPORTANT...
Product Manual
Page 9
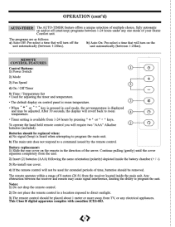
... cover on control panel is displayed and may cause signal interference, limiting the ability to a command issued by pressing " + " or " - To operate the hand held remote control you will turn off (start/stop) programs between 1-24 hours under any electrical appliances. Any obstruction between the receiver and remote may be used for adjusting the timer and temperature. • The default display on the remote in cool mode, the set temperature is room temperature. OPERATION...
... cover on control panel is displayed and may cause signal interference, limiting the ability to a command issued by pressing " + " or " - To operate the hand held remote control you will turn off (start/stop) programs between 1-24 hours under any electrical appliances. Any obstruction between the receiver and remote may be used for adjusting the timer and temperature. • The default display on the remote in cool mode, the set temperature is room temperature. OPERATION...
Product Manual
Page 10
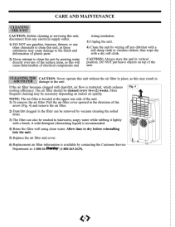
... unit. 1) To remove the air filter: Pull the air filter cover upward in vertical position. CARE AND MAINTENANCE CLEANING THE UNIT CAUTION: Before cleaning or servicing this unit, disconnect from any electrical supply outlet. 1) DO NOT use gasoline, benzene, thinner, or any other chemicals to clean this umt, as this may cause damage to the finish and deformation of plastic parts. 2) Never attempt to clean the unit by pouring water directly...
... unit. 1) To remove the air filter: Pull the air filter cover upward in vertical position. CARE AND MAINTENANCE CLEANING THE UNIT CAUTION: Before cleaning or servicing this unit, disconnect from any electrical supply outlet. 1) DO NOT use gasoline, benzene, thinner, or any other chemicals to clean this umt, as this may cause damage to the finish and deformation of plastic parts. 2) Never attempt to clean the unit by pouring water directly...
Product Manual
Page 11
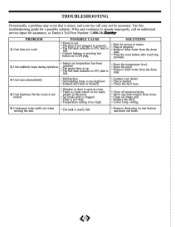
... full. • Reset the temperature level. • Reset the timer. • Remove drain water from room. • Clean air intake grill. • Replace the filter. • Lower temp. is too hi ow. • This is normal. • Exhaust duct hose is blocked. • Check the duct hose. 4) Unit functions but the room is not cooled. • Window or door is open in room. • There is nearly full. • Remove drain plug on LCDI plug. setting. 5) Condensed water spills out...
... full. • Reset the temperature level. • Reset the timer. • Remove drain water from room. • Clean air intake grill. • Replace the filter. • Lower temp. is too hi ow. • This is normal. • Exhaust duct hose is blocked. • Check the duct hose. 4) Unit functions but the room is not cooled. • Window or door is open in room. • There is nearly full. • Remove drain plug on LCDI plug. setting. 5) Condensed water spills out...
Product Manual
Page 12
....4, 2) Damage in transit or when moving the appliance. 3) Improper power supply such as low voltage, defective house wiring or inadequate fuses. 4) Accident alteration, abuse or misuse of the appliance such as inadequate air circulation in the room or abnormal operating conditions (extremely high or low room temperature). ,_/s.`.\,', ,i.s.t/e') I01\* 5) Use fa commercial or industrial purposes (ie. so, please retain bills of Denby...
....4, 2) Damage in transit or when moving the appliance. 3) Improper power supply such as low voltage, defective house wiring or inadequate fuses. 4) Accident alteration, abuse or misuse of the appliance such as inadequate air circulation in the room or abnormal operating conditions (extremely high or low room temperature). ,_/s.`.\,', ,i.s.t/e') I01\* 5) Use fa commercial or industrial purposes (ie. so, please retain bills of Denby...
Product Manual
Page 24
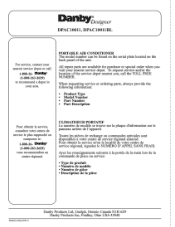
... autorise. Da nbXesigner DPAC10011, DPAC10011BL K For service, contact your nearest service depot or call the TOLL FREE NUMBER. fi t' (1-800-263-2629) to recommend a depot in China (P RC) Danby Products Ltd, Guelph, Ontario Canada N1H 6Z9 Danby Products Inc, Findlay, Ohio USA 45840 PORTABLE AIR CONDITIONER The model number can be found on the serial plate located on the back panel of the service depot nearest you visit...
... autorise. Da nbXesigner DPAC10011, DPAC10011BL K For service, contact your nearest service depot or call the TOLL FREE NUMBER. fi t' (1-800-263-2629) to recommend a depot in China (P RC) Danby Products Ltd, Guelph, Ontario Canada N1H 6Z9 Danby Products Inc, Findlay, Ohio USA 45840 PORTABLE AIR CONDITIONER The model number can be found on the serial plate located on the back panel of the service depot nearest you visit...


