Product Manual
Page 2
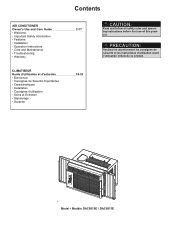
Contents AIR CONDITIONER Owner's Use and Care Guide 2-17 • Welcome • Important Safety Information • Features • Installation • Operation Instructions • Care and Maintenance • Troubleshooting • Warranty CAUTION: Read and follow all safety rules and ...Guide d'utilisation et d'entretien 18-33 • Bienvenue • Consignes de Sécurité Importantes • Caractéristiques • Installation • Consignes d'utilisation • Soins et Entretien • Dépannage • Garantie Model • Modèle DAC6010E...
Contents AIR CONDITIONER Owner's Use and Care Guide 2-17 • Welcome • Important Safety Information • Features • Installation • Operation Instructions • Care and Maintenance • Troubleshooting • Warranty CAUTION: Read and follow all safety rules and ...Guide d'utilisation et d'entretien 18-33 • Bienvenue • Consignes de Sécurité Importantes • Caractéristiques • Installation • Consignes d'utilisation • Soins et Entretien • Dépannage • Garantie Model • Modèle DAC6010E...
Product Manual
Page 4
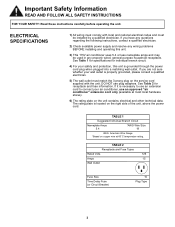
...Types Rated Volts 125 Amps 15 Wall Outlet Fuse Size Time Delay Fuse (or Circuit Breaker) 15 Plug Type 3 DO NOT use an approved "air conditioner" extension cord only (available at 60°C temperature rating. American Wire Gauge *Based on copper wire at most local hardware stores). 6) The ... whether your wall outlet is necessary to use an extension cord to connect your safety and protection, this unit. 3) This 115V air conditioner uses 5.4 or less nameplate amps and may be installed by a qualified electrician. See Table 2 for individual branch circuit. 4) For your...
...Types Rated Volts 125 Amps 15 Wall Outlet Fuse Size Time Delay Fuse (or Circuit Breaker) 15 Plug Type 3 DO NOT use an approved "air conditioner" extension cord only (available at 60°C temperature rating. American Wire Gauge *Based on copper wire at most local hardware stores). 6) The ... whether your wall outlet is necessary to use an extension cord to connect your safety and protection, this unit. 3) This 115V air conditioner uses 5.4 or less nameplate amps and may be installed by a qualified electrician. See Table 2 for individual branch circuit. 4) For your...
Product Manual
Page 5
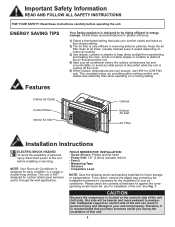
...the contents of hardware kit against the corresponding model check list, prior to installation of personal injury, disconnect power to obstruct the air flow around the unit. 4) Start your air conditioner. See Fig. 1. Inadequate support on indoor air quality). 3) Use drapes, curtains or shades to keep direct sunlight from penetrating...off the room. 5) When outdoor temperatures are cool enough, use HIGH or LOW FAN only. Follow these instructions carefully before installing or servicing. ENERGY SAVING TIPS Your Danby appliance is NOT designed for future storage or transportation.
...the contents of hardware kit against the corresponding model check list, prior to installation of personal injury, disconnect power to obstruct the air flow around the unit. 4) Start your air conditioner. See Fig. 1. Inadequate support on indoor air quality). 3) Use drapes, curtains or shades to keep direct sunlight from penetrating...off the room. 5) When outdoor temperatures are cool enough, use HIGH or LOW FAN only. Follow these instructions carefully before installing or servicing. ENERGY SAVING TIPS Your Danby appliance is NOT designed for future storage or transportation.
Product Manual
Page 6
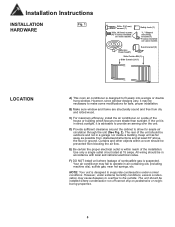
... only a single outlet circuit rated at least 30" above the floor or ground. C) For maximum efficiency, install the air conditioner on some models Adhesive Foam Seal(1) Sash bracket (2) Side Curtain RH (1) Side Curtain LH (1) LOCATION A) This room air conditioner is suspected. D) Provide sufficient clearance around the cabinet to operate in accordance with local and national...
... only a single outlet circuit rated at least 30" above the floor or ground. C) For maximum efficiency, install the air conditioner on some models Adhesive Foam Seal(1) Sash bracket (2) Side Curtain RH (1) Side Curtain LH (1) LOCATION A) This room air conditioner is suspected. D) Provide sufficient clearance around the cabinet to operate in accordance with local and national...
Product Manual
Page 7
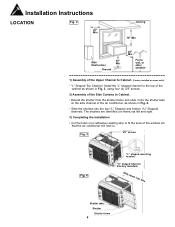
... 3/8" screws Fig. 4 "L" shaped mounting bracket "U" shaped Channel (Factory Installed) Slide down into tabs Shutter tabs Shutter Shutter frame 6 The shutters are identified (on frame) as left and right. 3) Completing the Installation • Cut the foam (non adhesive) sealing strip to Cabinet. &#... Assembly of the Upper Channel to Cabinet. (Factory installed on some units) • "L" Shaped Top Channel: Install the "L" shaped channel to the top of the window sill that the air conditioner will rest on the side channel of the air conditioner, as shown in Fig. 3, using four (4) 3/8"...
... 3/8" screws Fig. 4 "L" shaped mounting bracket "U" shaped Channel (Factory Installed) Slide down into tabs Shutter tabs Shutter Shutter frame 6 The shutters are identified (on frame) as left and right. 3) Completing the Installation • Cut the foam (non adhesive) sealing strip to Cabinet. &#... Assembly of the Upper Channel to Cabinet. (Factory installed on some units) • "L" Shaped Top Channel: Install the "L" shaped channel to the top of the window sill that the air conditioner will rest on the side channel of the air conditioner, as shown in Fig. 3, using four (4) 3/8"...

Product Manual
Page 8
PLEASE NOTE: Window applications come in a variety of the upper window sash. Installation Instructions 3) Completing the Installation (cont'd) • Carefully place the air conditioner into the window with the "L" shaped mounting bracket (on top) positioned in front of different styles. ... on each side of the cabinet should be necessary to the outside windows, then attach the safety lock to modify or improvise your particular installation. Fig. 5 Window sash 3/4" screws Fig. 6 Shutter clamps "L" Shaped Mounting Bracket Safety Lock Foam Seal 3/4" screw 7 The bottom ...
PLEASE NOTE: Window applications come in a variety of the upper window sash. Installation Instructions 3) Completing the Installation (cont'd) • Carefully place the air conditioner into the window with the "L" shaped mounting bracket (on top) positioned in front of different styles. ... on each side of the cabinet should be necessary to the outside windows, then attach the safety lock to modify or improvise your particular installation. Fig. 5 Window sash 3/4" screws Fig. 6 Shutter clamps "L" Shaped Mounting Bracket Safety Lock Foam Seal 3/4" screw 7 The bottom ...
Product Manual
Page 16
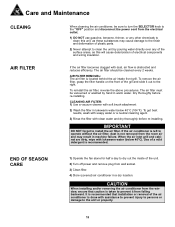
... finish and deformation of a mild detergent is obstructed and reduces efficiency. CAUTION When installing and/or removing the air conditioner from the window, ensure that installation or removal of electrical components and wiring insulation. Care and Maintenance CLEAING When cleaning the air conditioner, be sure to turn the SELECTOR knob to the "OFF" position and disconnect...
... finish and deformation of a mild detergent is obstructed and reduces efficiency. CAUTION When installing and/or removing the air conditioner from the window, ensure that installation or removal of electrical components and wiring insulation. Care and Maintenance CLEAING When cleaning the air conditioner, be sure to turn the SELECTOR knob to the "OFF" position and disconnect...
Product Manual
Page 17
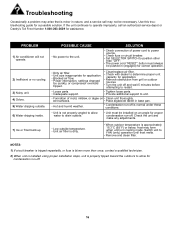
Use this troubleshooting guide for a possible solution. PPRROOBBLLEEMM 1) Air conditioner will not operate. 2) Inefficient or no cooling. 3) Noisy unit. 4) Odors. 5) Water dripping outside. 6) Water dripping inside. 7) Ice or frost build-up PPOOSSSSIIBBLLEE... is properly tipped toward the outdoors to operate improperly, call may not be installed on • Clean unit thoroughly. wet surfaces. • Place algaecide tablet in nature, and a service call an authorized service depot or Danby's Toll Free Number 1-800-263-2629 for assistance. Troubleshooting Occasionally a problem may...
Use this troubleshooting guide for a possible solution. PPRROOBBLLEEMM 1) Air conditioner will not operate. 2) Inefficient or no cooling. 3) Noisy unit. 4) Odors. 5) Water dripping outside. 6) Water dripping inside. 7) Ice or frost build-up PPOOSSSSIIBBLLEE... is properly tipped toward the outdoors to operate improperly, call may not be installed on • Clean unit thoroughly. wet surfaces. • Place algaecide tablet in nature, and a service call an authorized service depot or Danby's Toll Free Number 1-800-263-2629 for assistance. Troubleshooting Occasionally a problem may...


