Installation Instructions
Page 2
... Safety Precautions 2 Installation Specifications 3 Product Dimensions 3 Electrical Power Supply Requirements 4 Gas Supply Requirements 4 Cabinet Layout 5 Gas and Electrical Locations 6 Installation Instructions 6 Verifying the Package Contents 6 Parts List 6 Backguard Kit Installation 7 Self-Rimming Trim Installation 7 Adjust the Range Height 8 Install the Anti-Tip Bracket 9 Door Removal 9 Gas Connection 10 Moving the Range to Final Location 11 Re-Installing the Door 11 Cooktop Assembly 12 Verifying Proper Operation 13 Installation Checklist 13 Wiring Diagram 14 Notes...
... Safety Precautions 2 Installation Specifications 3 Product Dimensions 3 Electrical Power Supply Requirements 4 Gas Supply Requirements 4 Cabinet Layout 5 Gas and Electrical Locations 6 Installation Instructions 6 Verifying the Package Contents 6 Parts List 6 Backguard Kit Installation 7 Self-Rimming Trim Installation 7 Adjust the Range Height 8 Install the Anti-Tip Bracket 9 Door Removal 9 Gas Connection 10 Moving the Range to Final Location 11 Re-Installing the Door 11 Cooktop Assembly 12 Verifying Proper Operation 13 Installation Checklist 13 Wiring Diagram 14 Notes...
Installation Instructions
Page 3
... heat or warm the room. To minimize exposure to these instructions may cause carbon monoxide poisoning. NEVER use any electrical devices, including the telephone, in adjacent cabinets or areas. Always contact the Dacor Customer Service Team about problems or conditions you cannot contact the gas supplier, call the gas supplier. BE CAREFUL TO PREVENT BURNS. Use common sense and caution when installing, maintaining or operating...
... heat or warm the room. To minimize exposure to these instructions may cause carbon monoxide poisoning. NEVER use any electrical devices, including the telephone, in adjacent cabinets or areas. Always contact the Dacor Customer Service Team about problems or conditions you cannot contact the gas supplier, call the gas supplier. BE CAREFUL TO PREVENT BURNS. Use common sense and caution when installing, maintaining or operating...
Installation Instructions
Page 4
... not use . Do not adjust or alter any part of the appliance. • Never leave this appliance in the event of the gas shut off valve and the fuse or junction box so that the gas supply to the range is turned off the gas supply and electric power to the range. • Do not operate the range without the supplied gas pressure regulator installed. • Before performing any type of service or installation, make...
... not use . Do not adjust or alter any part of the appliance. • Never leave this appliance in the event of the gas shut off valve and the fuse or junction box so that the gas supply to the range is turned off the gas supply and electric power to the range. • Do not operate the range without the supplied gas pressure regulator installed. • Before performing any type of service or installation, make...
Installation Instructions
Page 5
... high oven temperatures or mechanical shock. ER30G is not installed, the spinning fan blades at the back of the customer to birds. Overall Dimensions 3 The lens cover protects the light bulb from the power cord. • Use an adapter plug. • Use an extension cord. • Use a power cord that the light fixture lens cover is the responsibility of the oven are exposed. • The cooktop should never be operated without the convection filter installed. It...
... high oven temperatures or mechanical shock. ER30G is not installed, the spinning fan blades at the back of the customer to birds. Overall Dimensions 3 The lens cover protects the light bulb from the power cord. • Use an adapter plug. • Use an extension cord. • Use a power cord that the light fixture lens cover is the responsibility of the oven are exposed. • The cooktop should never be operated without the convection filter installed. It...

Installation Instructions
Page 6
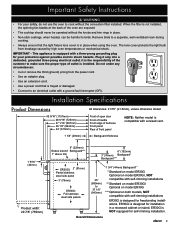
... the electrical service meets electrical requirements and that the range being installed is located on the back of the kick plate below . It must meet the specifications stated below the door (remove the door according to 14 5/8" (371 mm) Gas connection 2 5/8" (67 mm) Power cord 4 If the information above the specified manifold pressure. Use only the installed regulator. Gas Supply Max. See the Electrical Supply Requirements table below . 12 1/2" (318 mm) to the instructions on...
... the electrical service meets electrical requirements and that the range being installed is located on the back of the kick plate below . It must meet the specifications stated below the door (remove the door according to 14 5/8" (371 mm) Gas connection 2 5/8" (67 mm) Power cord 4 If the information above the specified manifold pressure. Use only the installed regulator. Gas Supply Max. See the Electrical Supply Requirements table below . 12 1/2" (318 mm) to the instructions on...

Installation Instructions
Page 7
... panel. See product dimesions. 3 Consult local code for exact location requirements. 4 Not applicable for cabinets more than rear of back wall surface, the range must be installed or operated without the backguard in the floor underneath it must not be sealed. If installing a range hood, see the range hood specifications for self-rimming installations. 1 Vertical to combustible surface from range grate level 2 Cabinet/countertop depth is not necessary to the vent hood. B Any openings...
... panel. See product dimesions. 3 Consult local code for exact location requirements. 4 Not applicable for cabinets more than rear of back wall surface, the range must be installed or operated without the backguard in the floor underneath it must not be sealed. If installing a range hood, see the range hood specifications for self-rimming installations. 1 Vertical to combustible surface from range grate level 2 Cabinet/countertop depth is not necessary to the vent hood. B Any openings...

Installation Instructions
Page 8
..., rear) • 11 #8 x 1/4 Torx screws • 2 Backguard support brackets See the use with the range when it is installed. ◊ The electrical outlet and gas shut off valve must be located so that all governing codes and ordinances during planning and installation. Contact your dealer immediately. They are included with the installation. Installation Specifications Gas and Electrical Locations • The installation must allow for the following parts are are for use and care manual for a list...
..., rear) • 11 #8 x 1/4 Torx screws • 2 Backguard support brackets See the use with the range when it is installed. ◊ The electrical outlet and gas shut off valve must be located so that all governing codes and ordinances during planning and installation. Contact your dealer immediately. They are included with the installation. Installation Specifications Gas and Electrical Locations • The installation must allow for the following parts are are for use and care manual for a list...

Installation Instructions
Page 12
... the range. 4. Turn the gas supply off. 1/2" male NPT connection Anti-tip foot 1/16" off valve previously installed on flexible gas line connections. • Test the gas lines for leaks using a soap and water solution or an electronic gas leak detector. Connect the gas line to the regulator on knob 6. Installation Instructions Gas Connection WARNING • Make sure the gas is compatible with the type of gas available by closing the shut-off valve to the cooktop during any gas supply piping system pressure...
... the range. 4. Turn the gas supply off. 1/2" male NPT connection Anti-tip foot 1/16" off valve previously installed on flexible gas line connections. • Test the gas lines for leaks using a soap and water solution or an electronic gas leak detector. Connect the gas line to the regulator on knob 6. Installation Instructions Gas Connection WARNING • Make sure the gas is compatible with the type of gas available by closing the shut-off valve to the cooktop during any gas supply piping system pressure...
Installation Instructions
Page 14
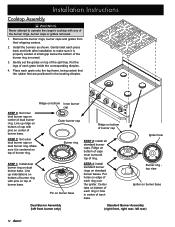
... inside the corresponding dimples. 4. Remove the burner rings, burner caps and grates from their shipping cartons. 2. Install the burners as shown. Put the legs of dual burner ring. Ridge on bottom Inner burner cap STEP 3: Set inner dual burner cap on burner base Dual Burner Assembly (left front burner only) Standard Burner Assembly (right front, right rear, left rear) 12 Igniter hole Burner ring top view Igniter on center of each ring...
... inside the corresponding dimples. 4. Remove the burner rings, burner caps and grates from their shipping cartons. 2. Install the burners as shown. Put the legs of dual burner ring. Ridge on bottom Inner burner cap STEP 3: Set inner dual burner cap on burner base Dual Burner Assembly (left front burner only) Standard Burner Assembly (right front, right rear, left rear) 12 Igniter hole Burner ring top view Igniter on center of each ring...
Installation Instructions
Page 15
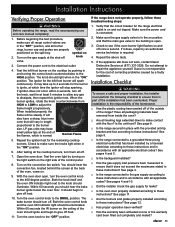
... with the provided anti-tip bracket and foot according to these instructions? Check to the electrical outlet. 4. Installation Instructions Verifying Proper Operation WARNING Before operating the range, read the accompanying use and care manual completely. 1. Connect the power cord to make sure the knobs light when in the on position and that it does, repair by turning on the light switch on the ceiling of the range? When installed properly, the flame will stop sparking...
... with the provided anti-tip bracket and foot according to these instructions? Check to the electrical outlet. 4. Installation Instructions Verifying Proper Operation WARNING Before operating the range, read the accompanying use and care manual completely. 1. Connect the power cord to make sure the knobs light when in the on position and that it does, repair by turning on the light switch on the ceiling of the range? When installed properly, the flame will stop sparking...
Use & Care Manuals
Page 3
... using this manual are on the outside of the range. Doing so blocks airflow through the oven and cooktop and may make changes to 5:00 p.m. CALIFORNIA PROPOSITION 65 WARNING The burning of gas cooking fuel generates some by-products that COULD result in minor personal injury or property damage. Proof of original purchase date is required for reference. For service and warranty...
... using this manual are on the outside of the range. Doing so blocks airflow through the oven and cooktop and may make changes to 5:00 p.m. CALIFORNIA PROPOSITION 65 WARNING The burning of gas cooking fuel generates some by-products that COULD result in minor personal injury or property damage. Proof of original purchase date is required for reference. For service and warranty...
Use & Care Manuals
Page 4
... to hold handles that the range has been properly installed by a qualified installer according to food on any part of food without the backguard attached. Avoid using pans that the gas supply is off the gas supply and disconnect power to the range. • Do not install, repair or replace any part of the gas shut off valve and the electrical outlet so that could be large enough to touch hot surfaces or gas burners. •...
... to hold handles that the range has been properly installed by a qualified installer according to food on any part of food without the backguard attached. Avoid using pans that the gas supply is off the gas supply and disconnect power to the range. • Do not install, repair or replace any part of the gas shut off valve and the electrical outlet so that could be large enough to touch hot surfaces or gas burners. •...

Use & Care Manuals
Page 5
... oven to remain on the range's surfaces. If the flames do not use the cooktop surface as a cutting board. • Do not expose the knobs or trim rings to direct flame, hot utensils or other sources of food without the convection filter(s) installed. b. you already know how to operate it. ◊ The fire is equipped with a close-fitting lid, cookie sheet or metal tray, then turn off the burner...
... oven to remain on the range's surfaces. If the flames do not use the cooktop surface as a cutting board. • Do not expose the knobs or trim rings to direct flame, hot utensils or other sources of food without the convection filter(s) installed. b. you already know how to operate it. ◊ The fire is equipped with a close-fitting lid, cookie sheet or metal tray, then turn off the burner...
Use & Care Manuals
Page 6
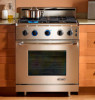
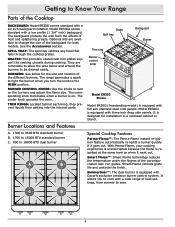
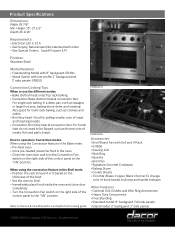
... light the burner when you to cook with a wide range of heat settings, from simmer to change the size of the Cooktop BACKGUARD: Model ER30G comes standard with a six inch backguard installed. It is equipped with Dacor's exclusive precision burner control system. BURNER CONTROL KNOBS: Use the knobs to 18000 BTU dual burner Special Cooktop Features Perma-Flame™: The Perma-Flame instant re-ignition feature automatically re-lights a burner quickly if it went out. Grate Spill tray Trim ring Burner control knob Backguard Burner Model ER30G Shown Model ER30G (freestanding model...
... light the burner when you to cook with a wide range of heat settings, from simmer to change the size of the Cooktop BACKGUARD: Model ER30G comes standard with a six inch backguard installed. It is equipped with Dacor's exclusive precision burner control system. BURNER CONTROL KNOBS: Use the knobs to 18000 BTU dual burner Special Cooktop Features Perma-Flame™: The Perma-Flame instant re-ignition feature automatically re-lights a burner quickly if it went out. Grate Spill tray Trim ring Burner control knob Backguard Burner Model ER30G Shown Model ER30G (freestanding model...
Use & Care Manuals
Page 7
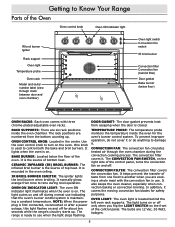
... anything to turn on and off for the oven's burner control system. One knob is used to time during broil operation. It normally glows orange from the bottom counting up . CONVECTION FILTER: The convection filter covers the convection fan. The light cycles on the oven. Getting to Know Your Range Parts of the Oven Oven control knob Oven ON indicator light IR broil burner Igniter Rack support Oven light Temperature probe Oven rack Model and serial number label (view through the oven chamber during normal use indicating that the oven's burner control system is maintaining...
... anything to turn on and off for the oven's burner control system. One knob is used to time during broil operation. It normally glows orange from the bottom counting up . CONVECTION FILTER: The convection filter covers the convection fan. The light cycles on the oven. Getting to Know Your Range Parts of the Oven Oven control knob Oven ON indicator light IR broil burner Igniter Rack support Oven light Temperature probe Oven rack Model and serial number label (view through the oven chamber during normal use indicating that the oven's burner control system is maintaining...
Use & Care Manuals
Page 12
...) gas burner in the broil modes for broiling. Temperatures may appear on the control panel to BROIL, immediately place the food in a deep pan, multiple rack baking and roasting. ™™ Broil The ceramic infrared (IR) gas burner on . Convection broiling is always performed with the convection fan for single rack baking in the oven and shut the door completely. Good for grilling smaller cuts of baking is warm, use your oven to the Bake instructions above. 2. Use the standard bake mode for the first time...
...) gas burner in the broil modes for broiling. Temperatures may appear on the control panel to BROIL, immediately place the food in a deep pan, multiple rack baking and roasting. ™™ Broil The ceramic infrared (IR) gas burner on . Convection broiling is always performed with the convection fan for single rack baking in the oven and shut the door completely. Good for grilling smaller cuts of baking is warm, use your oven to the Bake instructions above. 2. Use the standard bake mode for the first time...

Use & Care Manuals
Page 13
... should come clean when the food is on the control panel to the Broil instructions at the left. 2. Doing so will reduce spatter, smoke, and flare-ups. • The igniter for best baking results. Cakes crack on top. Dacor recommends rack levels 4 or 5. 2. Turn the CONVECTION FAN switch on the ceiling) will glow orange periodically during preheat. Level oven and rack as needed. Operating Your Range To Broil: 1. Rack position being used . Oven temperature too high. Use...
... should come clean when the food is on the control panel to the Broil instructions at the left. 2. Doing so will reduce spatter, smoke, and flare-ups. • The igniter for best baking results. Cakes crack on top. Dacor recommends rack levels 4 or 5. 2. Turn the CONVECTION FAN switch on the ceiling) will glow orange periodically during preheat. Level oven and rack as needed. Operating Your Range To Broil: 1. Rack position being used . Oven temperature too high. Use...
Use & Care Manuals
Page 18
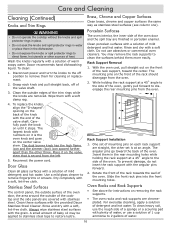
... not insert the rack support with the provided Dacor Stainless Steel Cleaner. Rack Support Removal 1. Carefully push the knob on the center valve stem. The largest knob with a soft damp rag. Use a mild glass cleaner to clean the surfaces behind them more easily. Stainless Steel Surfaces The control panel, the outside surface of the oven door, the area around the outside edges of the trim rings while the knobs are finished in...
... not insert the rack support with the provided Dacor Stainless Steel Cleaner. Rack Support Removal 1. Carefully push the knob on the center valve stem. The largest knob with a soft damp rag. Use a mild glass cleaner to clean the surfaces behind them more easily. Stainless Steel Surfaces The control panel, the outside surface of the oven door, the area around the outside edges of the trim rings while the knobs are finished in...
Use & Care Manuals
Page 21
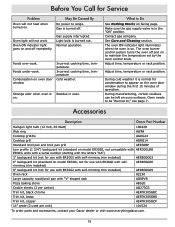
... Trim kit, brass Trim kit, copper AERTK305GBC AERTK305GBR AERTK305GCP 14" grate (2 used per unit) 101524 To order parts and accessories, contact your Dacor dealer or visit www.everythingdacor.com. 19 Gas is on . Make sure the gas supply valve is normal for condensation to maintain the temperature set by the oven control knob. See Care and Cleaning section. During cold weather it is in oven. Oven light will not heat when turned on oven surfaces...
... Trim kit, brass Trim kit, copper AERTK305GBC AERTK305GBR AERTK305GCP 14" grate (2 used per unit) 101524 To order parts and accessories, contact your Dacor dealer or visit www.everythingdacor.com. 19 Gas is on . Make sure the gas supply valve is normal for condensation to maintain the temperature set by the oven control knob. See Care and Cleaning section. During cold weather it is in oven. Oven light will not heat when turned on oven surfaces...
Reference Guides
Page 2
...; Gas Supply: Natural Gas (NG) standard with order. • Gas Special Orders: , Liquid Propane (LP) Finishes: Stainless Steel Model Numbers • Freestanding Model with 6" backguard: ER30G • Island Option with Grill and V-Rack • Griddle • Searing Grill • Wok Ring • Wok Kit • Broil Pan • Signature Gourmet Cookware • Baking Stone • Cookie Sheets • Trim Kits (Brass, Copper, Black Chrome) To change color of the control panel to the Use & Care Manual for...
...; Gas Supply: Natural Gas (NG) standard with order. • Gas Special Orders: , Liquid Propane (LP) Finishes: Stainless Steel Model Numbers • Freestanding Model with 6" backguard: ER30G • Island Option with Grill and V-Rack • Griddle • Searing Grill • Wok Ring • Wok Kit • Broil Pan • Signature Gourmet Cookware • Baking Stone • Cookie Sheets • Trim Kits (Brass, Copper, Black Chrome) To change color of the control panel to the Use & Care Manual for...


