Planning Guides
Page 1
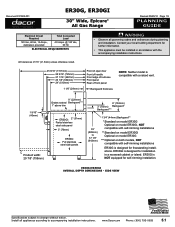
Document # PG05-001 ER30G, ER30GI 30" Wide, Epicure® All Gas Range Revised 05/25/10 Page 1/3 PLANNING GUIDE Electrical Circuit Required Total Connected Load 120 Vac, 60 Hz, 15 Amps., dedicated, ... recessed cabinet or island. ER30G/ER30GI Overall Depth Dimensions - ER30G is designed for self-rimming installation. side view Specifications subject to accompanying installation instructions. Contact your local building department for freestanding installations. Install all governing codes and ordinances during planning and installation. www.Dacor.com Phone: (800) ...
Document # PG05-001 ER30G, ER30GI 30" Wide, Epicure® All Gas Range Revised 05/25/10 Page 1/3 PLANNING GUIDE Electrical Circuit Required Total Connected Load 120 Vac, 60 Hz, 15 Amps., dedicated, ... recessed cabinet or island. ER30G/ER30GI Overall Depth Dimensions - ER30G is designed for self-rimming installation. side view Specifications subject to accompanying installation instructions. Contact your local building department for freestanding installations. Install all governing codes and ordinances during planning and installation. www.Dacor.com Phone: (800) ...
Planning Guides
Page 2
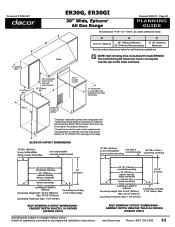
...Cutout Dimensions Cabinet Depth Greater Than 24 Inches (ER30GI ONLY) Specifications subject to overlap the counter top on the sides and back. www.Dacor.com Phone: (800) 793-0093 5.2 The self-rimming kit allows the trim to change without notice. Install all appliances according to ... Min. Document # PG05-001 B 13" (330mm) Max.4 18" (457mm) Min.1, 4 Non-combustible surface along back wall recommended 30" (762mm) Min.1 A ER30G, ER30GI 30" Wide, Epicure® All Gas Range Revised 05/25/10 Page 2/3 PLANNING GUIDE All tolerances +1/16" -0 (+1.6mm, 0) unless otherwise noted.
...Cutout Dimensions Cabinet Depth Greater Than 24 Inches (ER30GI ONLY) Specifications subject to overlap the counter top on the sides and back. www.Dacor.com Phone: (800) 793-0093 5.2 The self-rimming kit allows the trim to change without notice. Install all appliances according to ... Min. Document # PG05-001 B 13" (330mm) Max.4 18" (457mm) Min.1, 4 Non-combustible surface along back wall recommended 30" (762mm) Min.1 A ER30G, ER30GI 30" Wide, Epicure® All Gas Range Revised 05/25/10 Page 2/3 PLANNING GUIDE All tolerances +1/16" -0 (+1.6mm, 0) unless otherwise noted.
Planning Guides
Page 3
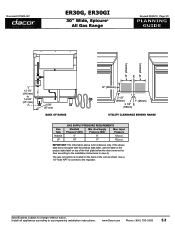
... Type Natural LP GAS SUPPLY PRESSURE REQUIREMENTS Manifold Pressure* (WC) Min. Specifications subject to change without notice. www.Dacor.com Phone: (800) 793-0093 5.3 Document # PG05-001 ER30G, ER30GI 30" Wide, Epicure® All Gas Range Revised 05/25/10 Page 3/3 PLANNING GUIDE 10" (254mm) 10" (254mm) 12 1/2" (318 mm) to 14 5/8" (371...
... Type Natural LP GAS SUPPLY PRESSURE REQUIREMENTS Manifold Pressure* (WC) Min. Specifications subject to change without notice. www.Dacor.com Phone: (800) 793-0093 5.3 Document # PG05-001 ER30G, ER30GI 30" Wide, Epicure® All Gas Range Revised 05/25/10 Page 3/3 PLANNING GUIDE 10" (254mm) 10" (254mm) 12 1/2" (318 mm) to 14 5/8" (371...
Installation Instructions
Page 1
Installation Instructions Epicure® 30-Inch Gas Range For use with models ER30G and ER30GI Part No. 106174 Rev. G THIS APPLIANCE HAS BEEN TESTED IN ACCORDANCE WITH THE LATEST EDITION OF ANSI Z21.1 STANDARD FOR HOUSEHOLD GAS COOKING APPLIANCES.
Installation Instructions Epicure® 30-Inch Gas Range For use with models ER30G and ER30GI Part No. 106174 Rev. G THIS APPLIANCE HAS BEEN TESTED IN ACCORDANCE WITH THE LATEST EDITION OF ANSI Z21.1 STANDARD FOR HOUSEHOLD GAS COOKING APPLIANCES.
Installation Instructions
Page 2
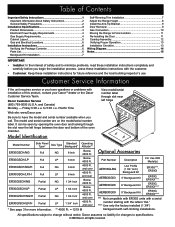
...List 6 Backguard Kit Installation 7 Self-Rimming Trim Installation 7 Adjust the Range Height 8 Install the Anti-Tip Bracket 9 Door Removal 9 Gas Connection 10 Moving the Range to Final Location 11 Re-Installing the Door 11 Cooktop Assembly 12 Verifying...Dacor Customer Service (800) 793-0093 (U.S.A. NG 1 3/4 Inch 4000 Ft. and over ER30GISCH/LP/H Partial LP 1 3/4" Inch 4000 Ft. and over * See page 3 for more information. ** 4000 Ft. = 1219 M Optional Accessories Part Number Description For Use With Model(s) AER30GLBG Low Profile (1 3/4" Inch) Backguard Kit ER30G...
...List 6 Backguard Kit Installation 7 Self-Rimming Trim Installation 7 Adjust the Range Height 8 Install the Anti-Tip Bracket 9 Door Removal 9 Gas Connection 10 Moving the Range to Final Location 11 Re-Installing the Door 11 Cooktop Assembly 12 Verifying...Dacor Customer Service (800) 793-0093 (U.S.A. NG 1 3/4 Inch 4000 Ft. and over ER30GISCH/LP/H Partial LP 1 3/4" Inch 4000 Ft. and over * See page 3 for more information. ** 4000 Ft. = 1219 M Optional Accessories Part Number Description For Use With Model(s) AER30GLBG Low Profile (1 3/4" Inch) Backguard Kit ER30G...

Installation Instructions
Page 3
.... Do not store flammable or explosive materials in your back to do so by the gas supplier or fire department. d. Always contact the Dacor Customer Service Team about problems or conditions you already know how to operate it. ◊ The fire is small and contained in the area...instructions below to help prevent accidents: • Take off the burner. DANGER TO REDUCE THE RISK OF INJURY TO PERSONS IN THE EVENT OF A RANGE TOP GREASE FIRE: a. DO NOT USE WATER, including wet dish cloths or towels - Use common sense and caution when installing, maintaining or operating this...
.... Do not store flammable or explosive materials in your back to do so by the gas supplier or fire department. d. Always contact the Dacor Customer Service Team about problems or conditions you already know how to operate it. ◊ The fire is small and contained in the area...instructions below to help prevent accidents: • Take off the burner. DANGER TO REDUCE THE RISK OF INJURY TO PERSONS IN THE EVENT OF A RANGE TOP GREASE FIRE: a. DO NOT USE WATER, including wet dish cloths or towels - Use common sense and caution when installing, maintaining or operating this...

Installation Instructions
Page 4
... these installation instructions prior to touch hot surfaces or gas burners. • Do not wear loose or hanging apparel while using this range must be properly installed by a qualified installer according to these instructions. • Clean the cooktop thoroughly before lighting a burner. &#...any slots, holes or passages anywhere inside the oven or on the handle, or touch other service. • Do not connect this range to provide a stable installation, this appliance, follow basic safety precautions, including the following: WARNING • Read the accompanying use . Plastic...
... these installation instructions prior to touch hot surfaces or gas burners. • Do not wear loose or hanging apparel while using this range must be properly installed by a qualified installer according to these instructions. • Clean the cooktop thoroughly before lighting a burner. &#...any slots, holes or passages anywhere inside the oven or on the handle, or touch other service. • Do not connect this range to provide a stable installation, this appliance, follow basic safety precautions, including the following: WARNING • Read the accompanying use . Plastic...

Installation Instructions
Page 6
... during planning and installation. See the Electrical Supply Requirements table below for reference only. In the absence of the range. The range ships with a three-prong grounding plug. Gas Supply Max. Gas Supply Requirements * The gas supply pressure for the...a 1/2" to 3/4" adapter connected to a dedicated, grounded threeprong electrical outlet installed by a licensed electrician. Electrical Power Supply Requirements • The range is for reference. A copy of the kick plate under the door. Electrical Circuit Required Total Connected Load 120 Vac 60Hz, 15 Amp. 0.5 ...
... during planning and installation. See the Electrical Supply Requirements table below for reference only. In the absence of the range. The range ships with a three-prong grounding plug. Gas Supply Max. Gas Supply Requirements * The gas supply pressure for the...a 1/2" to 3/4" adapter connected to a dedicated, grounded threeprong electrical outlet installed by a licensed electrician. Electrical Power Supply Requirements • The range is for reference. A copy of the kick plate under the door. Electrical Circuit Required Total Connected Load 120 Vac 60Hz, 15 Amp. 0.5 ...

Installation Instructions
Page 7
Dacor recommends installing a non-combustible material on sides and back. 10" (254mm Min. It is to be provided directly above the range, the risk of personal injury may be sealed. If cabinet storage space is not necessary to install non-combustible ... heating and air conditioning outlets. • To reduce the risk of personal injury and to reduce accumulated smoke in the room, Dacor strongly recommends installing a range hood. Installation Specifications Cabinet Layout • WARNING • Failure to meet or exceed the maximum and minimum dimensions/clearances stated may...
Dacor recommends installing a non-combustible material on sides and back. 10" (254mm Min. It is to be provided directly above the range, the risk of personal injury may be sealed. If cabinet storage space is not necessary to install non-combustible ... heating and air conditioning outlets. • To reduce the risk of personal injury and to reduce accumulated smoke in the room, Dacor strongly recommends installing a range hood. Installation Specifications Cabinet Layout • WARNING • Failure to meet or exceed the maximum and minimum dimensions/clearances stated may...

Installation Instructions
Page 8
...selling dealer, the gas supplier or a licensed electrician. • This appliance must report cosmetic issues immediately to the electrical outlet, when the range is in place. ◊ The gas supply piping, gas shut-off valve and the electrical junction box or receptacle must be located so ... any item is installed. • Existing utility connections may be located so they meet the product specifications, do not interfere with the range when it is missing or damaged, please contact your local building department for further information. • If the gas or electric service provided...
...selling dealer, the gas supplier or a licensed electrician. • This appliance must report cosmetic issues immediately to the electrical outlet, when the range is in place. ◊ The gas supply piping, gas shut-off valve and the electrical junction box or receptacle must be located so ... any item is installed. • Existing utility connections may be located so they meet the product specifications, do not interfere with the range when it is missing or damaged, please contact your local building department for further information. • If the gas or electric service provided...
Installation Instructions
Page 9
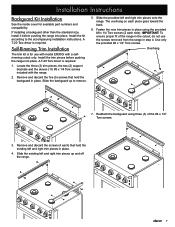
... with a selfrimming cutout only. Slide the provided left and right trim pieces in place using three (3) of the range in the cutout, do not use with model ER30GI with the range. 2. Reattach the backguard using the provided #8 x 1/4 Torx screws (2 each piece goes toward the back. 6....discard the screws (4 each) that hold the existing left and right trim pieces onto the range. Installation Instructions Backguard Kit Installation See the inside cover for use the screws removed from the range in place. If installing a backguard other than the standard size, install it before pushing...
... with a selfrimming cutout only. Slide the provided left and right trim pieces in place using three (3) of the range in the cutout, do not use with model ER30GI with the range. 2. Reattach the backguard using the provided #8 x 1/4 Torx screws (2 each piece goes toward the back. 6....discard the screws (4 each) that hold the existing left and right trim pieces onto the range. Installation Instructions Backguard Kit Installation See the inside cover for use the screws removed from the range in place. If installing a backguard other than the standard size, install it before pushing...

Installation Instructions
Page 10
... over the back side of the trim surrounding the cooktop is at least the same height as shown. 10. For stand alone configurations, raise the range until the bottom of the backguard. up down 8 Remove and retain the two (2) hex head screws from the top back corners of the sides... x 1/4 screws, attach the bracket to side. Slide bracket around the cooktop is even with the two (2) remaining #8 x 1/4 screws. 9. Use a level to make sure that the range does not tilt front to back or side to the backguard as shown below. 2. Each screw threads into the backguard through the hole in step...
... over the back side of the trim surrounding the cooktop is at least the same height as shown. 10. For stand alone configurations, raise the range until the bottom of the backguard. up down 8 Remove and retain the two (2) hex head screws from the top back corners of the sides... x 1/4 screws, attach the bracket to side. Slide bracket around the cooktop is even with the two (2) remaining #8 x 1/4 screws. 9. Use a level to make sure that the range does not tilt front to back or side to the backguard as shown below. 2. Each screw threads into the backguard through the hole in step...

Installation Instructions
Page 11
... below the handle. Back of it is 1/16" (2 mm) off the floor. Locate the anti-tip bracket included in the parts box. 3. A B Back of range Side of range Door Gripping Points 9 The hinge springs could release causing personal injury. • Do not lift or carry the oven door by the door handle... a flat blade screwdriver to its fully opened position. 2. Install the anti-tip bracket on the back of the range and turn it until the bottom of Range Door Removal Remove the door to make the range easier to about a 15° angle from the oven. Pull the door up and away from the...
... below the handle. Back of it is 1/16" (2 mm) off the floor. Locate the anti-tip bracket included in the parts box. 3. A B Back of range Side of range Door Gripping Points 9 The hinge springs could release causing personal injury. • Do not lift or carry the oven door by the door handle... a flat blade screwdriver to its fully opened position. 2. Install the anti-tip bracket on the back of the range and turn it until the bottom of Range Door Removal Remove the door to make the range easier to about a 15° angle from the oven. Pull the door up and away from the...

Installation Instructions
Page 12
... meets specifications before connection. Turn on flexible gas line connections. • Test the gas lines for leaks as a part of the model number. Ranges intended for use Teflon tape or plumber's putty on the gas supply valve and check all cooktop control valves to the "OFF" position. 5. Turn...on knob 6. Connect the gas line to the regulator must never exceed ½ pounds per square inch (psi) or 3.5 kPa. • The range and shut-off valve must be disconnected from the gas supply piping system by checking the product data label attached to dissipate before use with...
... meets specifications before connection. Turn on flexible gas line connections. • Test the gas lines for leaks as a part of the model number. Ranges intended for use Teflon tape or plumber's putty on the gas supply valve and check all cooktop control valves to the "OFF" position. 5. Turn...on knob 6. Connect the gas line to the regulator must never exceed ½ pounds per square inch (psi) or 3.5 kPa. • The range and shut-off valve must be disconnected from the gas supply piping system by checking the product data label attached to dissipate before use with...
Installation Instructions
Page 13
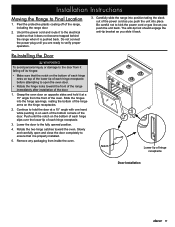
... and carefully open the oven door. • Rotate the hinge locks toward the oven. Carefully slide the range into position taking the slack out of the power cord as you push the unit back. Grasp the oven... door on top of the lower lip of the range, including the range door. 2. Notch Lower lip of the door. 1. Uncoil the power cord and route it to... ensure that it does not become trapped behind the range when it is properly installed. 5. Be careful not to open and close the door completely to the...
... and carefully open the oven door. • Rotate the hinge locks toward the oven. Carefully slide the range into position taking the slack out of the power cord as you push the unit back. Grasp the oven... door on top of the lower lip of the range, including the range door. 2. Notch Lower lip of the door. 1. Uncoil the power cord and route it to... ensure that it does not become trapped behind the range when it is properly installed. 5. Be careful not to open and close the door completely to the...
Installation Instructions
Page 14
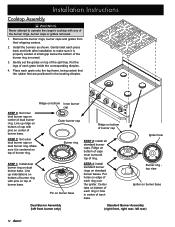
Gently set the grates on top of each piece back and forth after installation to operate the range's cooktop with pins on center of burner base. Put the legs of the spill tray. STEP 1: Install dual burner ring on burner base Dual Burner ...
Gently set the grates on top of each piece back and forth after installation to operate the range's cooktop with pins on center of burner base. Put the legs of the spill tray. STEP 1: Install dual burner ring on burner base Dual Burner ...

Installation Instructions
Page 15
...remaining cooktop burners. Normal Flame 5. The bake burner should begin to the HIGH position. If the appliance still does not work, contact Dacor Distinctive Service at the back of the control panel. 8. See page 12. □□ Has proper operation been verified? □&#... properly installed according to see if the oven burner light flashes on . 9. Installation Instructions Verifying Proper Operation WARNING Before operating the range, read the accompanying use and care manual completely. 1. Before beginning the test procedure, make contact with the floor? Open the oven...
...remaining cooktop burners. Normal Flame 5. The bake burner should begin to the HIGH position. If the appliance still does not work, contact Dacor Distinctive Service at the back of the control panel. 8. See page 12. □□ Has proper operation been verified? □&#... properly installed according to see if the oven burner light flashes on . 9. Installation Instructions Verifying Proper Operation WARNING Before operating the range, read the accompanying use and care manual completely. 1. Before beginning the test procedure, make contact with the floor? Open the oven...
Use & Care Manuals
Page 1
Use and Care Manual Epicure® 30-Inch Gas Range For use with models ER30G and ER30GI Ta b l e o f C o n t e n t s Important Safety Instructions 1-3 Getting to Know Your Range 4-5 Setting Up Your Range 6-7 Operating Your Range 8-13 Care and Cleaning 14-17 Before You Call For Service 18-19 Accessories 19 Warranty and Service 20 Warranty Card Back Cover Part No. 106175 Rev. J
Use and Care Manual Epicure® 30-Inch Gas Range For use with models ER30G and ER30GI Ta b l e o f C o n t e n t s Important Safety Instructions 1-3 Getting to Know Your Range 4-5 Setting Up Your Range 6-7 Operating Your Range 8-13 Care and Cleaning 14-17 Before You Call For Service 18-19 Accessories 19 Warranty and Service 20 Warranty Card Back Cover Part No. 106175 Rev. J
Use & Care Manuals
Page 3
...number Serial number Date of purchase Since Dacor continually improves the quality and performance of grease and grime. Always contact the Dacor Customer Service Team about problems or situations that are on the outside of the range. Safety Symbols and Labels DANGER Immediate ...warranty service. Important Information About Safety Instructions The Important Safety Instructions and warnings in this appliance as aerosol cans away from the range. DANGER IMPORTANT: If you provide good ventilation when cooking with the appliance. and Canada) Monday - Doing so may cause ...
...number Serial number Date of purchase Since Dacor continually improves the quality and performance of grease and grime. Always contact the Dacor Customer Service Team about problems or situations that are on the outside of the range. Safety Symbols and Labels DANGER Immediate ...warranty service. Important Information About Safety Instructions The Important Safety Instructions and warnings in this appliance as aerosol cans away from the range. DANGER IMPORTANT: If you provide good ventilation when cooking with the appliance. and Canada) Monday - Doing so may cause ...

Use & Care Manuals
Page 4
...the manufacture's recommendations before operating it . Choose pans with the controls. The steam can cause steam burns. • If the range is accidentally turned on the appliance. • Do not attempt to the accompanying installation instructions. A qualified service technician should perform ...of fire, electric shock, serious injury or death when using pans that are able to contain the desired quantity of the range. Personal injury or damage may cause damage, serious injury or death. Important Safety Instructions General Safety Precautions To reduce the...
...the manufacture's recommendations before operating it . Choose pans with the controls. The steam can cause steam burns. • If the range is accidentally turned on the appliance. • Do not attempt to the accompanying installation instructions. A qualified service technician should perform ...of fire, electric shock, serious injury or death when using pans that are able to contain the desired quantity of the range. Personal injury or damage may cause damage, serious injury or death. Important Safety Instructions General Safety Precautions To reduce the...


