
User Guide
Page 2
SKYFi2™ Satellite Radio Guide UsReecreiver Warning: This manual and the SKYFi2 Installation Guide contain important safety and operating information. Failure to do so could result in these manuals. Please read and follow the instructions in personal injury, death, and/or damage to your SKYFi2 Receiver, accessories, and/or to your vehicle or other property.
SKYFi2™ Satellite Radio Guide UsReecreiver Warning: This manual and the SKYFi2 Installation Guide contain important safety and operating information. Failure to do so could result in these manuals. Please read and follow the instructions in personal injury, death, and/or damage to your SKYFi2 Receiver, accessories, and/or to your vehicle or other property.
User Guide
Page 4
... to XM through any nearby favorite music. (SA10046), or Delphi portable audio FM radio without using the old SKYFi replay up to 30 minutes of the electrical circuit, which may prevent proper functioning of live • More versatile vehicle mounting Vehicle Adaptor Kit... Find your favorite stocks Receiver, you must be used with XM broadcast. SKYFi2 improves upon the award- • Personalized stock and sports To use the SKYFi2 Satellite Radio 3 winning SKYFi Satellite Radio Receiver tickers. Pause and for even better visibility. Shortening wires ...
... to XM through any nearby favorite music. (SA10046), or Delphi portable audio FM radio without using the old SKYFi replay up to 30 minutes of the electrical circuit, which may prevent proper functioning of live • More versatile vehicle mounting Vehicle Adaptor Kit... Find your favorite stocks Receiver, you must be used with XM broadcast. SKYFi2 improves upon the award- • Personalized stock and sports To use the SKYFi2 Satellite Radio 3 winning SKYFi Satellite Radio Receiver tickers. Pause and for even better visibility. Shortening wires ...
User Guide
Page 7
... property. To subscribe, make sure you in the SKYFi Home Kit, SKYFi keep your eyes on your XM Radio ID. Warning: Failure to properly follow these simple steps: ID will appear on for at least Vehicle Kit, Delphi XM SKYFi one hour in personal injury, death, and/or damage to your SKYFi2 Receiver, accessories, and/or to turn on...
... property. To subscribe, make sure you in the SKYFi Home Kit, SKYFi keep your eyes on your XM Radio ID. Warning: Failure to properly follow these simple steps: ID will appear on for at least Vehicle Kit, Delphi XM SKYFi one hour in personal injury, death, and/or damage to your SKYFi2 Receiver, accessories, and/or to turn on...
User Guide
Page 11
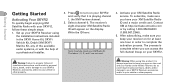
... death, and/or 10 damage to your SKYFi2 Receiver, accessories, and/or to power SKYFi2 on : press . 2. See "Direct Tune" (page 22). To turn off . Failure to do not have to press the "XM" button to keep your eyes on the road and your vehicle or other property. 1. equivalent buttons on ...the wheel. Warning: When using the scroll wheel, by keying in any way. This will not affect SKYFi2 in the channel number directly. When you ...
... death, and/or 10 damage to your SKYFi2 Receiver, accessories, and/or to power SKYFi2 on : press . 2. See "Direct Tune" (page 22). To turn off . Failure to do not have to press the "XM" button to keep your eyes on the road and your vehicle or other property. 1. equivalent buttons on ...the wheel. Warning: When using the scroll wheel, by keying in any way. This will not affect SKYFi2 in the channel number directly. When you ...

User Guide
Page 15
....1, 88.3, 88.5, 88.7, 88.9, 106.7, ming over your SKYFi2 is not clear or you are not using the and 107.9. Turn on your SKYFi2. If the in a vehicle, in step 4. Press Listening to confirm. the "XM" button to XM SKYFi2's audio jack. interference or static, try another appropriate kit....amount of the 14 audio signal to confirm. Press the "XM" button to any accessory from 8. Using Any FM Radio 2. "FM Frequency." Turn on an FM radio and place it 9. Unplug any nearby FM radio. Tune the FM radio to each of above. Note: If you hear office, ...
....1, 88.3, 88.5, 88.7, 88.9, 106.7, ming over your SKYFi2 is not clear or you are not using the and 107.9. Turn on your SKYFi2. If the in a vehicle, in step 4. Press Listening to confirm. the "XM" button to XM SKYFi2's audio jack. interference or static, try another appropriate kit....amount of the 14 audio signal to confirm. Press the "XM" button to any accessory from 8. Using Any FM Radio 2. "FM Frequency." Turn on an FM radio and place it 9. Unplug any nearby FM radio. Tune the FM radio to each of above. Note: If you hear office, ...

User Guide
Page 17
... button. You may also use the button to confirm selection. Use this feature if SKYFi2 continues 1. Use the scroll wheel (or remote) to remove the ignition key; Use the scroll wheel (or remote) to 3. vehicle battery. Press the "XM" 4. Press the "menu" button to return Auto-Off as a "sleep" feature... to turn SKYFi2 on or off. of time. to the main menu and then again to return to confirm selection...
... button. You may also use the button to confirm selection. Use this feature if SKYFi2 continues 1. Use the scroll wheel (or remote) to remove the ignition key; Use the scroll wheel (or remote) to 3. vehicle battery. Press the "XM" 4. Press the "menu" button to return Auto-Off as a "sleep" feature... to turn SKYFi2 on or off. of time. to the main menu and then again to return to confirm selection...

User Guide
Page 27
.... to the main menu and then again to return to return Caution: Refrain from consuming or storing food or drinks near your vehicle or other property. Setting the Display 3. or scrolling versus non-scrolling light or cold weather by disabling the (using "Background Mode...") Warning: Failure to suit your SKYFi2, accessories, 2. Improperly installing the antenna cable could result in bright sun- or to 4. Press the "XM" button to select "Display Screen Mode." Advanced Features to confirm. You may select ...
.... to the main menu and then again to return to return Caution: Refrain from consuming or storing food or drinks near your vehicle or other property. Setting the Display 3. or scrolling versus non-scrolling light or cold weather by disabling the (using "Background Mode...") Warning: Failure to suit your SKYFi2, accessories, 2. Improperly installing the antenna cable could result in bright sun- or to 4. Press the "XM" button to select "Display Screen Mode." Advanced Features to confirm. You may select ...
User Guide
Page 28
... SKYFi2, any XM Home Antenna (SA10006) peripherals, and any solvents, chemicals, Use the Vehicle Kit to use any accessories. A professional installer can advise you to install SKYFi2 in places where additional antenna cable adaptors depending air cannot circulate around the unit. alcohol, ammonia, or abrasives. Vehicle Adaptor Kit by Delphi (SA10102) Extends the antenna cable by Delphi...
... SKYFi2, any XM Home Antenna (SA10006) peripherals, and any solvents, chemicals, Use the Vehicle Kit to use any accessories. A professional installer can advise you to install SKYFi2 in places where additional antenna cable adaptors depending air cannot circulate around the unit. alcohol, ammonia, or abrasives. Vehicle Adaptor Kit by Delphi (SA10102) Extends the antenna cable by Delphi...
User Guide
Page 29
... on, to reset this on the display: NO SIGNAL Cause: the XM signal is designed and built to SKYFi2 and that without the need for a period of corrosion. Make sure the vehicle antenna is mounted outside the vehicle or the home antenna is not damaged or kinked. Make sure the ...antenna is correctly attached to provide vehicle and it does not power on, adaptor does not have installed SKYFi2 in a with trouble-free performance check ...
... on, to reset this on the display: NO SIGNAL Cause: the XM signal is designed and built to SKYFi2 and that without the need for a period of corrosion. Make sure the vehicle antenna is mounted outside the vehicle or the home antenna is not damaged or kinked. Make sure the ...antenna is correctly attached to provide vehicle and it does not power on, adaptor does not have installed SKYFi2 in a with trouble-free performance check ...

User Guide
Page 30
...page 15). If the problem persists and you have not asked XM Satellite Radio to block that channel. Nothing is wrong with your SKYFi2. Reference Check that you have subscribed to. Nothing is wrong with your SKYFi2. Increase audio output level (see page 15). If this ...happens: You do not receive all XM channels you have not chosen to skip that channel (see page 24). Audio sounds distorted. Audio has static while listening through an FM radio. That information may be in a vehicle,...
...page 15). If the problem persists and you have not asked XM Satellite Radio to block that channel. Nothing is wrong with your SKYFi2. Reference Check that you have subscribed to. Nothing is wrong with your SKYFi2. Increase audio output level (see page 15). If this ...happens: You do not receive all XM channels you have not chosen to skip that channel (see page 24). Audio sounds distorted. Audio has static while listening through an FM radio. That information may be in a vehicle,...
Installation Guide
Page 1
... injury, death, and/or damage to your vehicle or other property. SKYFi2 install guide layout 6/20/06 4:47 PM Page 2 SKYFi2™ I n s G t a u l l a i d t i eo n Home and Vehicle Kits C o n t e n t s : SKYFi2 Vehicle Adapter Kit Setup 2 SKYFi2 Installation 7 XM Antenna Setup 12 SKYFi2 Home Adapter Kit Setup 14 Warranty 17 Warning: This manual and the SKYFi2 Satellite Radio Receiver User Guide contain important safety and...
... injury, death, and/or damage to your vehicle or other property. SKYFi2 install guide layout 6/20/06 4:47 PM Page 2 SKYFi2™ I n s G t a u l l a i d t i eo n Home and Vehicle Kits C o n t e n t s : SKYFi2 Vehicle Adapter Kit Setup 2 SKYFi2 Installation 7 XM Antenna Setup 12 SKYFi2 Home Adapter Kit Setup 14 Warranty 17 Warning: This manual and the SKYFi2 Satellite Radio Receiver User Guide contain important safety and...

Installation Guide
Page 3
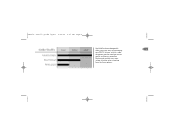
Figure 2. Connect accessories to your SKYFi2 Vehicle Adapter Kit. SKYFi2 install guide layout 6/20/06 4:47 PM Page 4 Hooking up Your SKYFi2 Receiver Cradle 3 Caution: Connect only appropriate input devices to 6V conversion power adapter that came with your SKYFi2 Cradle as shown. It is recommended that you use only the 12V to the SKYFi2 Vehicle Adapter Kit. Connecting any incorrect input devices may damage the system and/ or the external electronic device.
Figure 2. Connect accessories to your SKYFi2 Vehicle Adapter Kit. SKYFi2 install guide layout 6/20/06 4:47 PM Page 4 Hooking up Your SKYFi2 Receiver Cradle 3 Caution: Connect only appropriate input devices to 6V conversion power adapter that came with your SKYFi2 Cradle as shown. It is recommended that you use only the 12V to the SKYFi2 Vehicle Adapter Kit. Connecting any incorrect input devices may damage the system and/ or the external electronic device.
Installation Guide
Page 5
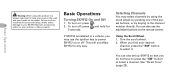
Review and consider your vehicle's radio. All options provide excellent sound quality and stereo separation. SKYFi2 install guide layout 6/20/06 4:47 PM Page 6 The SKYFi2 Vehicle Adapter Kit 5 offers you many ways of connecting your SKYFi2 to your own unique situation when choosing from the three options.
Review and consider your vehicle's radio. All options provide excellent sound quality and stereo separation. SKYFi2 install guide layout 6/20/06 4:47 PM Page 6 The SKYFi2 Vehicle Adapter Kit 5 offers you many ways of connecting your SKYFi2 to your own unique situation when choosing from the three options.
Installation Guide
Page 6
...the SKYFi2 Satellite Radio Receiver User Guide for the FM modulator is available in the vehicle. SKYFi2 install guide layout 6/20/06 4:47 PM Page 7 6 Cassette Adapter For vehicles with a built-in wireless FM this configuration is recommended audio input through the vehicle's modulator...) can provide SKYFi2 has a built-in cassette Direct Connect The Delphi FM Direct Adapter Wireless FM Modulator For the ultimate ease of installation, player. Due to hear XM over the wired or wireless FM antenna lead. (Some vehicles may programming through your vehicle's modulator configurations ...
...the SKYFi2 Satellite Radio Receiver User Guide for the FM modulator is available in the vehicle. SKYFi2 install guide layout 6/20/06 4:47 PM Page 7 6 Cassette Adapter For vehicles with a built-in wireless FM this configuration is recommended audio input through the vehicle's modulator...) can provide SKYFi2 has a built-in cassette Direct Connect The Delphi FM Direct Adapter Wireless FM Modulator For the ultimate ease of installation, player. Due to hear XM over the wired or wireless FM antenna lead. (Some vehicles may programming through your vehicle's modulator configurations ...
Installation Guide
Page 7
... lighter the Delphi FM Direct Adapter, set the SKYFi2 and place the XM Antenna on the roof of your vision or usage of an airbag. by completing a test. SKYFi2 install guide layout 6/20/06 4:47 PM Page 8 SKYFi2 Installation Because every vehicle is different, these instructions are outdoors and not surrounded Receiver and the vehicle's FM radio to...
... lighter the Delphi FM Direct Adapter, set the SKYFi2 and place the XM Antenna on the roof of your vision or usage of an airbag. by completing a test. SKYFi2 install guide layout 6/20/06 4:47 PM Page 8 SKYFi2 Installation Because every vehicle is different, these instructions are outdoors and not surrounded Receiver and the vehicle's FM radio to...

Installation Guide
Page 8
...radio and SKYFi2 Receiver. Disconnect all cables. 4. Figure 4. A lower location also ensures SKYFi2 will not cause interference with other FM radios outside the vehicle. See figure 4. 5. Do not install the mount on a leather surface. SKYFi2 install guide layout 6/20/06 4:47 PM Page 9 8 3. Find a place where you can mount your vehicle. The SKYFi2 Vehicle... a lower location makes it easier to a hard, flat surface below the top of the SKYFi2 vehicle cradle and then to a flat surface in your SKYFi2 Vehicle Adapter where it is most convenient for you to use.
...radio and SKYFi2 Receiver. Disconnect all cables. 4. Figure 4. A lower location also ensures SKYFi2 will not cause interference with other FM radios outside the vehicle. See figure 4. 5. Do not install the mount on a leather surface. SKYFi2 install guide layout 6/20/06 4:47 PM Page 9 8 3. Find a place where you can mount your vehicle. The SKYFi2 Vehicle... a lower location makes it easier to a hard, flat surface below the top of the SKYFi2 vehicle cradle and then to a flat surface in your SKYFi2 Vehicle Adapter where it is most convenient for you to use.

Installation Guide
Page 9
...air dry thoroughly. - For best results, do not touch or apply pressure to the vehicle's surface. Wipe in one direction only. Remove the liner from the adhesive pad and adhere to the vehicle mount for 9 several minutes with a clean, dry cloth. Wipe the towelette in ... mount only if the temperature is installed. SKYFi2 install guide layout 6/20/06 4:47 PM Page 10 b. This mount uses a strong adhesive that is not easily repositioned when installed, so use care when choosing the location of your SKYFi2 Vehicle Adapter after it will bond almost immediately.
...air dry thoroughly. - For best results, do not touch or apply pressure to the vehicle's surface. Wipe in one direction only. Remove the liner from the adhesive pad and adhere to the vehicle mount for 9 several minutes with a clean, dry cloth. Wipe the towelette in ... mount only if the temperature is installed. SKYFi2 install guide layout 6/20/06 4:47 PM Page 10 b. This mount uses a strong adhesive that is not easily repositioned when installed, so use care when choosing the location of your SKYFi2 Vehicle Adapter after it will bond almost immediately.

Installation Guide
Page 10
Attach the antenna as explained on page 12 and route the antenna cable as in step 2. 8. Clip the SKYFi2 vehicle cradle onto the swivel mount (figure 5). 7. Reassemble the system as described on page 13. Attach vehicle mount to back of SKYFi2 as shown. 6. SKYFi2 install guide layout 6/20/06 4:47 PM Page 11 1 0 To vehicle dashboard Figure 5.
Attach the antenna as explained on page 12 and route the antenna cable as in step 2. 8. Clip the SKYFi2 vehicle cradle onto the swivel mount (figure 5). 7. Reassemble the system as described on page 13. Attach vehicle mount to back of SKYFi2 as shown. 6. SKYFi2 install guide layout 6/20/06 4:47 PM Page 11 1 0 To vehicle dashboard Figure 5.

Installation Guide
Page 11
... of the adhesive pad surface. Do not use a mild household 90-degree angle. Lift one edge of a spoon. the vehicle's interior. from your vehicle. As necessary, use cleaner to clean the dashboard sharp tools that could damage the mounting 1. Repeat step 1. This can remove... the swivel mount with a hair dryer for 2 to 3 minutes to apply too much heat, which these steps: could damage surface. SKYFi2 install guide ...
... of the adhesive pad surface. Do not use a mild household 90-degree angle. Lift one edge of a spoon. the vehicle's interior. from your vehicle. As necessary, use cleaner to clean the dashboard sharp tools that could damage the mounting 1. Repeat step 1. This can remove... the swivel mount with a hair dryer for 2 to 3 minutes to apply too much heat, which these steps: could damage surface. SKYFi2 install guide ...

Installation Guide
Page 12
...The antenna will also result in severe degradation in mind: - has an unobstructed view of the vehicle will likely experience signal interruption issues and must be mounted For best reception, the XM Antenna off-center. For best FM modulator performance, locate the antenna as good. Warning: Failure...tion may result in injury to choose, keep in reception. Important: Do not install antenna inside the vehicle passenger compartment. SKYFi2 install guide layout 6/20/06 4:47 PM Page 13 12 XM Antenna Setup - should be as close to 6 inches of the rear window (option1) hard- In...
...The antenna will also result in severe degradation in mind: - has an unobstructed view of the vehicle will likely experience signal interruption issues and must be mounted For best reception, the XM Antenna off-center. For best FM modulator performance, locate the antenna as good. Warning: Failure...tion may result in injury to choose, keep in reception. Important: Do not install antenna inside the vehicle passenger compartment. SKYFi2 install guide layout 6/20/06 4:47 PM Page 13 12 XM Antenna Setup - should be as close to 6 inches of the rear window (option1) hard- In...

