
Product Manual
Page 3
Package Contents Contents of Package: D-Link AirPlusTM G DWL-G122 2.4 GHz Wireless USB 2.0 Adapter Manual on CD-ROM Quick Installation Guide Cradle If any of memory and a 500MHz processor Properly installed and working USB Controller 3 System Requirements: A computer or laptop with an available USB port Windows XP/2000 At least 64MB of the above items are missing, please contact your reseller.
Package Contents Contents of Package: D-Link AirPlusTM G DWL-G122 2.4 GHz Wireless USB 2.0 Adapter Manual on CD-ROM Quick Installation Guide Cradle If any of memory and a 500MHz processor Properly installed and working USB Controller 3 System Requirements: A computer or laptop with an available USB port Windows XP/2000 At least 64MB of the above items are missing, please contact your reseller.

Product Manual
Page 4
... a network with Microsoft Windows XP, Windows 2000 and other Windows operating systems to achieve the best available wireless signal reception - With transfer rates up and running on a wireless network in just a matter of seconds. With the optional USB cradle, the DWL-G122 can connect and interoperate ...it can be up to 54Mbps you use the Pre- Introduction The D-Link AirPlusTMG DWL-G122 Wireless USB Adapter is a convenient Plug & Play USB 2.0 solution that brings wireless networking to any wireless hotspot. The DWL-G122 connects to your deck or patio, by the pool, at a ...
... a network with Microsoft Windows XP, Windows 2000 and other Windows operating systems to achieve the best available wireless signal reception - With transfer rates up and running on a wireless network in just a matter of seconds. With the optional USB cradle, the DWL-G122 can connect and interoperate ...it can be up to 54Mbps you use the Pre- Introduction The D-Link AirPlusTMG DWL-G122 Wireless USB Adapter is a convenient Plug & Play USB 2.0 solution that brings wireless networking to any wireless hotspot. The DWL-G122 connects to your deck or patio, by the pool, at a ...

Product Manual
Page 11
... icon in the system tray Select the Wireless Networks tab. Using the Configuration Utility D-Link AirPlusTM G DWL-G122 uses the Configuration Utility as the management software. To use either the Zero Configuration Utility or the D-Link Configuration Utility. In the window that came with XP by clicking on the utility icon will appear. If the...
... icon in the system tray Select the Wireless Networks tab. Using the Configuration Utility D-Link AirPlusTM G DWL-G122 uses the Configuration Utility as the management software. To use either the Zero Configuration Utility or the D-Link Configuration Utility. In the window that came with XP by clicking on the utility icon will appear. If the...

Product Manual
Page 14
...either ASCII (e.g., a word) or hexadecimal format. ASCII (American Standard Code for Information Interchange) is visible to save changes. 14 the DWL-G122 is a code for representing English letters as numbers from 0-127. IEEE802.1X: Select Enabled or Disabled. Hexadecimal digits consist of the .... Click Apply to all devices on the network. Authentication Config: When you enable IEEE802.1X you click IP Settings in this window. Shared Authentication - allows communication only with other devices with identical WEP settings. Keys 1-4: Select the default key. The Advanced ...
...either ASCII (e.g., a word) or hexadecimal format. ASCII (American Standard Code for Information Interchange) is visible to save changes. 14 the DWL-G122 is a code for representing English letters as numbers from 0-127. IEEE802.1X: Select Enabled or Disabled. Hexadecimal digits consist of the .... Click Apply to all devices on the network. Authentication Config: When you enable IEEE802.1X you click IP Settings in this window. Shared Authentication - allows communication only with other devices with identical WEP settings. Keys 1-4: Select the default key. The Advanced ...

Product Manual
Page 16
... the current SSID. 16 Scroll up and down and highlight the profile that you can Add or Remove a profile, or configure the Properties of the window displays the Available Networks. Advanced: Highlight a network; Click on the next page will appear. Add: Click Add and the screen on the Connect button....Using the Configuration Utility (continued) Available Network: The top section of the profile in public places. You can manage the profiles that network. the configuration window on Refresh to remove a network from the profile list. Connect: Highlight a network profile;
... the current SSID. 16 Scroll up and down and highlight the profile that you can Add or Remove a profile, or configure the Properties of the window displays the Available Networks. Advanced: Highlight a network; Click on the next page will appear. Add: Click Add and the screen on the Connect button....Using the Configuration Utility (continued) Available Network: The top section of the profile in public places. You can manage the profiles that network. the configuration window on Refresh to remove a network from the profile list. Connect: Highlight a network profile;

Product Manual
Page 17
... the properties of a profile that you wish to add to the network. Using the Configuration Utility (continued) Site Survey > Add In this window, all the properties of a profile that already exists in the network. Click OK to save the changes. Configuration, Add or Properties If you clicked on ...Configuration or Properties you can select the type of network connection. Click OK to save the changes. 17 Advanced If you can configure, in this window you clicked on the following pages.
... the properties of a profile that you wish to add to the network. Using the Configuration Utility (continued) Site Survey > Add In this window, all the properties of a profile that already exists in the network. Click OK to save the changes. Configuration, Add or Properties If you clicked on ...Configuration or Properties you can select the type of network connection. Click OK to save the changes. 17 Advanced If you can configure, in this window you clicked on the following pages.

Product Manual
Page 19
Click Add and the window below will appear. Enter the User Name. Enter the IP address of the RADIUS server in your authentication server requires it. Click Validate Server if your network. Click OK to save the changes. Using the Configuration Utility (continued) Authentication > WPA > Advanced Security Settings Select the EAP type here. Leave the User Certificate field blank. Click OK to save the changes. 19
Click Add and the window below will appear. Enter the User Name. Enter the IP address of the RADIUS server in your authentication server requires it. Click Validate Server if your network. Click OK to save the changes. Using the Configuration Utility (continued) Authentication > WPA > Advanced Security Settings Select the EAP type here. Leave the User Certificate field blank. Click OK to save the changes. 19

Product Manual
Page 22
Note: Please refer to websites such as http://www.homenethelp.com and http://www.microsoft.com/windows2000 for information about networking computers using Microsoft Windows XP. Select Set up a home or small office network. When this section you will learn how to Start>Control Panel>Network Connections. Networking Basics Using the Network Setup Wizard in Windows XP In this screen appears, click Next. 22 Go to establish a network at home or work, using Windows 2000/Me/98SE.
Note: Please refer to websites such as http://www.homenethelp.com and http://www.microsoft.com/windows2000 for information about networking computers using Microsoft Windows XP. Select Set up a home or small office network. When this section you will learn how to Start>Control Panel>Network Connections. Networking Basics Using the Network Setup Wizard in Windows XP In this screen appears, click Next. 22 Go to establish a network at home or work, using Windows 2000/Me/98SE.

Product Manual
Page 23
Networking Basics (continued) Please follow all the instructions in this window: Click Next. In the following window, select the best description of your computer connects to the Internet through a router, select the second option as shown. Click Next. 23 If your computer.
Networking Basics (continued) Please follow all the instructions in this window: Click Next. In the following window, select the best description of your computer connects to the Internet through a router, select the second option as shown. Click Next. 23 If your computer.

Product Manual
Page 26
In this case drive A. 26 Click Next. Insert a disk into the Floppy Disk Drive, in this example, Create a Network Setup Disk has been selected. Networking Basics (continued) In the window below, select the option that fits your network. You will run this disk on each of the computers on your needs.
In this case drive A. 26 Click Next. Insert a disk into the Floppy Disk Drive, in this example, Create a Network Setup Disk has been selected. Networking Basics (continued) In the window below, select the option that fits your network. You will run this disk on each of the computers on your needs.

Product Manual
Page 29
Networking Basics (continued) Naming Your Computer To name your computer in Windows XP, please follow these directions: Click Start (in the System Properties window. Select Properties. You may enter a Computer Description if you wish; Select the Computer Name Tab in the lower left corner of the screen). To rename the computer and join a domain, click Change. 29 Right-click on My Computer. this field is optional.
Networking Basics (continued) Naming Your Computer To name your computer in Windows XP, please follow these directions: Click Start (in the System Properties window. Select Properties. You may enter a Computer Description if you wish; Select the Computer Name Tab in the lower left corner of the screen). To rename the computer and join a domain, click Change. 29 Right-click on My Computer. this field is optional.

Product Manual
Page 30
Networking Basics (continued) Naming Your Computer In this manual for a definition of IP address range.) To check on Status. 30 Checking the IP Address in Windows XP All wireless adapter-equipped computers in your network must be in the same IP address range (see Getting Started in the task bar. Click on the IP address of the Workgroup. All computers on your network must have the same Workgroup name. Click OK. Select Workgroup and enter the name of an adapter, please do the following: Right-click on the Local Area Connection icon in this window, enter the Computer name.
Networking Basics (continued) Naming Your Computer In this manual for a definition of IP address range.) To check on Status. 30 Checking the IP Address in Windows XP All wireless adapter-equipped computers in your network must be in the same IP address range (see Getting Started in the task bar. Click on the IP address of the Workgroup. All computers on your network must have the same Workgroup name. Click OK. Select Workgroup and enter the name of an adapter, please do the following: Right-click on the Local Area Connection icon in this window, enter the Computer name.

Product Manual
Page 31
... not need to assign a static IP address, please follow these instructions: Go to Start. Assigning a Static IP Address in Windows XP This window will appear. Networking Basics (continued) Checking the IP Address in Windows XP/2000 Note: Many broadband routers will automatically assign IP addresses to the computers on Control Panel. 31 Click...
... not need to assign a static IP address, please follow these instructions: Go to Start. Assigning a Static IP Address in Windows XP This window will appear. Networking Basics (continued) Checking the IP Address in Windows XP/2000 Note: Many broadband routers will automatically assign IP addresses to the computers on Control Panel. 31 Click...

Product Manual
Page 32
Networking Basics (continued) Assigning a Static IP Address in Windows XP/2000 Double-click on Properties. 32 Click on Network Connections. Right-click on Local Area Connections.
Networking Basics (continued) Assigning a Static IP Address in Windows XP/2000 Double-click on Properties. 32 Click on Network Connections. Right-click on Local Area Connections.

Product Manual
Page 33
... all the computers on Internet Protocol (TCP/IP). The subnet mask must be within the same range. Networking Basics (continued) Assigning a Static IP Address in Windows XP/2000 Click on the network.) Input your ISP (Internet Service Provider.) Click OK. 33
... all the computers on Internet Protocol (TCP/IP). The subnet mask must be within the same range. Networking Basics (continued) Assigning a Static IP Address in Windows XP/2000 Click on the network.) Input your ISP (Internet Service Provider.) Click OK. 33

Product Manual
Page 34
Networking Basics (continued) Checking the Wireless Connection by Pinging in Windows XP and 2000 Go to Start > Run > type cmd. Checking the Wireless Connection by Pinging in Windows Me and 98 Go to Start > Run > type command. A good wireless connection will show four replies from the wireless ...router or access point, as shown. A window similar to this will appear. A window similar to this one will appear. Type ping xxx.xxx.xxx.xxx, where xxx is the IP address of the wireless router...
Networking Basics (continued) Checking the Wireless Connection by Pinging in Windows XP and 2000 Go to Start > Run > type cmd. Checking the Wireless Connection by Pinging in Windows Me and 98 Go to Start > Run > type command. A good wireless connection will show four replies from the wireless ...router or access point, as shown. A window similar to this will appear. A window similar to this one will appear. Type ping xxx.xxx.xxx.xxx, where xxx is the IP address of the wireless router...
Product Manual
Page 35
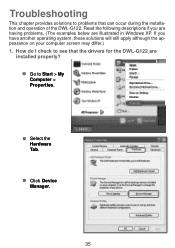
Click Device Manager. 35 Go to problems that the drivers for the DWL-G122 are illustrated in Windows XP. If you are having problems. (The examples below are installed properly? Select the Hardware Tab. Troubleshooting This chapter provides solutions to Start > My Computer > Properties. Read the following descriptions if you have another operating system, these solutions will still apply although the appearance on your computer screen may differ.) 1. How do I check to see that can occur during the installation and operation of the DWL-G122.
Click Device Manager. 35 Go to problems that the drivers for the DWL-G122 are illustrated in Windows XP. If you are having problems. (The examples below are installed properly? Select the Hardware Tab. Troubleshooting This chapter provides solutions to Start > My Computer > Properties. Read the following descriptions if you have another operating system, these solutions will still apply although the appearance on your computer screen may differ.) 1. How do I check to see that can occur during the installation and operation of the DWL-G122.


