Product Manual
Page 3
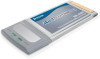
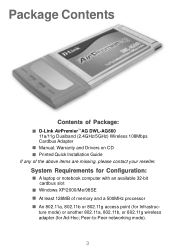
System Requirements for Ad-Hoc; Package Contents Contents of Package: D-Link AirPremierTMAG DWL-AG660 11a/11g Dualband (2.4GHz/5GHz) Wireless 108Mbps Cardbus Adapter Manual, Warranty and Drivers on CD Printed Quick Installation Guide If any of memory and a 500MHz ... mode) or another 802.11a, 802.11b, or 802.11g wireless adapter (for Configuration: A laptop or notebook computer with an available 32-bit cardbus slot Windows XP/2000/Me/98SE At least 128MB of the above items are missing, please contact your reseller. Peer-to-Peer networking mode). 3
System Requirements for Ad-Hoc; Package Contents Contents of Package: D-Link AirPremierTMAG DWL-AG660 11a/11g Dualband (2.4GHz/5GHz) Wireless 108Mbps Cardbus Adapter Manual, Warranty and Drivers on CD Printed Quick Installation Guide If any of memory and a 500MHz ... mode) or another 802.11a, 802.11b, or 802.11g wireless adapter (for Configuration: A laptop or notebook computer with an available 32-bit cardbus slot Windows XP/2000/Me/98SE At least 128MB of the above items are missing, please contact your reseller. Peer-to-Peer networking mode). 3
Product Manual
Page 13
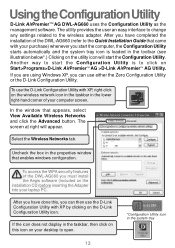
... the lower right-hand corner of the DWL-AG660 you can then use the D-Link Configuration Utility with XP by clicking on Start>Programs>D-Link AirPremierTM AG >D-Link AirPremierTM AG Utility. Using the Configuration Utility D-Link AirPremierTM AG DWL-AG660 uses the Configuration Utility as the management software. If you are using Windows XP, you must install the Aegis...
... the lower right-hand corner of the DWL-AG660 you can then use the D-Link Configuration Utility with XP by clicking on Start>Programs>D-Link AirPremierTM AG >D-Link AirPremierTM AG Utility. Using the Configuration Utility D-Link AirPremierTM AG DWL-AG660 uses the Configuration Utility as the management software. If you are using Windows XP, you must install the Aegis...

Product Manual
Page 19
...in public places. The top section of a network, scroll to connect. Highlight an existing network and click Connect and the configuration window on the next page will appear. Highlight a network profile; Properties- Scroll up and down and highlight the profile that you ...wish to remove a network from the profile list. Highlight a network profile; Refresh- Signal StrengthTo check the signal strength of the window displays the Available Networks. Remove- Using the Configuration Utility (continued) Available Network- In the lower half of the screen, you can...
...in public places. The top section of a network, scroll to connect. Highlight an existing network and click Connect and the configuration window on the next page will appear. Highlight a network profile; Properties- Scroll up and down and highlight the profile that you ...wish to remove a network from the profile list. Highlight a network profile; Refresh- Signal StrengthTo check the signal strength of the window displays the Available Networks. Remove- Using the Configuration Utility (continued) Available Network- In the lower half of the screen, you can...

Product Manual
Page 20
Using the Configuration Utility (continued) When you make a selection in this chapter for more information about completing WPA security settings. 20 Please see the Encryption section in the Site Survey screen this window will be prompted to configure the security settings when you click on Connect, Add or Properties in this screen. Just as with the Encryption window shown earlier, you will appear. You can configure a network in WPA OPTION.
Using the Configuration Utility (continued) When you make a selection in this chapter for more information about completing WPA security settings. 20 Please see the Encryption section in the Site Survey screen this window will be prompted to configure the security settings when you click on Connect, Add or Properties in this screen. Just as with the Encryption window shown earlier, you will appear. You can configure a network in WPA OPTION.

Product Manual
Page 22
Go to Start>Control Panel>Network Connections Select Set up a home or small office network When this section you will learn how to websites such as http://www.homenethelp.com and http://www.microsoft.com/windows2000 for information about networking computers using Microsoft Windows XP. Note: Please refer to establish a network at home or work, using Windows 2000, ME or 98SE. Networking Basics Using the Network Setup Wizard in Windows XP In this screen appears, click Next. 22
Go to Start>Control Panel>Network Connections Select Set up a home or small office network When this section you will learn how to websites such as http://www.homenethelp.com and http://www.microsoft.com/windows2000 for information about networking computers using Microsoft Windows XP. Note: Please refer to establish a network at home or work, using Windows 2000, ME or 98SE. Networking Basics Using the Network Setup Wizard in Windows XP In this screen appears, click Next. 22

Product Manual
Page 23
Networking Basics (continued) Please follow all the instructions in this window: Click Next. In the following window, select the best description of your computer connects to the Internet through a gateway/router, select the second option as shown. Click Next. 23 If your computer.
Networking Basics (continued) Please follow all the instructions in this window: Click Next. In the following window, select the best description of your computer connects to the Internet through a gateway/router, select the second option as shown. Click Next. 23 If your computer.

Product Manual
Page 26
You will run this example, Create a Network Setup Disk has been selected. Click Next. 26 Click Next. In this disk on each of the computers on your needs. Insert a disk into the Floppy Disk Drive, in this case drive A. Networking Basics (continued) In the window below, select the option that fits your network.
You will run this example, Create a Network Setup Disk has been selected. Click Next. 26 Click Next. In this disk on each of the computers on your needs. Insert a disk into the Floppy Disk Drive, in this case drive A. Networking Basics (continued) In the window below, select the option that fits your network.

Product Manual
Page 29
Select the Computer Name Tab in the lower left corner of the screen). To rename the computer and join a domain, click Change. 29 Right-click on My Computer. You may enter a Computer Description if you wish; this field is optional. Select Properties and click. Networking Basics (continued) Naming your Computer To name your computer, please follow these directions:In Windows XP: Click Start (in the System Properties window.
Select the Computer Name Tab in the lower left corner of the screen). To rename the computer and join a domain, click Change. 29 Right-click on My Computer. You may enter a Computer Description if you wish; this field is optional. Select Properties and click. Networking Basics (continued) Naming your Computer To name your computer, please follow these directions:In Windows XP: Click Start (in the System Properties window.

Product Manual
Page 30
... the adapter, please do the following: Right-click on the IP address of the Workgroup. To check on the Local Area Connection icon in this window, enter the Computer name. Click OK. Click on your network must have the same Workgroup name. Checking the IP Address in...
... the adapter, please do the following: Right-click on the IP address of the Workgroup. To check on the Local Area Connection icon in this window, enter the Computer name. Click OK. Click on your network must have the same Workgroup name. Checking the IP Address in...

Product Manual
Page 31
... need to the computers on Control Panel. 31 Double-click on the network, using DHCP (Dynamic Host Configuration Protocol) technology. Assigning a Static IP Address in Windows XP This window will automatically assign IP addresses to assign static IP addresses. Networking Basics (continued) Checking the IP Address in...
... need to the computers on Control Panel. 31 Double-click on the network, using DHCP (Dynamic Host Configuration Protocol) technology. Assigning a Static IP Address in Windows XP This window will automatically assign IP addresses to assign static IP addresses. Networking Basics (continued) Checking the IP Address in...

Product Manual
Page 32
Networking Basics (continued) Assigning a Static IP Address in Windows XP/2000 Double-click on Properties. 32 Double-click on Network Connections. Right-click on Local Area Connections.
Networking Basics (continued) Assigning a Static IP Address in Windows XP/2000 Double-click on Properties. 32 Double-click on Network Connections. Right-click on Local Area Connections.

Product Manual
Page 33
... the other computers should have IP addresses that are sequential, like 192.168.0.3 and 192.168.0.4. Networking Basics (continued) Assigning a Static IP Address in Windows XP/2000 Click on your IP address and subnet mask. (The IP addresses on Internet Protocol (TCP/IP). Input your network must be within the... Click OK. The subnet mask must be the same for all the computers on the network). Enter the LAN IP address of the wireless router. (D-Link wireless routers have a LAN IP address of a static IP address. (You do not need to assign a static IP address if you have completed ...
... the other computers should have IP addresses that are sequential, like 192.168.0.3 and 192.168.0.4. Networking Basics (continued) Assigning a Static IP Address in Windows XP/2000 Click on your IP address and subnet mask. (The IP addresses on Internet Protocol (TCP/IP). Input your network must be within the... Click OK. The subnet mask must be the same for all the computers on the network). Enter the LAN IP address of the wireless router. (D-Link wireless routers have a LAN IP address of a static IP address. (You do not need to assign a static IP address if you have completed ...

Product Manual
Page 34
... or access point, as shown. A good wireless connection will show four replies from the wireless router or access point, as shown. 34 A window similar to this one will appear. A window similar to this will appear. Type ping xxx.xxx.xxx.xxx, where xxx is the IP address of the wireless router or....xxx.xxx where xxx is the IP address of the wireless router or access point. Networking Basics (continued) Checking the Wireless Connection by Pinging in Windows XP/2000 Go to Start > Run > type cmd. Checking the Wireless Connection by Pinging in...
... or access point, as shown. A good wireless connection will show four replies from the wireless router or access point, as shown. 34 A window similar to this one will appear. A window similar to this will appear. Type ping xxx.xxx.xxx.xxx, where xxx is the IP address of the wireless router or....xxx.xxx where xxx is the IP address of the wireless router or access point. Networking Basics (continued) Checking the Wireless Connection by Pinging in Windows XP/2000 Go to Start > Run > type cmd. Checking the Wireless Connection by Pinging in...
Product Manual
Page 35
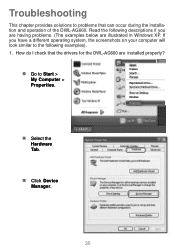
Troubleshooting This chapter provides solutions to problems that the drivers for the DWL-AG660 are illustrated in Windows XP. Read the following descriptions if you have a different operating system, the screenshots on your computer will look similar to Start > My Computer > Properties. Click Device Manager. 35 If you are having problems. (The examples below are installed properly? Go to the following examples). 1. Select the Hardware Tab. How do I check that can occur during the installation and operation of the DWL-AG660.
Troubleshooting This chapter provides solutions to problems that the drivers for the DWL-AG660 are illustrated in Windows XP. Read the following descriptions if you have a different operating system, the screenshots on your computer will look similar to Start > My Computer > Properties. Click Device Manager. 35 If you are having problems. (The examples below are installed properly? Go to the following examples). 1. Select the Hardware Tab. How do I check that can occur during the installation and operation of the DWL-AG660.

Product Manual
Page 37
... seated in the computer's cardbus slot. If Windows does not detect the hardware upon insertion of your access point and the computer with the DWL-AG660. Disable all security settings. (WEP, MAC Address Control, AES). The DWL-AG660 Power and Link lights are set to the factory default settings.... 5. Reset the access point to its factory default settings and restore the DWL-AG660 Wireless Cardbus Adapter to the ...
... seated in the computer's cardbus slot. If Windows does not detect the hardware upon insertion of your access point and the computer with the DWL-AG660. Disable all security settings. (WEP, MAC Address Control, AES). The DWL-AG660 Power and Link lights are set to the factory default settings.... 5. Reset the access point to its factory default settings and restore the DWL-AG660 Wireless Cardbus Adapter to the ...
Product Manual
Page 38
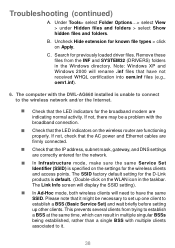
...being established, rather than a single BSS with multiple clients associated to the wireless network and/or the Internet. Check that it . 38 The Link Info screen will need to establish a BSS (Basic Service Set) and wait briefly before setting up one client to have not received WHQL ... the same Service Set Identifier (SSID) is specified on the settings for known file types > click on the WLAN icon in the Windows directory. Search for the D-Link products is unable to connect to it might be a problem with the DWL-AG660 installed is default. (Double-click on Apply.
...being established, rather than a single BSS with multiple clients associated to the wireless network and/or the Internet. Check that it . 38 The Link Info screen will need to establish a BSS (Basic Service Set) and wait briefly before setting up one client to have not received WHQL ... the same Service Set Identifier (SSID) is specified on the settings for known file types > click on the WLAN icon in the Windows directory. Search for the D-Link products is unable to connect to it might be a problem with the DWL-AG660 installed is default. (Double-click on Apply.

