User Manual
Page 3
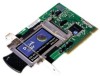
INTRODUCTION The D-Link DWL-500 802.11b Wireless PCI Adapter is designed to help you connect your laptop to a network when running Windows 98, Windows ME, NT 4.0 or 2000 in this adapter gives you to connect computers and devices at speeds up to 11Mbps, depending on the distance between wireless adapters. such as it to any 802.11b network. Yet the...
INTRODUCTION The D-Link DWL-500 802.11b Wireless PCI Adapter is designed to help you connect your laptop to a network when running Windows 98, Windows ME, NT 4.0 or 2000 in this adapter gives you to connect computers and devices at speeds up to 11Mbps, depending on the distance between wireless adapters. such as it to any 802.11b network. Yet the...
User Manual
Page 12
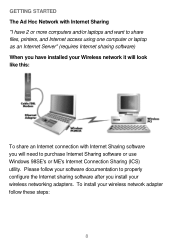
Please follow these steps: 8 To install your wireless network adapter follow your wireless networking adapters. GETTING STARTED The Ad Hoc Network with Internet Sharing "I have 2 or more computers and/or laptops and want to share files, printers, and Internet access using ...one computer or laptop as an Internet Server" (requires Internet sharing software) When you have installed your Wireless network it will look like this: To share an Internet connection with Internet Sharing software you will need to properly configure the Internet sharing software...
Please follow these steps: 8 To install your wireless network adapter follow your wireless networking adapters. GETTING STARTED The Ad Hoc Network with Internet Sharing "I have 2 or more computers and/or laptops and want to share files, printers, and Internet access using ...one computer or laptop as an Internet Server" (requires Internet sharing software) When you have installed your Wireless network it will look like this: To share an Internet connection with Internet Sharing software you will need to properly configure the Internet sharing software...

User Manual
Page 37
.... Note: All of Motherboard and hardware manufacturers. The settings may not be listed on your system. You should look for is under the heading "PNP/PCI Configuration." Under this heading check to make sure that says "Plug and Play OS." This is due to look for a setting that "Resources Controlled By... FREE AN IRQ What to do if you don't have an available IRQ If there is not an available (open) IRQs on your Motherboard and Windows do the following steps to check for a Plug and Play Motherboard and to reset the configuration. 1. The first thing you can do is let your...
.... Note: All of Motherboard and hardware manufacturers. The settings may not be listed on your system. You should look for is under the heading "PNP/PCI Configuration." Under this heading check to make sure that says "Plug and Play OS." This is due to look for a setting that "Resources Controlled By... FREE AN IRQ What to do if you don't have an available IRQ If there is not an available (open) IRQs on your Motherboard and Windows do the following steps to check for a Plug and Play Motherboard and to reset the configuration. 1. The first thing you can do is let your...

User Manual
Page 38
The next setting below should be "Reset Configuration" or "Reset ESSCD". This setting allows Windows to reconfigure all of the configuration information for your computer to boot up and load Windows. 7. After Windows loads, check in the Device Manager to see if there is a one-time setting. Set this to "Disabled...." It is reset to "Disabled" so that Windows will not perform the reconfiguration each time you don't have an available IRQ continued 5. This will return to "Enabled." TROUBLESHOOTING HOW TO FREE AN...
The next setting below should be "Reset Configuration" or "Reset ESSCD". This setting allows Windows to reconfigure all of the configuration information for your computer to boot up and load Windows. 7. After Windows loads, check in the Device Manager to see if there is a one-time setting. Set this to "Disabled...." It is reset to "Disabled" so that Windows will not perform the reconfiguration each time you don't have an available IRQ continued 5. This will return to "Enabled." TROUBLESHOOTING HOW TO FREE AN...

User Manual
Page 39
Reboot your COM Ports. Let Windows load and follow the steps to "Disable." 5. Change the setting to Checking for "Reset Configuration" to the heading "Save and Exit." 9. Change the setting for ... not have a Plug and Play Motherboard or you still do not have a PS/2 or USB Mouse then you might be able to the heading "PNP/PCI Configuration." 6. When your computer is set to "Auto." 7. For instance if you have a free IRQ you might need to disable your COM Ports. 1. Go to...
Reboot your COM Ports. Let Windows load and follow the steps to "Disable." 5. Change the setting to Checking for "Reset Configuration" to the heading "Save and Exit." 9. Change the setting for ... not have a Plug and Play Motherboard or you still do not have a PS/2 or USB Mouse then you might be able to the heading "PNP/PCI Configuration." 6. When your computer is set to "Auto." 7. For instance if you have a free IRQ you might need to disable your COM Ports. 1. Go to...

User Manual
Page 41
Let Windows load and follow the above steps can be followed to remove a "Built On" Sound Card as well. This will free up an IRQ for an Available IRQ. Other ideas for freeing up IRQs If these steps do not free up ...
Let Windows load and follow the above steps can be followed to remove a "Built On" Sound Card as well. This will free up an IRQ for an Available IRQ. Other ideas for freeing up IRQs If these steps do not free up ...

User Manual
Page 43
Click the "Identification" tab on the top of the dialog box. 39 NETWORKING BASICS Computer Identification If you had previously given your Desktop, right-click the icon "Network Places" and select "Properties" from the context menu. A. B. On your Windows 98 computers names or if you are using Windows 98, you may need to verify that each computer has a unique name and common workgroup name.
Click the "Identification" tab on the top of the dialog box. 39 NETWORKING BASICS Computer Identification If you had previously given your Desktop, right-click the icon "Network Places" and select "Properties" from the context menu. A. B. On your Windows 98 computers names or if you are using Windows 98, you may need to verify that each computer has a unique name and common workgroup name.

User Manual
Page 46
G. Click "OK" on the "File and Print Sharing" dialog box. Reboot if prompted. 42 F. E. Provide the Windows 98 installation CD or diskette(s) if prompted or direct Windows to my files." Click "OK" on the "Network" dialog box. NETWORKING BASICS Sharing Files D. Click to place a check mark next to "I want to be able to give others access to the proper location of the installation files.
G. Click "OK" on the "File and Print Sharing" dialog box. Reboot if prompted. 42 F. E. Provide the Windows 98 installation CD or diskette(s) if prompted or direct Windows to my files." Click "OK" on the "Network" dialog box. NETWORKING BASICS Sharing Files D. Click to place a check mark next to "I want to be able to give others access to the proper location of the installation files.

User Manual
Page 47
...one can read CD's. Or, maybe you want to share a CD-ROM drive so your other computers on your desktop. Right-click on your network. Find the disk drive or folder you and a colleague/family member needs to share. Only the disk drives and folders that you specifically identify... as shared will now be accessible to other computer that both you want to share with Windows Explorer or the "My Computer" icon on the disk drive or folder icon and select "Sharing." 43 NETWORKING BASICS Sharing Files H. Both of these processes are the same. I. J. You will be able...
...one can read CD's. Or, maybe you want to share a CD-ROM drive so your other computers on your desktop. Right-click on your network. Find the disk drive or folder you and a colleague/family member needs to share. Only the disk drives and folders that you specifically identify... as shared will now be accessible to other computer that both you want to share with Windows Explorer or the "My Computer" icon on the disk drive or folder icon and select "Sharing." 43 NETWORKING BASICS Sharing Files H. Both of these processes are the same. I. J. You will be able...

User Manual
Page 50
... the shared disk drive or folder (recognized by double-clicking the "My Network Places" icon on a computer where you are accessing a shared folder from another computer, inside Windows Explorer. Checking "Reconnect at logon" allows Windows to assign an available drive letter. S. You should now see the disk...-click. You can access a disk drive or folder shared over the network from another computer. Do so by the "Computer Name" you start your desktop or inside Windows Explorer right-click and select "Map Network Drive·" You will be able to map this disk drive or ...
... the shared disk drive or folder (recognized by double-clicking the "My Network Places" icon on a computer where you are accessing a shared folder from another computer, inside Windows Explorer. Checking "Reconnect at logon" allows Windows to assign an available drive letter. S. You should now see the disk...-click. You can access a disk drive or folder shared over the network from another computer. Do so by the "Computer Name" you start your desktop or inside Windows Explorer right-click and select "Map Network Drive·" You will be able to map this disk drive or ...

User Manual
Page 60
Select "Obtain an IP Address Automatically" Click "OK" When the network properties window comes back up, click "OK". Windows will ask you to reboot and click "Yes". 56 NETWORKING BASICS Configuring a Dynamic IP Address When the TCP/IP window opens, choose "IP Address" tab.
Select "Obtain an IP Address Automatically" Click "OK" When the network properties window comes back up, click "OK". Windows will ask you to reboot and click "Yes". 56 NETWORKING BASICS Configuring a Dynamic IP Address When the TCP/IP window opens, choose "IP Address" tab.

User Manual
Page 63
Suggested IP Range 192.168.0.2 to 192.168.0.254 NOTE: IP Addresses must be signed sequentially to reboot and click "Yes". 59 When the "Network Properties" window comes back up click "OK". Insert Windows CD if prompted. Suggested Subnet Mask of 255.255.255.0 Click "OK". NETWORKING BASICS Configuring a Static IP Address When the "TCP/IP Properties" window opens, choose "IP Address" tab Select "Specify an IP address" Enter an IP address into the empty field. Windows will ask you to each computer.
Suggested IP Range 192.168.0.2 to 192.168.0.254 NOTE: IP Addresses must be signed sequentially to reboot and click "Yes". 59 When the "Network Properties" window comes back up click "OK". Insert Windows CD if prompted. Suggested Subnet Mask of 255.255.255.0 Click "OK". NETWORKING BASICS Configuring a Static IP Address When the "TCP/IP Properties" window opens, choose "IP Address" tab Select "Specify an IP address" Enter an IP address into the empty field. Windows will ask you to each computer.
User Manual
Page 70
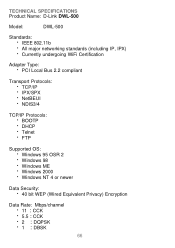
...: D-Link DWL-500 Model: DWL-500 Standards: · IEEE 802.11b · All major networking standards (including IP, IPX) · Currently undergoing WiFi Certification · Adapter Type: PCI Local Bus 2.2 compliant Transport Protocols: · TCP/IP · IPX/SPX · NetBEUI · NDIS3/4 TCP/IP Protocols: · BOOTP · DHCP · Telnet · FTP Supported OS: · Windows...
...: D-Link DWL-500 Model: DWL-500 Standards: · IEEE 802.11b · All major networking standards (including IP, IPX) · Currently undergoing WiFi Certification · Adapter Type: PCI Local Bus 2.2 compliant Transport Protocols: · TCP/IP · IPX/SPX · NetBEUI · NDIS3/4 TCP/IP Protocols: · BOOTP · DHCP · Telnet · FTP Supported OS: · Windows...

User Manual
Page 73
Microsoft Windows 98, Windows ME, Windows 2000, and Windows NT are registered trademarks of D-Link. D-Link, DWL-120, DWL-1000AP, DWL-500, and DWL-650 are trademarks of their respective holders. All other trademarks are subject to change without notice. 69 All specifications are registered trademarks or trademarks of the Microsoft Corporation. Copyright ©2000 D-Link, all rights reserved.
Microsoft Windows 98, Windows ME, Windows 2000, and Windows NT are registered trademarks of D-Link. D-Link, DWL-120, DWL-1000AP, DWL-500, and DWL-650 are trademarks of their respective holders. All other trademarks are subject to change without notice. 69 All specifications are registered trademarks or trademarks of the Microsoft Corporation. Copyright ©2000 D-Link, all rights reserved.

User Manual
Page 79
... network? Would you recommend your D-Link product to support your organization use ? Your title at installation site? What network ...3. What network management program does your organization use ? oTCP/IP oIPX/SPX oOthers 4. oD-View oHP OpenView/Windows oHPOpenView/Unix ...Card Print, type or use ? Product was purchased from: Reseller's name: Telephone: Fax: Reseller's full address: Answers to the following questions help us to a friend? oNovell NetWare oSCO Unix/Xenix oLinux oSolaris oWindows NT oWindows 2000 oWindows '98/ME oOthers 5. What network...
... network? Would you recommend your D-Link product to support your organization use ? Your title at installation site? What network ...3. What network management program does your organization use ? oTCP/IP oIPX/SPX oOthers 4. oD-View oHP OpenView/Windows oHPOpenView/Unix ...Card Print, type or use ? Product was purchased from: Reseller's name: Telephone: Fax: Reseller's full address: Answers to the following questions help us to a friend? oNovell NetWare oSCO Unix/Xenix oLinux oSolaris oWindows NT oWindows 2000 oWindows '98/ME oOthers 5. What network...
Quick Installation Guide
Page 1
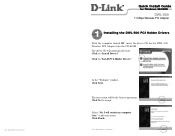
Click on "Install Drivers". dwl-50098-12-5-00,1pm Quick Install Guide for Windows 98/98SE DWL-500 11 Mbps Wireless PCI Adapter 1 Installing the DWL-500 PCI Holder Drivers With the computer turned ON, insert the driver CD for the DWL-500 Wireless PCI Adapter into the CD-ROM. Click Finish. dwl-500.98-12-7-00,8am Select "No, I will automatically load. At the "Welcome" window, Click Next. Rev. The driver CD will restart my computer later" at the next screen. The next screen will be the license agreement, Click Yes to accept. Rev. Click on "Install PCI-Holder Drivers" .
Click on "Install Drivers". dwl-50098-12-5-00,1pm Quick Install Guide for Windows 98/98SE DWL-500 11 Mbps Wireless PCI Adapter 1 Installing the DWL-500 PCI Holder Drivers With the computer turned ON, insert the driver CD for the DWL-500 Wireless PCI Adapter into the CD-ROM. Click Finish. dwl-500.98-12-7-00,8am Select "No, I will automatically load. At the "Welcome" window, Click Next. Rev. The driver CD will restart my computer later" at the next screen. The next screen will be the license agreement, Click Yes to accept. Rev. Click on "Install PCI-Holder Drivers" .
Quick Installation Guide
Page 3
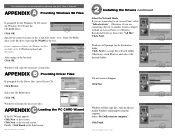
...the PC CARD Wizard If the PC Wizard appears, Click Next at the third screen. Click OK. Otherwise, click Browse and select the desired folder. B APPENDIX Providing Driver Files If prompted for the Windows 98 CD, insert the Windows 98 CD into the CD-ROM Drive. Rev. dwl-500.98-...12-7-00,8am 2 Installing the Drivers continued Select the Network Mode. Click Next. After the files are connecting to another wireless adapter without an Access Point, or a Wireless Residential Gateway then ...
...the PC CARD Wizard If the PC Wizard appears, Click Next at the third screen. Click OK. Otherwise, click Browse and select the desired folder. B APPENDIX Providing Driver Files If prompted for the Windows 98 CD, insert the Windows 98 CD into the CD-ROM Drive. Rev. dwl-500.98-...12-7-00,8am 2 Installing the Drivers continued Select the Network Mode. Click Next. After the files are connecting to another wireless adapter without an Access Point, or a Wireless Residential Gateway then ...

Quick Installation Guide
Page 4
.... If prompted for Windows 98 files or driver files, please refer to finish installation. Make sure that wireless adapter is secured, then insert the PCI Card, facing down the computer. dwl-500.98-12-7-00,8am Insert the DWL-500 Wireless PCI Holder , without the PC CARD, into the PCI holder. After the PC card is a wireless connection under the "link info tab". Rev. Restart...
.... If prompted for Windows 98 files or driver files, please refer to finish installation. Make sure that wireless adapter is secured, then insert the PCI Card, facing down the computer. dwl-500.98-12-7-00,8am Insert the DWL-500 Wireless PCI Holder , without the PC CARD, into the PCI holder. After the PC card is a wireless connection under the "link info tab". Rev. Restart...